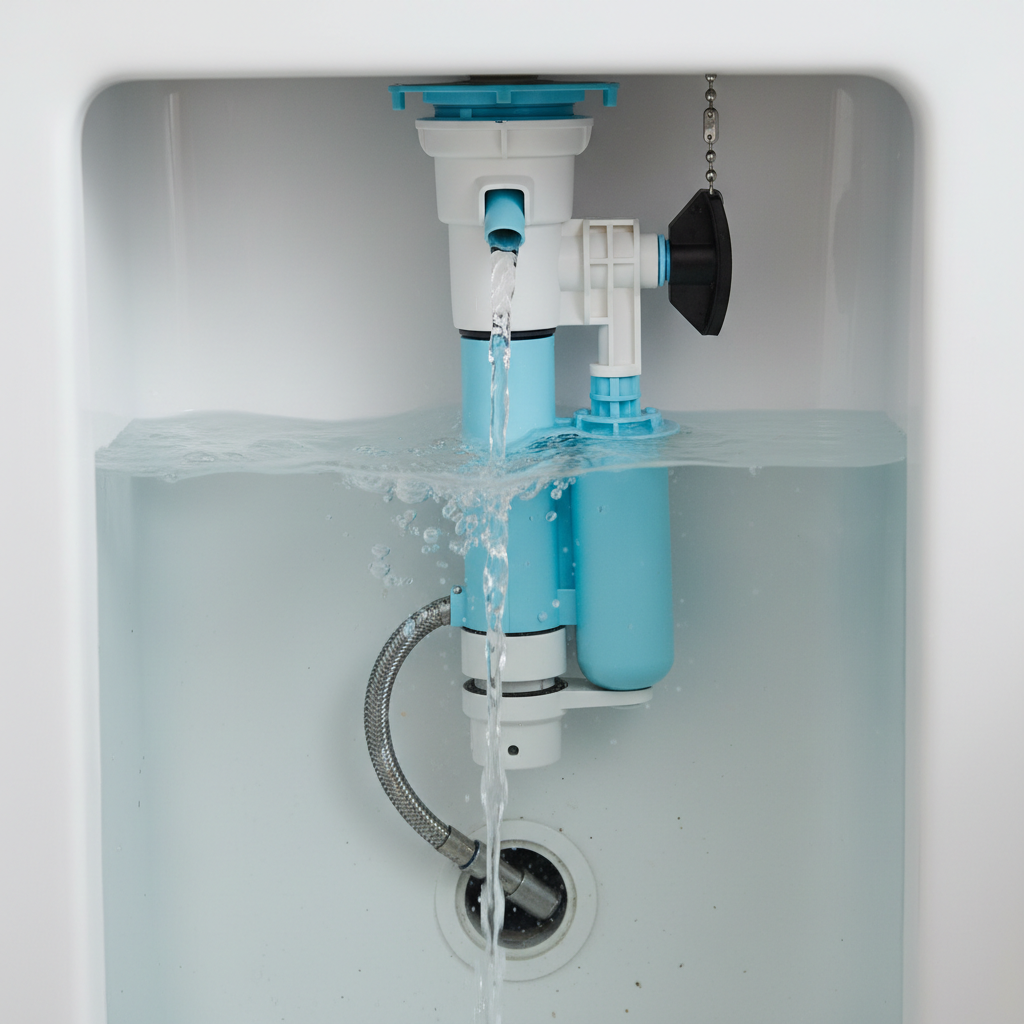
- Turn off the water supply to the toilet and flush to drain the tank.
- Remove the fill valve cap. This usually involves twisting it counter-clockwise about a quarter turn and lifting it off. On some models, there might be a small locking tab to depress.
- Clean the valve seat. While the diaphragm is out, use a small brush (like an old toothbrush) to gently scrub the valve seat area inside the fill valve body to remove any mineral deposits.
- Reassemble. Place the new or cleaned diaphragm back into its slot, ensuring it's seated correctly. Reattach the cap by aligning it and twisting it clockwise until it locks. Turn the water supply back on and check the fill rate.
Plumbing · Leak
| Project category | Plumbing |
|---|---|
| Problem type | Leak |
| Trade required | Plumbing |
| Urgency | Emergency — act now |
| Safety risk | High safety risk |
| DIY suitability | DIY for experienced homeowners |
| Cost category | Low cost |
| Typical timeline | Shut water off now; repair usually same or next day |
| Contractor type | Licensed plumber |
Repair option
Isolate at the shutoff, replace the failed component, and dry the cavity fully.
Replacement option
Repipe the run or the branch when corrosion is widespread.
Common causes
- Failed supply line or shutoff valve
- Worn washers, cartridges, or P-trap connections
- Pinhole corrosion in older copper
Relevant tools:emergency checklistdiy or hire a pro
Published July 22, 2026Last updated August 18, 2026
Tools & materials you'll need
Affiliate linksAs an Amazon Associate FixlyGuide earns from qualifying purchases — at no extra cost to you. Prices and availability are accurate as of publication and subject to change.
Quick Answer
A slow-filling toilet tank is typically caused by issues with the fill valve assembly. The most common culprits are a kinked supply line, a partially closed shut-off valve, or mineral buildup and wear within the fill valve itself. By systematically checking these components and performing a simple cleaning or replacement, most homeowners can restore their toilet's fill speed in under 30 minutes, often saving a professional plumbing visit.
The Problem
You flush your toilet, and it empties effectively, but then you wait… and wait… for the tank to refill. The water trickles in slowly, the process takes several minutes, and your toilet isn't ready for its next flush as quickly as it should be. This isn't just an inconvenience; a perpetually slow-filling toilet can signal underlying issues that, if left unaddressed, could lead to inefficient flushing, increased water waste, or even minor leaks over time. While the wait is frustrating, the good news is that the solution is usually straightforward and doesn't require specialized plumbing skills or expensive tools.
How It Works
Understanding how your toilet tank refills helps in diagnosing the problem. When you flush, the water in the tank rushes into the bowl. As the tank empties, a float mechanism (either a cup-style float riding on the fill tube or an older ballcock float arm) drops. This drop in the float opens the fill valve, a crucial component that controls the incoming water. Water flows from your home's main supply line, through the shut-off valve, up the flexible supply line, and into the fill valve inside the tank. The fill valve has a diaphragm or washer that allows water to enter the tank rapidly. A small portion of this water is also directed through a refill tube into the overflow pipe, replenishing the water in the toilet bowl. As the tank fills, the float rises with the water level. Once the water reaches the set fill line, the float triggers the fill valve to close, stopping the water flow. If any part of this system—from the shut-off valve to the fill valve's internal components—is obstructed, kinked, or malfunctioning, the flow of water into the tank will be restricted, resulting in a slow fill.
Step-by-Step Fix
1. Inspect the Supply Line and Shut-Off Valve — The simplest solutions often hide in plain sight.
First, check the flexible water supply line that runs from the wall or floor to the bottom of your toilet tank. Ensure it's not kinked or crimped, which can severely restrict water flow. Straighten any kinks you find. Next, locate the shut-off valve (the small oval or lever handle) near where the supply line connects to the wall. This valve controls the water flow to the toilet. Often, it gets partially closed by accident during cleaning or minor adjustments. Turn the handle counter-clockwise as far as it will go to ensure it's fully open. Flush the toilet to check if the fill speed has improved. If not, proceed to the next step.
2. Check the Fill Valve's Refill Tube — A common, easily overlooked obstruction.
Open the toilet tank lid. Inside, you'll see the fill valve mechanism, usually a vertical plastic column. A small, thin tube (the refill tube) extends from the top of the fill valve and clips onto the top of the overflow pipe (the larger vertical pipe in the center of the tank). Ensure this refill tube is securely attached and not submerged too far into the overflow pipe, which can create siphoning issues or backpressure. Also, make sure it's not clogged. You can gently unclip it, check for any debris, and reattach it. This tube primarily refills the bowl, but a blockage here can sometimes affect overall tank filling if it creates backpressure.
3. Clean the Fill Valve Screen/Filter — Mineral buildup is a silent water restrictor.
Safety Note: Always turn off the water supply to the toilet at the shut-off valve before working inside the tank.
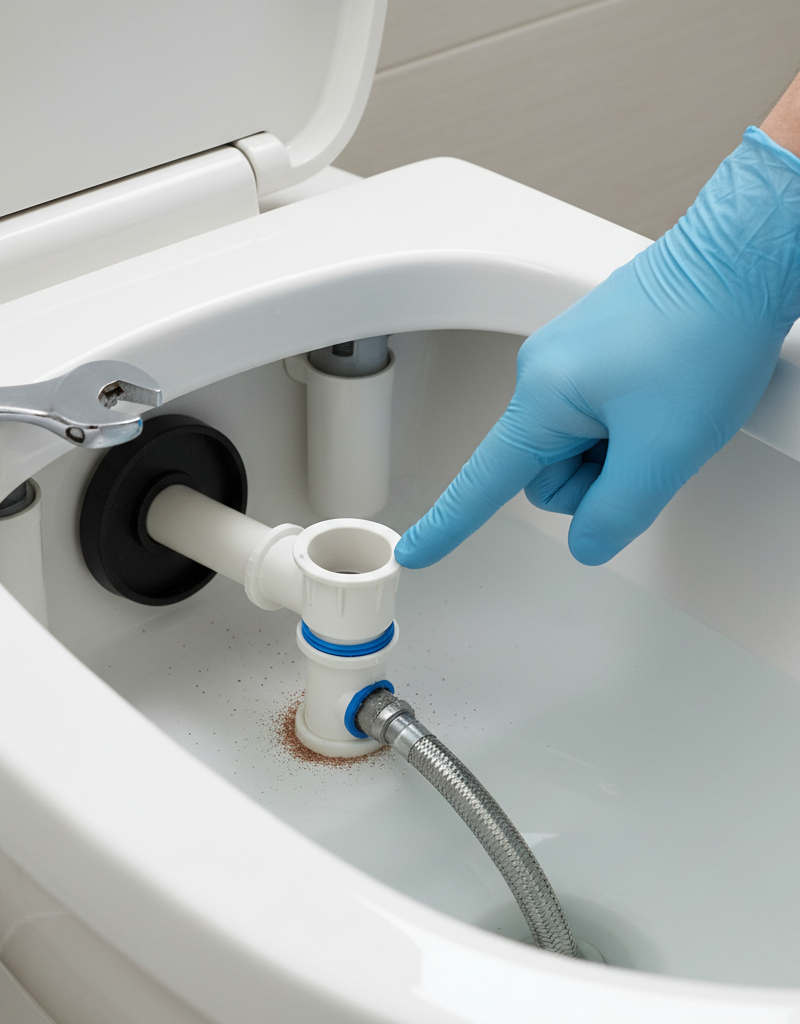
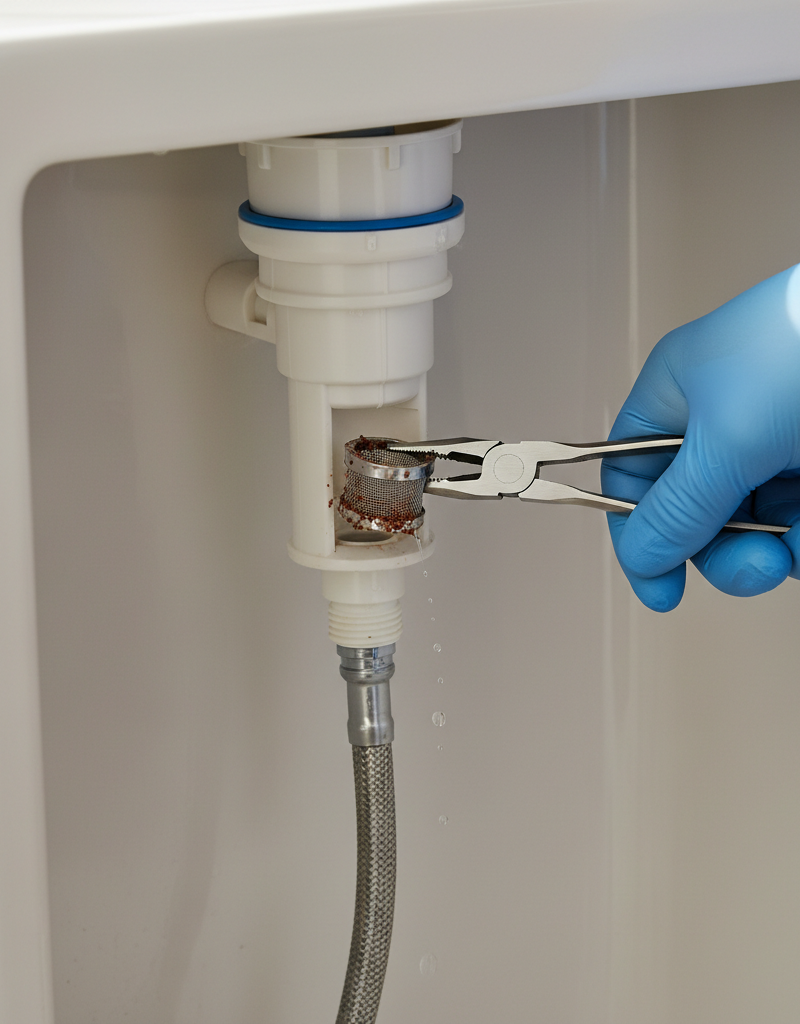
Many fill valves have a small screen or filter located at the very bottom where the supply line connects. This screen can become clogged with sediment and mineral deposits from your water supply. To access it, you'll need to turn off the water supply at the wall, flush the toilet to empty the tank, and then disconnect the flexible supply line from the bottom of the fill valve. Use an adjustable wrench for this. Once disconnected, you should see the screen inside the fill valve's shank. Use needle-nose pliers or a small pick to carefully remove the screen. Rinse it thoroughly under running water to remove any debris. If it's heavily corroded or damaged, consider replacing it. Reinsert the clean screen, reattach the supply line (hand-tighten, then a quarter turn with a wrench), and turn the water back on. Test the fill speed.
4. Adjust or Replace the Fill Valve Diaphragm/Washer — Wear and tear affects performance.
If cleaning the screen didn't work, the internal components of the fill valve might be worn or obstructed. Many modern fill valves (especially the 'cup-style' Fluidmaster 400A or similar) have a rubber diaphragm or washer under a cap at the top. To access it:
- Turn off the water supply to the toilet and flush to drain the tank.
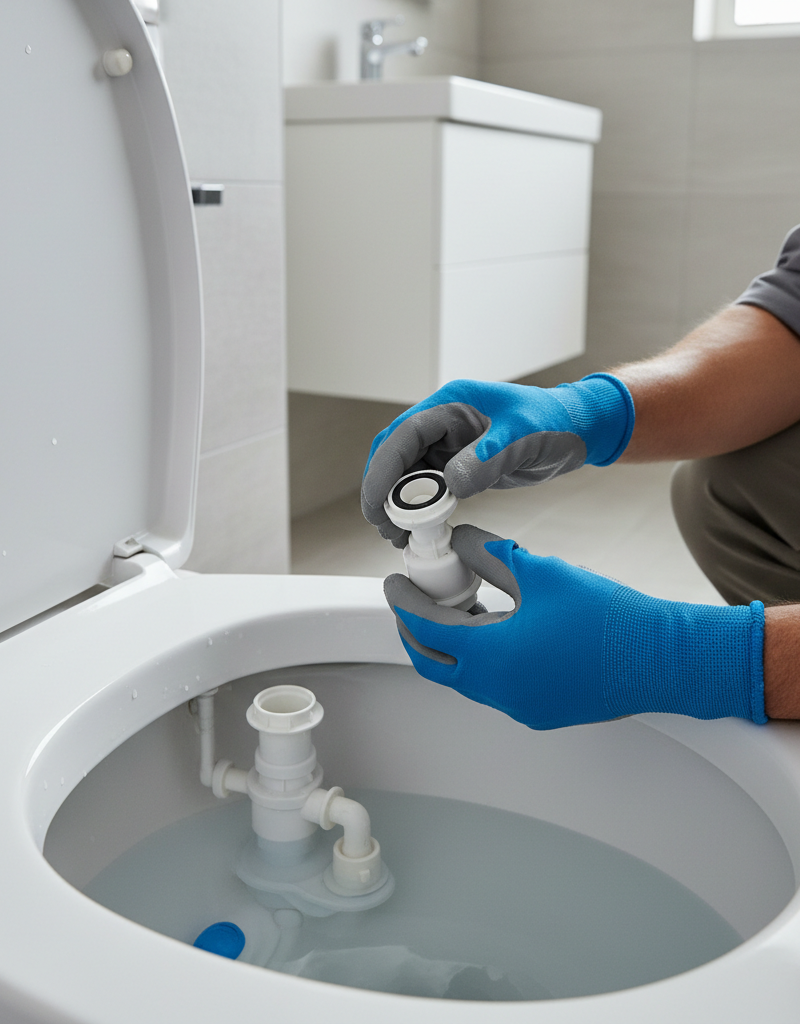
- Remove the fill valve cap. This usually involves twisting it counter-clockwise about a quarter turn and lifting it off. On some models, there might be a small locking tab to depress.
- Inspect the diaphragm/washer. Carefully lift out the rubber diaphragm. Look for any tears, stiffness, or mineral buildup. Clean any visible debris. If it appears damaged or brittle, you'll need to replace it. Many hardware stores sell universal fill valve repair kits that include a new diaphragm.
- Clean the valve seat. While the diaphragm is out, use a small brush (like an old toothbrush) to gently scrub the valve seat area inside the fill valve body to remove any mineral deposits.
- Reassemble. Place the new or cleaned diaphragm back into its slot, ensuring it's seated correctly. Reattach the cap by aligning it and twisting it clockwise until it locks. Turn the water supply back on and check the fill rate.
5. Replace the Entire Fill Valve Assembly — When internal repairs aren't enough.
If, after checking and attempting to clean/replace internal components, your toilet still fills slowly, the fill valve itself is likely at the end of its life, or too damaged for simple repairs. Replacing the entire fill valve is a relatively inexpensive and straightforward DIY project that will almost certainly resolve a slow-filling issue.
- Turn off the water supply and flush the toilet to empty the tank. Use a sponge to remove any remaining water.
- Disconnect the supply line from the bottom of the fill valve using an adjustable wrench.
- Unscrew the large locknut on the underside of the tank that holds the fill valve in place. You might need a basin wrench for this, or a large pair of channel locks if space allows.
- Remove the old fill valve from the tank. You may need to wiggle it a bit to free it.
- Install the new fill valve. Insert the new fill valve into the hole at the bottom of the tank. Ensure the rubber washer is on the inside of the tank, and the plastic locknut is on the outside. Hand-tighten the locknut, then give it an additional quarter to half-turn with a wrench (don't overtighten).
- Connect the refill tube to the top of the new fill valve and clip it onto the overflow pipe.
- Attach the supply line to the bottom of the new fill valve. Hand-tighten, then a quarter turn with a wrench.
- Turn on the water supply and check for leaks. Adjust the float height if necessary to ensure the water fills to the correct level (usually marked inside the tank).
Common Causes
- Partially Closed Shut-Off Valve: The most frequent and easiest-to-fix culprit. The valve connecting your toilet to the wall water supply might not be fully open.
- Kinked or Crimped Supply Line: The flexible hose connecting the shut-off valve to the toilet tank can get bent, restricting water flow.
- Clogged Fill Valve Screen: Sediment and mineral deposits from hard water can build up on the small filter screen at the base of the fill valve, restricting flow.
- Worn or Damaged Fill Valve Diaphragm/Washer: The rubber seal inside the fill valve can become stiff, torn, or coated with mineral buildup, preventing it from opening fully or sealing properly.
- Faulty Fill Valve: Over time, the entire fill valve assembly can wear out, or its internal mechanisms can become too corroded or damaged to function efficiently.
- Low Water Pressure (less common): If slow filling affects all toilets and faucets in your home, you might have a broader issue with your home's water pressure. This is rarely specific to a single toilet.
Common Mistakes
- Forgetting to Turn Off the Water: Always turn off the shut-off valve before performing any work inside the toilet tank or disconnecting the supply line. Failure to do so can result in a significant water mess.
- Overtightening Connections: When reconnecting the supply line or the fill valve locknut, overtightening can strip threads, crack plastic components, or damage rubber washers, leading to leaks. Hand-tighten, then a slight snug with a wrench.
- Assuming the Worst Immediately: Don't immediately assume you need a new fill valve. Always start with the simplest checks: the shut-off valve and the supply line. Many issues are resolved here.
- Ignoring the Refill Tube: Sometimes the small refill tube gets dislodged, clogged, or pushed too far into the overflow pipe, which can create subtle hydraulic issues that affect fill speed.
- Using Harsh Chemicals: Avoid pouring harsh chemical drain cleaners or descalers into the toilet tank. These can damage rubber and plastic components of the fill valve and flapper, leading to more problems. Manual cleaning is always preferred.
- Not Flushing to Relieve Pressure: After turning off the water, flush the toilet to empty the tank and relieve any residual pressure in the supply line before disconnecting anything. This prevents water from spraying out.
Cost & Time Breakdown
| Task | DIY cost | Pro cost | Time |
|---|---|---|---|
| Inspect line & shut-off valve | $0 | $50–$100 | 5 minutes |
| Clean fill valve screen | $0 | $75–$150 | 10–15 minutes |
| Replace diaphragm/washer | $5–$15 | $100–$200 | 15–20 minutes |
| Replace entire fill valve | $15–$30 | $150–$250+ | 30–60 minutes |
| Professional diagnosis | N/A | $100–$200+ | 30–60 minutes |
Tips & Prevention
- Semi-Annual Check: At least twice a year, remove your toilet tank lid and inspect the components. Ensure the shut-off valve is fully open and the supply line isn't kinked. This quick check can prevent many common issues.
- Preventive Cleaning: If you have hard water, consider periodically (e.g., once a year) turning off the water and flushing the toilet to empty the tank. Gently remove and rinse the fill valve screen to prevent mineral buildup.
- Gentle Valve Operation: When opening or closing the shut-off valve, do so gently. Rapid or forceful movements can damage the valve's internal components over time.
- Water Softener Consideration: If you live in an area with very hard water, installing a whole-house water softener can significantly extend the life of all your plumbing fixtures, including toilet fill valves, by reducing mineral buildup.
- Listen for Unusual Noises: Gurgling, hissing, or intermittent filling sounds can indicate a fill valve that's starting to fail. Addressing these early can prevent the issue from escalating to a slow fill or constant running.
- Proper Water Level: Ensure the water level in your tank is set correctly, usually about 1 inch below the top of the overflow pipe. If the float is set too low, it will close the valve prematurely, but if too high, it leads to constant running or wasting water.
When to Call a Professional
While most slow-filling toilet issues are DIY-friendly, there are specific situations where calling a licensed plumber is the wiser choice. If you've systematically worked through all the diagnostic and repair steps outlined above and the toilet still fills slowly, the problem might be more complex, such as low water pressure to your entire home, issues with the main water supply line, or internal plumbing clogs that are beyond the toilet itself. Additionally, if you encounter persistent leaks after attempting a repair, if you're uncomfortable working with plumbing components, or if the shut-off valve is seized or leaks when you try to operate it, a professional plumber has the tools, experience, and licensing to diagnose and fix the issue safely and effectively without causing further damage to your home's plumbing system. Never force plumbing components or attempt repairs that feel beyond your skill level; a small leak can quickly become significant water damage.
Related Articles
Keep troubleshooting with these hand-picked guides from FixlyGuide:
- The 3 Hidden Reasons Your Toilet Tank Fills Slowly (And How to Fix Each) — Discover the common culprits behind a slow-filling toilet tank, from crucial valve issues to subtle obstructions, and learn how to restore…
- The 4 Hidden Reasons Your Toilet Tank Fills Slowly (And How to Fix Them in 30 Minutes) — A slow-filling toilet tank is a common, annoying problem that usually points to issues with the fill valve or water supply and can often be…
- The 4 Hidden Reasons Your Toilet Tank Fills Slowly (And How to Fix Them in Under an Hour) — A toilet tank that fills slowly is a common, annoying plumbing problem, often caused by easily fixable issues within the fill valve or wate…
- The Secret Culprit Behind Your Slow Toilet Fill (It's Not Clogs!) — A slow-filling toilet tank is usually caused by issues with the fill valve, not clogs, affecting both water pressure and flush efficiency.…
- The $2 Trick to Stop a Running Toilet (Plumbers Don't Want You to Know) — Discover the simple, two-dollar fix that can stop your running toilet in minutes, saving water and preventing costly repairs.
- The Secret Culprit Behind Your Whole-House Low Water Pressure (It's Not Always the City) — Whole-house low water pressure can be a frustrating and complex issue, ranging from simple fixes homeowners can do to signs that require a…
Should you do this yourself?
Answer five quick questions before you start. Safety outranks savings every time.
Your experience with work like this
How high do you have to work?
Does the job involve any of these?
Will it need a permit?
Specialty tools
Free and instant. Educational guidance only — not a quote, inspection, or professional diagnosis.
What should this project cost?
Enter your project details for a realistic cost range before you call anyone.
Common repairs run $150–$650; repipes and water-heater replacements reach $1,500–$4,500.
- Regional adjustment
- National average
- Labor share (typical)
- ~$754
- Quotes to collect
- 3 written estimates
Educational estimate based on national averages — not a binding quote. Always confirm with written local estimates.
Fixly Project Decision Box
- DIY difficulty
- Moderate
- Estimated time
- 30 minutes – half a day
- Cost level
- Moderate
Main tools / materials
- Adjustable wrench
- Plunger or drain auger
- Bucket and towels
- Thread tape
When to stop and call a pro
- Water you cannot shut off at the fixture or main
- Sewage backing up into more than one fixture
- Water near electrical panels or outlets
- Gas water heater work beyond relighting a pilot
Need professional help?
Get a Licensed PlumberBefore you start
Check the difficulty, permits, and safety risk — then decide whether to call a pro.
- Estimate this projectGet a cost range for your scope and ZIP before you call anyone.Open
- Get local estimatesSend one request and compare written estimates from vetted pros.Open
Free, no signup required. Estimates are educational guidance, not a quote or an inspection.
Frequently asked questions
Why is my toilet tank filling so slowly?+
The most common reasons for a slow-filling toilet tank are a partially closed water shut-off valve, a kinked supply line, or a clogged or faulty fill valve inside the tank due to mineral buildup or wear and tear.
Can I fix a slow-filling toilet myself?+
Yes, most slow-filling toilet issues are simple DIY fixes. By checking the supply line, shut-off valve, and cleaning or replacing the fill valve components, homeowners can usually resolve the problem in under an hour with basic tools.
How much does it cost to fix a slow-filling toilet?+
DIY costs typically range from $0 (if just a valve adjustment or cleaning) to $15-$30 for a new fill valve. Hiring a professional plumber for this issue might cost anywhere from $100 to $250 or more, depending on the complexity and local rates.
How do I know if my fill valve is bad?+
Signs of a bad fill valve include a slow-filling tank even after checking the supply line and shut-off valve, constant hissing, water continually running into the overflow pipe, or the valve failing to shut off water at the correct level.
What's the white sediment in my toilet tank?+
The white sediment is typically mineral buildup (limescale or calcium deposits) from hard water. These deposits can restrict water flow in the fill valve and other components, leading to slow filling or other operational issues. Regular cleaning helps prevent this.
Discussion
Loading comments…