
Tools & materials you'll need
Affiliate linksAs an Amazon Associate FixlyGuide earns from qualifying purchases — at no extra cost to you. Prices and availability are accurate as of publication and subject to change.
Quick Answer
Patchy grass in your lawn is a common and frustrating problem, often stemming from underlying issues such as compacted soil, uneven watering, nutrient deficiencies, or even pest and disease activity. While the visual impact is clear – unsightly bare spots and thinning areas – the solution usually involves a multi-pronged approach beyond simply throwing down more seed. The most effective strategy begins with diagnosing the root cause, amending the soil to create a hospitable environment, and then carefully overseeding and nurturing the new growth to blend seamlessly with your existing turf. Addressing these foundational problems rather than just the symptoms is key to achieving a lush, uniform lawn.
The Problem
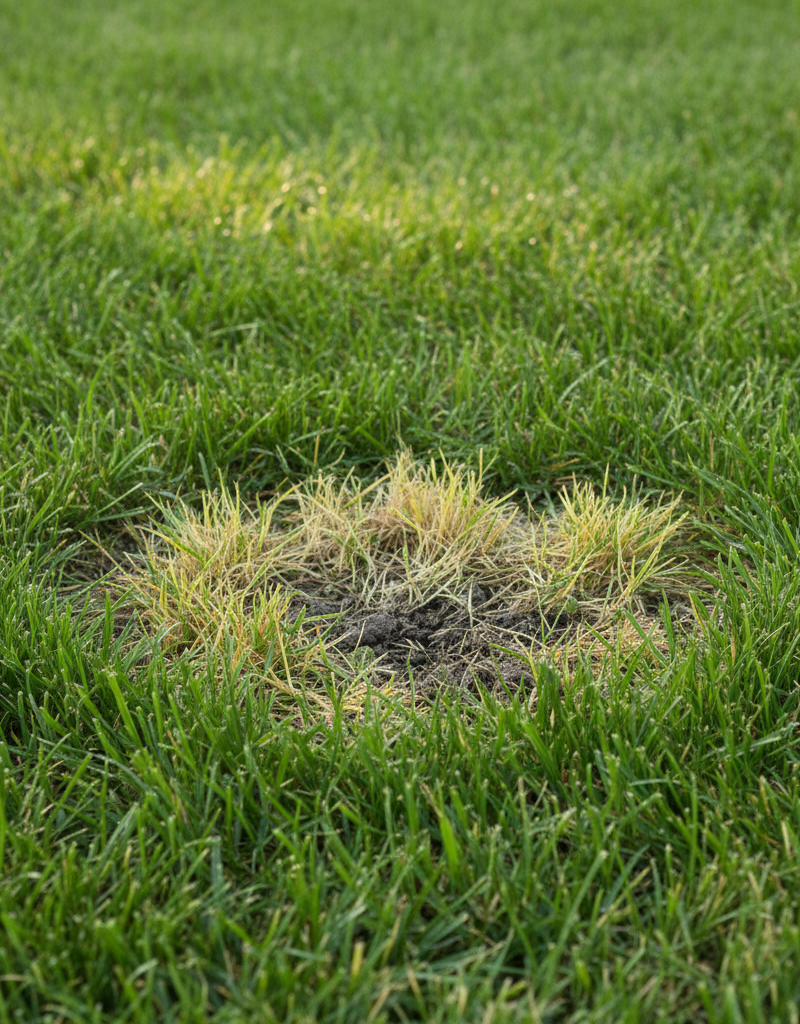
You wake up one morning, grab your coffee, and step outside, only to be confronted by a mosaic of green and brown. Bare spots, thinning areas, and discolored patches interrupt the otherwise uniform carpet of your lawn. This isn’t just an aesthetic annoyance; patchy grass indicates underlying stress or damage to your turf. It can be caused by a variety of factors: heavy foot traffic compacting the soil, inconsistent irrigation leading to dehydration or overwatering, a lack of essential nutrients, the invasion of pests like grubs, the spread of fungal diseases, or even chemical spills from fertilizers or herbicides. Ignoring these patches allows the problems to worsen, potentially leading to larger areas of turf loss, increased weed growth in the bare spots, and a generally unhealthy lawn that struggles to recover from environmental stressors. Addressing patchy grass effectively requires understanding these potential causes and implementing targeted solutions.
How It Works
A healthy lawn thrives on a delicate balance of sun, water, and nutrients, all supported by a robust soil structure. Grass plants, like all living organisms, require specific conditions to flourish. They absorb water and dissolved nutrients through their roots, which need access to both moisture and oxygen in the soil. When soil becomes compacted – often due to heavy traffic, machinery, or even rainfall – the air pockets are squeezed out, restricting root growth and the uptake of vital resources. This leads to stress, weakening the grass and making it susceptible to disease and pests.
Watering plays a critical role. Too little water, and grass dehydrates, turning brown and eventually dying. Too much water, especially in poorly draining soil, can suffocate roots, encourage fungal growth, and leach away nutrients. Nutrients, particularly nitrogen, phosphorus, and potassium (N-P-K), are the building blocks for healthy grass growth. Nitrogen promotes lush green blades, phosphorus supports strong root development, and potassium enhances overall plant vigor and stress resistance. A deficiency in any of these can lead to discolored patches, stunted growth, or susceptibility to problems.
Furthermore, the presence of beneficial microorganisms in the soil is crucial for breaking down organic matter and making nutrients available to grass roots. When this ecosystem is disturbed by harsh chemicals, extreme pH levels, or poor soil structure, the grass suffers. Understanding these interacting factors – soil compaction, nutrient availability, proper hydration, and microbial activity – is fundamental to diagnosing and effectively treating patchy grass. It's not just about adding water or fertilizer; it's about creating an environment where the grass can naturally thrive.
Step-by-Step Fix
1. Assess the Damage — Pinpoint the specific characteristics of your patchy areas.
- Walk your lawn and examine the patches closely. Are they bare spots, thinning areas, or discolored? Note the size, shape, and distribution. Are they near trees, a sidewalk, or in high-traffic zones? This initial assessment will help narrow down potential causes.
- If the grass is yellow or pale green: This often indicates a nutrient deficiency, particularly nitrogen. Consider a soil test.*
- If the grass pulls up easily in clumps: You might have grubs. Check for C-shaped white larvae in the soil beneath the turf.
2. Perform a Soil Test — Understand your soil's composition and nutrient levels.
- Collect soil samples from several patchy areas using a soil probe or a clean trowel. Dig down 4-6 inches. Avoid touching the samples with bare hands if possible. Combine the samples in a clean bucket. Air dry the soil. Mix thoroughly and send a representative sample to your local extension office or use a reputable home soil test kit.
- Safety Note: Always wear gloves when handling soil, especially if you suspect chemical contaminants. Follow the specific instructions of your soil test kit carefully.
- Why it works: A soil test provides vital information on pH, N-P-K levels, and organic matter content, guiding your targeted amendments.
3. Aerate Compacted Areas — Improve soil structure for better root growth.
- If your soil test indicates compaction or if water pools easily in patchy areas, aeration is essential. For smaller patches, use a manual core aerator or a pitchfork to create holes 2-3 inches deep, spaced 4-6 inches apart. For larger areas or full-lawn issues, consider renting a mechanical core aerator.
- Timing: Aerate when the grass is actively growing (early spring or early fall) and the soil is moist but not waterlogged. Avoid aerating during extremely hot or dry periods.
- Pro Tip: Leave the soil cores on the lawn; they will break down and return nutrients to the soil.
4. Amend the Soil — Correct deficiencies identified by the soil test.
- Based on your soil test results, apply necessary amendments. If pH is too low (acidic), add agricultural lime. If too high (alkaline), add sulfur or elemental iron. For nutrient deficiencies, use a balanced slow-release fertilizer or specific amendments like bone meal (phosphorus) or blood meal (nitrogen).
- Organic Matter: Spread a 1/4-inch layer of high-quality compost over the patches. Compost improves soil structure, drainage, and nutrient retention, and introduces beneficial microorganisms.
- Application: Follow product instructions carefully for application rates to avoid over-fertilization, which can burn the grass.
5. Select the Right Grass Seed — Choose a variety suited to your climate and conditions.
- Identify your existing grass type if possible. If not, choose a cool-season mix (e.g., fescue, rye, bluegrass) for northern climates or a warm-season mix (e.g., Bermuda, Zoysia, St. Augustine) for southern climates. Consider specific conditions like shade tolerance if the patch is under a tree, or drought resistance if in a dry area.
- What to look for: Purchase fresh, high-quality seed from a reputable supplier. Look for high germination rates and low weed seed content.
6. Prepare the Seedbed — Create an optimal environment for seed-to-soil contact.
- Rake out any dead grass, thatch, or debris from the patchy areas. Loosen the top 1/2 inch of soil with a hand rake or cultivator. This ensures good seed-to-soil contact, which is crucial for successful germination.
- If your issue was grubs: Apply a grub control product according to package directions before seeding, or use a preventative granular product in late spring/early summer.
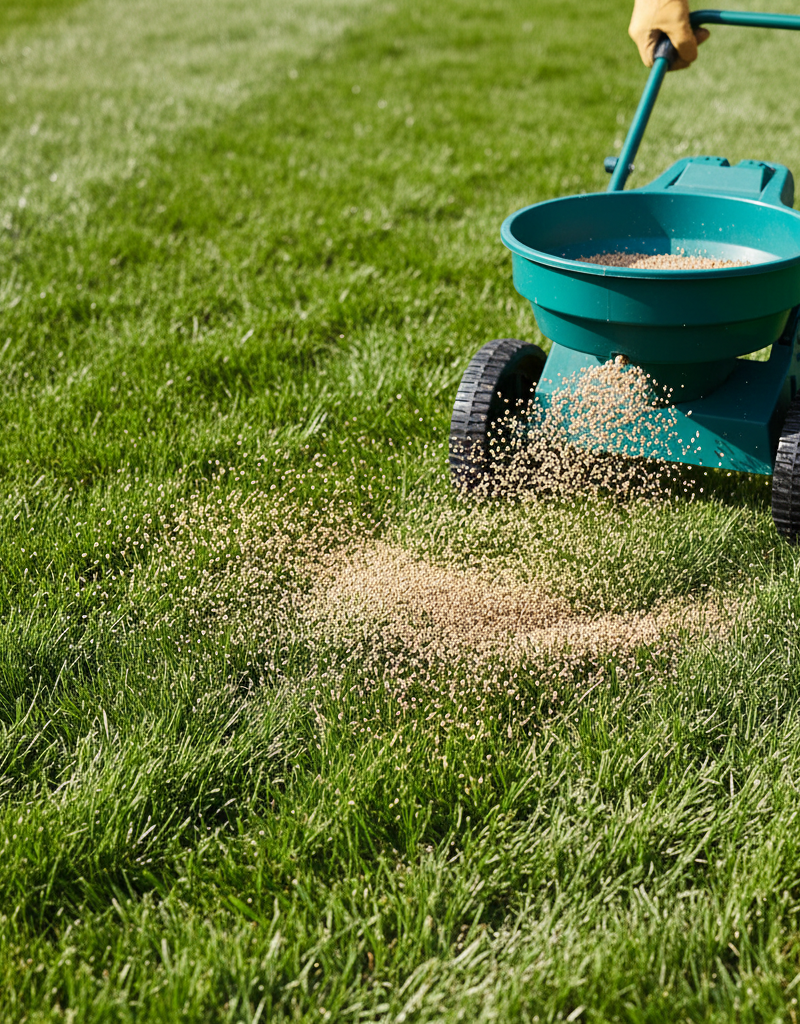
7. Overseed the Patches — Apply new seed evenly for dense growth.
- Spread the selected grass seed evenly over the prepared areas using a hand spreader or by broadcasting. Refer to the seed package for recommended application rates; typically, you'll need a slightly higher rate for patching than for new lawns. Lightly rake the seed into the top 1/8 inch of soil to ensure good contact and protect it from birds.
- No bare spots: Ensure even coverage across the entire patch. If you see bare soil, add more seed.
8. Apply a Starter Fertilizer and Topdressing — Boost initial growth and protect seeds.
- After seeding, apply a starter fertilizer, which is rich in phosphorus to encourage root development. Follow product directions precisely. Optionally, apply a thin layer (1/8-inch) of peat moss, straw, or compost as a topdressing. This helps retain moisture, insulate the seeds, and deter birds.
- Avoid: Do not use regular lawn fertilizer at this stage, as it can burn new seedlings. Ensure the starter fertilizer is specifically for new grass.
9. Water Consistently (and Correctly) — The most critical step for germination.
- This is the most crucial step for successful germination. Immediately after seeding, water gently but thoroughly to moisten the top 1-2 inches of soil. For the next 2-3 weeks, or until the new grass is established (about 1-inch tall), water lightly several times a day to keep the seedbed consistently moist. Avoid heavy watering that can wash away seeds.
- Rule of thumb: The goal is to keep the soil surface damp, not soggy. As seedlings grow, gradually reduce the frequency and increase the duration of watering to encourage deeper root growth. Eventually, transition to deep, infrequent watering.
10. Protect New Seedlings — Guard against foot traffic, pests, and weeds.
- Keep foot traffic, pets, and lawn equipment off newly seeded areas until the grass is well established (at least 4-6 weeks and mowed several times). Consider using temporary fencing or markers. Watch for weeds; hand-pull them carefully if they appear, avoiding herbicides until new grass has been mowed at least 3-4 times. Apply a pre-emergent herbicide in early spring to prevent weeds from sprouting, but ensure it is safe for new seedlings or wait until new grass is established.
- Pest protection: If grubs or other pests were an issue, continue monitoring. Apply appropriate biological or chemical controls if necessary.
11. First Mow (and Ongoing Care) — Encourage dense growth and long-term health.
- Wait until new grass is about 3-4 inches tall before its first mow. Use a sharp mower blade and only cut off the top 1/3 of the blade. Continue good lawn care practices: mow high (2.5-3.5 inches depending on grass type), water deeply and infrequently, and fertilize according to soil test recommendations. Consider annual aeration and overseeding as preventative measures.
- Adjust: Adjust your watering schedule based on weather conditions and grass needs.
Common Causes
Patchy grass can be attributed to a variety of factors, often working in combination. Recognizing these common culprits is the first step toward a successful fix:
- Compacted Soil: Heavy foot traffic, children's play, pets, or even heavy rainfall can compact the soil, squeezing out air pockets essential for root growth. This prevents water and nutrients from penetrating deeply, leading to stressed, thinning grass.
- Improper Watering: Both under-watering and over-watering can cause patches. Under-watering leads to dehydration and brown, crunchy spots. Over-watering, especially in poorly draining soil, can suffocate roots, encourage fungal diseases, and leach nutrients away.
- Nutrient Deficiencies: Lawns are heavy feeders. Lack of essential nutrients like nitrogen (for vibrant green growth), phosphorus (for root development), or potassium (for overall health and stress resistance) will manifest as discolored and thinning patches. A soil test is crucial here.
- Pests: Grubs are a common culprit. These C-shaped larvae feed on grass roots, causing patches of turf to lift easily like a carpet. Other pests like chinch bugs or sod webworms can also cause damage.
- Diseases: Fungal diseases like brown patch, dollar spot, or rust can cause circular or irregular discolored patches, especially in humid conditions or with improper watering.
- Weed Competition: Aggressive weeds can outcompete grass for resources, shading out desirable turf and leaving bare spots when they die off. Broadleaf weeds and crabgrass are common examples.
- Pet Urine: Dog and cat urine is high in nitrogen salts, causing distinct brown patches surrounded by a dark green ring. The salts burn the grass in the center, while the outer ring benefits from the diluted nitrogen.
- Chemical Spills or Misapplication: Gasoline, oil, herbicides (especially non-selective types), or even too much fertilizer applied unevenly can burn and kill grass in distinct patches.
- Thatch Buildup: A thick layer of thatch (dead organic matter between the grass blades and soil surface) can prevent water, air, and nutrients from reaching the soil, leading to shallow roots and patchy growth.
- Shade: Most common lawn grasses require a good amount of direct sunlight. Areas under dense trees or structures often struggle due to insufficient light, resulting in thin, weak grass prone to patching.
Common Mistakes
Fixing patchy grass can be a straightforward process, but many homeowners inadvertently make mistakes that hinder progress or even worsen the situation. Avoid these common pitfalls:
- Skipping the Soil Test: Guessing what your soil needs is like trying to fix a complex engine without diagnostics. Without knowing your soil's pH and nutrient levels, you might apply the wrong amendments, waste money, and fail to solve the underlying problem. Always start with a soil test.
- Over-fertilizing: More isn't always better. Applying too much fertilizer, especially high-nitrogen varieties, can
Related Articles
Keep troubleshooting with these hand-picked guides from FixlyGuide:
- The #1 Mistake Killing Your Lawn's Thatch (And How to Fix Patchy Grass) — Patchy grass often stems from an overlooked problem: excessive thatch. Learn how to diagnose and correct thatch issues to restore a healthy…
- The #1 Mistake Killing Your Thin Lawn (And How to Fix It in a Weekend) — Overseeding your lawn can transform it from thin and patchy to lush, but many homeowners make a crucial mistake that hinders success. Learn…
- The #1 Mistake Killing Your Thin Lawn (and How to Fix It in a Weekend) — Overseeding a thin lawn is crucial for a lush yard, but a common mistake can ruin your efforts before they even begin. Learn how to diagnos…
- The #1 Mistake Killing Your Lawn's Crabgrass Defense (And the Easy Fix) — Discover why common crabgrass removal methods fail and how to naturally eliminate this stubborn weed for a healthier lawn.
- The #1 Mistake Killing Your Summer Lawn (It's Not What You Think) — Uncover the surprising truth behind your yellow summer lawn and learn how to fix the most common, yet overlooked, culprit: overwatering.
- The #1 Mistake When Fixing Baseboards That Pull Away From Walls — Discover the crucial mistake homeowners make when reattaching baseboards and how to properly secure them for a lasting fix.
Frequently asked questions
How do I fix patchy grass quickly?+
For a quick fix, first rake out any dead grass and loosen the soil. Then, generously apply a high-quality grass seed suited to your climate, followed by a starter fertilizer. Water lightly several times a day to keep the soil consistently moist until new grass is established. Addressing underlying issues like compaction or nutrient deficiencies is key for long-term success.
What causes bare spots in my lawn?+
Bare spots can be caused by compacted soil, insufficient watering, nutrient deficiencies, pest activity (like grubs), fungal diseases, pet urine, chemical spills, or excessive shade. A thorough assessment and soil test can help identify the primary cause.
Should I put topsoil over grass seed?+
Yes, applying a thin layer (about 1/8 to 1/4 inch) of topsoil, peat moss, or compost over newly sown grass seed can significantly improve germination. It helps maintain moisture, protects seeds from birds and wind, and encourages better seed-to-soil contact. Just ensure it's a very light layer so the seedlings can push through easily.
How often should I water new grass seed?+
New grass seed requires consistent moisture for germination. Water 2-3 times a day for short durations (5-10 minutes) to keep the top inch of soil continuously damp, but not soggy. Continue this for 2-3 weeks or until seedlings are about 1 inch tall. Gradually reduce frequency and increase duration as the grass matures to encourage deeper root growth.
When is the best time to plant grass seed to fix patches?+
The best time to plant grass seed depends on your climate. For cool-season grasses (e.g., fescues, bluegrass), early fall (late August to mid-October) is ideal. For warm-season grasses (e.g., Bermuda, Zoysia), late spring to early summer (April to June) is best. These times offer optimal soil temperatures and moisture levels for germination and establishment.

Discussion
Loading comments…