
Tools & materials you'll need
Affiliate links- AmazonTalcum powder or powdered graphite1 container
- AmazonWooden shims1 pack
- AmazonConstruction adhesive1 tube
- AmazonWood screws (1 1/4 inch and 2 inch)
- AmazonSqueak-repair screw kit (for carpet)If fixing a carpeted floor
- AmazonTrim-head screws (for hardwood)If fixing a hardwood floor
- AmazonWood putty (matching floor color)If fixing hardwood floors
As an Amazon Associate FixlyGuide earns from qualifying purchases — at no extra cost to you. Prices and availability are accurate as of publication and subject to change.
Quick Answer
Squeaky floors are a common nuisance but often have surprisingly simple fixes that don't involve a major demolition project. The core issue is almost always friction and movement between floor components – typically the subfloor, joists, or even the finished floorboards. By identifying the source of this movement, you can apply targeted solutions like lubrication, shims from below, or specialized screws from above, restoring peace and quiet to your home without ever lifting a single floorboard.
The Problem
That annoying squeak, creak, or groan under your foot isn't just a sound; it's a symptom of friction. As you walk across a floor, the weight of your body causes tiny shifts and deflections in the flooring system. When different components – like a plywood subfloor and a wooden joist, or two adjacent floorboards – rub against each other due to these shifts, they create that distinctive, irritating noise. Over time, wood naturally shrinks and expands with changes in humidity and temperature, which can loosen nails, widen gaps, and increase the likelihood of friction. The problem areas are usually high-traffic zones or spots where the house has settled, creating slight imperfections in the subfloor's contact with the joists below. Addressing this movement and friction is key to silencing the squeaks.
How It Works
To understand how to fix a squeaky floor, it helps to visualize the layers beneath your feet. Most modern floors consist of a finished surface (hardwood, carpet, tile) laid over a subfloor, which is typically large sheets of plywood or OSB (oriented strand board). This subfloor is then nailed or screwed to structural wooden beams called joists, which span across the foundation or supporting walls of your home. The joists are the primary load-bearing members, transferring the weight of the floor and everything on it down to the foundation.
Squeaks occur when there's an air gap or loose connection between these layers. When you step on a loose section of subfloor, it can flex downwards, rubbing against the top of the joist or the shank of a loose nail. Similarly, two adjacent subfloor panels that have separated slightly can rub against each other. In older homes with solid hardwood floors directly nailed to joists, the individual floorboards themselves can dry out, shrink, and rub against each other or the nails. The friction of wood on wood, or wood on metal (nails), often amplified by dust or debris in the gap, is what produces the squeak. The goal of any repair is to eliminate these gaps and secure the components tightly together, preventing that friction and movement.
Step-by-Step Fix
1. Locate the Exact Squeak – Pinpoint the Culprit
- Walk and Listen – Have a partner walk slowly across the noisy section of the floor while you listen carefully, ideally from below if you have basement or crawl space access. Mark the exact points where the squeaks are loudest using painter's tape or chalk. Identify if it's a single spot, a line along a joist, or a wider area.
- Press and Identify – If working from above, try pressing down firmly with your foot (or knee) on various spots in the squeaky area. This can help isolate the precise point of movement and friction. The more accurately you locate it, the more effective your fix will be.
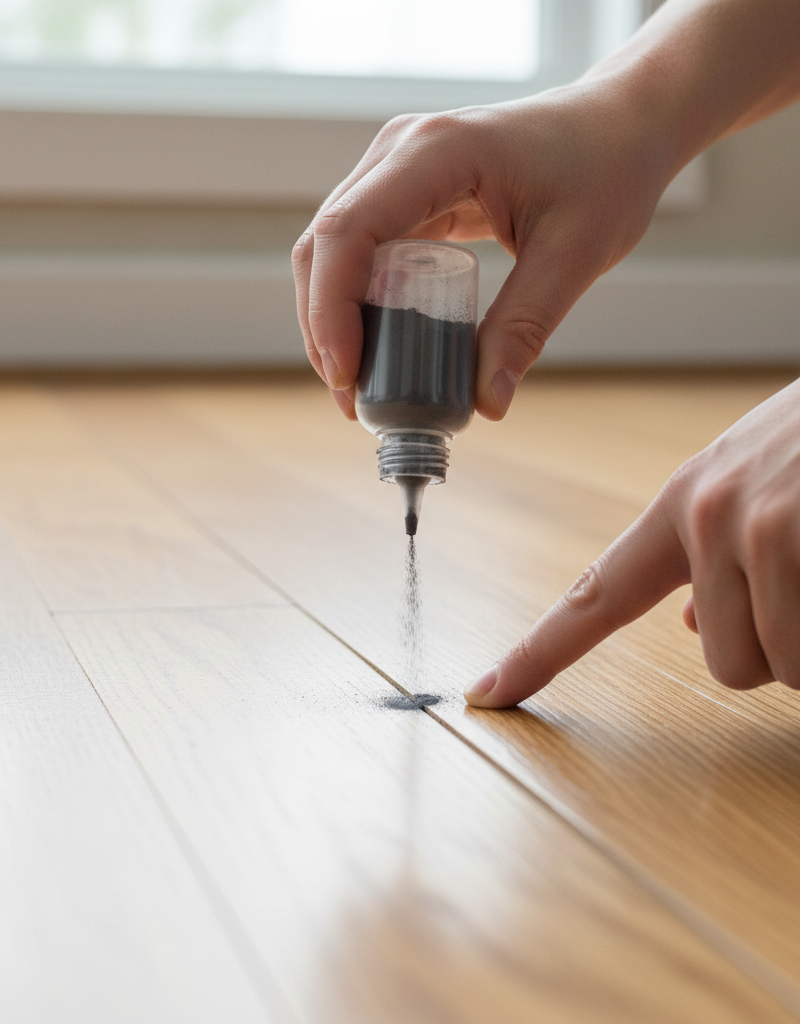
2. Lubricate Surface Gaps (If from Above) – The Powdery Trick
- Clean the Area – Thoroughly clean the floor surface around the squeak to remove any dirt or debris that could hinder lubrication.
- Apply Fine Powder – For hardwood floors or laminate where the squeak comes from between individual boards, sprinkle a generous amount of talcum powder, powdered graphite, or even cornstarch directly over the joints. Work the powder into the gaps by gently flexing the floorboards (walking on them) or by using a soft brush.
- Wipe Excess – Once the squeak is reduced or eliminated, vacuum up any excess powder to prevent it from tracking.
- If this doesn't work: The squeak is likely deeper than surface friction, indicating movement between the subfloor and joists, or subfloor panels.
3. Shim from Below (If Basement/Crawl Space Access) – Bridging the Gap
- Safety First – Wear gloves and eye protection. Ensure the area is well-lit.
- Identify Loose Spot – Have a partner walk above to activate the squeak. From below, look for tiny gaps between the subfloor and the top of the joist, or areas where the subfloor visibly flexes away from the joist when weight is applied above.
- Prepare Shims – Use wooden shims (thin, tapered pieces of wood, often sold for door/window installation). You can also cut narrow strips from cedar shingles.
- Tap Shims Gently – Apply a small amount of construction adhesive to one side of the shim. Gently tap one or two shims into the gap between the joist and the subfloor. Tap just enough to make firm contact, but do not force them, as you could create a hump in the floor above. The goal is to fill the gap and prevent movement. If desired, you can secure the shim to the joist with a small finish nail (1-inch).
- If shims won't fit/don't work: If the gap is too small for a shim, or the subfloor is badly warped, consider using a block and screw method (Step 4).
4. Use a Block and Screws (If Basement/Crawl Space Access) – The Bracing Approach
- Cut Wood Blocks – Cut short lengths (6-8 inches) of 2x4 or 2x6 lumber. These will act as brace blocks.
- Apply Adhesive – Apply a strong construction adhesive to one face of a wooden block.
- Position and Secure – Press the adhesive side of the block firmly against the subfloor, ensuring it also overlaps and makes good contact with the side of the joist. Using 2-inch wood screws, drive them through the block and into the side of the joist. Then, drive 1 1/4-inch wood screws at an angle (toe-nailing) through the block and up into the subfloor until they are just snug. Be careful not to overtighten and push through the finished floor above.
- Alternative: For very large gaps where shims and blocks are insufficient, a specialized 'squeak stopper' bracket can be installed. This bracket attaches to the joist and uses a screw to apply upward pressure to the subfloor.
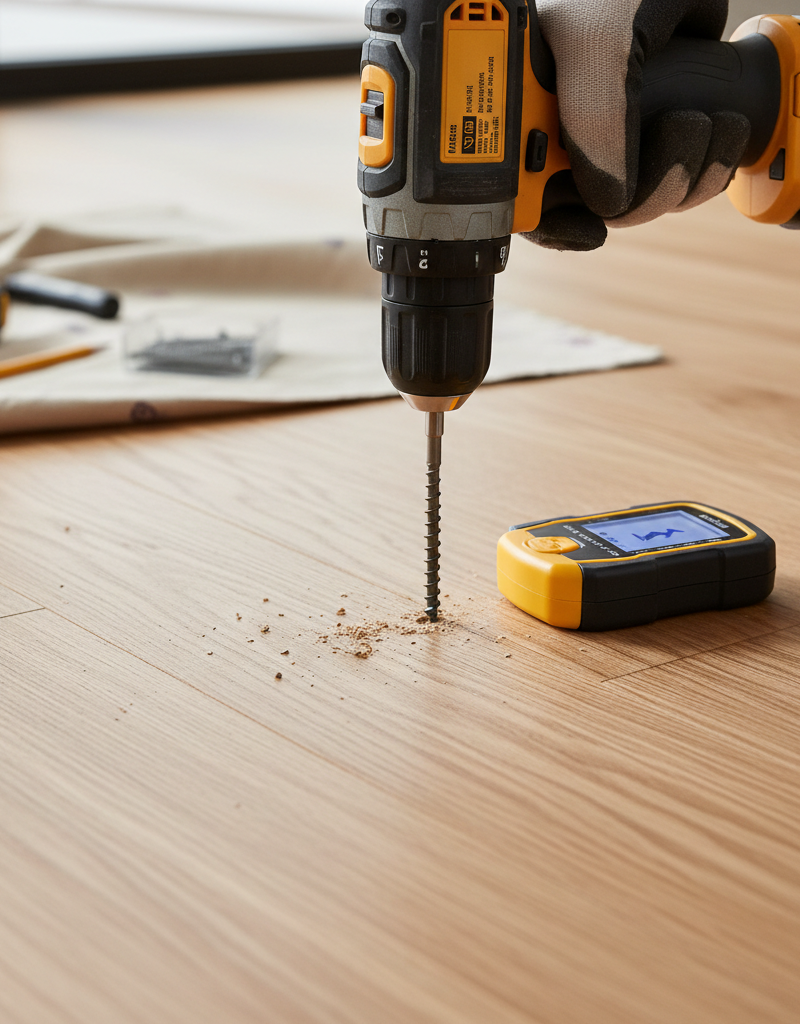
5. Install Squeak-Repair Screws Through Carpet (If No Access Below & Carpeted) – Invisible Anchors
- Locate Joists – Use an electronic stud finder to locate the floor joists in the squeaky area. Mark their locations with painter's tape.
- Determine Piloting – Squeak-repair kits typically come with specialized screws designed to penetrate carpet without snagging, plus a guide tool. You'll bore a small pilot hole through the carpet and pad, but not into the subfloor yet.
- Drill and Drive – Follow the kit instructions precisely. Engage the squeak-repair screw into the guide tool. Drill the screw through the carpet, pad, and subfloor until it engages with the joist below. The guide tool has a special collar that allows you to break off the screw head just below the carpet surface, leaving no visible trace.
- Safety Note: Always ensure you know what's below your floor before drilling. Avoid drilling into electrical wires, plumbing, or heating ducts. If unsure, consult with a professional.
- If this doesn't work: The squeak may be between subfloor panels, not directly over a joist. In this case, professional advice for a more invasive fix might be needed.
6. Install Squeak-Repair Screws Through Hardwood (If No Access Below & Hardwood) – The Countersink Method
- Locate Joists – Use a stud finder to identify the joists. Mark lightly with a pencil.
- Pre-Drill Pilot Holes – Using a drill bit slightly smaller than your screw's shank, carefully drill a pilot hole through the hardwood floor and subfloor, just deep enough to penetrate the subfloor and begin to enter the joist. Be precise to prevent splitting the hardwood.
- Drive Screws – Use 1 1/2-inch to 2-inch trim-head screws (these have small heads that are less noticeable). Drive them carefully through the pilot hole and into the joist until the head is slightly below the surface of the hardwood. Use a countersink bit if you plan to fill the holes.
- Fill Holes – Fill the screw holes with wood putty that matches your floor's color. Sand smooth once dry and, if desired, apply a matching stain or finish.
- Pro Tip: For hardwood, try to hide screws in less conspicuous areas or along grain lines. If using a countersink bit, consider a tapered bit for a cleaner finish.
Common Causes
- Wood Shrinkage – As wood dries out over time, especially in low-humidity environments, it shrinks. This shrinkage can cause gaps to form between the subfloor and joists, or between individual floorboards, loosening fasteners.
- Loose Fasteners – Nails used to secure subfloors to joists can work their way loose over time due to repeated flexing and movement. This allows the subfloor to move up and down on the nail shank, creating friction.
- Material Expansion/Contraction – All building materials expand and contract with temperature and humidity changes. This constant movement can gradually wear away at connections, creating play and friction.
- Improper Installation – Sometimes, squeaks are built-in from the start. Insufficient or improperly spaced fasteners, inadequate adhesive during subfloor installation, or uneven joists can lead to squeaks down the line.
- Subfloor Issues – Gaps between subfloor panels themselves, or an uneven subfloor that isn't making full contact with joists, can also lead to squeaks as the panels rub against each other or flex independently.
Common Mistakes
- Ignoring the Source – Just lubricating the surface of a hardwood floor when the real issue is a loose subfloor-to-joist connection will only provide a temporary or partial fix. Diagnose accurately.
- Over-Tightening Shims/Screws – Forcing shims too tightly or overtightening screws from below can create an unsightly hump in the floor above, or even damage the subfloor or joist. Go snug, not tight.
- Drilling Blindly – Drilling screws from above without locating joists or knowing what's underneath can lead to hitting electrical wires, plumbing pipes, or HVAC ducts, causing significant damage and safety hazards. Always use a stud finder.
- Using the Wrong Screws – Standard wood screws can split hardwood or leave visible heads. Use trim-head screws for hardwood or specialized squeak-repair kits for carpeted floors for best results.
- Assuming All Squeaks are the Same – A squeak from a loose hardwood board requires different treatment than a squeak from a loose subfloor over a joist. Adapt your repair method to the specific type of squeak.
- Not Testing Thoroughly – After applying a fix, test the area thoroughly by walking and even jumping lightly to ensure the squeak is truly gone. Sometimes a minor adjustment is needed.
Cost & Time Breakdown
| Task | DIY cost | Pro cost | Time |
|---|---|---|---|
| Locate Squeak | $0 | N/A | 5–15 min |
| Lubricate Surface Gaps | $5–$15 | N/A | 5–10 min |
| Shim from Below | $10–$20 | N/A | 15–30 min |
| Block & Screw from Below | $15–$30 | N/A | 30–60 min |
| Squeak-Repair Screws (Carpet) | $20–$40 | N/A | 20–45 min |
| Squeak-Repair Screws (Hardwood) | $10–$25 | N/A | 20–45 min |
| Pro Assessment/Repair | N/A | $150–$400+ | 1–3 hours+ |
Tips & Prevention
- Maintain Humidity Levels – Use a humidifier in dry climates or during winter to keep indoor humidity between 35-55%. This helps prevent wood from drying out and shrinking, which is a major cause of squeaks.
- Inspect Basements/Crawl Spaces Annually – Periodically check these areas for signs of moisture, loose subfloor connections, or pest damage that could contribute to floor issues.
- Address New Squeaks Promptly – Don't let a small squeak become a larger problem. The sooner you address it, the simpler the fix is likely to be.
- Consider Construction Adhesive on New Floors – When installing new subfloors, using construction adhesive in addition to screws between the subfloor and joists creates a much stronger, squeak-resistant bond.
- Proper Fastener Spacing – If you ever replace subfloor sections, ensure fasteners are spaced correctly (e.g., 6 inches along edges, 12 inches in the field) to prevent future movement.
- Check for Plumbing Leaks – Water damage can weaken flooring components and lead to squeaks. Address any leaks immediately.
When to Call a Professional
You've tried the DIY fixes and the squeak persists, or perhaps you're confronting a problem beyond simple friction. It's time to call a professional if the squeaks are widespread throughout a large area, suggesting a foundational issue or significant subfloor degradation that requires expert assessment. If you suspect structural damage, such as rotting joists, cracked beams, or termite damage in your crawl space or basement, a professional should be called immediately. Similarly, if your home is older and the source of the squeak involves complex framing or difficult-to-access areas, a flooring contractor or general contractor can provide a more effective long-term solution. They have specialized tools to precisely locate and rectify deep-seated issues without causing further damage, and they can properly assess if the problem is merely an annoyance or a symptom of a larger structural concern that could compromise your home's integrity. Also, if drilling from above makes you nervous due to unknown utility locations, a pro can assist in a safer manner.
Related Articles
Keep troubleshooting with these hand-picked guides from FixlyGuide:
- The 4 Hidden Reasons Your Doorbell Dies (And the 20-Minute Fix) — A non-working doorbell is often caused by simple, hidden issues like a tripped transformer or a corroded button, which homeowners can fix i…
- The 3 Hidden Reasons Your Window Won't Stay Up (And the Easy Fixes) — Before you call a repairman, learn the three most common reasons your double-hung window won't stay open and how to fix them yourself.
- The 3 Hidden Reasons Your Door Won't Latch (And the Easy DIY Fixes) — Frustrated by a door that refuses to latch? Discover the common culprits behind this annoying problem and learn simple, effective DIY fixes…
- The 3 Hidden Reasons Your Door Won't Latch (And the Easy Fixes) — A door that won't latch properly is a common household nuisance, often caused by simple issues that are easy to diagnose and repair.
- The 3 Hidden Reasons Your Garage Door Stops Mid-Close (And the $0 Fix) — Your garage door stopping mid-close is usually a sign of misaligned safety sensors, a blocked path, or incorrect travel limits, all fixable…
- Is Your Gutter Sagging After Every Storm? The Hidden Flaw Most Homeowners Miss — Discover the overlooked reason your gutters sag after every storm and learn the lasting fix that most homeowners miss.
Recommended for DIYers & woodworkers
Sponsored
The Top 20 Tools for Workshops of Any Budget
No stationary machines or power tools required — plus 3 fundamental tools that can't be bought at any price.
Get the free guide
Ted's Woodworking — The #1 Woodworking Resource
Detailed instructions, dimensioned drawings, materials & cutting lists, and 3D schematics for every skill level.
See the plansSponsored: links above are affiliate links. FixlyGuide may earn a commission on qualifying purchases — at no extra cost to you.
Frequently asked questions
What causes floors to squeak?+
Floors typically squeak due to friction caused by movement between the subfloor, joists, or finished floorboards. This movement often arises from wood shrinkage, loose nails, or improper installation, creating gaps that allow components to rub together when weight is applied.

Discussion
Loading comments…