Tools & materials you'll need
Affiliate linksAs an Amazon Associate FixlyGuide earns from qualifying purchases — at no extra cost to you. Prices and availability are accurate as of publication and subject to change.
Quick Answer
Garage door sensors are critical safety devices that prevent the door from closing on people, pets, or objects. When they malfunction, the door may act erratically—reversing when closing, refusing to close at all, or only closing when you hold down the wall button. Most often, the issue is minor: misaligned beams, dirty lenses, or a simple obstruction. A quick inspection, cleaning, and alignment can solve the problem in under 30 minutes, restoring your garage door's safe operation and preventing costly repairs or injuries.
The Problem
You push the button, the garage door starts to close, and then—for no apparent reason—it reverses and goes back up. Or perhaps it won't close at all, only moving a few inches before stopping. You might notice one or both of the small LED lights on the sensors are off, blinking, or solid but not green. These are classic symptoms of malfunctioning safety sensors, sometimes called 'photo eyes' or 'electric eyes.' Left unaddressed, this isn't just an inconvenience; it's a significant safety hazard. A garage door that fails to detect an obstruction can cause serious injury or damage property. Although often simple to diagnose and fix, understanding the underlying cause is key to a lasting repair.
How It Works
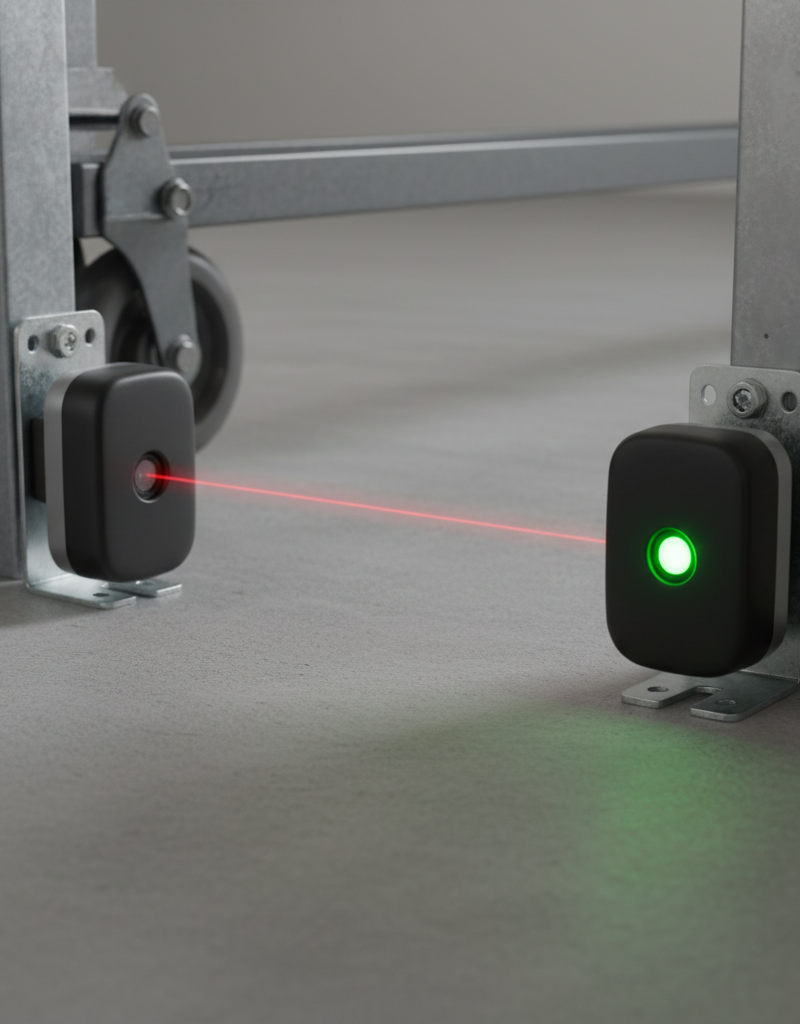
Garage door safety sensors operate on a simple yet ingenious principle: an invisible infrared beam transmits from one sensor to a receiver on the opposite side of the garage door opening. Think of it like a tripwire, but with light. This beam forms a protective barrier approximately 4 to 6 inches above the garage floor. When you activate the garage door to close, the opener's control board constantly monitors this beam. If anything breaks the infrared light path—a child, a pet, a car bumper, or even a leaf blowing in the wind—the receiver sensor immediately signals the opener's control board. In response, the control board instantly reverses the door's direction, preventing it from closing on the obstruction. This safety mechanism is mandated by federal law (UL 325) for all garage door openers manufactured after 1993. The sensors are typically low-voltage (usually 18-24V AC) and are wired directly back to the garage door opener motor unit. Each sensor usually has an LED indicator: one for power (often amber or green) and one for alignment/beam presence (often green). A steady green light usually means the beam is connected and clear, while a blinking or absent light indicates a problem with the beam connection, signaling a potential hazard to the opener's control board.
Step-by-Step Fix
- Safety First — Disconnect Power: Before you touch any wiring or components, unplug the garage door opener from the ceiling outlet. This prevents accidental activation and electrocution. If you can't reach the outlet, locate your home's circuit breaker panel and switch off the breaker controlling the garage. Safety Note: Always confirm power is off before handling electrical components.
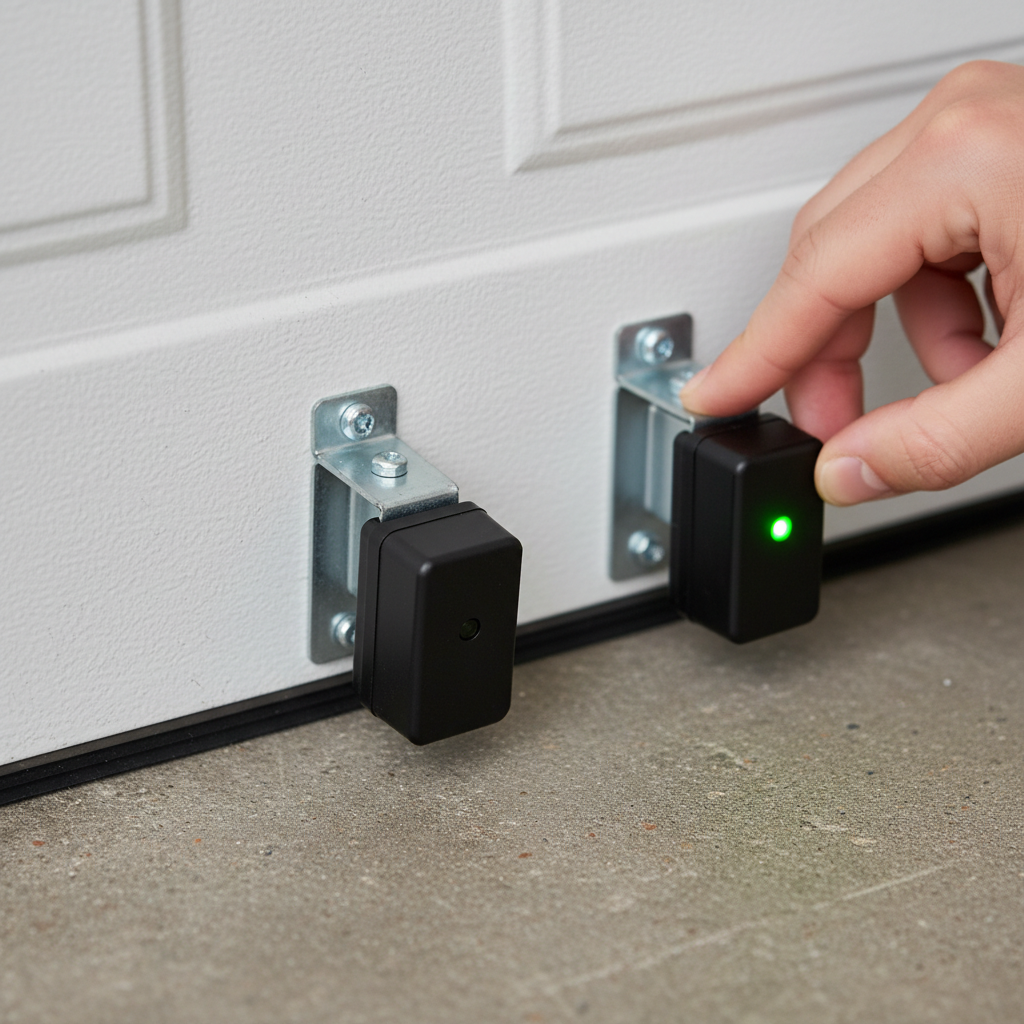
- Inspect the Sensor Lenses and Brackets: – Check both the sending and receiving sensors, located about 4-6 inches off the ground on either side of the garage door track. – Look for any dirt, dust, spiderwebs, or debris on the small lenses. – Verify that the sensor brackets aren't bent or loose, which could cause misalignment.
- Clean the Sensor Lenses: – Gently wipe the lenses of both sensors with a soft, clean cloth. – Use a mild glass cleaner if there's stubborn grime, but apply it to the cloth first, not directly to the sensor. – Ensure there are no streaks or residue left on the lenses.
- Clear Any Obstructions: – Look for anything that might be blocking the invisible beam between the two sensors. This could be a stray broom, a gardening tool, leaves, or even an accumulation of dust bunnies. – Remove all obstructions from the path of the beam.
- Realign the Sensors: – Each sensor is typically held by a bracket with wing nuts or bolts that can be loosened slightly. – Gently push and pivot one sensor until its LED indicator light (usually green) illuminates steadily. This often involves angling the sensor slightly inward. – Repeat for the other sensor. – If both lights are steady green, the sensors are aligned. Tighten the wing nuts or bolts to secure them in place. If this doesn't work: Try moving the sensors in very small increments. Sometimes it's a difference of a millimeter or two.
- Inspect Wiring for Damage: – While power is still disconnected, carefully inspect the low-voltage wires running from each sensor back to the garage door opener motor unit. – Look for any frayed insulation, nicks, cuts, or pinched spots. – Check where the wires connect to the sensors and the opener unit for corrosion or loose connections.
- Repair or Replace Damaged Wiring: – If you find minor insulation damage, you can repair it with electrical tape. – For cuts or severely damaged sections, cut out the damaged portion and splice in a new piece of 18 or 20-gauge bell wire using wire nuts and electrical tape. Ensure connections are secure and polarity (matching positive to positive, negative to negative) is maintained. – If the wiring is extensively damaged, it's often best to replace the entire run of wire from the sensor to the opener.
- Test the Sensors: – Once you've cleaned, aligned, and inspected the wiring, plug the garage door opener back in or restore power at the breaker. – Press the wall button to close the door. It should now close smoothly. – Perform a safety test: Place a cardboard box or a 2x4 piece of wood flat on the garage floor in the path of the sensors. Press the close button. The door should descend and then immediately reverse upon hitting the obstruction. If it doesn't reverse, do NOT use the door and re-evaluate the previous steps or call a professional.
Common Causes
- Misalignment: Even a slight bump from a car, a child's toy, or vibrations can knock sensors out of alignment, breaking the infrared beam. This is the most frequent cause of sensor failure. The green LED indicator will usually blink or be off if misaligned.
- Dirty Lenses: Dust, dirt, spiderwebs, and insect nests can accumulate on the sensor lenses, obscuring the infrared beam and preventing proper communication between the sending and receiving units.
- Obstructions: Any object, no matter how small, placed between the sensors can block the beam. This includes tools, trash cans, or even loose leaves blowing into the garage.
- Damaged Wiring: The low-voltage wires connecting sensors to the opener can be chewed by rodents, cut, pinched under items, or corroded at the terminals, interrupting the electrical signal.
- Sunlight Interference: Strong, direct sunlight shining into the receiving sensor can sometimes mimic the infrared beam, confusing the sensor and causing it to falsely detect an obstruction or prevent the beam from establishing. This is less common with newer sensors but can happen.
- Moisture or Water Damage: If sensors are exposed to significant moisture, rain, or standing water, it can short out the internal electronics.
Common Mistakes
- Ignoring the Problem: Many homeowners repeatedly hold down the wall button (which bypasses the safety sensors) to close the door when sensors are malfunctioning. This circumvents the critical safety feature and risks serious injury or damage.
- Not Checking Both Sensors: Assuming only one sensor is the problem. Both sensors must be clean and perfectly aligned for the system to work. Always check the lights on both units.
- Over-Tightening Alignment Screws: Forcing or over-tightening the wing nuts or bolts that hold the sensors can strip the threads or crack the plastic brackets, making proper alignment impossible.
- Using Abrasive Cleaners: Harsh chemicals or abrasive cloths can scratch the sensor lenses, permanently impairing their ability to transmit or receive the infrared beam.
- Improper Wire Splicing: When repairing damaged wires, using incorrect wire gauges, loose connections, or failing to properly insulate splices can lead to intermittent problems or short circuits.
- Forgetting to Test: After any sensor adjustment or repair, failing to perform the real-world obstruction test (with a box or 2x4) means you haven't confirmed the fix, leaving a potential safety hazard.
Cost & Time Breakdown
| Task | DIY Cost | Pro Cost | Time |
|---|---|---|---|
| Sensor Cleaning/Alignment | $0 | $75–$150 | 15–30 minutes |
| Minor Wire Repair | $5–$15 | $100–$200 | 30–60 minutes |
| Sensor Replacement | $30–$60 | $150–$250 | 45–90 minutes |
| Full System Diagnosis | $0 | $75–$150 (visit) | 1–2 hours |
Tips & Prevention
- Regular Cleaning: At least twice a year, gently wipe down the sensor lenses with a soft, clean cloth to remove dust and grime. Do this more often if your garage is particularly dusty or prone to spiderwebs.
- Annual Alignment Check: Periodically check that both sensors are firmly mounted and that their indicator lights are solid green. If they're loose, gently retighten their mounting hardware.
- Keep Path Clear: Make it a habit to keep the area around the sensors and the garage door opening clear of all objects, tools, and debris that could potentially block the beam.
- Inspect Wiring: During your annual checks, visually inspect the low-voltage wiring for any signs of damage: fraying, nicks, or rodent chew marks. Address any issues promptly.
- Proper Lighting: If direct sunlight interference is an issue, consider a small shield or hood over the receiving sensor, but ensure it doesn't obstruct the beam path. Some manufacturers offer these accessories.
- Safety Test Monthly: Once a month, perform the physical obstruction test (as described in Step 8) to ensure your safety sensors are truly working as intended.
When to Call a Professional
While most sensor issues are easy DIY fixes, there are times when calling a licensed garage door technician is the safest and most practical option. If you've cleaned and realigned the sensors, inspected the wiring thoroughly, and replaced damaged sections, but the problem persists, the issue might be more complex. This could indicate a faulty sensor unit itself, a problem with the garage door opener's logic board, or more extensive wiring damage within the walls. If you're uncomfortable working with low-voltage wiring, or if you can't get both sensor lights to illuminate steadily after multiple attempts at alignment, a professional can quickly diagnose and resolve the issue. Additionally, if the door continues to reverse even when no obstruction is present and the sensors appear fine, it might suggest an issue with the opener's sensitivity settings or other internal components that require specialized tools and expertise. Never compromise on safety; if in doubt, call a pro.
Related Articles
Keep troubleshooting with these hand-picked guides from FixlyGuide:
- The Hidden Reason Your AC Isn't Cooling (And 7 Fixes Homeowners Miss) — If your central AC isn't cooling your home, the culprit often lies in an overlooked issue that's simple to fix, preventing costly professio…
- The Secret to Endless Hot Showers? It's Not Your Water Heater's Age — Inconsistent hot water or no hot water at all often points to a single, often overlooked culprit: the thermostat. Understanding its role is…
- The Hidden Culprit Behind Your AC Not Cooling (and How to Find It) — If your central AC isn't cooling your home, the issue often stems from a surprisingly simple problem that's easy to overlook. Learn how to…
- The Secret Power Tool Hiding in Your Garage for a Speedier Clean — Unlock the hidden potential of your cordless drill to tackle stubborn household grime, soap scum, and dirt with specialized cleaning attach…
- The 3 Hidden Ways Your — Uncover the surprising habits and hidden household issues that are silently increasing your homeownership costs and learn how to fix them.
- The 3 Hidden Reasons Your Garage Door Won't Close (And The 10-Minute Fix) — A garage door that won't close all the way is a common, frustrating issue often stemming from simple obstructions or sensor misalignment.
Get the print-ready PDF of this guide
A clean, ad-free, printable version you can keep on your phone or pin to the workshop wall. Free with a FixlyGuide account.
- Print-optimized layout
- Tools, materials & every step included
- Saved to your account
This article was independently written by FixlyGuide based on the source topic.
Frequently asked questions
Why do my garage door sensors have a blinking light?+
A blinking light on one or both garage door sensors usually indicates that the infrared beam between them is interrupted or misaligned. This prevents the door from closing properly. Check for obstructions, clean the lenses, and then carefully realign the sensors until the light becomes steady.
Can I bypass a garage door safety sensor?+
You can temporarily close a garage door with faulty sensors by holding down the wall control button until the door is fully closed. However, you should NEVER permanently bypass safety sensors. They are a critical safety feature mandated by law to prevent serious injury or death from the door closing on an obstruction.
How high should garage door sensors be off the ground?+
Garage door safety sensors should be mounted approximately 4 to 6 inches (10-15 cm) above the garage floor. This height ensures they detect objects or people that might be in the door's path as it closes.
What tools do I need to fix garage door sensors?+
For most garage door sensor fixes, you'll need basic tools like a soft cloth (for cleaning), a screwdriver or wrench (to adjust sensor brackets), and potentially wire cutters/strippers and wire nuts if you need to repair damaged wiring. A level can also assist with proper alignment.


Discussion
Loading comments…