Tools & materials you'll need
Affiliate linksAs an Amazon Associate FixlyGuide earns from qualifying purchases — at no extra cost to you. Prices and availability are accurate as of publication and subject to change.
Quick Answer
If your garage door refuses to close all the way, the culprit is often a simple issue that homeowners can diagnose and fix in minutes. Most frequently, the problem lies with misaligned or obstructed safety sensors, which are designed to prevent the door from closing on people or objects. Less commonly, but still within DIY reach, the issue can be a bent track, an improperly set down-limit switch on the opener, or even debris caught in the door's path. Addressing these common problems often involves simple adjustments or cleaning, restoring your garage door to full functionality without a professional call.
The Problem
A garage door that won't close fully is more than just an inconvenience; it's a security risk and an energy waste. Whether it stops a few inches from the ground, reverses after touching down, or refuses to move past a certain point, the underlying cause is usually one of a few common issues. This guide will walk you through the most frequent culprits and provide clear, step-by-step instructions to get your door closing securely again, saving you the expense of a service call.
How It Works
To understand why your garage door isn't closing, it helps to know how the system is designed to work. Modern garage door openers are sophisticated safety devices. At the core, an electric motor, controlled by a wall switch or remote, pulls the door up and pushes it down along a metal track. The motor connects to the door via a trolley and either a chain, belt, or screw drive.
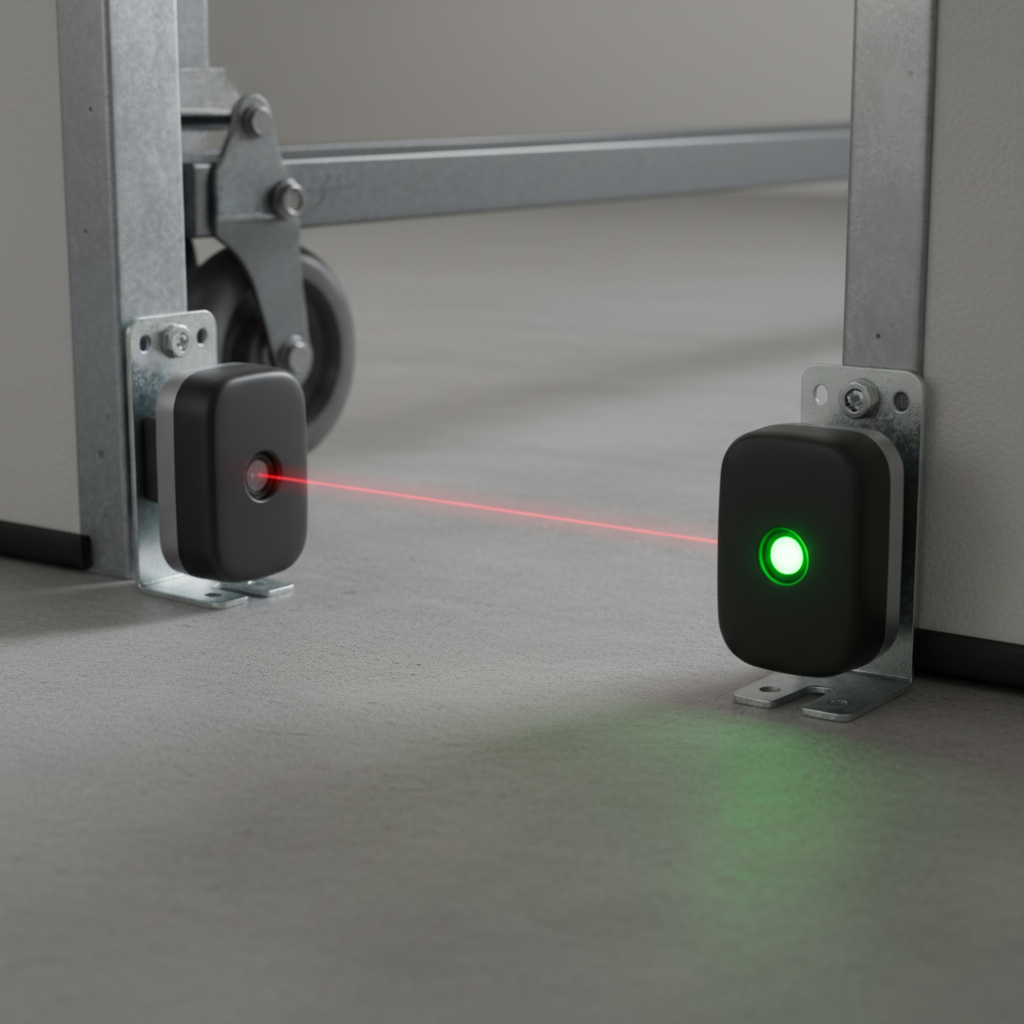
Crucial to the closing mechanism are two primary safety features: the photoelectric safety sensors and the force/limit settings. The safety sensors are small, often black, boxes mounted on each side of the garage door opening, about 4-6 inches above the floor. One sensor (the emitter) sends an invisible infrared beam to the other (the receiver). If anything breaks this beam while the door is closing, the opener immediately reverses the door to prevent injury or damage. This is a federal safety standard.
Additionally, the opener has built-in force and limit settings. The 'down limit' setting tells the opener how far down the door should travel before stopping. The 'down force' setting determines how much resistance the opener can encounter before it stops or reverses, acting as another layer of protection if the door hits an unexpected obstruction. If these are incorrectly set or if there's physical resistance (like a bent track), the door's closing cycle will be interrupted, leading to it not closing all the way or reversing prematurely.
Step-by-Step Fix
Here’s how to diagnose and fix the most common reasons your garage door won’t close completely.
1. Check the Safety Sensors for Obstructions — Inspect and clear anything blocking the beam.
- Walk-around Inspection: Stand outside your garage and look for anything that might be in the path of the safety sensors. This includes leaves, cobwebs, tools, toys, or even small rocks.
- Clear the Path: Gently remove any visible obstructions. Even a small spiderweb can be enough to disrupt the infrared beam.
- Test: Attempt to close the door. If it works, you've found the issue.
2. Clean the Safety Sensor Lenses — Wipe down the sensor eyes for a clear signal.
- Locate Sensors: Identify the two safety sensors, usually mounted on the door tracks, 4-6 inches from the floor, on either side of the garage opening.
- Clean Lenses: Use a soft, clean cloth to gently wipe the lenses of both sensors. Dirt, dust, and grime can obscure the beam. Avoid harsh cleaners.
- Test: Try closing the door again.
3. Align the Safety Sensors — Ensure the sensors are pointing directly at each other.
- Identify Indicator Lights: Many sensors have LED indicator lights. One sensor's light should be steadily on (receiving the beam), and the other's (sending the beam) should also be on. If only one is on, or if one is blinking, it indicates misalignment or an obstruction.
- Adjust if Needed: Loosen the wing nut or screw holding each sensor. Gently pivot the sensors until both indicator lights are solid (not blinking). You may need to make small, subtle adjustments. A good trick is to use a straight edge or a string held taut between them to help align.
- Secure: Once aligned, tighten the wing nuts or screws.
- Test: Attempt to close the door. If the problem persists, try very fine adjustments again.
4. Inspect and Clear the Door Tracks — Look for bends, debris, or loose hardware.
- Visual Inspection: Open the garage door fully. Carefully examine both vertical and horizontal tracks for any signs of damage, dents, or debris. Look for loose bolts or screws.
- Remove Debris: Use a vacuum or a rag to clear any dirt, small pebbles, or hardened grease from the tracks.
- Check for Bends: Even a slight bend in the track can cause the door to bind. If you find a minor bend, you might be able to gently tap it back into shape with a rubber mallet and a block of wood, but be very cautious not to worsen it. For significant bends, call a professional.
- Tighten Hardware: Use a socket wrench to tighten any loose bolts or screws on the track brackets. Do not overtighten.
- Test: With the door open, try closing it to see if the issue is resolved.
5. Adjust the Down Limit Setting — Tell the opener how far the door should travel.
- Locate Adjustment Screws: On the back or side of your garage door opener motor unit, you'll typically find two or three adjustment screws. They are usually labeled 'UP LIMIT', 'DOWN LIMIT', and sometimes 'FORCE'. Refer to your opener's manual if unsure.
- Small Adjustments: Using a flat-head screwdriver, turn the 'DOWN LIMIT' screw a quarter turn clockwise. This tells the door to travel slightly further down.
- Test: Close the door and observe its travel. If it still doesn't close all the way, repeat the adjustment. If it reverses immediately upon touching the floor, you've gone too far; turn the screw a quarter turn counter-clockwise. Continue small adjustments until the door closes fully and gently compresses against the floor seal.
6. Adjust the Down Force Setting — Fine-tune the safety sensitivity.
- Locate Adjustment Screw: Find the 'DOWN FORCE' adjustment screw on your opener. It's often near the limit screws.
- Increase Force (Slightly): Turn the 'DOWN FORCE' screw a quarter turn clockwise. This makes the opener less sensitive to resistance when closing, allowing it to push down a bit harder.
- Test Safety Reversal: Crucially, after adjusting the force, place a 2x4 piece of wood flat on the floor in the door's path. Close the door. It must reverse immediately upon contacting the wood. If it doesn't, the force setting is too high and is dangerous. Decrease the force by turning the screw counter-clockwise until it reverses correctly.
- Test Door: Once safety reversal is confirmed, test the door closing normally.
7. Check for a Stuck Travel Module (Screw Drive Openers) — Inspect the moving carriage.
- Unplug Opener: For safety, unplug the garage door opener from the ceiling outlet.
- Inspect Trolley: For screw-drive openers, visually inspect the trolley (the part that moves along the screw drive). Sometimes, the internal components can seize or become damaged, preventing full travel.
- Lubricate (Optional): If the trolley appears to be sticking, very lightly apply a silicone-based garage door lubricant to the screw drive, avoiding over-lubrication which attracts dirt.
- Professional Help: If the travel module is visibly broken or stuck, it's often a job for a professional.
8. Examine the Door Itself — Look for damage or binding.
- Manual Operation: Disconnect the emergency release cord (usually a red handle) to put the door in manual mode.
- Observe Movement: Carefully lift and lower the door by hand. It should move smoothly and easily without excessive resistance.
- Look for Damage: Inspect panels for bends, cracks, or serious damage. Check rollers for wear or if they've popped out of the track. If the door binds significantly or feels extremely heavy, there could be a spring issue (call a pro!) or serious track/roller damage.
- Re-engage Opener: Once you've inspected, reconnect the emergency release cord.
Common Causes
- Misaligned or Obstructed Safety Sensors: By far the most common reason. Anything breaking the invisible beam will prevent the door from closing fully.
- Incorrect Down Limit Setting: The opener thinks it has reached the ground before the door is actually closed, causing it to stop prematurely.
- Bent or Damaged Tracks: Physical damage to the tracks can cause rollers to bind, creating resistance the opener interprets as an obstruction.
- Debris in Tracks or Door Path: Small objects, dirt, or even loose insulation can impede the door's travel.
- Weak Down Force Setting: The opener might be reversing because it's encountering too much (or even normal) resistance, thinking it's hitting something when it's just the ground.
- Damaged Travel Module (Screw Drive): The internal mechanism that moves the door along a screw drive can wear out or break.
- Worn Rollers or Hinges: Old, damaged rollers or stiff hinges can create resistance.
Common Mistakes
- Ignoring the Safety Sensors: Many homeowners overlook the sensors, immediately jumping to opener adjustments. Always check and clean these first.
- Adjusting Limit/Force Too Drastically: Making large turns (half or full turns) to the limit or force screws can throw off the settings entirely, making the problem worse. Always make quarter-turn adjustments.
- Over-lubricating Tracks: Tracks should generally not be lubricated as this can attract dirt and grime. Only rollers and hinges benefit from specific silicone-based lubrication.
- Forgetting to Test Safety Reversal: After adjusting down force, always test the safety reversal with a 2x4. A door that doesn't reverse is a serious safety hazard.
- Attempting Spring Repairs: Garage door springs are under extreme tension and can be incredibly dangerous. Never attempt to adjust, repair, or replace them yourself.
- Ignoring Bent Tracks: Bending a track back into shape without proper tools or knowledge can cause further warping or make the door bind even more. Small cosmetic bends might be fixable, but significant damage requires a pro.
Cost & Time Breakdown
| Task | DIY Cost | Pro Cost | Time |
|---|---|---|---|
| Safety Sensor Cleaning/Alignment | $0 | $75–$150 | 5–15 minutes |
| Track Inspection/Debris Removal | $0 | $75–$150 | 5–10 minutes |
| Limit/Force Adjustment | $0 | $75–$150 | 10–20 minutes |
| Minor Track Straightening (DIY) | $0 | N/A | 10–15 minutes |
| Roller/Hinge Lubrication | $5–$10 | Included in service | 5 minutes |
| Total DIY (if applicable) | $0–$10 | N/A | 20–60 min |
Tips & Prevention
- Monthly Sensor Check: Once a month, check your safety sensors. Place an object (like a box) in the door's path and try to close it. The door should immediately reverse.
- Annual Lubrication: Lubricate rollers, hinges, and springs annually with a silicone-based garage door lubricant. Avoid WD-40 or grease which attract dirt.
- Keep Tracks Clear: Regularly sweep or vacuum the garage floor near the tracks to prevent debris buildup.
- Visual Inspection: Periodically inspect tracks, rollers, and cables for signs of wear, rust, or damage. Address small issues before they become big ones.
- Test Door Balance: Disengage the opener and manually lift the door to waist height. It should stay there without falling or rising. If it doesn't, your springs may need adjustment by a professional.
- Check Weather Stripping: Ensure the bottom weather stripping is intact and not catching on anything. Replace it if it's damaged.
When to Call a Professional
While many garage door closing issues are DIY-friendly, some problems warrant professional attention. Always call a licensed garage door technician if you suspect issues with the torsion springs or extension springs, as these are under extreme tension and can cause severe injury if mishandled. Similarly, if the garage door opener motor is making unusual grinding noises, smells burnt, or if the logic board appears damaged, professional diagnosis and repair are necessary. Significant damage to the door panels, severely bent tracks that cannot be easily straightened, or broken cables also indicate it's time to bring in an expert to ensure safe and correct repair. Do not attempt high-tension spring or electrical opener repairs yourself.
Related Articles
Keep troubleshooting with these hand-picked guides from FixlyGuide:
- The 3 Hidden Reasons Your Garage Door Stops Mid-Close (And the $0 Fix) — Your garage door stopping mid-close is usually a sign of misaligned safety sensors, a blocked path, or incorrect travel limits, all fixable…
- The 3 Hidden Reasons Your Garage Door Won't Fully Close (And The Easy Fixes) — Before you call a pro, troubleshoot the common reasons your garage door won't close all the way, from misaligned sensors to travel limit se…
- The 3 Hidden Reasons Your Garage Door Won't Close (And How to Fix Each) — A garage door that won't close completely is a common, frustrating issue often caused by simple sensor obstructions, misalignments, or trav…
- The 3 Hidden Reasons Your Garage Door Won't Close (And The 10-Minute Fix) — A garage door that won't close completely is a common, frustrating, and often simple problem to fix with basic tools and a few minutes of y…
- The 5-Minute Trick to Fix a Window That Won't Stay Open (No Tools Needed!) — Discover the surprisingly simple reasons why your window keeps sliding shut and how to fix it in minutes, often without any tools.
- Is Your Gutter Sagging After Every Storm? The Hidden Flaw Most Homeowners Miss — Discover the overlooked reason your gutters sag after every storm and learn the lasting fix that most homeowners miss.
Recommended for DIYers & woodworkers
Sponsored
The Top 20 Tools for Workshops of Any Budget
No stationary machines or power tools required — plus 3 fundamental tools that can't be bought at any price.
Get the free guide
Ted's Woodworking — The #1 Woodworking Resource
Detailed instructions, dimensioned drawings, materials & cutting lists, and 3D schematics for every skill level.
See the plansSponsored: links above are affiliate links. FixlyGuide may earn a commission on qualifying purchases — at no extra cost to you.
Frequently asked questions
Why does my garage door stop and go back up when closing?+
This is almost always a safety sensor issue. Either something is blocking the infrared beam between the two sensors, the sensor lenses are dirty, or the sensors are misaligned and can't 'see' each other properly. Clean the lenses and ensure they are pointing directly at one another.
How do I reset my garage door opener after adjusting the sensors?+
In most cases, you don't need to 'reset' the opener after adjusting sensors. Once the sensors are clear and aligned (indicated by solid green/amber lights), the door should operate normally. If it still acts up, try unplugging the opener for 30 seconds and then plugging it back in to soft-reset its logic board.
Can I lubricate my garage door tracks?+
No, you should generally *not* lubricate garage door tracks. Lubricant attracts dirt and grime, which will eventually cause the rollers to stick. Instead, use a silicone-based garage door lubricant on rollers, hinges, and springs annually. Simply keep the tracks themselves clean and free of debris.


Discussion
Loading comments…