Tools & materials you'll need
Affiliate links- AmazonGarage door lubricantsilicone-based, for prevention
As an Amazon Associate FixlyGuide earns from qualifying purchases — at no extra cost to you. Prices and availability are accurate as of publication and subject to change.
Quick Answer
AA garage door that stops short of closing completely is a common, frustrating issue often stemming from easy-to-fix problems with its safety sensors or travel limits. Most frequently, the culrpit is a minor obstruction blocking the photoelectric safety sensors mounted near the bottom of your garage door tracks. Less commonly, but still DIY-friendly, the sensors themselves might be slightly misaligned, or the door's 'down' travel limit—which tells the opener how far to close—needs a simple adjustment. Diagnosing and resolving these issues usually takes less than 30 minutes with basic tools.
The Problem
Your garage door, a heavy and complex system, suddenly decides to stop its descent a few inches or even a few feet above the floor, leaving a gap. This isn't just an inconvenience; it's a security risk and exposes your garage to pests and the elements. The door might reverse immediately after hitting the floor or simply stop mid-air. You might hear the opener motor working, but the door just won't complete its full closing cycle. This problem most commonly points to the safety mechanisms designed to prevent the door from closing on an obstruction or person. Occasionally, it signals that the opener's internal programming, specifically its 'travel limits,' needs recalibration.
How It Works
Modern automatic garage door openers are equipped with crucial safety features that dictate how the door operates, primarily based on two core systems: safety sensors and travel limits.
Safety Sensors (Photoelectric Eyes): These are small, electronic 'eyes' mounted about 4-6 inches above the garage floor on each side of the door opening. One sensor emits an invisible infrared light beam, and the other receives it. When this beam is interrupted while the door is closing, the opener's control board instantly reverses the door's direction, preventing potential injury or damage. Think of it as a laser tripwire. If the beam is blocked by a stray ball, a garden tool, or even a spiderweb, or if the sensors themselves are out of alignment, the opener thinks there's an obstruction and won't allow the door to close completely.
Travel Limits: Inside your garage door opener's housing, there are settings for 'up' and 'down' travel. These limits tell the opener exactly how far the door should open and close. They are essentially programmed stop points. If the 'down' travel limit isn't set correctly, the opener might think the door has already reached the floor even when it hasn't, causing it to stop prematurely. Conversely, if the limit is set too low, the door might try to force itself into the floor, causing it to reverse due to excessive force (which is sensed by another safety feature called force limits). Most modern openers have electronic travel limits adjusted with buttons, while older models use mechanical screws.
When a garage door won't close all the way, it's usually one of these systems acting up. The opener's control board processes signals from these components. If the safety beam is broken or the travel limit thinks the door is 'down' prematurely, the board commands the motor to stop or reverse, leaving your door open.
Step-by-Step Fix
Safety Note: Always unplug your garage door opener before performing any work on the tracks, springs, or cables. The door itself can be heavy and under tension. Only proceed with simple sensor and limit adjustments; for more complex issues, call a professional.
-
Inspect the Safety Sensors for Obstructions — Clear the path
- Look closely at the area between the two small safety sensors (photoelectric eyes) located near the bottom of your garage door tracks. Is there anything physically blocking the invisible beam? This could be leaves, dirt, a child's toy, a garden hose, or even a thick spiderweb. Small items can easily go unnoticed.
- Action: Gently sweep or wipe away any debris. Sometimes, simply repositioning items stored near the door opening is enough.
- If this doesn't work: Proceed to the next step, as the obstruction might be less visible or the sensors are misaligned.
-
Clean the Sensor Lenses — Restore clear vision
- The lenses on the safety sensors can become dirty or dusty, obscuring the beam. Even a thin film can disrupt the signal.
- Tool: A soft, clean cloth (like a microfiber cloth).
- Action: Lightly wipe the lens on both the sending and receiving sensors. Avoid harsh chemicals as they can damage the plastic.
- If this doesn't work: The problem might be alignment, which is the next logical step.
-
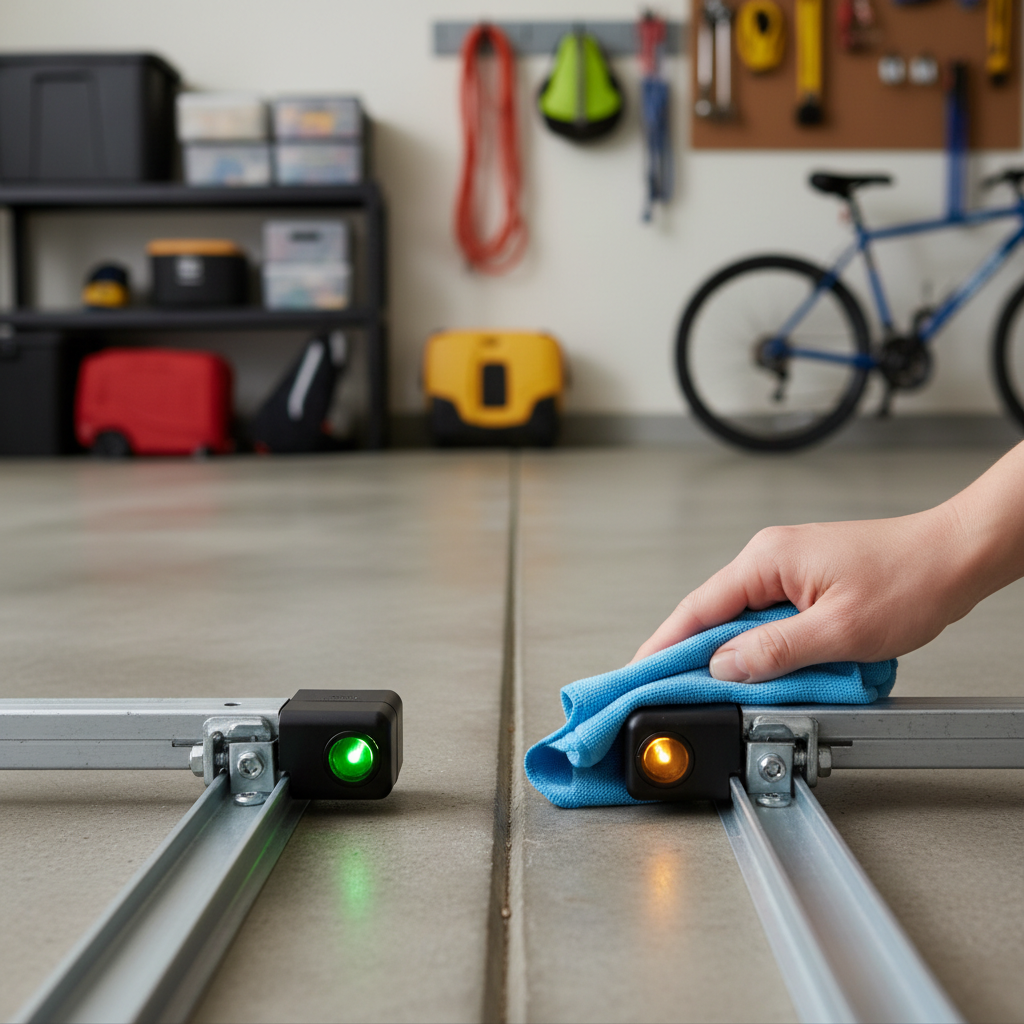
Check Sensor Alignment — Re-point the eyes
- The sensors must be perfectly aligned for the beam to connect. A slight bump from a car or equipment can knock them out of position. You'll typically see an indicator light on one or both sensors: a solid light usually means good alignment, while a flickering or off light means misaligned or obstructed.
- Action: Gently adjust each sensor by hand, aiming them directly at each other. Most sensors have an adjustable bracket. You're looking for the indicator light to glow solid on both sensors (or the receiving sensor, depending on your model).
- Tip: If you're having trouble, try holding a long, straight object (like a broom handle) against the wall and using it as a guide to ensure they're level and pointing straight across.
- Sub-bullet if this doesn't work: If you can't get a solid light, check the wiring for obvious damage like kinks or cuts. Loose wires at the sensor or opener terminals can also cause issues. Tighten any loose screws on the terminals. If wiring is damaged, consult a professional.
-
Inspect Sensor Mounting Brackets — Ensure stability
- If the brackets holding the sensors are loose, bent, or damaged, they won't hold the sensors in proper alignment.
- Action: Try to wiggle each sensor. If it moves easily, tighten the screws securing the bracket to the track or wall. If a bracket is bent, gently try to straighten it. Severely damaged brackets may need replacement.
-
Check the Down Travel Limit — Tell the door where to stop
- If the sensors are clear and aligned, the issue might be the opener's 'down' travel limit. This setting tells the door where to stop its closing cycle. If set too high, the door will stop short of the floor.
- Location: Look for 'Limit Adjustment' controls on the back or side panel of your garage door opener motor unit. These are often labeled 'Down' or represented by an arrow pointing down. Modern openers usually have push buttons, while older models have screws (often marked with an arrow indicating increase/decrease).
- Action (Electronic Limits): Press and hold the 'Down' adjustment button briefly (usually a small decrease). Cycle the door to test. Repeat small adjustments until the door closes fully and gently against the floor without reversing. Consult your owner's manual for specific button sequences.
- Action (Mechanical Limits): Use a flathead screwdriver to turn the 'Down' limit screw a quarter turn clockwise (to increase down travel). Cycle the door to test. Repeat small adjustments until the door closes properly.
- Safety Tip: Do not over-adjust. If the door closes too forcefully and immediately reverses, you've set the limit too low. Back off the adjustment until it closes gently. Forcing the door can damage the opener or the door itself.
-
Verify Force Limit (if door reverses immediately upon touching floor) — Prevent excessive force
- Sometimes, if the door touches the floor too hard, the 'down force' setting kicks in and causes it to reverse. This is a safety feature to prevent the door from crushing something. If the travel limit is almost right but the door still reverses, the force limit might be too sensitive.
- Location: Find the 'Force Adjustment' controls on your opener, often labeled 'Down Force' or just 'Force'. These are typically separate from travel limits and may be rotary knobs or screw adjustments.
- Action: Make very small adjustments (quarter turns for screws, single taps for buttons) to decrease the sensitivity of the down force (often by turning clockwise or pressing the '+' button). Test the door after each tiny adjustment. The goal is for the door to close gently and stay closed.
- Important: Never disable or significantly increase the force limit beyond manufacturer recommendations. This is a critical safety feature. If the door is genuinely heavy or binding, you need a professional, not a higher force limit.
-
Check Door Tracks and Rollers — Smooth operation
- While less common than sensor or limit issues, a physically obstructed or damaged track, or binding rollers, can prevent the door from closing properly. The opener might sense increased resistance and stop.
- Action: Visually inspect the entire length of both tracks. Look for dents, bends, or objects obstructing the rollers. Check the rollers themselves for excessive wear or damage. Remove any debris. Lubricate the tracks and rollers (see prevention section).
- Pro Tip: If the door binds significantly or looks like it's coming off the track, stop work immediately. Adjusting tracks can be dangerous and is best left to a professional, as it can affect springs and cables.
Common Causes
- Obstructed Safety Sensor Beam: The most frequent culprit. Even a small item like a stray leaf, pebble, or spiderweb breaks the infrared beam between the photoelectric eyes.
- Misaligned Safety Sensors: If the sensors are bumped or slightly out of alignment, the light beam cannot accurately reach the receiver, mimicking an obstruction.
- Dirty Sensor Lenses: A film of dust or grime on the sensor lenses can weaken or block the infrared signal.
- Incorrect Down Travel Limit: The opener's internal setting that tells the door where to stop in its closing cycle is set too high, causing the door to stop prematurely.
- Loose or Damaged Wiring to Sensors: Frayed, cut, or loose wires connecting the sensors to the opener can interrupt the signal.
- Sun Glare on Sensors: In rare cases, direct, intense sunlight can interfere with the infrared signal of the receiving sensor, especially if it's hitting the lens directly.
Common Mistakes
- Ignoring Sensor Lights: Many homeowners overlook the small indicator lights on the sensors. A solid light usually means the sensor is properly aligned and receiving a signal, while a flickering or off light clearly indicates an issue. Don't troubleshoot until both lights are solid.
- Over-Adjusting Travel Limits: Making large or multiple adjustments without testing in between can throw the door's calibration way off, creating more problems than you solve. Make small, incremental changes.
- Increasing Force Limits Blindly: If the door is struggling to close, homeowners sometimes increase the down force limit excessively. This is dangerous as it overrides a safety feature. If the door needs excessive force, there's a mechanical issue (like binding tracks or worn rollers) that needs professional attention, not just more power.
- Not Checking Wiring: Loose or corroded wiring connections at the sensor or the opener motor head are often overlooked. A quick check and tightening can sometimes solve the issue.
- Forgetting to Test Safeties: After any adjustment, always test the safety reversal system by placing an object (like a 2x4 laid flat) on the floor in the door's path. The door should reverse upon contact. If it doesn't, the door is unsafe.
Cost & Time Breakdown
| Task | DIY Cost | Pro Cost | Time |
|---|---|---|---|
| Clear / Clean Sensors | $0 | $0–$50 (service call) | 5–10 minutes |
| Align Safety Sensors | $0 | $0–$50 (service call) | 10–20 minutes |
| Adjust Travel Limits | $0 | $0–$100 (service call) | 15–30 minutes |
| Replace Sensors (if truly faulty) | $30–$60 | $100–$250 | 30–60 minutes |
| Minor Wire Repair | $5–$15 | $75–$150 | 15–30 minutes |
Tips & Prevention
- Regular Sensor Check: Once a month, quickly check the area around your safety sensors for obstructions and ensure their indicator lights are solid. A quick wipe down with a soft cloth also helps maintain clear lenses.
- Lubricate Moving Parts: Every 3-6 months, lubricate your garage door's moving parts (rollers, hinges, and springs) with a silicone-based garage door lubricant. This prevents binding and ensures smooth operation, reducing strain on the motor and preventing the door from stopping due to resistance.
- Test Safety Reversal: Annually, place a 2x4 board flat on the garage floor where the door closes. Close the door; it should immediately reverse when it touches the board. If it doesn't, the safety feature is failing and needs professional attention.
- Keep Tracks Clear: Routinely inspect the garage door tracks for debris, dents, or signs of bending. Clear any obstructions and call a professional if tracks appear damaged.
- Monitor Spring & Cable Condition: While not directly related to stopping short, damaged springs or frayed cables can put immense strain on your opener and lead to more severe issues. Visually inspect them monthly for signs of wear. Never attempt to repair or adjust garage door springs or cables yourself; they are under extreme tension and extremely dangerous.
When to Call a Professional
While many garage door closing issues are DIY-friendly, certain problems absolutely warrant calling a licensed garage door technician. If, after checking sensors and making minor travel limit adjustments, your door still won't close properly, or if you suspect mechanical damage, it's time to step back. You should immediately call a professional if you observe damaged garage door springs, frayed or broken cables, or bent/cracked tracks; these components are under extreme tension and DIY repair attempts are extremely dangerous and can cause severe injury or further damage. Similarly, if the opener motor unit is making unusual grinding noises, smells like burning, or fails to respond at all, there might be internal electrical or mechanical failures beyond homeowner repair. Professionals have the specialized tools, training, and experience to safely diagnose and repair these complex issues, ensuring your garage door operates safely and reliably.
Related Articles
Keep troubleshooting with these hand-picked guides from FixlyGuide:
- The 3-Minute Trick That Fixes a Finicky Garage Door (And Saves a Service Call) — Don’t let a garage door that won't close all the way frustrate you—a simple adjustment to your opener's travel limits might be all it needs.
- The 3 Hidden Reasons Your Garage Door Won't Close (And The 10-Minute Fix) — A garage door that won't close all the way is a common, frustrating issue often stemming from simple obstructions or sensor misalignment.
- The 3 Hidden Reasons Your Garage Door Won't Fully Close (And The Easy Fixes) — Before you call a pro, troubleshoot the common reasons your garage door won't close all the way, from misaligned sensors to travel limit se…
- The 5-Minute Trick to Fix a Door That Won't Latch (No New Hardware Needed) — Discover the simple, often-overlooked reason your door won't latch and how to fix it in minutes without replacing any parts.
- The 5-Minute Trick to Fix a Door That Won't Latch (No New Hardware Needed) — Discover the simple, often overlooked reason your door isn't latching and how to fix it in minutes with basic tools, no new hardware requir…
- The Secret to a Flawless Drywall Patch Is In the Paper — Frustrated by drywall patches that always show through? That telltale bump or sanding mark can ruin a perfect wall. Discover the 'Californi…
Get the print-ready PDF of this guide
A clean, ad-free, printable version you can keep on your phone or pin to the workshop wall. Free with a FixlyGuide account.
- Print-optimized layout
- Tools, materials & every step included
- Saved to your account
Recommended for DIYers & woodworkers
Sponsored
The Top 20 Tools for Workshops of Any Budget
No stationary machines or power tools required — plus 3 fundamental tools that can't be bought at any price.
Get the free guide
Ted's Woodworking — The #1 Woodworking Resource
Detailed instructions, dimensioned drawings, materials & cutting lists, and 3D schematics for every skill level.
See the plansSponsored: links above are affiliate links. FixlyGuide may earn a commission on qualifying purchases — at no extra cost to you.
Frequently asked questions
Why does my garage door stop and go back up?+
Most often, your garage door stops and reverses because its safety sensors detected an obstruction in the door's path. This could be anything from a spiderweb to a toy. It can also be caused by misaligned or dirty sensor eyes.
How do I know if my garage door sensors are bad?+
You can usually tell if your garage door sensors are faulty if their indicator lights are off, flickering, or remain off even after you've cleared obstructions and realigned them. If the door only closes by holding down the wall button, it's a strong sign the sensors are not communicating correctly.
How do I adjust the travel on my garage door?+
To adjust the travel on your garage door, locate the 'travel limit' adjustment screws or buttons on your opener motor unit. For down travel, make small incremental adjustments (a quarter turn or brief button press) according to your opener's manual, retesting the door after each adjustment until it closes fully and gently.
What if my garage door won't close but the sensors are lit?+
If your garage door sensors are lit and appear to be working but the door still won't close all the way, the problem is likely an incorrectly set down travel limit. The opener thinks the door has already reached the floor. You'll need to adjust the 'down' travel setting on your opener's motor head.


Discussion
Loading comments…