
Tools & materials you'll need
Affiliate links- AmazonWire brush or fine-grit sandpaperFor cleaning corrosion
- AmazonCompressed air canFor cleaning chime unit
- AmazonElectrical tape or wire connectorsFor securing connections
- AmazonNew doorbell buttonIf old one is faulty, ensure correct voltage
- AmazonNew doorbell transformerIf old one is faulty, ensure correct voltage
As an Amazon Associate FixlyGuide earns from qualifying purchases — at no extra cost to you. Prices and availability are accurate as of publication and subject to change.
Quick Answer
Most doorbell problems, from complete silence to inconsistent ringing, can be traced back to one of three core components: the button, the transformer, or the chime unit. Often, the issue is as simple as a stuck button, a loose wire, or a low-voltage transformer. With a few basic tools and a careful approach, you can diagnose and fix most common doorbell malfunctions without needing a professional.
The Problem
You press the doorbell button, but nothing happens. No triumphant ding-dong, no subtle ding, just silence. Or perhaps it works sometimes, and other times it's a fickle friend, refusing to announce visitors. A non-functional doorbell isn't just an inconvenience; it can mean missed deliveries, unexpected guests, or even a safety concern if you're relying on it to alert you to someone at your door. The good news is that most residential doorbell systems are relatively simple, and with a bit of systematic troubleshooting, you can likely restore that essential ding-dong.
How It Works
Understanding how a standard wired doorbell system operates is the first step to pinpointing what's gone wrong. Most residential wired doorbells are low-voltage electrical systems, typically operating between 10 to 24 volts AC. Here's a breakdown of the key components and their roles:
-
The Transformer: This is the heart of your doorbell's power supply. It's a small, usually metallic box (often mounted near your electrical panel, in a closet, or on a junction box in the garage or basement) that converts your home's standard 120-volt AC electricity into the low-voltage AC required by the doorbell system. It has two sets of terminals: two for the 120V input and two for the low-voltage output that feeds the rest of the doorbell circuit.
-
The Doorbell Button: Located outside your door, this is a simple momentary switch. When you press the button, you complete an electrical circuit. Inside the button assembly, two small wires are connected to terminals. When the button is pressed, a small metal contact bridges these terminals, allowing current to flow.
-
The Chime Unit: This is the part that makes the sound. Most traditional chime units contain one or two electromagnets and plungers (or strikers) that strike metal tone bars. When electricity flows through the circuit, the electromagnet pulls its corresponding plunger, which then hits a tone bar, producing the iconic ding or ding-dong. More modern electronic chimes might use a speaker, but the principle of needing an electrical signal remains.
-
Wiring: Low-voltage wires connect the transformer to the doorbell button, and the doorbell button to the chime unit. Another set of wires connects the chime unit back to the transformer, completing the circuit. These wires are typically 18-gauge or 20-gauge, and because they carry low voltage, they are generally safe to work with provided the primary power to the transformer is off.
When a visitor presses the button, it closes the circuit, allowing low-voltage electricity to flow from the transformer, through the button, to the chime unit, and back to the transformer. This sudden influx of power energizes the electromagnets in the chime unit, causing the plungers to strike the tone bars and create the sound. Any interruption in this circuit—whether it's a lack of power from the transformer, a faulty button not closing the circuit, or a problem within the chime unit itself—will prevent the doorbell from ringing.
Step-by-Step Fix
1. Check the Basics — Is it a simple power issue?
Start with the easiest possibilities. Ensure your home's electricity is on and there haven't been any recent power outages that might have tripped a breaker. While rare for dedicated doorbell circuits, it's worth a quick check.
- Is it a Wireless Doorbell? If so, check batteries in both the button and the chime unit. These are often the culprits for wireless models. Replace them with fresh batteries before proceeding.
- Listen for the Hum. Go to your transformer (usually found near the electrical panel, in a basement, or in an attic) and listen closely. A properly functioning transformer will often emit a very faint hum. If you hear nothing, it could indicate a lack of power to the transformer or a dead transformer.
2. Inspect the Doorbell Button — The most common point of failure
The outdoor button is exposed to the elements and frequent use, making it a prime candidate for malfunction. This is often the quickest fix.
- Remove the Button: Carefully pry off the doorbell button cover. It usually snaps or screws into place. Be gentle to avoid damaging the wires.
- Check for Loose Wires: Once the button is exposed, look for any wires that have come loose from their terminals. If you find one, use a small screwdriver to tighten the terminal screw securely around the wire.
- Clean Contacts: Check for corrosion or dirt on the internal contacts. Gently scrape away any buildup with a small wire brush or fine-grit sandpaper.
- Test the Button Directly: With the wires exposed, carefully touch the two wires together. If the doorbell chimes, the button itself is faulty and needs replacement. If it doesn't chime, the problem lies elsewhere in the system.
- If this doesn't work: Consider replacing the button. They are inexpensive and can wear out over time. Ensure the new button matches the voltage requirements of your system (usually labeled on the old button or transformer).
3. Troubleshoot the Chime Unit — When the sound doesn't happen
The chime unit can accumulate dust, or its mechanical components can stick or become misaligned.
- Turn off Power: Locate your home's main electrical panel and turn off the circuit breaker that supplies power to the doorbell transformer. Safety Note: Always turn off power when working with electrical components.
- Remove Chime Cover: Gently remove the cover of the chime unit. It usually slides up or snaps off.
- Clean and Inspect: Look for dust, spiderwebs, or debris that might be impeding the plungers. Use a can of compressed air or a soft brush to clean it out. Check that the plungers move freely. If they are stuck, GENTLY try to free them with your finger. Ensure they spring back easily.
- Tighten Wires: Check for loose wires within the chime unit. Just like the button, wires can come loose from vibration or age. Tighten any insecure connections.
- Check Tone Bars: Ensure the metal tone bars are securely seated and not bent or damaged. If a bar is loose, it might not produce a sound or produce a muffled one.
- If this doesn't work: With the power still off, you can visually inspect the wiring on the back of the chime unit. Look for any signs of arcing, burnt insulation, or broken wires. If you have a multimeter, you can check for continuity on the chime unit's terminals (though this requires a bit more electrical knowledge). If everything looks good and the button test earlier didn't work, the problem likely points to the transformer.
4. Fix the Doorbell Transformer — No power, no chime
The transformer is crucial. If it's not supplying power, nothing else will work. This is where a multimeter becomes very useful.
- Locate the Transformer: As mentioned, it's often near the electrical panel, in a utility closet, basement, or garage. It might be a small, metal box directly attached to a junction box.
- Verify Power at Primary (High-Voltage) Side: Safety Note: Use extreme caution when working with high voltage. If you are uncomfortable, call a professional. With the breaker ON, use a non-contact voltage tester to confirm there's 120V AC present at the transformer's input (primary) wires. If there's no power, check the breaker. If the breaker is on, and no power is detected, there's a problem with the line going to the transformer, which suggests a professional electrician is needed.
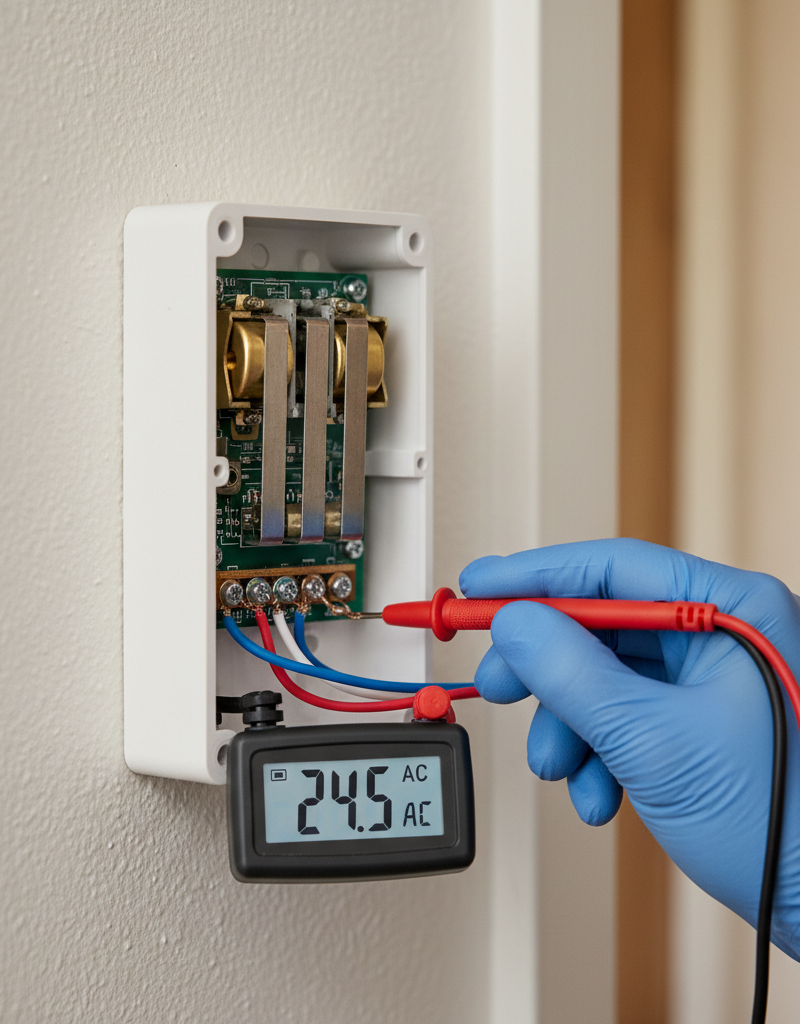
- Test the Secondary (Low-Voltage) Side: Once you've safely confirmed 120V input, turn off the breaker again. Disconnect the low-voltage wires from the secondary terminals. Turn the breaker back on. Carefully touch the probes of your multimeter (set to AC voltage, range 0-50V) to the two low-voltage output terminals of the transformer. You should read a voltage between 10V and 24V AC. If you read 0V or a very low, inconsistent voltage, the transformer is faulty and needs replacement.
- Replace the Transformer: Safety Note: Always turn off the breaker for the transformer before disconnecting any wires. Disconnect both the high-voltage (120V) and low-voltage wires. Remove the old transformer and install the new one, connecting the wires exactly as they were on the old unit. Ensure all connections are secure and well-insulated. Match the voltage output (e.g., 16V) of the old transformer to the new one.
5. Inspect the Wiring — The hidden culprit
Sometimes the issue isn't a component, but the connections themselves.
- Perform a Continuity Test: With the power off at the breaker, and using a multimeter set to continuity mode, you can test sections of your doorbell wire. Disconnect the wires at both ends (e.g., at the button and at the chime). Touch one probe to each end of a single wire. If it beeps, the wire has continuity. If not, the wire is broken and needs replacement. This is most practical if you have accessible wiring. For wires inside walls, replacement is much more involved and often requires a professional.
- Look for Damage: Visually inspect any exposed wiring for cuts, nicks, or rodent damage. While low-voltage wires are safer, damaged insulation can lead to shorts or complete breaks.
Common Causes
- Faulty Doorbell Button: The most common issue. Contacts wear out, corrode, or get stuck due to dirt, moisture, or insect nests.
- Dead Doorbell Transformer: The transformer can burn out, especially if there's a short in the system or it's simply reached the end of its lifespan. It might hum but not produce sufficient voltage.
- Jammed Chime Plunger: Dust, debris, or a bent plunger can prevent the hammer from striking the tone bar inside the chime unit.
- Loose or Corroded Wiring: Over time, wire connections can loosen from vibration, or corrosion can build up, impeding electrical flow at the button, chime, or transformer terminals.
- Incorrect Voltage: Using a doorbell button or chime unit that requires a different voltage than what the transformer provides can lead to malfunction or damage.
- Breaker Trip: Although uncommon for dedicated doorbell circuits, a tripped circuit breaker can cut power to the transformer.
Common Mistakes
- Forgetting to Turn Off Power: This is a crucial safety step when working with the transformer or anytime you are connecting or disconnecting wires. Always turn off the circuit breaker.
- Ignoring the Transformer: Many DIYers focus only on the button and chime, overlooking the transformer as the power source. Always include the transformer in your diagnostic steps.
- Not Testing the Button Directly: Skipping the step of touching the two button wires together means you might replace a good button or miss a simple wiring issue.
- Overlooking Loose Wires: Even a slightly loose wire can interrupt the circuit. Always check and tighten all terminal screws at the button, chime, and transformer.
- Using the Wrong Voltage Replacement Parts: Ensure any new doorbell button, chime, or transformer you purchase matches the voltage needs of your system. Installing a 24V chime with a 10V transformer won't work correctly.
- Assuming a Chime is Dead: Often, a chime unit just needs a thorough cleaning or a freed plunger rather than a full replacement.
Cost & Time Breakdown
| Task | DIY Cost | Pro Cost | Time |
|---|---|---|---|
| Diagnose Issue | $0 | $75–$150 | 15–30 minutes |
| Replace Doorbell Button | $10–$30 | $100–$180 | 5–15 minutes |
| Clean Chime Unit | $0 | $75–$150 | 10–20 minutes |
| Replace Doorbell Chime | $20–$80 | $120–$250 | 20–40 minutes |
| Replace Transformer | $15–$40 | $150–$300 | 30–60 minutes |
| Wiring Repair | $5–$20 (wire) | $150–$400+ | 30 mins – 2 hrs |
Tips & Prevention
- Regular Cleaning: Periodically clean your doorbell button, especially if it's exposed to weather. Use a soft cloth to wipe away dirt and debris. Consider a small amount of dielectric grease on the contacts for added protection against moisture.
- Check Connections Annually: During seasonal home maintenance, take a few minutes to check and gently tighten the terminal screws at your doorbell button, chime unit, and transformer. Loose connections are a frequent cause of intermittent issues.
- Choose Durable Buttons: If you live in an area with harsh weather, invest in a doorbell button designed for outdoor durability and moisture resistance.
- Dust the Chime Unit: Every few years, remove the chime cover and use compressed air to clear out any dust or cobwebs that could impede the plungers.
- Know Your Voltage: Before buying replacement parts, make a note of your transformer's output voltage (e.g., 16V AC) to ensure compatibility.
- Consider a Cover: For outdoor buttons, a small protective cover can shield it from direct rain and prolonged sun exposure, extending its life.
When to Call a Professional
While most doorbell issues are DIY-friendly, there are specific situations where calling a licensed electrician is the safest and most efficient option. If your troubleshooting leads you to believe there's a fault with the high-voltage (120V) wiring feeding the transformer, or if you're uncomfortable working with electrical circuits, it's time to call a pro. Additionally, if the wiring inside your walls appears damaged or needs to be replaced, an electrician has the tools and expertise to perform this work without damaging your drywall. Any persistent issues after trying the above steps, or if you suspect a deeper electrical problem, warrant a professional assessment to ensure safety and proper function.
Related Articles
Keep troubleshooting with these hand-picked guides from FixlyGuide:
- The 4 Hidden Reasons Your Doorbell Dies (And the 20-Minute Fix) — A non-working doorbell is often caused by simple, hidden issues like a tripped transformer or a corroded button, which homeowners can fix i…
- The #1 Reason Your Doorbell Suddenly Dies (and the 10-Minute Fix) — A non-functioning doorbell is often caused by a tripped transformer, a simple issue homeowners can usually resolve in minutes.
- The 3 Hidden Reasons Your Doorbell Dies (And How to Resurrect It for $0) — A non-functioning doorbell is often due to simple, overlooked issues like a tripped breaker, a stuck button, or a loose wire, and can often…
- The 5-Minute Trick That Fixes 90% of Dead Doorbells — Learn the surprisingly simple steps to diagnose and fix a non-working doorbell, from sticky buttons to blown transformers, and restore your…
- The 3 Hidden Reasons Your Garage Door Stops Mid-Close (And the $0 Fix) — Your garage door stopping mid-close is usually a sign of misaligned safety sensors, a blocked path, or incorrect travel limits, all fixable…
- The 5-Minute Trick When Your Range Hood Fan Suddenly Dies (It's Not Always the Motor) — Before you panic about a broken motor, learn the quick diagnostic steps to revive a dead range hood fan and restore proper kitchen ventilat…
Recommended for DIYers & woodworkers
Sponsored
The Top 20 Tools for Workshops of Any Budget
No stationary machines or power tools required — plus 3 fundamental tools that can't be bought at any price.
Get the free guide
Ted's Woodworking — The #1 Woodworking Resource
Detailed instructions, dimensioned drawings, materials & cutting lists, and 3D schematics for every skill level.
See the plansSponsored: links above are affiliate links. FixlyGuide may earn a commission on qualifying purchases — at no extra cost to you.
Frequently asked questions
Why does my doorbell sometimes work and sometimes not?+
Intermittent doorbell issues are often caused by loose wiring connections at the button, chime, or transformer, or by a sticky plunger inside the chime unit. Corrosion on the contacts of the doorbell button can also lead to inconsistent operation. A thorough cleaning and tightening of connections usually resolves this.
Where is the doorbell transformer usually located?+
The doorbell transformer is typically a small, metallic box found near your home's main electrical panel, in a utility closet, a basement, an attic, or sometimes mounted directly to a junction box in a garage. It converts your home's standard voltage to the low voltage required by the doorbell system.
How can I tell if my doorbell transformer is bad?+
You can test a doorbell transformer with a multimeter set to AC voltage. After safely turning off the breaker, disconnect the low-voltage wires, turn the breaker back on, and check the voltage across the two low-voltage terminals. A reading of 0V or significantly below its stated output (e.g., 16V) indicates a faulty transformer that needs replacement.
Is it safe to replace a doorbell transformer myself?+
Replacing a doorbell transformer involves working with both low-voltage and high-voltage (120V) wiring. While the low-voltage side is generally safe, connecting the high-voltage input requires turning off the appropriate circuit breaker and careful handling. If you're uncomfortable or inexperienced with electrical work, it's best to call a licensed electrician.
Can a doorbell button get stuck?+
Yes, doorbell buttons can get stuck or worn out. Dirt, moisture, insect nests, or simple mechanical wear can cause the internal contacts to remain closed or open, preventing the doorbell from ringing consistently or at all. Replacing a faulty button is usually a quick and inexpensive fix.


Discussion
Loading comments…