
Tools & materials you'll need
Affiliate links- AmazonSmall wire brush or fine-grit sandpaperFor cleaning corroded terminals
- AmazonRubbing alcohol and cotton swabsFor cleaning button contacts
- AmazonReplacement doorbell buttonIf button is faulty
- AmazonReplacement doorbell transformerIf transformer is faulty, match voltage
- AmazonReplacement doorbell chime unitIf chime is faulty
As an Amazon Associate FixlyGuide earns from qualifying purchases — at no extra cost to you. Prices and availability are accurate as of publication and subject to change.
Quick Answer
Most non-working doorbell issues stem from common problems like a stuck button, a tripped transformer, or corroded wiring. Don't immediately assume the worst – many fixes are simple, involving a quick check of the button, the chime unit, and the transformer. With a few basic tools and a systematic approach, homeowners can often diagnose and fix these problems in under an hour, restoring their doorbell's function without needing a professional.
The Problem
You push your doorbell button, but nothing happens. No chime, no buzz, just silence. This common household annoyance can leave you wondering if guests are arriving unnoticed or if important deliveries are being missed. A non-working doorbell isn't just an inconvenience; it can be a security concern and a source of frustration. While the symptom is simple – no ring – the underlying cause can range from a minor issue like a dirty button to a more complex electrical problem that requires careful investigation. Many homeowners immediately fear a costly repair or the need for a new system, but often, the solution is much simpler and cheaper than anticipated.
How It Works
Understanding how a wired doorbell system functions is key to troubleshooting it. A typical wired doorbell system consists of three main components: the button, the transformer, and the chime unit.
When you press the doorbell button, you complete a low-voltage electrical circuit. This button acts as a momentary switch. Inside the button, two contacts briefly touch when pressed, allowing electricity to flow. This circuit originates from the transformer. The transformer is vital because it converts the standard 120-volt alternating current (AC) from your home's electrical system down to a much lower, safer voltage, typically 10 to 24 volts AC, which is suitable for the doorbell system. Most doorbell transformers are small, rectangular boxes often found mounted to a junction box in an attic, basement, utility closet, or near the main electrical panel. Sometimes, they are even found inside the chime unit itself or in less obvious locations like behind an access panel. The important thing is that it is always connected to a 120V household circuit, so finding it is crucial for safety and diagnosis.
Once the circuit is completed by pressing the button, this low-voltage current travels through thin wires to the chime unit. The chime unit houses electromagnets and plungers (or strikers) that, when energized, strike metal tone bars or bells to create the distinctive doorbell sound. Different chime units have varying mechanisms, from simple two-tone chimes to more elaborate melodic ones, but the principle remains the same: electrical energy is converted into mechanical motion to produce sound. There are typically three terminals on a chime unit: one for the transformer wire, one for the front door button wire, and one for the back door button wire (if applicable). These wires are often small gauge, typically 18- or 20-gauge, and can become brittle or corroded over time. When the button is released, the circuit breaks, and the chime returns to its resting state, waiting for the next visitor.
Step-by-Step Fix
Before you begin, remember to work safely. While doorbell systems operate on low voltage, the transformer is connected to your home's main electrical supply. Turn off the power to the doorbell circuit at your electrical panel before working on the transformer or any wiring connections. Use a non-contact voltage tester to confirm the power is off.
Step 1: Inspect the Doorbell Button — The most common culprit
Start your troubleshooting directly at the source: the doorbell button itself. This is often the simplest fix and the most overlooked.
- Test for stickiness: Press the button multiple times. Does it feel stuck or spongy? Sometimes the button gets jammed in the 'pressed' position, or dirt and debris accumulate around it, preventing it from making a good connection.
- Look for damage: Examine the button for visible cracks, corrosion, or loose wires. Outdoor buttons are exposed to the elements and can degrade over time.
- Clean the button: If it feels sticky, try cleaning around the edges with a cotton swab dipped in rubbing alcohol. For a more thorough cleaning, carefully pry the button cover off (if possible) and clean the internal contacts.
- Check wiring: With the power off, carefully remove the button from the wall. You'll usually find two small wires connected to screw terminals. Check if these wires are loose, corroded, or broken. Lightly tug on them to see if they're securely fastened. If they're corroded, gently scrape them clean with a small screwdriver or sandpaper. Reattach any loose wires securely. Consider bypassing the button: Briefly touch the two wires together that were connected to the button (do not do this if you bypassed the transformer power). If the chime rings, the button is faulty and needs replacement.
Step 2: Examine the Chime Unit — Dust, debris, or a dead insect can stop the music
Next, move to the chime unit, which is typically mounted inside your home, often in a hallway or living area.
- Remove the cover: Carefully pull or unclip the cover to expose the internal mechanisms.
- Clear debris: Look for obvious obstructions like dust, spiderwebs, small insects, or even paint splatters that could be preventing the plungers from striking the tone bars. Use a soft brush, a can of compressed air, or a vacuum cleaner with a brush attachment to gently clear away any debris.
- Check for loose wires: Inspect the wiring connections at the chime unit's terminals. There are usually three terminals: one for the common wire from the transformer, one for the front door button, and one for the back door button (if you have one). Ensure all wires are securely attached and free from corrosion. Tighten any loose screws.
- Inspect plungers/strikers: In most mechanical chimes, you'll see small plungers or strikers that move to hit the metal bars. Gently try to move them with your finger. They should move freely. If they're stiff or stuck, a tiny drop of lubricating oil (like silicone spray or a very light machine oil, applied sparingly with a cotton swab) might free them up. Do not over-lubricate.
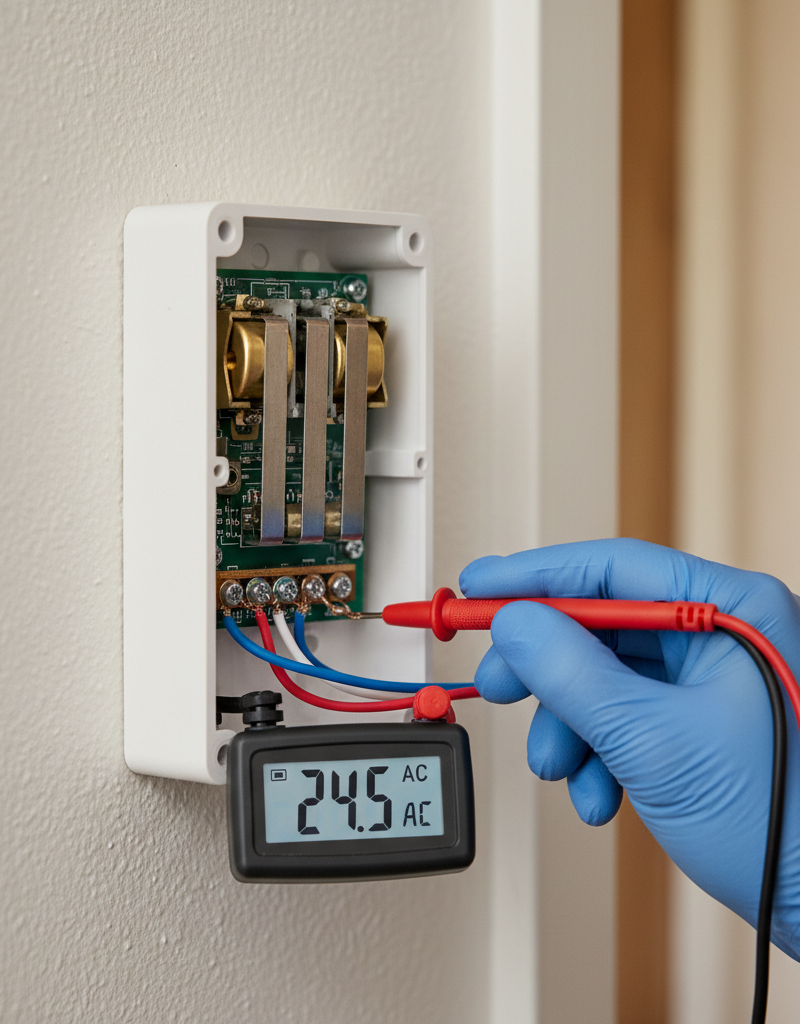
- Test transformer voltage at the chime (Optional but recommended): With the power back on, use a multimeter to check the voltage between the transformer terminal and a door button terminal on the chime. You should read a voltage between 10V and 24V AC. If you read 0V, the problem is likely with the transformer or its wiring.
Step 3: Locate and Inspect the Transformer — The heart of the system
The transformer converts your home's high voltage to the low voltage needed for the doorbell. This is a critical component.
- Find its location: Doorbell transformers are often found near the electrical panel, in a basement, attic, crawl space, or sometimes inside the chime unit's housing. They are usually small, rectangular, metal boxes with two low-voltage wires coming out and two high-voltage wires hidden inside a junction box.
- Check connections: With the power off at the circuit breaker that supplies the transformer, check the low-voltage wires (the small wires going to the chime and button) for looseness or corrosion. Tighten any loose screw terminals. Also, ensure the high-voltage connections (usually black and white wires) inside the junction box are secure – but only do this if you are comfortable working with high voltage and have completely shut off the power at the main breaker. If you are not comfortable, call an electrician.
- Test for voltage output: This step requires caution as you are dealing with live electrical components. With the power on to the transformer's circuit, use a multimeter set to AC voltage to test the low-voltage terminals on the transformer. You should read a voltage between 10 and 24 volts AC. If you read 0V, or a significantly lower voltage, the transformer is likely faulty and needs replacement. Before replacing, re-check the circuit breaker; it may have tripped. Resetting it might restore power.
Step 4: Check Wiring for Breaks or Shorts — The unseen culprit
The wires connecting the button, transformer, and chime can suffer damage.
- Visual inspection: Follow the doorbell wires as much as possible, checking for pinched spots, cuts, breaks, or frayed insulation. Wires can be stapled too tightly, chewed by rodents, or corroded behind walls.
- Continuity test (with multimeter): With the power completely off at the main breaker, disconnect one end of each wire (e.g., at the button). Use a multimeter set to continuity mode to test each wire individually. Place one probe on one end of the wire and the other probe on the other end. A good wire will show continuity (a beep or a low resistance reading). If a wire shows no continuity, it has a break and needs to be replaced.
- Short circuit check: Also with power off, ensure no two wires are accidentally touching each other or touching a metal surface, which could cause a short.
Step 5: Consider Component Replacement — When diagnosis points to failure
If your troubleshooting has isolated the problem, it's time to replace the faulty component.
- Faulty button: If bypassing the button makes the chime ring, replace the doorbell button. They are inexpensive and easy to install. Ensure the new button has the correct voltage rating (most are universal for low-voltage systems).
- Faulty transformer: If the transformer isn't outputting the correct voltage, it needs to be replaced. Always turn off power at the circuit breaker before replacing a transformer. Disconnect the high-voltage wires inside the junction box first (usually black/white) and then the low-voltage wires. Install the new transformer, connecting high-voltage wires first (matching black to black, white to white) and then the low-voltage wires. Secure all connections tightly. If unsure about dealing with high voltage, call a licensed electrician.
- Faulty chime unit: If the button and transformer are working, and the wiring is good, the chime unit itself may be faulty. Replace the chime unit by disconnecting the old unit's wires (label them first!) and connecting them to the corresponding terminals on the new chime unit. Ensure the new chime is compatible with your transformer's voltage.
Common Causes
- Stuck or Broken Doorbell Button: The most frequent cause. Buttons can get dirty, corroded, or physically damaged, especially outdoor units exposed to weather. Internal contacts can wear out or become misaligned.
- Blown or Tripped Transformer: The transformer is overloaded, shorted, or simply fails due to age, causing it to stop converting power. Sometimes, a circuit breaker supplying the transformer may trip.
- Loose or Corroded Wiring: Wires can become loose at the button, chime, or transformer terminals. Corrosion build-up on connections increases resistance, preventing the low voltage from reaching the chime. Wires can also be accidentally cut or pinched during other home renovations.
- Faulty Chime Unit: The internal solenoids or plungers can get jammed with dust, debris, or insects, preventing them from striking the tone bars. The electromagnet coil itself can also fail.
- Circuit Breaker Issues: The circuit breaker supplying power to the doorbell transformer might be tripped, cutting off all power to the doorbell system. This isn't common for the doorbell specifically, but can happen if the transformer shares a circuit with another overloaded device.
Common Mistakes
- Replacing the Chime Before Checking the Button: Many homeowners jump straight to replacing the chime unit, which is often more expensive and time-consuming, when the problem was simply a sticky or faulty button. Always start with the simplest component. Always test the button first.
- Forgetting to Turn Off Power (Especially for Transformer Work): Working on the transformer without shutting off the corresponding circuit breaker is extremely dangerous. While the doorbell side is low voltage, the transformer's input is 120V AC house current, which can cause severe electrical shock or fire.
- Ignoring Corrosion on Wires/Terminals: A quick visual check isn't enough. Corrosion acts as an insulator, preventing current flow. Always clean any visibly corroded wires or terminals to ensure a good electrical connection. Use fine-grit sandpaper or a wire brush.
- Not Testing All Components Systematically: Randomly poking around or replacing parts without a diagnostic process means you're just guessing. Follow a logical sequence: button, chime, transformer, then wiring. This saves time, money, and frustration.
- Using the Wrong Voltage Transformer: While less common, some older homes might have different transformer voltages (e.g., 8V or 16V). Replacing a transformer with one that provides too much or too little voltage can damage the chime unit or cause it to not function correctly. Always check the voltage rating on your existing transformer or chime unit before purchasing a replacement. Most modern systems use 16VAC or 24VAC.
Cost & Time Breakdown
| Task | DIY Cost | Pro Cost | Time |
|---|---|---|---|
| Doorbell Button Repair | $0-$15 | $50-$100 (min.) | 5-15 minutes |
| Chime Unit Cleaning | $0 | $50-$100 (min.) | 10-20 minutes |
| Transformer Check/Reset | $0 | $75-$150 (min.) | 15-30 minutes |
| Component Replacement | $10-$50 | $150-$300 | 30-60 minutes |
| Full System Diagnosis | $0 (your time) | $150-$400 | 1-2 hours |
The DIY costs represent parts only. Professional costs include labor and a service call fee, which can vary significantly by region and specific electrician rates.
Tips & Prevention
- Regular Button Cleaning: Periodically wipe down your outdoor doorbell button, especially if exposed to weather. Use a damp cloth to remove dirt and grime, preventing buildup that can jam the mechanism.
- Check Wiring Annually: When doing other home maintenance, take a quick look at the visible doorbell wires at the button and chime. Ensure they are secure and not corroded. Tighten any loose screws.
- Protect from Elements: If your doorbell button is very exposed to rain and sun, consider adding a small protective cover or hood. This can extend its lifespan.
- Know Your Transformer Location: Make a note of where your doorbell transformer is located (e.g.,
Related Articles
Keep troubleshooting with these hand-picked guides from FixlyGuide:
- The 4 Hidden Reasons Your Doorbell Dies (And the 20-Minute Fix) — A non-working doorbell is often caused by simple, hidden issues like a tripped transformer or a corroded button, which homeowners can fix i…
- The #1 Reason Your Doorbell Suddenly Dies (and the 10-Minute Fix) — A non-functioning doorbell is often caused by a tripped transformer, a simple issue homeowners can usually resolve in minutes.
- The 3 Hidden Reasons Your Doorbell Dies (And How to Resurrect It for $0) — A non-functioning doorbell is often due to simple, overlooked issues like a tripped breaker, a stuck button, or a loose wire, and can often…
- The 3 Hidden Reasons Your Door Won't Latch (And the Easy Fixes) — A door that won't latch properly is a common household nuisance, often caused by simple issues that are easy to diagnose and repair.
- The 3 Hidden Reasons Your Garage Door Stops Mid-Close (And the $0 Fix) — Your garage door stopping mid-close is usually a sign of misaligned safety sensors, a blocked path, or incorrect travel limits, all fixable…
- The 3 Hidden Reasons Your Sprinkler Head Won't Pop Up (And How to Fix It FAST) — Discover the most common reasons your sprinkler head isn't popping up and follow our step-by-step guide to quickly diagnose and fix the iss…
Recommended for DIYers & woodworkers
Sponsored
The Top 20 Tools for Workshops of Any Budget
No stationary machines or power tools required — plus 3 fundamental tools that can't be bought at any price.
Get the free guide
Ted's Woodworking — The #1 Woodworking Resource
Detailed instructions, dimensioned drawings, materials & cutting lists, and 3D schematics for every skill level.
See the plansSponsored: links above are affiliate links. FixlyGuide may earn a commission on qualifying purchases — at no extra cost to you.
Frequently asked questions
Why did my doorbell suddenly stop working?+
Doorbell failure is often due to a stuck or dirty button, a tripped or failed transformer, or loose/corroded wiring at the button, chime, or transformer. Less commonly, the chime unit itself can fail or become obstructed by debris.
How do I test if my doorbell button is bad?+
To test your doorbell button, first turn off power to the doorbell transformer at your electrical panel. Then, carefully disconnect the two wires from the back of the button. Briefly touch these two wires together. If the chime rings, the button is faulty and needs replacement. If it doesn't ring, the issue lies elsewhere.
Where is the doorbell transformer usually located?+
Doorbell transformers are often found in basements, attics, utility closets, near the main electrical panel, or sometimes even inside the chime unit housing. Look for a small, rectangular metal box connected to a junction box.
Can I replace a doorbell transformer myself?+
Yes, you can replace a doorbell transformer yourself, but it involves working with your home's 120-volt electrical system. Always turn off the power at the circuit breaker beforehand and use a non-contact voltage tester to confirm it's off. If you are uncomfortable or unsure, it's best to call a licensed electrician due to the risk of electrical shock.
What's the typical voltage for a doorbell system?+
Most modern wired doorbell systems operate on low voltage, typically between 10 and 24 volts AC (Alternating Current). Older systems might use 8V or 16V. Always check the voltage rating on your existing transformer or chime unit before purchasing replacements.


Discussion
Loading comments…