
Tools & materials you'll need
Affiliate links- AmazonMild dish soap
As an Amazon Associate FixlyGuide earns from qualifying purchases — at no extra cost to you. Prices and availability are accurate as of publication and subject to change.
How it works
A modern gas stove burner ignition system is a precise sequence of gas flow and electrical spark. When you turn the control knob, two actions occur simultaneously. First, the knob physically opens a gas valve, allowing a controlled amount of natural gas or propane to flow through a tube to the burner base. Second, pressing or turning the knob engages a small ignition switch located directly behind the knob shaft. This switch sends a signal to the spark module, a solid-state device often located at the back of the stove.
The spark module acts as a transformer, converting the standard 120-volt household current into a high-voltage, low-amperage pulse (typically over 10,000 volts). This pulse travels through an insulated wire to the spark electrode, which is the small, ceramic-encased metal pin next to the burner. The high voltage creates a potential difference between the electrode tip and the grounded metal of the burner head. To resolve this, electricity arcs across the gap, creating the familiar, bright spark. This spark provides the heat needed to ignite the gas-air mixture that is now flowing out of the small openings, or ports, around the burner head. The burner cap, which sits on top of the burner head, helps to spread this initial flame evenly for consistent cooking heat. A failure in any part of this chain—gas flow, spark generation, or the physical condition of the burner components—will prevent ignition.
Step-by-Step Fix
Follow these steps in order to diagnose and resolve the most common causes of a gas burner failing to light. Work methodically and do not skip steps.
- Safety First: Before starting any work, unplug the stove from the electrical outlet. If your stove has a separate gas shut-off valve (often a red or yellow handle on the gas line behind the appliance), turn it to the off position. Never work on a gas appliance if you smell gas.
-
Isolate the Problem — Turn on the other burners on your stove. If they light correctly, the issue is isolated to the single malfunctioning burner's components. If no burners light or spark, the problem may be with the main gas supply, the home's circuit breaker, or the stove's internal spark module, which is a job for a professional. Assuming only one burner is faulty, proceed with the following steps.
-
Disassemble the Burner — Wait for the cooktop to be completely cool. Lift the heavy metal grate off the faulty burner. Remove the circular burner cap (the flat, disc-like piece) and the burner head (the piece with the gas ports that the cap sits on). They should lift off without tools. Inspect these two parts for large food chunks, warping, or cracks.
-
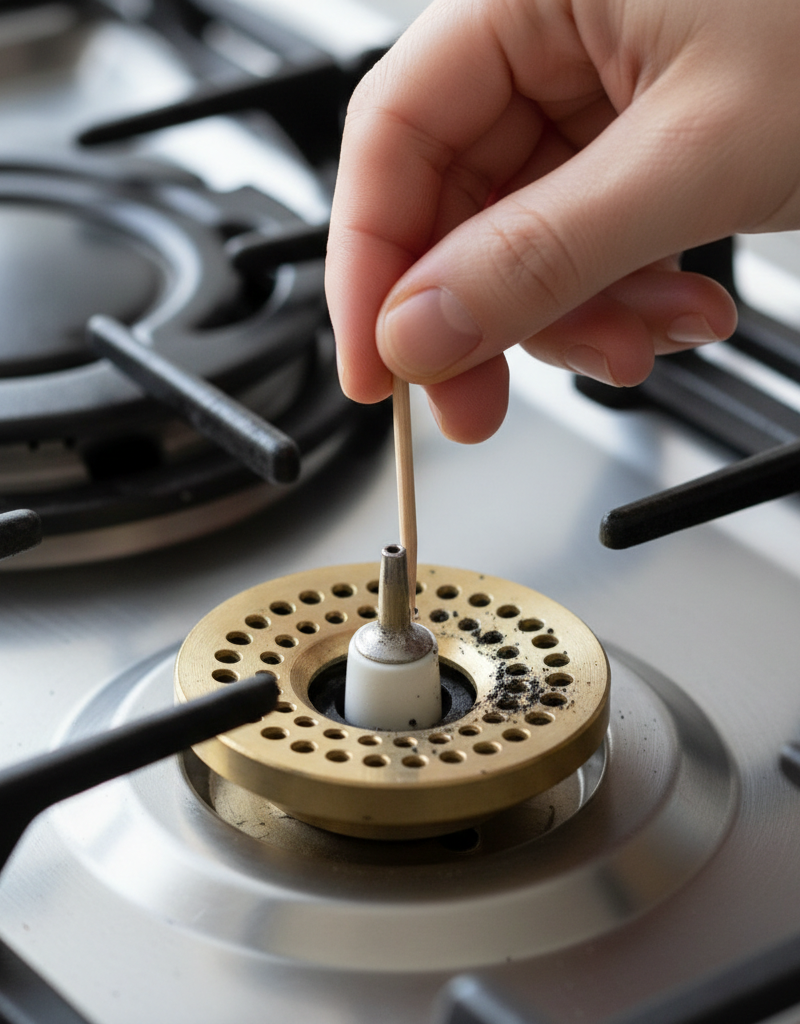
Inspect and Clean the Spark Igniter — Locate the spark igniter, the small white ceramic post with a metal tip protruding near the burner base. It is a common point of failure.
- Tools: Dry toothbrush, cotton swabs, rubbing alcohol.
- Gently scrub the metal tip and ceramic base with a dry toothbrush to dislodge any baked-on food, grease, or carbon. For stubborn residue, lightly dampen a cotton swab with rubbing alcohol and carefully clean the metal tip. Do not soak the area. Ensure no cotton fibers are left behind.
- Visually inspect the white ceramic insulator for any hairline cracks. A cracked igniter can short-circuit the spark to the burner base before it can jump the gap to ignite the gas, and must be replaced.
-
Clear Clogged Burner Head Ports — The small holes (ports) around the perimeter of the burner head can become clogged with spillover. Blocked ports prevent gas from reaching the spark.
- Tools: Straightened paperclip, sewing needle, or a specialized orifice cleaning tool. Do not use a toothpick, as it can break off inside the port.
- Carefully insert the tip of your tool into each port and twist gently to break up and remove debris. Be careful not to use force or files, which can enlarge the port and create an unsafe, poorly-formed flame. After clearing the ports, you can use a vacuum with a hose attachment to suck out the loosened debris from the burner head.
-
Wash the Burner Cap and Head — With the cap and head removed, they can be cleaned thoroughly.
- Tools: Non-abrasive scrub brush or sponge, mild dish soap, warm water.
- Submerge the cap and head in a sink of hot, soapy water. Scrub away all grease and food residue from all surfaces, including the underside. Rinse them completely to remove all soap residue, which can otherwise affect flame color.
-
Dry All Components Completely — This is the most critical step and the source of many failed repair attempts. Any moisture remaining on the burner head or near the igniter can ground the spark, preventing ignition until it has fully evaporated.
- Methods: You can let the components air-dry on a towel for several hours. To speed up the process, use a hairdryer on a low or cool setting to blow-dry the burner head, cap, and the igniter area on the stove itself. Ensure every crevice is bone dry before proceeding.
-
Reassemble and Test — Place the burner head back onto the burner base, ensuring it sits flat and level. The igniter should protrude through the notch in the burner head. Place the burner cap on top, also ensuring it is seated correctly. Replace the grate. Plug the stove back into the outlet and turn the gas supply valve back on if you closed it. Turn the control knob for the cleaned burner to a medium setting. It should click and ignite within a few seconds.
-
Evaluate the Spark (If It Still Fails) — If the burner clicks but does not light, perform the test in a dimly lit room. You should see a consistent, robust blue-white spark jumping from the igniter tip to the burner head.
- Weak or Orange Spark: If the spark is weak, orange, or appears to arc down the side of the igniter instead of at the tip, the igniter is likely dirty, cracked, or failing.
- No Spark, But Clicking is Heard: This confirms a functional spark module and switch, pointing strongly toward a bad connection or a broken igniter on that specific burner.
- No Spark, No Click: If you hear no clicking sound from the faulty burner but other burners click and ignite, the ignition switch for that specific burner has likely failed.
Common mistakes
Diagnosing a burner issue often goes wrong when DIYers overlook simple details or use improper techniques. Avoid these common errors.
-
Reassembling a Damp Burner. This is the number one cause of a burner failing to light immediately after a thorough cleaning. Water is conductive and will short the high-voltage spark from the igniter to the grounded burner base, preventing the arc required for ignition. Instead: After washing, meticulously dry the burner head, cap, and the cooktop area around the igniter. Use a hairdryer on a cool setting or allow parts to air-dry for at least 4-6 hours to be certain all moisture has evaporated.
-
Aggressively Cleaning the Igniter. Using steel wool, a knife, or harsh abrasive cleaners on the ceramic spark igniter can easily scratch the metal tip or crack the delicate ceramic insulator. A cracked insulator will cause the spark to ground out, permanently disabling the system until the part is replaced. Instead: Gently scrub the igniter tip and ceramic column with a soft, dry toothbrush. For stubborn grime, use a cotton swab lightly dampened with rubbing alcohol.
-
Enlarging the Burner Ports. When clearing clogged gas ports on the burner head, some users resort to drill bits or force a screw into the port. This permanently enlarges the hole, which alters the factory-calibrated gas-to-air ratio. This results in large, inefficient, and sooty yellow flames that can produce carbon monoxide. Instead: Use a tool that is thinner than the port itself, such as a straightened paperclip or a needle. The goal is to break up the blockage, not to ream out the hole.
-
Ignoring the Sounds. The clicking of the igniter is a key diagnostic clue. If you don't hear a click, the problem is electrical (igniter switch, wiring, or module), not a clog. If you hear constant clicking even after the flame is lit, it means the system doesn't sense a flame and is a sign of a dirty igniter or a faulty flame sensor on higher-end models. Instead: Listen carefully. A click tells you the system is trying to work. No click points you toward the switch and module, saving you time cleaning parts that aren't the problem.
-
Replacing Parts without Confirmation. It's easy to assume the igniter is faulty and order a new one. However, the issue could be a simple clog or a failed ignition switch. Instead: If cleaning doesn't work, and you are comfortable doing so, swap the non-working igniter with a known working one from an adjacent burner. If the problem moves with the igniter, you have confirmed the part is bad. If the problem stays in the same location, the issue lies elsewhere (likely the switch or wiring).
Cost & time breakdown
Repair costs vary based on your stove's brand and whether you perform the labor yourself or hire a professional appliance technician. Prices listed for professional service include the part and typical labor charges.
| Task | DIY Cost | Pro Cost | Avg. DIY Time |
|---|---|---|---|
| Thorough Burner & Igniter Cleaning | $0–$10 (cleaning supplies) | $100–$175 (service call) | 30–60 minutes |
| Spark Igniter Electrode Replacement | $15–$40 (part only) | $150–$250 | 45–90 minutes |
| Ignition Switch Replacement | $10–$30 (part only) | $175–$275 | 1–2 hours |
| Spark Module Replacement | $50–$150 (part only) | $250–$400 | 1–2 hours |
| Professional Diagnosis Only | N/A | $85–$150 (service fee) | N/A |
When to call a pro
While many burner issues are simple cleaning tasks, gas appliances demand caution. Contact a licensed appliance repair professional immediately if you encounter any of the following signs.
The most critical indicator is the smell of gas. If you detect the odor of natural gas (rotten eggs) or propane, do not operate any electrical switches, unplug the stove, or attempt to light the burner. Immediately turn off the gas supply valve to the stove, open windows to ventilate the area, evacuate the home, and call your gas utility company or a qualified gas technician from a safe location.
You should also call a professional if all burners fail to light simultaneously. This often points to a larger, systemic problem, such as a faulty gas pressure regulator, a tripped main gas valve, or a failed spark module that powers all igniters. Troubleshooting these components involves testing gas pressures and high-voltage systems and should be left to a trained technician. Finally, if you have meticulously cleaned all components, confirmed the igniter sparks, and the burner still won't light, the problem is likely deeper within the appliance—such as a faulty gas valve or internal wiring harness—and requires professional diagnosis.
Prevention & maintenance
Consistent, proactive maintenance is the most effective way to prevent burner ignition failures and ensure your cooktop operates safely and efficiently.
-
Clean Spills Immediately. Do not let spilled food, especially sugary sauces or starchy water from boiling pasta, sit on the cooktop. These substances quickly carbonize under heat, creating stubborn blockages on burner ports and fouling the spark igniter. Wipe up messes with a damp sponge as soon as the surface is cool enough to touch.
-
Perform a Monthly Deep Clean. Once a month, remove all grates, burner caps, and burner heads. Wash the caps and heads in hot, soapy water, using a brush to scrub them clean. Use a paperclip to proactively check and clear each gas port. Wipe down the cooktop surface, paying special attention to the area around the igniter bases.
-
Observe Your Flame Quality. A healthy flame on a gas burner is a steady, quiet, and primarily blue cone of fire, with only slight yellow or orange tips. If you notice your flames are mostly yellow or orange, are noisy (hissing or sputtering), or appear uneven and lifting off the burner, it is a clear sign that the burner components are dirty and restricting proper gas or air flow. This is your cue to perform a deep clean.
-
Protect the Igniters. The ceramic insulators on spark igniters are brittle. When cleaning the cooktop or moving heavy pots, be careful not to strike the igniters. A hairline crack is all it takes to cause an ignition failure. Treat them with the same care you would a spark plug.
-
Listen to Your Stove. Pay attention to the ignition sequence. If a burner that normally lights in 1-2 clicks suddenly starts taking 5-6 clicks, it's an early warning that debris is starting to accumulate on the igniter or burner ports. Addressing it early with a quick cleaning can prevent a complete failure.
Related Articles
Keep troubleshooting with these hand-picked guides
Get the print-ready PDF of this guide
A clean, ad-free, printable version you can keep on your phone or pin to the workshop wall. Free with a FixlyGuide account.
- Print-optimized layout
- Tools, materials & every step included
- Saved to your account
Frequently asked questions
Why is my gas stove burner clicking but not lighting?+
If your burner is clicking but not lighting, it usually means the igniter is sparking but gas isn't reaching the flame, or the spark isn't strong enough. This is often caused by clogged burner ports or a dirty igniter.
Can I use water to clean my gas stove igniter?+
No, avoid using water to clean the igniter directly. Water can damage the ceramic or create a short circuit. Use a dry toothbrush or cotton swab to gently remove debris.
How often should I clean my gas stove burners?+
Regularly wipe up spills. A deeper clean of the burner caps and heads is recommended every few months, or whenever you notice performance issues.
What if I smell gas while troubleshooting?+
If you smell gas, immediately turn off the gas supply to your stove, open windows, and evacuate the area. Do not attempt to light the burner or continue troubleshooting. Contact a licensed gas professional or your gas company immediately.


Discussion
Loading comments…