Tools & materials you'll need
Affiliate linksAs an Amazon Associate FixlyGuide earns from qualifying purchases — at no extra cost to you. Prices and availability are accurate as of publication and subject to change.
Quick Answer
Ice dams are destructive phenomena that can lead to significant roofing and interior damage if not addressed properly. The safest and most effective DIY method for removing an ice dam involves a two-pronged approach: first, carefully reducing the ice mass with a calcium chloride-filled sock, and then, once significantly weakened, breaking away smaller, manageable sections using a shingle-friendly tool. Crucially, always work from the ground using an extension pole whenever possible, and if you must access the roof, ensure you have proper fall protection and a spotter.
The Problem
That beautiful blanket of snow on your roof might be hiding a destructive secret: an ice dam. This ridge of ice forms at the edge of your roof, preventing melting snow from draining off. Water then backs up behind the dam, seeping under shingles, into your attic, and down walls, leading to rotten sheathing, damaged insulation, spoiled drywall, and even electrical hazards. Beyond the structural damage, the sheer weight of a large ice dam can stress gutters and fascia boards. Many DIY attempts to remove ice dams involve aggressive methods like chipping with axes or using harsh chemicals, which often cause more damage to shingles, gutters, and even personal injury through falls. The real problem isn't just the ice dam itself, but the underlying conditions that allow it to form, namely inconsistent roof temperatures.
How It Works
Understanding how an ice dam forms is crucial to safely tackling it. The process begins with heat escaping from your home's interior, often through inadequate attic insulation or air leaks, warming sections of your roof. This warmth melts snow on the upper, warmer parts of the roof. As this melted water flows down the roof, it reaches the colder eaves, which extend beyond the heated living space and are typically uninsulated from below. Here, the water refreezes, forming a barrier of ice – the ice dam.
Once an ice dam forms, additional melting snow and ice from above become trapped behind it. This standing water has nowhere to go but up and under your shingles, which are designed to shed water downwards, not hold it back. The water then infiltrates the roof deck, drips into the attic, saturates insulation, and can continue its journey into wall cavities and ceilings. The cycle perpetuates: more snow melts, more water accumulates, and the ice dam grows, exerting immense pressure on your roofing materials and increasing the risk of interior leaks. Without addressing both the dam and the underlying heat loss, the problem will recur with every substantial snowfall.
Step-by-Step Fix
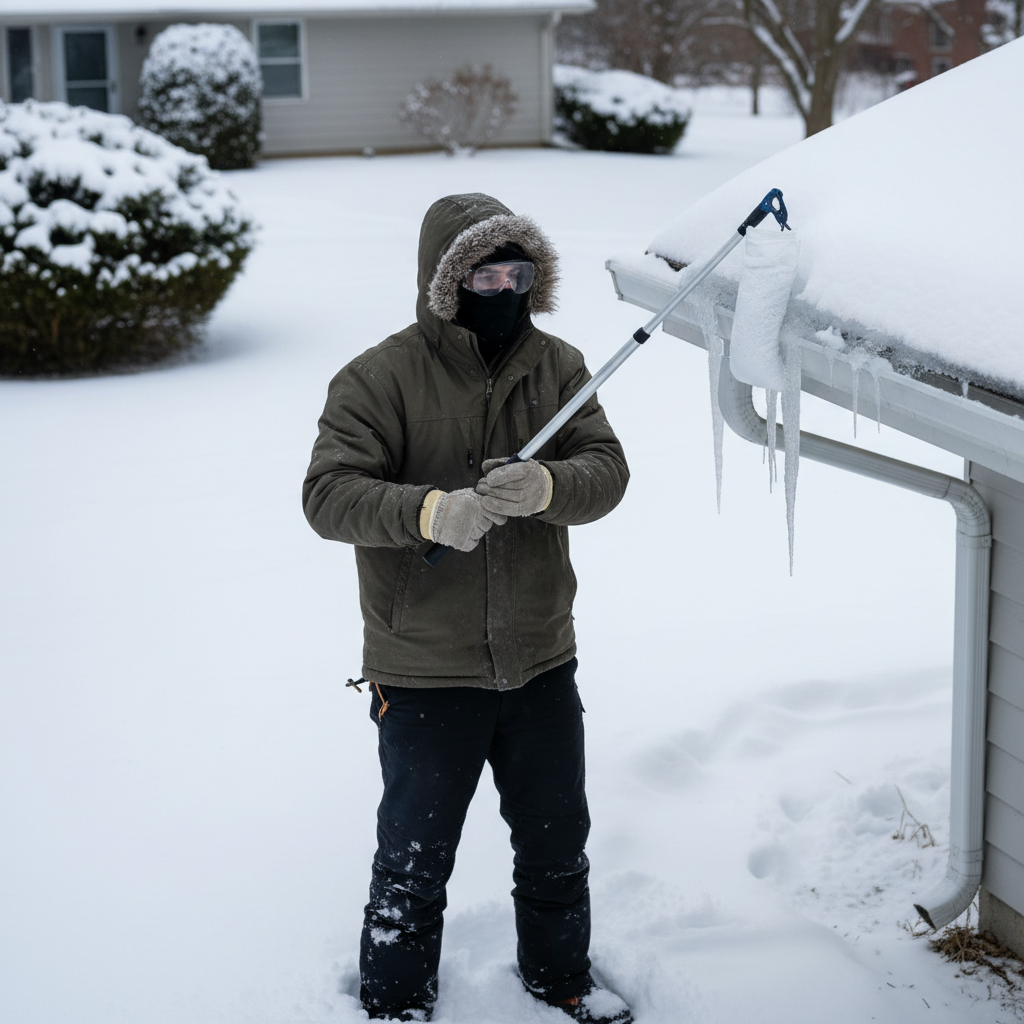
1. Prioritize Safety First — Before doing anything, assess the situation. Can you reach the ice dam safely from the ground with an extension pole? If not, and the dam is causing immediate interior leaking, consider calling a professional. If you must get on the roof, ensure it's not excessively slippery, consider a safety harness, and have a spotter. Always work in teams if working on a ladder near the roof edge.
2. Prepare Your Ice Melt Socks — Fill old nylon stockings or socks with calcium chloride ice melt. Do not use rock salt (sodium chloride), as it can be corrosive to roofing materials and nearby vegetation. Tie off the ends securely. Each sock should be about 2-3 feet long.
3. Create Water Channels — Carefully place the calcium chloride socks across the ice dam, perpendicular to the roof edge. Position them directly over areas where water is pooling or backing up. The calcium chloride will slowly melt channels through the ice, allowing trapped water to drain off the roof. This can take several hours, or even a full day, depending on the thickness of the ice and external temperatures. Repeat with additional socks if the dam is very wide.
4. Gently Break Apart Weakened Ice — Once the calcium chloride has created significant channels and softened the dam, use a roof rake or a rubber mallet with an extension pole to gently tap and break off smaller, manageable pieces of ice. Work from the peak downwards, always aiming to dislodge ice away from the roof surface. Never use sharp tools like axes, picks, or shovels directly on the ice dam, as these can easily damage shingles, gutters, and flashing. Tap lightly and patiently.
- Safety Note: Falling ice can be heavy and sharp. Keep pets and children away from the drop zone.
- If this doesn't work: If the ice dam is too thick or tenacious, and the calcium chloride isn't having enough effect, you might need to apply warm water carefully, but only if you can immediately clear a drainage path AND ensure the water won't refreeze into a new dam. This is extremely tricky and generally best left to professionals with steam equipment.
5. Clear Gutters and Downspouts — As ice breaks free, ensure gutters and downspouts are clear to allow for proper drainage. Use a trowel or a small garden spade on an extension pole to remove any ice or debris blocking the flow. Blocked gutters can lead to new ice formations.
6. Address the Root Cause (Heat Loss) — Once the immediate threat is gone, focus on preventing recurrence. In the spring, inspect your attic for adequate insulation (R-49 to R-60 is typically recommended for most northern climates) and seal any air leaks. Look for gaps around vent pipes, light fixtures, and attic hatches.
Common Causes
- Inadequate Attic Insulation: This is the most prevalent cause. Insufficient insulation allows heat from the living space below to transfer into the attic, warming the roof deck.
- Poor Attic Ventilation: A lack of proper soffit and ridge vents can trap warm air in the attic, leading to uneven roof temperatures.
- Air Leaks from Living Space: Gaps around recessed lights, unsealed attic hatches, plumbing stacks, electrical wiring, and dropped soffits allow warm, moist air directly into the attic, melting snow from below.
- Clogged Gutters: Debris-filled gutters can prevent melted snow from draining properly, acting as a starting point for ice dam formation.
- Sun Aspect & Roof Features: Valleys, skylights, and even the varying sun exposure on different roof planes can contribute to uneven melting and refreezing patterns.
Common Mistakes
- Aggressively Chipping with Sharp Tools: Using an axe, chisel, or even a sharp shovel to chip away at ice dams is a recipe for disaster. You will almost certainly damage shingles, cut through underlayment, or puncture flashing, leading to leaks worse than the ice dam itself.
- Using Rock Salt (Sodium Chloride): While effective at melting ice, rock salt can corrode metal gutters and downspouts, discolor roofing materials, and kill nearby landscaping when the runoff occurs. Always opt for calcium chloride.
- Applying Hot Water Without Drainage: Pouring hot water on an ice dam without immediately clearing a path for the melted water to drain off the roof will often just create more ice as the water refreezes on the cold surfaces. This can worsen the problem and make the roof extremely slick.
- Ignoring the Root Cause: Simply removing ice dams without addressing the underlying issues of heat loss and poor attic ventilation guarantees their return season after season, along with the continued risk of damage.
- Working from a Ladder on an Icy Roof: Attempting to reach and chip away at an ice dam from an unstable ladder on a potentially icy and sloped roof is incredibly dangerous and leads to thousands of falls and injuries each winter.
Cost & Time Breakdown
| Task | DIY Cost | Pro Cost | Time |
|---|---|---|---|
| Calcium chloride ice melt | $20–$40 per bag | Included | 10–20 minutes |
| Nylon stockings/socks | $0–$5 | Included | 5 minutes |
| Roof rake (if needed) | $40–$80 | Included | 1–2 hours |
| Post-fix attic inspection | $0 | $150–$300 (audit) | 30–60 minutes |
| Sealing air leaks (DIY) | $30–$100 | $500–$1,500+ | 2–4 hours |
| Adding attic insulation (DIY) | $300–$1,500+ | $1,000–$3,000+ | 1–2 days |
Tips & Prevention
- Clear Snow Promptly: The best defense is a good offense. After a snowfall, use a roof rake to carefully remove snow from the first 3-5 feet of your roof edge. This eliminates the
Related Articles
Keep troubleshooting with these hand-picked guides from FixlyGuide:
- The #1 Mistake Homeowners Make Removing Ice Dams (And 3 Safer Fixes) — Discover the safest and most effective ways to remove ice dams from your roof, avoiding common mistakes that can cause severe damage to you…
- The #1 Mistake Homeowners Make with Ice Dams (and How to Fix It SAFELY) — Most homeowners approach ice dam removal incorrectly, creating more damage or safety risks. Learn the right, safe methods to protect your r…
- The 3 Hidden Reasons Your Roof Gets Ice Dams (and the Easy Fixes) — Ice dams are a common winter problem that can cause significant damage to your roof and home if not addressed safely and effectively.
- The $30 Secret to Banishing Ice Dams Without Damaging Your Roof — Discover how a simple, inexpensive trick can safely eliminate dangerous ice dams from your roof and prevent costly damage to your home.
- The $20 Trick That Melts Ice Dams (and Saves Your Roof) — Discover a surprisingly simple, budget-friendly method to safely remove ice dams and prevent costly roof damage to your home.
- The One Shingle Mistake That Creates Roof Leaks (And How to Fix It Fast) — Missing roof shingles after a storm can quickly lead to extensive water damage if not addressed correctly. Learn how to safely inspect and…
Recommended for DIYers & woodworkers
Sponsored
The Top 20 Tools for Workshops of Any Budget
No stationary machines or power tools required — plus 3 fundamental tools that can't be bought at any price.
Get the free guide
Ted's Woodworking — The #1 Woodworking Resource
Detailed instructions, dimensioned drawings, materials & cutting lists, and 3D schematics for every skill level.
See the plansSponsored: links above are affiliate links. FixlyGuide may earn a commission on qualifying purchases — at no extra cost to you.
Frequently asked questions
What causes ice dams to form on a roof?+
Ice dams form when heat escapes from your home's interior, warming the roof and melting snow. This melted water then flows down to the colder roof eaves, where it refreezes, creating a barrier that traps more melting water.
Is it safe to chip away at an ice dam with a shovel or axe?+
No, it is extremely unsafe and highly likely to damage your roof. Sharp tools can easily cut through shingles, underlayment, and flashing, leading to more severe and costly leaks. Always use gentler methods like ice melt socks or a roof rake.
What is the best way to prevent ice dams?+
The most effective way to prevent ice dams is to ensure your attic is well-insulated and properly ventilated. This keeps the roof deck cold, preventing snow from melting and refreezing at the eaves. Sealing air leaks from your living space into the attic is also crucial.


Discussion
Loading comments…