
Tools & materials you'll need
Affiliate links- AmazonCalcium chloride ice melt1 large container · do not use rock salt/sodium chloride
- AmazonOld nylon stockings or tube socks3-5 pairs
- AmazonWork gloves1 pair
- AmazonAttic insulationVaries by attic size · Rockwool, fiberglass, or cellulose if needed for prevention
- AmazonExpanding foam sealant2-3 cans · low-expansion for air sealing
As an Amazon Associate FixlyGuide earns from qualifying purchases — at no extra cost to you. Prices and availability are accurate as of publication and subject to change.
Quick Answer
Ice dams are ridges of ice that form at the edge of a roof, preventing melting snow from draining properly. This trapped water can back up under shingles, leading to leaks, damaged insulation, and even structural compromise. Safely removing ice dams involves carefully clearing fresh snow, using calcium chloride or steam to melt existing ice, and, most importantly, addressing the underlying issue of heat loss from your attic.
The Problem
Imagine a beautiful blanket of snow on your roof. It looks idyllic, but underneath, a silent threat might be brewing: an ice dam. These formidable frozen barriers form along the eaves, stopping the natural flow of melting snow off your roof. The water, with nowhere to go, pools behind the dam, seeping under shingles, into your attic, and down your walls. This isn't just a minor annoyance; it's a structural and health hazard. Water intrusion can rot sheathing and rafters, ruin insulation, promote mold growth, and damage ceilings and interior finishes. In severe cases, the sheer weight of large ice dams can even pull down gutters or strain the roof structure itself. Understanding the 'why' behind ice dams is crucial because simply hacking away at the ice is often ineffective and can cause significant damage to your roof in the process.
How It Works
Ice dams are a direct consequence of a thermal imbalance on your roof. Here's a breakdown of the physics:
- Heat Loss from the House: In a cold climate, your home's interior is warm. If your attic isn't properly insulated and sealed, this heat rises and escapes into the attic space. Think of it like a leaky thermos – the heat slowly bleeds out.
- Melting Snow on the Upper Roof: This escaping heat warms the underside of your roof deck. When snow falls, the portions of the roof directly above the heated attic become warm enough (even if just slightly above freezing) to melt the underside of the snowpack.
- Water Flow to the Eaves: This meltwater then flows down the roof, under the insulating layer of snow. As it reaches the eaves – the parts of the roof that extend beyond the exterior walls – it encounters a colder environment. Why colder? Because the eaves are typically unheated and directly exposed to the exterior air temperature.
- Refreezing and Dam Formation: When the meltwater hits this colder zone, it refreezes. Drop by drop, layer by layer, this refrozen water builds up, creating a ridge of ice. This is your ice dam.
- Water Back-up and Intrusion: As more snow melts, the ice dam grows, forming an impenetrable barrier. The subsequent meltwater, unable to flow off the roof, pools behind the dam. This ponding water can then be driven by hydrostatic pressure and capillary action up and under your roof shingles, which are designed to shed water downwards, not hold it back. Once under the shingles, the water saturates the roof deck, insulation, and eventually leaks into your living space.
The key takeaway: ice dams don't just happen because it's cold. They happen because of a combination of cold outdoor temperatures and inconsistent roof surface temperatures caused by insufficient insulation and inadequate attic ventilation.
Step-by-Step Fix
Safety Note: Working on a snowy or icy roof is dangerous. Always prioritize safety. If you are uncomfortable or the ice dam is extensive, call a professional.
-
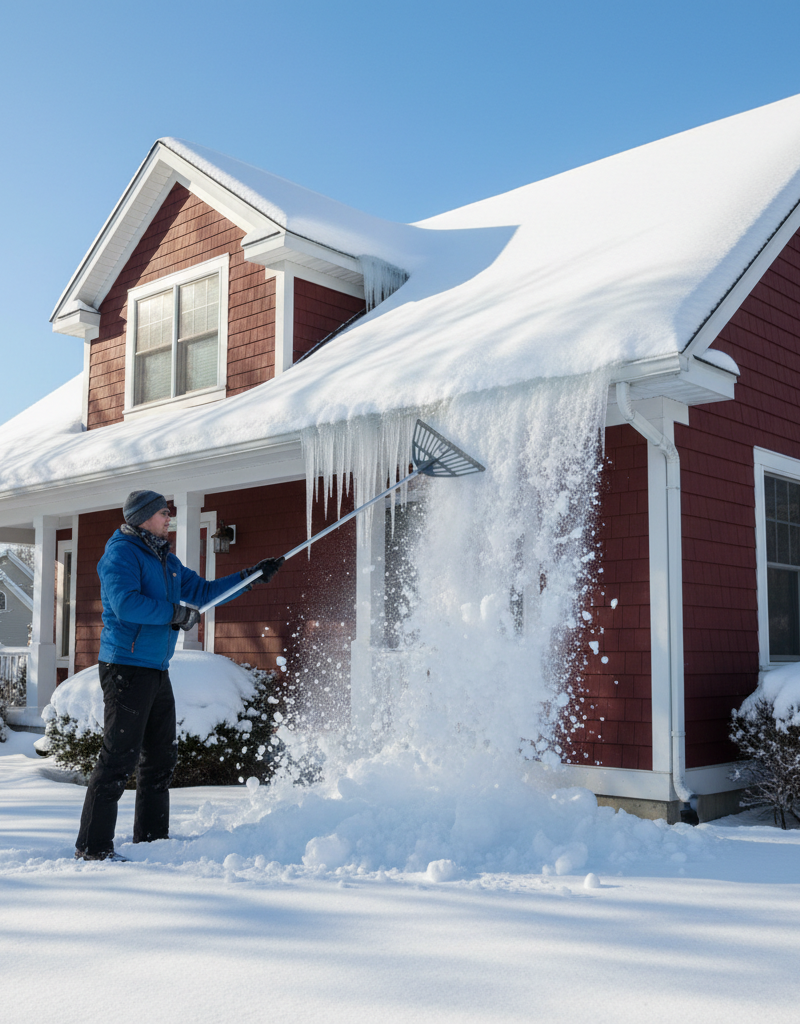
Clear Fresh Snow First — Reduce the source of meltwater.
- Before tackling the ice, remove as much loose snow as possible from the roof, especially around the edges and valleys. This reduces the amount of new water contributing to the dam.
- Tool: A roof rake with a long telescopic handle. Choose one with rollers or soft edges to prevent shingle damage.
- Safety: Work from the ground whenever possible. If you must use a ladder, ensure it's stable and secured. Have a spotter. Do not stand on a ladder on an icy surface.
- If this doesn't work: If the snow is too deep or compacted, consider hiring a service with specialized equipment.
-
Create Relief Channels (Temporary Fix) — Allow trapped water to drain.
- For existing ice dams causing leaks, creating temporary channels can relieve immediate pressure. Fill old nylon stockings or socks with calcium chloride (rock salt can damage roofing materials) and place them perpendicularly across the ice dam, extending into the gutter.
- Material: Calcium chloride ice melt (not rock salt/sodium chloride).
- Process: The calcium chloride will slowly melt channels through the ice, allowing trapped water behind the dam to drain off the roof. Do not use plain rock salt as it can corrode metals and damage asphalt shingles and landscaping.
- Caution: This is a temporary solution and won't remove the entire dam. It's meant to alleviate active leaks.
-
Break Up Smaller Ice Dams Carefully — Physical removal for manageable dams.
- For smaller, thinner ice dams, you can try to break them into smaller pieces using a rubber mallet. Aim for the edge of the dam, striking gently. Never use a pickaxe, shovel, or metal tools directly on shingles.
- Tool: Rubber mallet, plastic or composite pry bar.
- Technique: Work slowly and tap rather than strike forcefully. Focus on breaking the ice into manageable chunks that can be safely removed or allowed to melt.
- Warning: Be extremely careful not to damage shingles or gutters. If you hear crunching or scraping of shingles, stop immediately.
-
Use a Steamer for Larger Dams (Best Option) — The gentlest and most effective method.
- Professional ice dam removal often uses low-pressure steam, which is the safest way to remove large, stubborn ice dams without damaging the roof. You can rent commercial steamers built for this purpose.
- Tool/Service: Commercial low-pressure steam generator with a wand.
- Process: Follow the manufacturer's instructions for the steamer. Direct the steam at the ice, melting channels and eventually detaching sections of the dam. The goal is to melt from the top down and allow gravity to take small sections.
- Safety: Wear insulated gloves and eye protection. Be very careful with the hot steam and water. Do not point the steam at yourself or others.
-
Address the Root Cause: Attic Insulation — Prevent future formation.
- Once the immediate threat is resolved, assess your attic insulation. Heat escaping into the attic is the primary driver of ice dams. Aim for an R-value of R-49 to R-60 for most climates (approximately 16-24 inches of fiberglass or cellulose).
- Action: Add insulation to your attic floor to prevent heat transfer from your living space below. Ensure insulation is not blocking soffit vents.
- Inspection: Look for areas where insulation is thin, compressed, or missing, especially around light fixtures, access hatches, and plumbing vents.
-
Seal Air Leaks in the Attic — Stop heat from bypassing insulation.
- Insulation alone isn't enough if warm, moist air is bypassing it. Common culprits include gaps around plumbing stack vents, electrical wiring penetrations, recessed lights, attic hatches, and gaps where interior walls meet the attic floor.
- Material: Cans of expanding foam sealant (low-expansion for smaller gaps), caulk, weatherstripping for attic hatches.
- Process: Conduct an attic air seal audit. On a cold, windy day, you can often feel drafts or see light coming up from below. Seal all penetrations and gaps meticulously.
-
Ensure Proper Attic Ventilation — Maintain a cold roof deck.
- Even with good insulation, a poorly ventilated attic can still get warm. Proper ventilation uses soffit and ridge vents to create a continuous airflow, drawing in cold air at the eaves and expelling warm air at the ridge. This keeps the roof deck temperature closer to the outdoor ambient temperature.
- Inspection: Check that soffit vents are not blocked by insulation. Ensure ridge vents are clear and continuous. Calculate the required net free ventilation area (usually 1 square foot of vent area for every 300 square feet of attic floor, split evenly between intake and exhaust).
-
Clear Gutters and Downspouts — Ensure proper drainage.
- Clogged gutters can exacerbate ice dam problems by preventing meltwater from draining away. Clear leaves, twigs, and other debris before winter sets in.
- Action: Regularly clean gutters, especially in late fall. Consider gutter guards if debris is a persistent issue, but ensure they don't impede water flow.
Common Causes
- Insufficient Attic Insulation: The leading cause. If your attic floor isn't well-insulated, heat from your home easily transfers into the attic, warming the roof deck and melting snow.
- Poor Attic Ventilation: Even with good insulation, a lack of proper airflow through the attic allows heat to build up, especially if insulation is packed against the underside of the roof deck or blocking soffit vents.
- Air Leaks from Living Space: Recessed lights, unsealed attic hatches, bath fan exhaust ducts terminating in the attic, plumbing stack penetrations, and gaps around wiring allow warm air to bypass insulation and directly heat the attic and roof sheathing.
- Clogged Gutters: While not a direct cause of ice dam formation, clogged gutters prevent the proper drainage of meltwater, worsening the problem by allowing water to pool and refreeze at the eaves, contributing to the ice dam's size.
- Inconsistent Roof Temperature: Any factor that creates warm spots on the roof and cold spots at the eaves will contribute to ice dams. This can include skylights, chimneys not properly flashed/insulated, or complex roof designs that trap heat.
Common Mistakes
- Using Rock Salt (Sodium Chloride): Rock salt can corrode metal gutters and flashings, damage asphalt shingles, and harm plants below. Always use calcium chloride specifically designed for ice melt.
- Aggressively Chopping or Prying: Using an axe, shovel, or metal tools to violently break up ice dams causes significant damage to shingles, gutters, and the roof deck. The goal is gentle, controlled removal.
- Ignoring the Root Cause: Simply removing ice dams each winter without addressing the underlying issues of heat loss and poor ventilation is a costly and temporary fix. The dams will return.
- Applying Heat Directly with Torches or Heaters: Using open flames or high-heat devices to melt ice is an extreme fire hazard and can severely damage roofing materials. Never do this.
- Walking on an Icy Roof: This is extremely dangerous and can lead to serious injury or death. If you need to access the roof, use proper safety gear, secure ladders, and consider professional help.
- Blocking Soffit Vents with Insulation: When adding insulation, ensure that the soffit vents (intake vents along the eaves) remain clear. Use baffles to create a channel between the insulation and the underside of the roof sheathing to allow air circulation.
Cost & Time Breakdown
| Task | DIY Cost | Pro Cost | Time |
|---|---|---|---|
| Snow Removal (Roof Rake) | $40–$80 | $100–$300 | 30 min – 1 hour |
| Calcium Chloride Application | $15–$30 | N/A | 15–30 minutes |
| Immediate Ice Dam Removal (DIY) | $55–$110 | $300–$800+ | 1–3 hours |
| Attic Air Sealing | $50–$200 | $500–$1,500 | 4–8 hours |
| Adding Attic Insulation | $400–$1,500 | $1,000–$3,000+ | 1–2 days |
| Improving Attic Ventilation | $100–$500 | $500–$2,000 | Half day – 1 day |
Tips & Prevention
- Pre-Winter Attic Checkup: Before the first heavy snowfall, inspect your attic. Look for adequate insulation (at least R-49 in most northern climates), ensure all soffit vents are clear, and seal any visible air leaks around pipes, wires, and light fixtures.
- Clear Gutters Regularly: Keep your gutters and downspouts free of leaves and debris throughout the fall. Clogged gutters can worsen ice dam problems by preventing proper drainage.
- Install Attic Baffles: If you're adding insulation, install rigid foam or cardboard baffles (also known as insulation channels) in the attic at the eaves. These ensure that insulation doesn't block the soffit vents, maintaining a clear path for airflow.
- Use a Roof Rake: After every heavy snowfall, use a roof rake to clear the first 3-4 feet of snow from the eaves. This is the simplest and most effective preventative measure.
- Address Recessed Lighting: Older recessed lights can be significant sources of heat loss into the attic. Consider replacing them with IC-rated (insulation contact) LED fixtures or building airtight boxes around existing fixtures in the attic.
- Check Bath Fan Exhausts: Ensure all bathroom and kitchen exhaust fans vent directly to the outside, not into the attic space. Ducting should be insulated to prevent condensation.
When to Call a Professional
While tackling smaller ice dams and implementing preventative measures yourself is admirable, there are definite times when calling a licensed professional is the safest and smartest course of action. If your ice dam is extensive, spans a large portion of your roof, or is more than a few inches thick, attempting DIY removal can be dangerous and cause significant damage. Professionals have specialized steaming equipment that safely melts ice without harming shingles or gutters, and they have the proper safety gear, including harnesses and non-slip footwear, for working on icy roofs. Furthermore, if you're experiencing active leaks inside your home, a professional can not only remove the dam but also assess the extent of water damage and help you plan necessary repairs. Finally, if you're unsure about the adequacy of your attic insulation or ventilation, a professional can conduct an energy audit and recommend comprehensive, long-term solutions to prevent future ice dam formation, which goes beyond superficial removal.
Related Articles
Keep troubleshooting with these hand-picked guides from FixlyGuide:
- The #1 Mistake Homeowners Make Removing Ice Dams (And 3 Safer Fixes) — Discover the safest and most effective ways to remove ice dams from your roof, avoiding common mistakes that can cause severe damage to you…
- The $5 Secret to Preventing Ice Dams (and Why Your Neighbors Still Get Them) — Discover the surprising truth about ice dams and how a simple, inexpensive solution can protect your home from costly winter damage.
- The $30 Trick to Melting Ice Dams (Before They Destroy Your Roof) — Discover how to safely remove ice dams from your roof instantly with common household items, preventing costly damage. Stay safe while tack…
- The $20 Trick That Melts Ice Dams (and Saves Your Roof) — Discover a surprisingly simple, budget-friendly method to safely remove ice dams and prevent costly roof damage to your home.
- The 4 Hidden Reasons Your Entire Home Has Low Water Pressure (And the Easy Fixes) — Low water pressure throughout your entire home can be a frustrating and often misunderstood problem, with several common culprits. Learn to…
- The 3 Hidden Reasons Your Deck Boards Warp (and the Easy Fixes) — Deck board warping can ruin your outdoor space, but understanding the root causes and applying simple fixes can restore your deck's beauty.
Get the print-ready PDF of this guide
A clean, ad-free, printable version you can keep on your phone or pin to the workshop wall. Free with a FixlyGuide account.
- Print-optimized layout
- Tools, materials & every step included
- Saved to your account
Recommended for DIYers & woodworkers
Sponsored
The Top 20 Tools for Workshops of Any Budget
No stationary machines or power tools required — plus 3 fundamental tools that can't be bought at any price.
Get the free guide
Ted's Woodworking — The #1 Woodworking Resource
Detailed instructions, dimensioned drawings, materials & cutting lists, and 3D schematics for every skill level.
See the plansSponsored: links above are affiliate links. FixlyGuide may earn a commission on qualifying purchases — at no extra cost to you.
Frequently asked questions
What causes ice dams on a roof?+
Ice dams are primarily caused by heat escaping from your home's attic, melting snow on the upper portion of the roof. This meltwater then flows down to the unheated eaves, where it refreezes and builds up, creating a dam.
Is it safe to remove ice dams yourself?+
Removing ice dams can be dangerous due to icy conditions on the roof and the risk of damaging your roof. For extensive or thick ice dams, it's safest to call a professional. For smaller dams, use a roof rake from the ground or calcium chloride in stockings.
Can ice dams damage my roof?+
Yes, ice dams can cause significant damage. The trapped water behind the dam can seep under shingles, leading to water leaks into your attic and home, rot in the roof deck, damaged insulation, and even mold growth.
What's the best way to prevent ice dams?+
The most effective way to prevent ice dams is to ensure your attic has adequate insulation and proper ventilation. This keeps the roof deck cold, preventing snow from melting prematurely. Sealing air leaks from your home into the attic is also crucial.
Can I use rock salt to melt ice dams?+
No, you should not use rock salt (sodium chloride) to melt ice dams. It can corrode metal gutters and flashings, damage asphalt shingles, and harm landscaping below. Use calcium chloride instead, which is safer for roofing materials.


Discussion
Loading comments…