Tools & materials you'll need
Affiliate linksAs an Amazon Associate FixlyGuide earns from qualifying purchases — at no extra cost to you. Prices and availability are accurate as of publication and subject to change.
Quick Answer
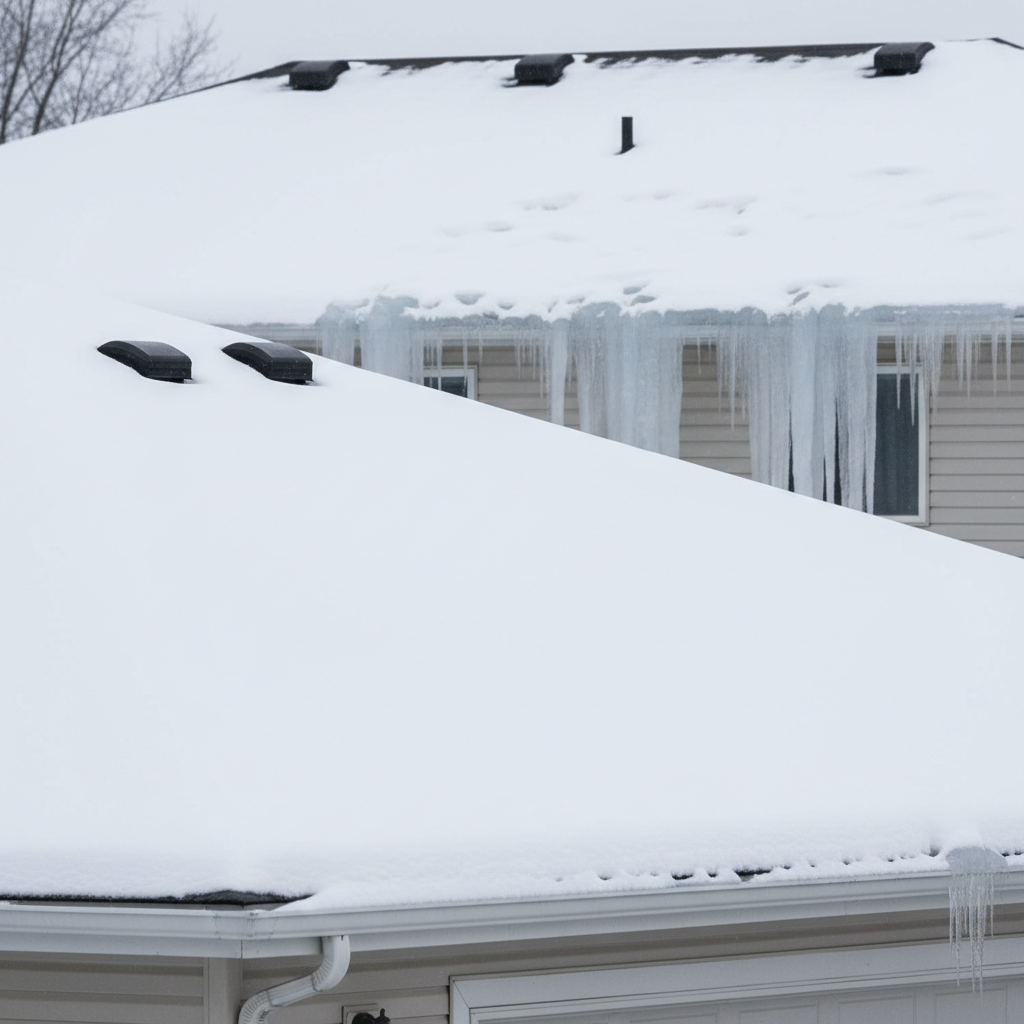
Ice dams are ridges of ice that form at the edge of a roof, preventing melting snow from draining off. They are a sign of heat loss from your home's attic, which causes snow on the upper roof to melt and then refreeze as it reaches the unheated eaves. The most effective way to prevent ice dams is to eliminate the temperature differences across your roof by improving attic insulation and ventilation, ensuring the entire roof stays equally cold.
The Problem
Many homeowners view ice dams as an inevitable winter nuisance, but they're actually a symptom of a deeper issue: a poorly performing thermal envelope and ventilation system in the attic. When warm air from your living space leaks into the attic, or if your attic insulation is insufficient, the heat radiates through the roof deck, melting the snow above. This meltwater flows down the roof until it hits the colder overhangs, where it refreezes, forming a barrier. As more snow melts, the water pools behind this icy dam, eventually backing up under shingles and into your home's walls, ceilings, and insulation. The damage can range from stained drywall and peeling paint to saturated insulation, rotted structural elements, and even mold growth. The sheer weight of large ice dams can also damage gutters and fascias.
How It Works
To understand why ice dams form, think of your roof as having two main temperature zones in winter: the upper, warmer section directly over your heated living space and the colder edges (eaves) that extend beyond the exterior walls. Heat from your home rises and, if not properly sealed and insulated, escapes into the attic. This heat can be from recessed lighting, unsealed attic hatches, poorly sealed ductwork, or inadequate insulation in the attic floor. Once in the attic, this warm air heats the underside of the roof deck, or the heat simply conducts through insufficient insulation. This warmth transfers to the roof surface, melting the snow. As this liquid water flows downwards, it reaches the roof's overhangs, which are typically unheated and exposed to the colder outside air. When the water hits this freezing zone, it refreezes, forming the initial ridge of an ice dam. This dam then traps subsequent meltwater, allowing it to pool. If that pooled water seeps under your shingles, it can saturate the roof sheathing and attic, leading to significant water damage.
The key to preventing this cycle is to ensure your entire roof surface remains at or very close to the ambient outdoor temperature. This is achieved through a combination of excellent attic insulation, which creates a thermal barrier between your living space and the attic, and robust attic ventilation (soffit and ridge vents working together) that flushes out any remaining heat that does make it into the attic, keeping the roof deck consistently cold. When the entire roof is cold, snow melts uniformly, if at all, and doesn't refreeze to form dams.
Step-by-Step Fix
1. Identify Heat Leaks — Find and seal gaps allowing warm air into your attic.
- Gather Your Gear: Headlamp, thermometer, caulk gun, expanding foam, utility knife.
- Safety First: Wear a respirator and long sleeves/gloves in dusty attics. Be mindful of exposed nails and insulation. Always use a sturdy ladder.
- Diagnostic: On a cold day, go into your attic. Using a non-contact thermometer, scan the attic floor, ceiling fixtures, and around pipes/vents. Warmer spots indicate heat escaping from your living space below. Look for gaps around electrical boxes, plumbing stacks, exhaust fans, and attic hatches.
- The Fix: Seal all major penetrations with fire-rated caulk or expanding foam. Pay close attention to the top plates of interior walls, which are often overlooked. Consider an attic hatch insulation kit if your hatch is a source of heat loss.
2. Boost Attic Insulation — Ensure your attic floor has adequate R-value.
- Tools: Tape measure, utility knife, face mask, gloves.
- Assess: Measure your current attic insulation depth. For most northern climates, a minimum of R-49 to R-60 (approximately 16-20 inches of fiberglass or cellulose) is recommended. If you can easily see the top of your ceiling joists, you likely need more.
- Installation: Add unfaced fiberglass batts or blown-in cellulose insulation over existing insulation. Ensure it's evenly distributed and doesn't block soffit vents. Use baffles to keep insulation away from vents. This creates a thermal barrier that keeps heat in your living space and out of your attic.
3. Improve Attic Ventilation — Ensure continuous airflow from soffit to ridge.
- Materials: Soffit vent baffles, utility knife, staple gun, appropriate screws for ridge vent.
- Check Soffits: From the attic, ensure that insulation isn't blocking the airflow from your soffit vents (the vents under your roof's eaves). Install baffles (insulation dams) to maintain a clear channel for air.
- Inspect Ridge Vent: Go outside and check the ridge vent (the continuous vent along the peak of your roof). It should be clear of debris, leaves, or snow. A good ventilation system requires both functional intake (soffit) and exhaust (ridge) vents to create a convection current that draws warm, moist air out of the attic.
4. Seal Exhaust Fan Ducts — Prevent warm, moist air from entering the attic.
- Materials: Aluminum duct tape, insulation sleeves for ducts, caulk.
- Inspection: Verify that all bathroom and kitchen exhaust fans vent outside through a roof or wall cap, not just into the attic. Ensure the ductwork is sealed without gaps.
- Repair/Insulate: If ducts vent into the attic, redirect them outside immediately. Seal any joints or gaps in the ductwork with aluminum duct tape. Insulate any uninsulated ductwork in the attic to prevent condensation and heat loss.
5. Clean Gutters & Downspouts — Ensure meltwater has a clear path.
- Tools: Sturdy ladder, garden hose, gloves, small trowel or scoop.
- Timing: Perform this step before winter and periodically during warmer spells if debris accumulates.
- Process: Clear all leaves, twigs, and sediment from gutters and downspouts. Run water through them to ensure they drain freely away from the foundation. Clogged gutters exacerbate ice dam formation by preventing proper water runoff.
6. Install Gutter Heating Cables (Temporary Fix) — For stubborn areas, as a last resort.
- Materials: Self-regulating heat cable, cable clips, outdoor-rated extension cord (if needed), GFCI outlet.
- Caution: This is an energy-intensive solution and does not address the root cause. It's best used after addressing insulation and ventilation, for specific problem areas.
- Installation: Follow manufacturer's instructions carefully for proper zigzag pattern and attachment to the bottom edge of the roof and inside gutters. Plug into a GFCI-protected outdoor outlet.
Common Causes
- Insufficient Attic Insulation: The most prevalent cause. If your attic floor lacks adequate R-value, heat easily transfers from your living space to the attic and then to the roof deck, melting snow.
- Poor Attic Ventilation: Even with good insulation, some heat will inevitably enter the attic. Without proper soffit and ridge vents, this warm air gets trapped, heating the roof surface and leading to snowmelt.
- Attic Air Leaks: Gaps and cracks around light fixtures, plumbing vents, electrical wires, ceiling penetrations, and unsealed attic hatches allow conditioned air to bypass insulation and enter the attic directly.
- Blocked Soffit Vents: Insulation pushed against the eaves can block the critical intake vents, stopping the flow of cold air into the attic from the soffits.
- Unvented Exhaust Fans: Bathroom or kitchen exhaust fans terminating into the attic instead of outside introduce significant amounts of warm, moist air, drastically raising attic temperatures.
- Clogged Gutters: While not a primary cause, clogged gutters exacerbate the problem by preventing meltwater from escaping, encouraging it to pool and freeze behind an existing or forming ice dam.
Common Mistakes
- Pounding on Ice Dams with a Hammer: This is extremely dangerous for both you and your roof. It can lead to falls, severe roof damage (broken shingles, punctures), and compromise the integrity of your roof, causing more leaks.
- Using Rock Salt Directly on the Roof: While salt melts ice, it is highly corrosive and can damage shingles, gutters, and landscaping. The residue can cause discoloration and premature wear to roofing materials.
- Relying Solely on Heat Cables: Heat cables are a band-aid solution. They consume significant electricity and don't address the underlying issues of poor insulation and ventilation. They should only be considered as a last resort for specific, persistent trouble spots after structural improvements have been made.
- Ignoring Soffit Vents When Insulating: Many DIYers add insulation but inadvertently block the soffit vents with new material. Always use baffles to ensure a clear pathway for air from the soffits into the attic.
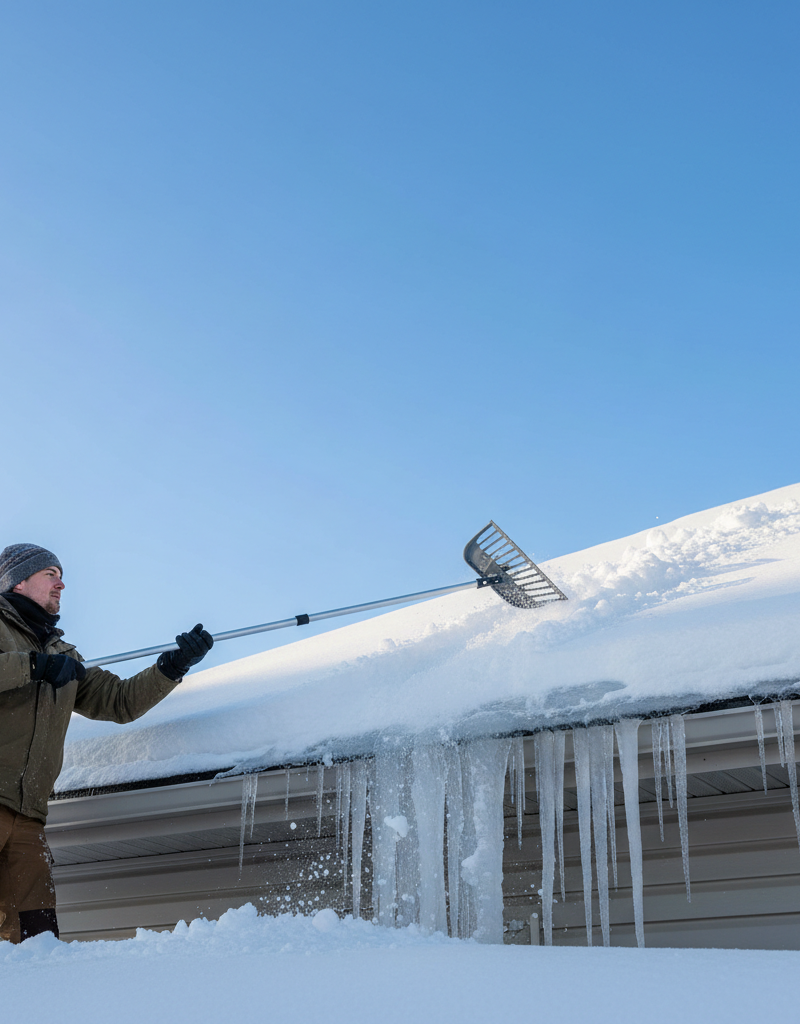
- Shoveling Snow Off the Roof Without Experience: While removing snow can help, improperly shoveling a roof can damage shingles, gutters, and lead to falls. Always be cautious, use a roof rake from the ground, or hire a professional if the snow load is excessive or difficult to reach.
- Not Sealing All Air Leaks: Homeowners often focus on insulation but overlook the smaller, numerous air leaks that allow significant amounts of warm air to bypass insulation and enter the attic. Air sealing is often more critical than adding insulation alone.
Cost & Time Breakdown
| Task | DIY cost | Pro cost | Time |
|---|---|---|---|
| Air Sealing Attic Leaks | $20–$100 | $300–$800 | 2–4 hours |
| Adding Attic Insulation | $300–$1,000 | $800–$2,500 | 4–8 hours |
| Installing Soffit Baffles | $50–$150 | Included with insulation | 1–3 hours |
| Gutter Cleaning | $0 | $100–$250 | 1 hour |
| Heat Cable Installation | $150–$400 | $400–$800 | 2–4 hours |
| Emergency Ice Dam Removal | N/A | $500–$2,000+ | 2–8 hours |
Tips & Prevention
- Annual Attic Inspection: Once a year, preferably in fall, inspect your attic for signs of moisture, critter activity, and ensure insulation is uniform and vents are clear. Reseal any newly formed gaps.
- Monitor Roof Snow Melt: After a snowfall, observe your roof. If snow melts quickly off the main roof but stays frozen at the eaves, it's a clear indicator of heat loss and potential ice dam issues.
- Use a Roof Rake: For existing snow, gently rake snow off the lower 3-4 feet of your roof using a specialized roof rake from the ground. This reduces the amount of snow available to melt and form dams. Do not get on the roof!
- Ensure Proper Downspout Drainage: Extend downspouts at least 3-6 feet away from your foundation to prevent meltwater from refreezing near the house or entering your basement.
- Consider a Home Energy Audit: A professional energy audit can pinpoint exact sources of heat loss in your attic and throughout your home, providing a comprehensive strategy for prevention.
- Regular Gutter Cleaning: Keep gutters clear of leaves and debris year-round, but especially before winter, to ensure unimpeded flow of meltwater.
When to Call a Professional
While addressing insulation and ventilation issues is largely a DIY-friendly project, there are specific situations where calling a licensed professional is essential. If you notice significant structural damage in your attic or ceiling from past water infiltration, a professional will be needed to assess and repair. For very large, stubborn ice dams that are actively causing leaks into your home, a professional roofing company trained in safe ice dam removal (often using steam) is critical to prevent further damage. Never attempt to remove massive ice dams yourself with chisels, hammers, or pickaxes, as this can severely damage your roof and gutters, leading to costly repairs. If working on your roof feels unsafe due to pitch, height, or weather conditions, always defer to a professional with proper safety equipment and insurance. Furthermore, if you suspect your ventilation system is complex or requires extensive modifications, a qualified roofing or HVAC contractor can design and implement an effective solution to ensure proper airflow and prevent future ice dam formation.
Related Articles
Keep troubleshooting with these hand-picked guides from FixlyGuide:
- The $30 Trick to Melting Ice Dams (Before They Destroy Your Roof) — Discover how to safely remove ice dams from your roof instantly with common household items, preventing costly damage. Stay safe while tack…
- The $20 Trick That Melts Ice Dams (and Saves Your Roof) — Discover a surprisingly simple, budget-friendly method to safely remove ice dams and prevent costly roof damage to your home.
- The #1 Mistake Homeowners Make Removing Ice Dams (And 3 Safer Fixes) — Discover the safest and most effective ways to remove ice dams from your roof, avoiding common mistakes that can cause severe damage to you…
- The 10-Second Flaw Home Inspectors Spot (That Hides Water Damage) — Discover the often-overlooked sign professionals catch in seconds that points to hidden water damage, protecting your home from costly repa…
- The 7 Sneaky Ways Spring Damages Your Home (And How to Stop Them Now) — Uncover the hidden threats spring poses to your home, from subtle water damage to pest invasions, and get actionable steps to protect your…
- The Secret Culprit Behind Your Leaky Refrigerator (It's Not What You Think) — Discover the often-overlooked reason your refrigerator is leaking water and how a simple, inexpensive fix can prevent costly damage.
Recommended for DIYers & woodworkers
Sponsored
The Top 20 Tools for Workshops of Any Budget
No stationary machines or power tools required — plus 3 fundamental tools that can't be bought at any price.
Get the free guide
Ted's Woodworking — The #1 Woodworking Resource
Detailed instructions, dimensioned drawings, materials & cutting lists, and 3D schematics for every skill level.
See the plansSponsored: links above are affiliate links. FixlyGuide may earn a commission on qualifying purchases — at no extra cost to you.
Frequently asked questions
What is an ice dam?+
An ice dam is a ridge of ice that forms at the edge of a roof, preventing melting snow from draining off. The water then backs up behind the dam and can leak into the house.
What causes ice dams?+
Ice dams are primarily caused by uneven roof temperatures. Heat escaping from your home warms the upper part of the roof, melting snow. This water then refreezes when it reaches the colder eaves, forming a dam.
Can I remove an ice dam myself?+
While small ice dams can sometimes be managed with a roof rake from the ground, attempting to chip away large dams can severely damage your roof. For significant dams, it's best to call a professional who uses steam to remove them safely.
How can I prevent ice dams permanently?+
The most effective long-term solution is to improve your attic's insulation and ventilation. This keeps the entire roof surface cold, preventing the freeze-thaw cycle that causes dams.


Discussion
Loading comments…