
Tools & materials you'll need
Affiliate linksAs an Amazon Associate FixlyGuide earns from qualifying purchases — at no extra cost to you. Prices and availability are accurate as of publication and subject to change.
Quick Answer
If your home was built before 1978, assume lead-based paint is present. Disturbing this paint through sanding, scraping, or demolition creates hazardous lead dust. Homeowners must use strict containment and cleanup protocols or hire lead-safe certified professionals to prevent widespread contamination. Ignoring these precautions can lead to significant health risks, especially for children and pregnant women, and can result in costly professional remediation later on.
The Problem
Old homes, charming as they are, often harbor a hidden danger: lead-based paint. While intact, undisturbed lead paint generally poses little immediate threat, the moment you begin a DIY renovation — be it sanding a door frame, scraping old window sills, drilling into a wall, or even minor demolition — you risk releasing microscopic lead dust and chips into your home environment. This dust is the real villain. It's invisible, odorless, and can settle on every surface, becoming a silent poison that can be inhaled or ingested.
Once lead enters the body, it can cause severe and irreversible health problems affecting the brain, kidneys, nerves, and blood. Children are particularly vulnerable because their developing bodies absorb lead more readily, and they often put their hands and toys into their mouths, making them highly susceptible to ingestion from contaminated surfaces. Even low levels of lead exposure can lead to learning disabilities, behavioral problems, and reduced IQ. For adults, lead exposure can cause high blood pressure, joint and muscle pain, headaches, and reproductive problems. Many homeowners, eager to tackle a renovation project, are unaware of these profound risks or underestimate the necessary precautions, inadvertently turning their dream project into a health hazard. This invisible threat can persist for years if not addressed correctly during the renovation process, making proper lead-safe practices absolutely critical.
How It Works
Lead-based paint was widely used in homes before 1978 for its durability and vibrant color. The lead compounds in the paint gave it these desirable properties, but it's precisely these compounds that become dangerous when disturbed. When activities like sanding, scraping, sawing, or demolition occur, the paint film is broken, releasing tiny particles of lead into the air. These particles are often too small to see, sometimes even microscopic, making them particularly insidious. They can remain airborne for hours, then settle onto every available surface: floors, furniture, carpets, and even into heating and ventilation systems, where they can be recirculated throughout the house long after the work stops.
Once settled, lead dust can be easily tracked throughout the home on shoes or clothing. Children crawling on floors or playing with toys that have collected dust are at high risk of ingesting lead through hand-to-mouth contact. Even cleaning methods like sweeping or using a regular vacuum cleaner can exacerbate the problem, re-suspending the dust into the air or spreading it further. The danger isn't just from directly inhaling the dust; it's also from secondary exposure through contaminated surfaces. Paint chips, especially those from damaged or deteriorating paint (flaking, chipping, peeling), also present an ingestion hazard, particularly for young children who might pick them up and put them in their mouths. The toxicity of lead doesn't diminish over time; once lead dust is present, it remains a hazard until it is properly removed. Understanding this mechanism of contamination is the first step in implementing effective prevention and cleanup strategies.
Step-by-Step Fix
Safety Note: Never attempt to remove or extensively disturb lead paint without proper personal protective equipment (PPE) and containment. If you are unsure or dealing with large areas, seek professional lead abatement services. Your health and the health of your family are paramount.
-
Test for Lead Before You Start – Use a reliable lead test kit to confirm the presence of lead-based paint.
- Swab tests are widely available at hardware stores. Follow the manufacturer's instructions precisely.
- Test multiple layers if possible (e.g., by making a small incision with a utility knife to expose lower layers if you plan on significant disturbance).
- For comprehensive and conclusive results, consider professional testing before major renovations. Knowing where lead paint is present will guide your precautions.
-
Prepare the Work Area – The Containment Zone – Isolate the area to prevent dust spread.
- Remove all furniture, rugs, curtains, and personal items from the room.
- Cover floors with heavy-duty plastic sheeting, taped securely to baseboards with painter's tape or duct tape. Extend sheeting at least 6 feet beyond the work area or to the entire room.
- Turn off central heating and air conditioning systems. Cover vents and cold air returns with plastic sheeting and tape.
- Close and seal all doors and windows leading to other parts of the house with plastic sheeting and tape. Post warning signs.
- Tools: Heavy-duty plastic sheeting (6mil or thicker), blue painter's tape, duct tape.
-
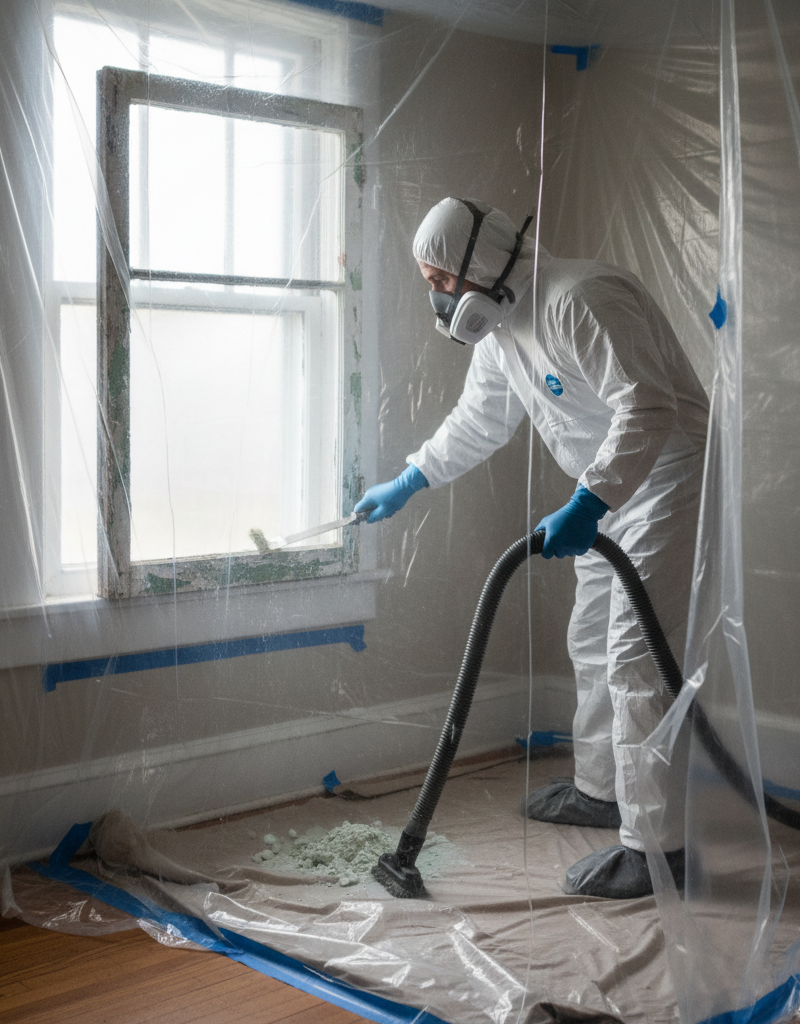
Don Your Personal Protective Equipment (PPE) – Protect yourself from lead dust exposure.
- Wear a disposable N100 or P100 respirator mask, not just a dust mask. Ensure it's properly fitted.
- Wear disposable coveralls or old clothing that can be bagged and laundered separately (or disposed of).
- Use disposable gloves. Consider safety glasses with side shields.
- Tools: N100/P100 respirator, disposable coveralls, disposable gloves, safety glasses.
-
Wet the Surface (Where Applicable) – Minimize airborne dust during removal.
- For tasks like hand scraping or minor repairs, lightly mist the painted surface with a spray bottle filled with water before disturbing it. This helps keep dust from becoming airborne.
- Do NOT oversaturate, especially with wood, to avoid damage. This method is not suitable for power tools or water-sensitive materials.
- Tools: Spray bottle with water.
-
Use Lead-Safe Practices for Paint Removal – Avoid methods that generate high dust levels.
- NEVER dry sand, grind, or use heat guns above 1100°F (593°C) on suspected lead paint. These methods create extremely hazardous lead fumes and dust clouds.
- Consider chemical paint strippers (ensure good ventilation) or wet scraping.
- For drilling, use a HEPA-filtered vacuum attachment to capture dust at the source.
- If you must use power tools, ensure they are equipped with shrouds and attached to a HEPA-filtered vacuum cleaner.
- Collect all paint chips and debris in heavy-duty plastic bags immediately.
-
Clean Up Meticulously (The Two-Bucket HEPA Method) – Thoroughly remove all lead dust.
- Initial Cleanup: Carefully roll up plastic sheeting from floors (dirty side in) and immediately place it in heavy-duty disposal bags. Seal bags and remove them from the work area.
- HEPA Vacuuming: Thoroughly vacuum all surfaces (floors, walls, window sills, ledges) with a HEPA-filtered vacuum cleaner. A regular vacuum cleaner will not suffice and will spread lead dust.
- Wet Wiping: Fill one bucket with hot water and a lead-specific cleaning solution (e.g., TSP substitute or general household cleaner). Fill a second bucket with clean rinse water. Use disposable wipes or rags.
- Wash surfaces with the cleaning solution, then rinse with clean water. Change water and rags frequently. Always wipe in one direction. Work from the top down.
- After wet wiping, vacuum again with the HEPA vacuum. Repeat the wet wiping and HEPA vacuuming steps.
- Dispose of all used rags, wipes, and vacuum bags as lead-contaminated waste in heavy-duty, sealed bags.
- Tools: HEPA vacuum cleaner, two buckets, lead-specific cleaning solution, disposable rags/wipes, heavy-duty trash bags.
-
Decontaminate Yourself – Prevent tracking lead dust out of the work zone.
- Before leaving the containment area, remove disposable coveralls and gloves within the sealed off zone, turning them inside out as you do, and place them in a sealed heavy-duty trash bag.
- Remove your respirator as the last step.
- Wash your hands and face thoroughly with soap and water immediately after leaving the work area. Consider showering.
-
Post-Renovation Cleaning and Testing – Ensure the area is truly lead-free.
- After your rigorous cleanup, perform a final, less intense HEPA vacuuming and wet wiping of the entire area.
- Consider professional post-remediation lead dust testing (
Related Articles
Keep troubleshooting with these hand-picked guides from FixlyGuide:
- Is That Sweet Car Smell a Secret Killer? (& 6 Other Odors to Watch For) — Unusual odors in your car aren't just unpleasant; they're often critical warnings of underlying mechanical issues that could compromise saf…
- The Hidden Danger in Your Old Light Switch Wiring (and How to Spot It) — Discover the crucial, often-misunderstood safety hazard hidden in older light switch wiring, where white wires can be live, and learn how t…
- The 6 Cleaning Secrets Hiding in Your Power Drill (Plus Attachments to Master) — Your power drill isn't just for DIY projects; with the right attachments, it's a powerful and efficient cleaning tool for tackling tough gr…
- The Secret Power Tool Hiding in Your Garage for a Speedier Clean — Unlock the hidden potential of your cordless drill to tackle stubborn household grime, soap scum, and dirt with specialized cleaning attach…
- 7 Inspection Red Flags That Secretly Signal a $20,000 Bill — Don't let your dream home become a money pit. Many buyers and even some inspectors overlook subtle home inspection red flags that lead to f…
- That Self-Clean Button? It Could Cost You $400. — Before you press that button, understand the oven self-clean danger many homeowners face. This convenient feature can lead to toxic fumes,…
Get the print-ready PDF of this guide
A clean, ad-free, printable version you can keep on your phone or pin to the workshop wall. Free with a FixlyGuide account.
- Print-optimized layout
- Tools, materials & every step included
- Saved to your account
This article was independently written by FixlyGuide based on the source topic.
Frequently asked questions
How do I know if my house has lead paint?+
If your home was built before 1978, assume lead-based paint is present. The only way to be certain is to use a lead test kit (available at hardware stores) or hire a certified lead risk assessor for professional testing. Testing is crucial before any renovation work.
What kind of respirator do I need for lead paint work?+
You need at least an N100 or P100 rated respirator mask. A standard dust mask is NOT sufficient to filter out microscopic lead particles. Ensure the respirator is properly fitted to create a seal around your face.
Can I just paint over lead paint?+
Encapsulating (painting over) intact lead-based paint can be a temporary solution if the paint is in good condition and not chipping or peeling. However, it does not remove the hazard. Any future disturbance (drilling, sanding) will still release lead dust. It's a management strategy, not a permanent fix.
What should I do with lead-contaminated waste?+
Collected lead paint chips, dust, plastic sheeting, and used PPE should be placed in heavy-duty plastic bags, sealed, and marked as lead-contaminated waste. Check with your local waste management facility or environmental health department for specific disposal requirements, as regulations vary by municipality. Do not put it in regular household trash unless explicitly permitted.


Discussion
Loading comments…