
Tools & materials you'll need
Affiliate linksAs an Amazon Associate FixlyGuide earns from qualifying purchases — at no extra cost to you. Prices and availability are accurate as of publication and subject to change.
Quick Answer
Lead paint is a serious health hazard found in many homes constructed before 1978. While intact lead paint is generally not dangerous, disturbing it through sanding, scraping, drilling, or demolition releases microscopic lead dust particles into the air. Inhaling or ingesting this dust can cause severe and irreversible health problems, particularly in children and pregnant women. Safe renovation practices involve testing for lead, creating airtight containment zones, using proper personal protective equipment, and meticulous cleanup to prevent contamination.
The Problem
Imagine the dream of transforming an outdated room, only to unknowingly release an invisible, toxic cloud that could harm your family for years. This isn't hyperbole for homeowners in older properties. Lead-based paint, once a common building material, is a silent threat lurking beneath layers of newer coatings. When this paint is disturbed during even minor DIY projects – a simple sanding to prep for a new coat, drilling a hole for new shelving, or scraping away peeling paint – it creates lead dust and chips. These particles are so fine they can remain airborne for hours and settle on every surface, becoming a persistent contaminant. Children are especially vulnerable; their developing brains and bodies absorb lead more readily, leading to developmental delays, learning disabilities, and behavioral issues. Adults can suffer from kidney damage, high blood pressure, and reproductive problems. The problem intensifies because lead dust is odorless and invisible, making its presence difficult to detect without specialized testing. Many homeowners mistakenly believe that simply painting over lead paint eliminates the risk, but any future disturbance of those layers can re-release the hazard.
How It Works
To understand the danger, it helps to know how lead paint interacts with your environment. Lead, a heavy metal, was valued for its durability, moisture resistance, and vibrant color pigments in paints. Manufacturers added it to everything from interior walls and trim to exterior siding and windows. However, as it ages, lead paint can chip, peel, crack, and chalk (form a fine, powdery residue). The real danger escalates when mechanical forces, such as friction from sanding or impact from drilling, break down these paint layers into microscopic dust. This dust contains lead particles that, when inhaled, enter the bloodstream and accumulate in bones, organs, and soft tissues. Unlike many toxins, lead has no safe threshold; even low levels of exposure can be detrimental. Furthermore, gravity doesn't completely solve the problem. Lead dust settles, but any activity that stirs the air—walking, vacuuming without a HEPA filter, even simply opening and closing a door—can re-suspend these particles, creating ongoing exposure. Young children, who frequently put their hands and toys in their mouths, often ingest lead dust from contaminated surfaces. Pets can also track lead dust through the home, compounding the risk. Understanding this mechanism is vital: the danger isn't static; it's dynamic, released by disturbance, spread by air currents, and absorbed by bodies.
Step-by-Step Fix
There isn't a "fix" for lead paint in the traditional sense; rather, it's a process of safe management or abatement. For DIY, encapsulation or minor repairs are generally the limit.
-
Test Before You Touch — Never assume your home is lead-free.
- Before starting any renovation on a home built before 1978, test painted surfaces. You can purchase EPA-recognized lead test kits (usually swab-based) from hardware stores. For more reliable and comprehensive results, consider hiring a certified lead inspector for XRF testing, which is non-destructive and highly accurate.
- If the test is positive, proceed with extreme caution. If negative, still follow dust control practices as other hazards may exist.
-
Create a Containment Zone — Isolate the work area completely.
- Remove all furniture, rugs, and personal items from the room. If removal isn't possible, cover items tightly with 6-mil plastic sheeting and seal with painter's tape.
- Close and seal all windows and doors leading to other areas of the house with 6-mil plastic sheeting and painter's tape, creating an airtight barrier. Turn off HVAC systems to prevent dust circulation.
- Cover the floor with two layers of 6-mil plastic sheeting, extending at least 6 feet beyond the work area. Tape seams securely.
-
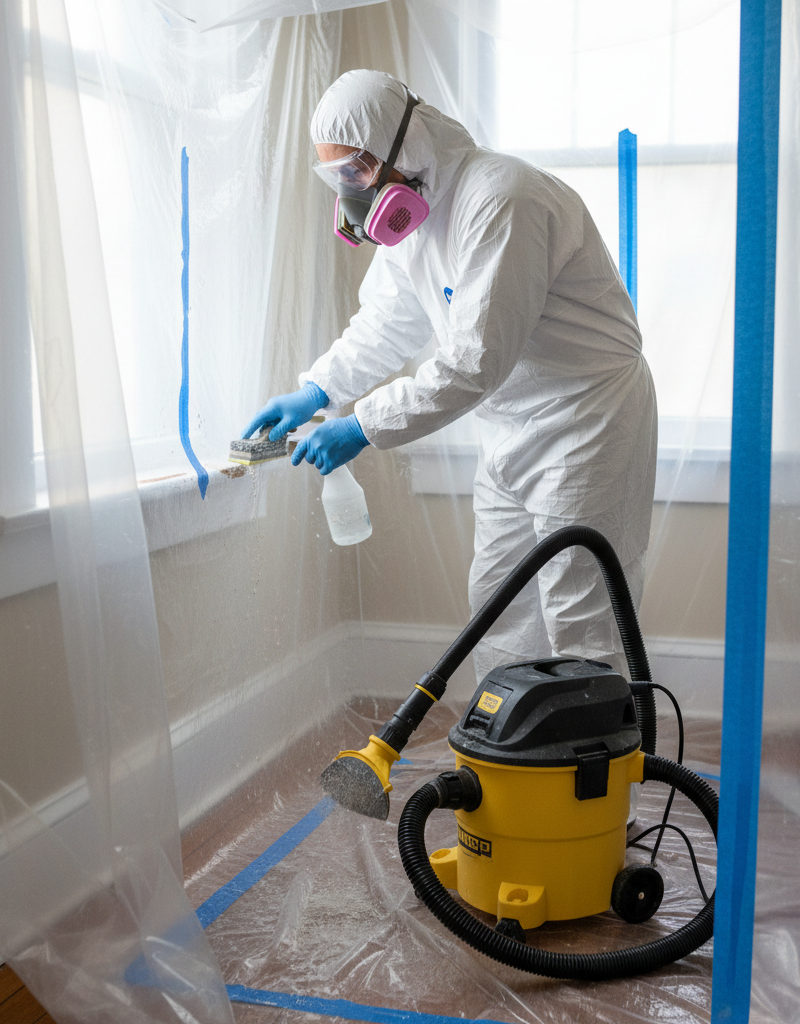
Don Your Personal Protective Equipment (PPE) — Protect yourself from inhalation and contact.
- Wear a properly fitted N100 or P100 lead-specific respirator (not a dust mask). Ensure a tight seal. Men should be cleanshaven for proper fit.
- Don disposable coveralls with a hood, disposable gloves, and disposable shoe covers. Change these before leaving the containment area.
- Wear safety glasses or goggles.
-
Wet Methods Only (No Dry Scraping/Sanding!) — Minimize airborne dust.
- For scraping, wet the paint surface thoroughly with a mist of water before beginning. This helps to agglomerate lead particles, making them heavier and less likely to become airborne.
- Use chemical paint removers containing N-methyl-2-pyrrolidone (NMP) or benzyl alcohol to soften paint, making it easier to remove without aggressive scraping. Always test in an inconspicuous area first and follow product instructions carefully, ensuring good ventilation.
- NEVER dry sand, grind, or use heat guns above 1100°F (593°C), as these methods vaporize lead and create significant dust or fumes.
-
Careful Debris Collection — Prevent spread during cleanup.
- Lay down a drop cloth directly beneath the work area to catch all paint chips and debris.
- Regularly mist the work surface and the drop cloth to keep dust settled.
- Use a heavy-duty plastic scraper and hand tools; avoid power tools unless specifically designed for lead paint abatement with HEPA vacuum attachments.
-
HEPA Vacuuming and Wet Wiping — Thoroughly clean all surfaces.
- After removing all visible debris, vacuum the entire work area (including walls, ceilings, and floors) with a HEPA-filtered vacuum cleaner. Standard shop vacs or household vacuums will just redistribute lead dust.
- Follow vacuuming with thorough wet wiping using a solution of water and an all-purpose cleaner (or a specialized lead-specific cleaning agent). Wipe all surfaces twice, rinsing rags frequently in a separate bucket of water. Dispose of rinse water as hazardous waste.
- Repeat the vacuuming and wet wiping process entirely at least once more.
-
Proper Waste Disposal — Treat all lead-contaminated materials carefully.
- Place all plastic sheeting, coveralls, gloves, rags, paint chips, and HEPA vacuum bags into heavy-duty, sealable plastic bags. Double bag for extra security.
- Contact your local waste management facility or health department for specific instructions on disposing of lead-contaminated waste. It is often considered hazardous waste and cannot go into regular household trash.
-
Post-Renovation Cleaning and Testing — Ensure the area is truly safe.
- After all cleanup, it's highly recommended to have a certified lead professional conduct a post-abatement clearance test, typically involving dust wipe samples. This verifies that lead levels are safe before re-occupying the space.
Common Causes
The presence of lead paint is a direct result of historical building practices, but the danger arises from its degradation and disturbance:
- Age of Home: Homes built before 1978 are highly likely to contain lead paint. The older the home, the higher the probability and concentration.
- Wear and Tear: Peeling, chipping, or chalking paint on windows, doors, walls, and trim naturally releases lead dust over time, even without direct intervention.
- Friction Surfaces: Windows and doors that rub together, creating friction, can generate lead dust from paint on their surfaces, depositing it on sills and floors.
- DIY Renovation Mistakes: Aggressive dry sanding, scraping, grinding, or using high-heat guns to remove lead paint are the primary ways homeowners create massive lead dust hazards.
- Impact and Abrasion: Any activity that damages painted surfaces, such as drilling, hammering, demolition, or even heavy traffic near walls, can release lead-containing particles.
- Lead Dust Accumulation: Even if not actively disturbed, lead dust from past events can accumulate in carpets, upholstery, and on surfaces, becoming a persistent source of exposure when re-suspended.
Common Mistakes
Homeowners often make critical errors when dealing with suspected lead paint:
- Assuming Fresh Paint Solves It: Painting over lead paint only encapsulates it temporarily. Any future disturbance of those layers re-releases the hazard. It's a band-aid, not a fix.
- Dry Sanding and Scraping: This is the most dangerous mistake. Dry methods aerosolize lead particles, making them breathable and spreading them throughout the home. Always use wet methods.
- Using a Regular Vacuum Cleaner: Standard vacuums (even those with "HEPA-type" filters) are not equipped to capture microscopic lead particles. They often exhaust the fine lead dust back into the air, making matters worse. Only use certified HEPA vacuums.
- Skipping Containment: Failure to seal off the work area allows lead dust to travel freely, contaminating adjacent rooms and the entire house.
- Inadequate PPE: Many DIYers underestimate the need for a proper respirator, disposable coveralls, and gloves. A simple dust mask offers almost no protection against lead dust.
- Improper Waste Disposal: Throwing lead-contaminated debris into regular household trash can spread lead in the community and is often illegal.
- Overestimating DIY Capability: While minor repairs can be managed with caution, extensive lead paint removal or renovation in a heavily contaminated home is almost always a job for licensed professionals.
Cost & Time Breakdown
| Task | DIY Cost | Pro Cost | Time |
|---|---|---|---|
| Lead Test Kits (DIY) | $20–$50 | N/A | 15–30 minutes |
| Professional Lead Inspection | N/A | $300–$800 | 1–3 hours |
| PPE (respirator, coveralls) | $50–$100 | N/A | N/A |
| Containment Supplies | $40–$100 | N/A | 1–2 hours |
| Minor Paint Scraping (DIY) | $0–$20 (tools) | N/A | 1–4 hours |
| Pro Lead Abatement (per room) | N/A | $1,000–$5,000+ | 2 days – 2 weeks |
Tips & Prevention
- Regular Inspections: Periodically check painted surfaces in older homes, especially windows, doors, and areas prone to friction or impact, for signs of chipping, peeling, or chalking paint.
- Maintain Intact Paint: If lead paint is in good condition, the best prevention is often encapsulation – painting over it with a high-quality, durable paint. This is a temporary solution that requires ongoing monitoring.
- Clean Appropriately: Routinely wet-wipe surfaces, especially window sills and floors, to remove any settling dust. Use a HEPA vacuum for carpets and rugs.
- Child Safety: Keep children and pregnant women away from renovation areas in older homes. Wash children's hands frequently and clean toys regularly.
- Footwear Policy: Implement a "shoes off" policy indoors to prevent tracking in lead dust from exterior sources.
- Stay Informed: Familiarize yourself with EPA and local regulations regarding lead-based paint. Resources like the National Lead Information Center (1-800-424-LEAD) offer valuable guidance.
When to Call a Professional
Calling a licensed lead abatement professional is essential when you're dealing with significant areas of lead-based paint, particularly if the paint is extensively chipping, peeling, or if you plan on major renovations involving demolition, window replacement, or floor removal. DIY methods are generally only suitable for very small, localized areas of intact paint that can be carefully encapsulated or disturbed minimally with rigorous safety protocols. If you have children under six, a pregnant person living in the home, or individuals with compromised immune systems, any confirmed presence of lead paint warrants a professional assessment. Professionals have the specialized training, equipment (like negative air machines and comprehensive HEPA filtration systems), and experience to safely remove or encapsulate lead paint with minimal risk of contamination, providing clearance testing to ensure the area is truly safe for re-occupancy. Never attempt to remove lead paint from large surfaces or structural components yourself; the health risks are too severe.
Related Articles
Keep troubleshooting with these hand-picked guides from FixlyGuide:
- 7 Hidden Equity Drains Costing You Thousands Annually — Your home is an asset, but silent problems like minor leaks, poor insulation, and deferred maintenance can drain its value. Discover the se…
- 7 Inspection Red Flags That Secretly Signal a $20,000 Bill — Don't let your dream home become a money pit. Many buyers and even some inspectors overlook subtle home inspection red flags that lead to f…
- The Hidden Reason Your AC Isn't Cooling (And 7 Fixes Homeowners Miss) — If your central AC isn't cooling your home, the culprit often lies in an overlooked issue that's simple to fix, preventing costly professio…
- The Hidden Culprit Behind Your AC Not Cooling (and How to Find It) — If your central AC isn't cooling your home, the issue often stems from a surprisingly simple problem that's easy to overlook. Learn how to…
- The 12 Checks That Prevent 80% of Costly Home Repairs — Don't wait for a disaster. Our comprehensive monthly home maintenance checklist reveals the surprising, simple tasks that catch small issue…
- The Invisible Hail Damage Mistake Most Homeowners Make (And How to Spot It) — Discover how to accurately assess hail damage on your home's siding, understand its hidden impacts, and perform essential repairs to protec…
Get the print-ready PDF of this guide
A clean, ad-free, printable version you can keep on your phone or pin to the workshop wall. Free with a FixlyGuide account.
- Print-optimized layout
- Tools, materials & every step included
- Saved to your account
This article was independently written by FixlyGuide based on the source topic.
Frequently asked questions
How do I know if my home has lead paint?+
The most reliable way is to have your home tested by a certified lead inspector using an XRF analyzer or to use EPA-recognized lead test kits found at hardware stores. Homes built before 1978 are most likely to contain lead paint.
Is it safe to paint over lead paint?+
Painting over intact lead paint (encapsulation) can be a temporary solution if the paint is in good condition. However, it does not remove the lead, and any future disturbance of the underlying layers can still release lead dust. It's not suitable for flaking or peeling paint.
What is the biggest danger with lead paint?+
The greatest danger comes from disturbed lead paint, such as during sanding, scraping, drilling, or demolition, which creates fine, invisible lead dust. Inhaling or ingesting this dust, particularly by children, can cause severe and irreversible health problems.
What kind of respirator do I need for lead paint?+
For lead paint work, you need a properly fitted N100 or P100 lead-specific respirator. A basic dust mask or surgical mask will not provide adequate protection against microscopic lead particles.


Discussion
Loading comments…