
Tools & materials you'll need
Affiliate linksAs an Amazon Associate FixlyGuide earns from qualifying purchases — at no extra cost to you. Prices and availability are accurate as of publication and subject to change.
Quick Answer
If your home was constructed before 1978, there's a significant likelihood that some of its painted surfaces contain lead-based paint. While intact lead paint generally poses a low risk, any activity that disturbs it—such as sanding, scraping, drilling, or demolition—can release microscopic lead particles into the air, creating a hazardous lead dust that is highly toxic if inhaled or ingested. Safe DIY repairs require strict adherence to containment, personal protection, and specialized cleaning protocols to prevent contamination and protect your health.
The Problem
You're tackling a home repair or renovation project, perhaps stripping old trim, sanding down a door, or patching crumbling plaster. Your home has character, maybe built in the 1950s or 60s. What you might not realize is that beneath those layers of modern paint, there could be a silent, invisible threat: lead-based paint. This isn't just an old wives' tale; it's a serious public health concern, especially for homes built before 1978, when lead paint for residential use was banned in the United States. Disturbing this paint without proper precautions creates lead dust, which is incredibly fine and can spread throughout your home, contaminating surfaces, furniture, and even ventilation systems. This dust can be ingested by children, who are particularly vulnerable to lead poisoning, leading to developmental problems, learning disabilities, and behavioral issues. Adults can also suffer from kidney damage, nervous system problems, and reproductive issues. The danger isn't always obvious because lead dust is often invisible, making proper safety protocols an absolute necessity for anyone working on older homes.
How It Works
Lead-based paint was once prized for its durability, vibrant colors, and moisture resistance. Before 1978, it was widely used on interior and exterior surfaces, including walls, ceilings, trim, doors, and windows. The problem isn't the lead contained within the paint film itself, as long as it remains undisturbed and in good condition. The hazard arises when the paint deteriorates, chips, or is intentionally disturbed during repair or renovation.
When lead paint is sanded, scraped, drilled, or demolished, it breaks down into microscopic particles of lead dust. These particles are often invisible to the naked eye, smaller than a grain of pollen. Once airborne, they can settle on any surface—floors, carpets, furniture, toys, and even food prep areas. Even a tiny amount of lead dust, equivalent to a few grains of sugar, can be highly toxic. The primary routes of exposure are inhalation and ingestion. Inhalation occurs when lead dust becomes airborne during work and is breathed in. Ingestion happens when dust settles on hands, food, or objects that are then put into the mouth. Children are especially vulnerable because they often put their hands and objects into their mouths, and their developing bodies absorb lead more readily than adults. The lead then interferes with various bodily functions, affecting the brain, kidneys, and blood-producing organs. Understanding this mechanism is vital: the goal of safe lead paint practices is to prevent the creation and spread of this hazardous dust.
Step-by-Step Fix
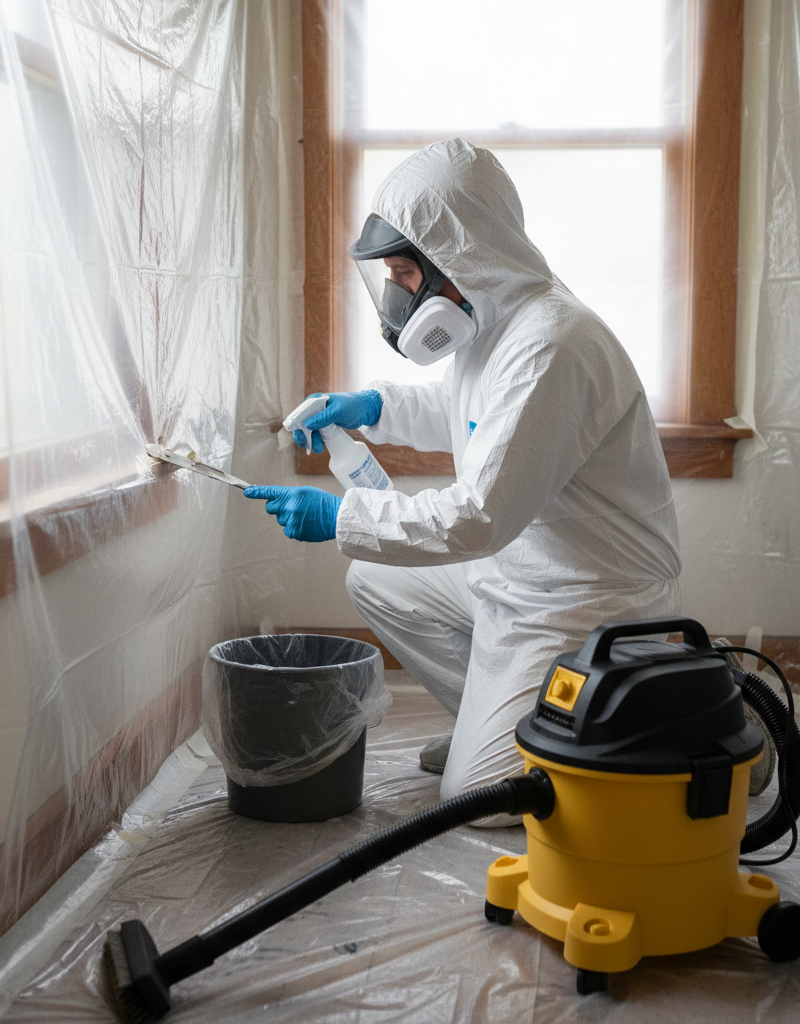
Always assume lead paint is present in homes built before 1978. For any DIY project that disturbs painted surfaces, follow these steps meticulously. If the project involves extensive disturbance of painted surfaces (e.g., full wall demolition or significant paint stripping), strongly consider professional lead abatement.
-
Test for Lead Paint (Optional but Recommended) — Before starting, you can use a home lead test kit or, for more accurate results, send paint chip samples to a certified lab. This confirms the presence and concentration of lead, guiding your precautions.
- Cost Insight: Home kits are $20-$40, lab tests $50-$100 per sample.
- If positive: Proceed with all precautions below.
- If negative: Still exercise caution, as tests can miss lead under multiple layers, though the risk is significantly lower.
-
Clear the Work Area Completely — Remove all furniture, curtains, rugs, toys, and anything else that could absorb lead dust. If items cannot be removed, cover them completely with two layers of 6-mil plastic sheeting and seal seams with painter's tape.
- Safety First: Clear path for entry/exit; ensure adequate lighting.
-
Seal Off the Work Area — Establish a decontamination zone. Close and seal all windows and doors in the work area with 6-mil plastic sheeting and painter's tape. Turn off forced-air heating and air conditioning systems to prevent dust from circulating throughout the house. Cover vents with plastic and tape.
- Tools: 6-mil plastic sheeting, painter's tape, utility knife.
-
Protect Yourself with PPE — Essential personal protective equipment (PPE) is non-negotiable. Wear a disposable N100 or P100 respirator (not just a dust mask), disposable coveralls with a hood, disposable gloves, and eye protection (goggles).
- Safety First: Ensure respirator fits snugly; facial hair can compromise the seal.
-
Prepare for Wet Methods — Wherever possible, use wet methods to reduce dust. Lightly mist surfaces with water before scraping or sanding. This agglomerates dust particles, making them less likely to become airborne. If drilling, consider a drill with a HEPA vacuum attachment.
- Avoid: Dry sanding, dry scraping, open-flame burning, or using heat guns above 1100°F (which can vaporize lead).
-
Work Carefully and Contained — Perform tasks with minimal disturbance. Use hand tools rather than power tools where possible. If power tools are necessary, ensure they have HEPA-filtered vacuum attachments. Place a drop cloth (6-mil plastic) directly under your work area to catch debris.
- If this doesn't work: For large-scale projects, professional lead abatement is safer and more effective.
-
Contain Debris as You Go — As painted material is removed, immediately place it into heavy-duty 6-mil plastic bags. Double-bag all lead-contaminated waste and seal bags tightly. Label them
Related Articles
Keep troubleshooting with these hand-picked guides from FixlyGuide:
- The #1 Chainsaw Mistake That Wrecks Your Yard (and Your Back) — Avoid common chainsaw errors that lead to frustration, damage, and unnecessary physical strain.
- The 12 Checks That Prevent 80% of Costly Home Repairs — Don't wait for a disaster. Our comprehensive monthly home maintenance checklist reveals the surprising, simple tasks that catch small issue…
- 7 Inspection Red Flags That Secretly Signal a $20,000 Bill — Don't let your dream home become a money pit. Many buyers and even some inspectors overlook subtle home inspection red flags that lead to f…
- Your Home's Secret To-Do List: Are You Missing It? — Most new homeowners focus on decorating, but ignoring a basic home maintenance checklist can lead to thousands in unexpected repairs. Learn…
- The 3 Crucial Mistakes That Ruin Wall Stripes (And How to Fix Them) — Achieving crisp, professional-looking painted stripes on a wall is a rewarding DIY project, but it's easy to make common mistakes that lead…
- The 3 Hidden Dangers of Frozen Pipes (And How to Thaw Them Safely) — Frozen pipes can burst, causing extensive water damage. Learn to safely thaw them and prevent costly repairs.
Get the print-ready PDF of this guide
A clean, ad-free, printable version you can keep on your phone or pin to the workshop wall. We'll also send occasional weekly tips matched to your home situation.
- Print-optimized layout
- Tools, materials & every step included
- Unsubscribe anytime
This article was independently written by FixlyGuide based on the source topic.
Frequently asked questions
How do I know if my paint contains lead?+
The most definitive way is to have your paint tested by a certified lab, or you can use a reliable home lead test kit. Homes built before 1978 are presumed to have lead-based paint.
What is the biggest danger of lead paint?+
The biggest danger comes from disturbing lead paint during renovations or repairs, which creates invisible lead dust. This dust can be inhaled or ingested, leading to lead poisoning, especially in children.
What kind of mask do I need for lead paint work?+
You need at least an N100 or P100 respirator approved by NIOSH. Standard dust masks or surgical masks do not provide adequate protection against lead dust.
Can I sand lead paint if I use a HEPA vacuum?+
While a HEPA vacuum can reduce airborne dust, dry sanding lead paint is still highly discouraged. Wet sanding or specialized tools with HEPA attachments are preferred, but professional abatement is best for heavily leaded surfaces.


Discussion
Loading comments…