
Tools & materials you'll need
Affiliate linksAs an Amazon Associate FixlyGuide earns from qualifying purchases — at no extra cost to you. Prices and availability are accurate as of publication and subject to change.
Quick Answer
If your home was constructed before 1978, there's a significant chance that its painted surfaces contain lead-based paint. The primary hazard isn't the intact paint itself, but the invisible, insidious lead dust generated when this paint is disturbed during common home renovation activities such as sanding, scraping, drilling, or demolition. Safeguarding your family requires stringent precautions, including isolating the work area, wearing appropriate personal protective equipment, and employing specific cleaning methods to prevent lead contamination and exposure.
The Problem
Imagine the dust motes dancing in a sunbeam after a day of scraping old paint – seemingly harmless, right? If your home predates 1978, some of those motes could be microscopic lead particles, carrying a silent, insidious threat. Lead poisoning, even at low levels, can have severe and lasting effects, particularly on children, pregnant women, and pets. In children, it can lead to developmental delays, learning difficulties, and behavioral problems. Adults can experience high blood pressure, joint pain, muscle pain, headaches, memory problems, and even reproductive issues. The danger isn't limited to ingestion; lead dust can be inhaled, settle on toys, food, and surfaces, and be tracked throughout the home, creating a widespread hazard. Home renovation, while exciting, often inadvertently becomes the primary vector for lead exposure simply because homeowners are unaware of the risks or underestimate the necessary precautions. A seemingly simple task like removing an old window or sanding a doorframe can create enough lead dust to contaminate an entire house for years if not handled correctly.
How It Works
Lead was a common additive in paint before 1978, prized for its durability, vibrant color, and resistance to moisture. When this paint is intact and undisturbed, it generally poses a low risk. The danger arises when the paint surface is broken, chipped, scraped, sanded, or otherwise disturbed, releasing microscopic lead particles into the air and onto surfaces. These particles are too small to be seen with the naked eye, hence the term “invisible dust.”
The process works like this: imagine layers of paint on an old doorframe. If the outermost layer isn't lead-based, but a deeper layer is, sanding through to that lead layer will release lead dust. Similarly, drilling into a wall painted with lead paint creates lead-laden chips and dust. When these particles become airborne, they can be inhaled directly. Once settled, they can adhere to skin, clothing, and hair, and be easily transferred to other parts of the house. Children, with their hand-to-mouth behaviors, are especially vulnerable to ingesting settled lead dust from floors, windowsills, and toys. Standard household vacuums, lacking HEPA filters, will simply redistribute this fine dust into the air, exacerbating the problem rather than solving it. Even washing clothes contaminated with lead dust can spread particles into the washing machine and onto other garments. Understanding this mechanism of dispersal is critical for preventing widespread contamination during any renovation or repair in an older home.
Step-by-Step Fix
Step 1: Test Before You Touch – Don't assume your home is lead-free without testing.
- Test Kits: Purchase EPA-recognized lead paint test kits from hardware stores. They involve swabbing a painted surface for a color change indicating lead. Follow manufacturer instructions precisely. Test multiple painted surfaces, as lead paint may only be present in certain areas or layers.
- Professional Testing: For comprehensive results, especially before major renovations, hire a certified lead inspector. They can use specialized equipment to identify lead paint layers without destructive testing and provide a detailed report.
- Assumed Lead: If testing is inconclusive or unavailable, always assume lead paint is present in homes built before 1978 and proceed with all necessary precautions.
Step 2: Isolate the Work Area – Prevent lead dust from spreading throughout your home.
- Empty the Room: Remove all furniture, curtains, rugs, and personal items from the work area. If items cannot be removed, cover them completely with two layers of 6-mil plastic sheeting and seal the edges with painter's tape.
- Seal Openings: Use two layers of 6-mil plastic sheeting and painter's tape to completely seal off doorways, HVAC vents, and any other openings leading to uncontaminated areas. Create an airlock by overlapping plastic sheets at main entry points, securing three sides and leaving one loose for entry/exit.
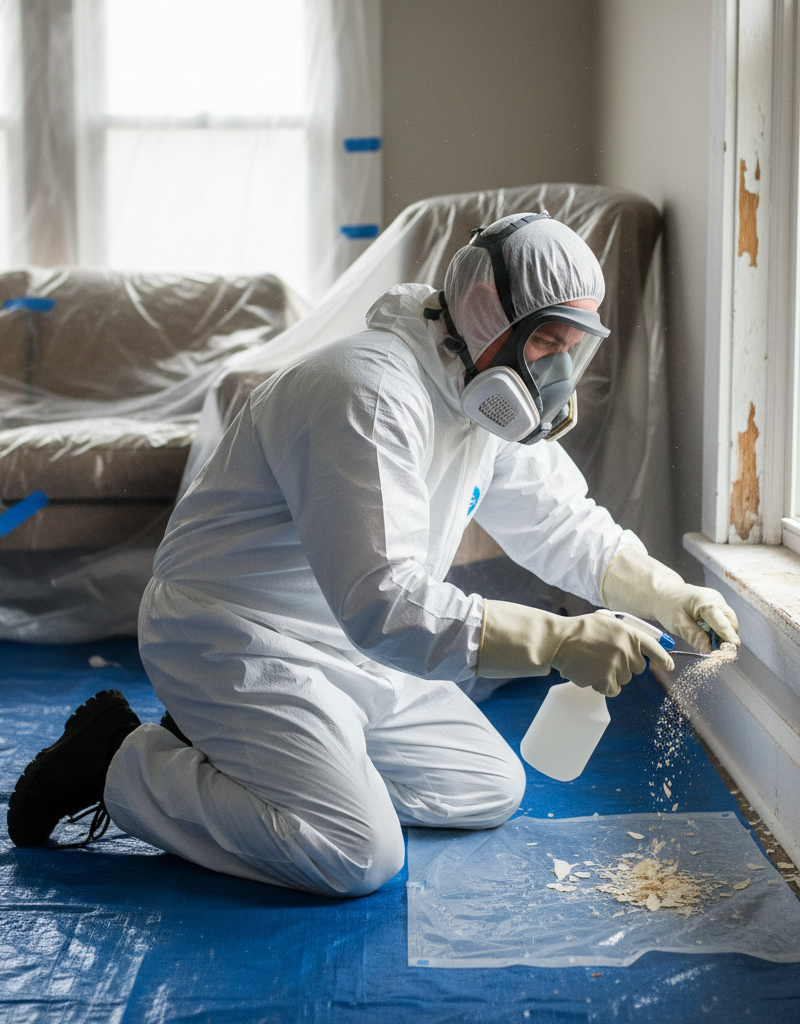
- Floor Protection: Cover the entire floor of the work area with two layers of 6-mil plastic sheeting, extending it up the walls by at least 6 inches. Tape seams securely.
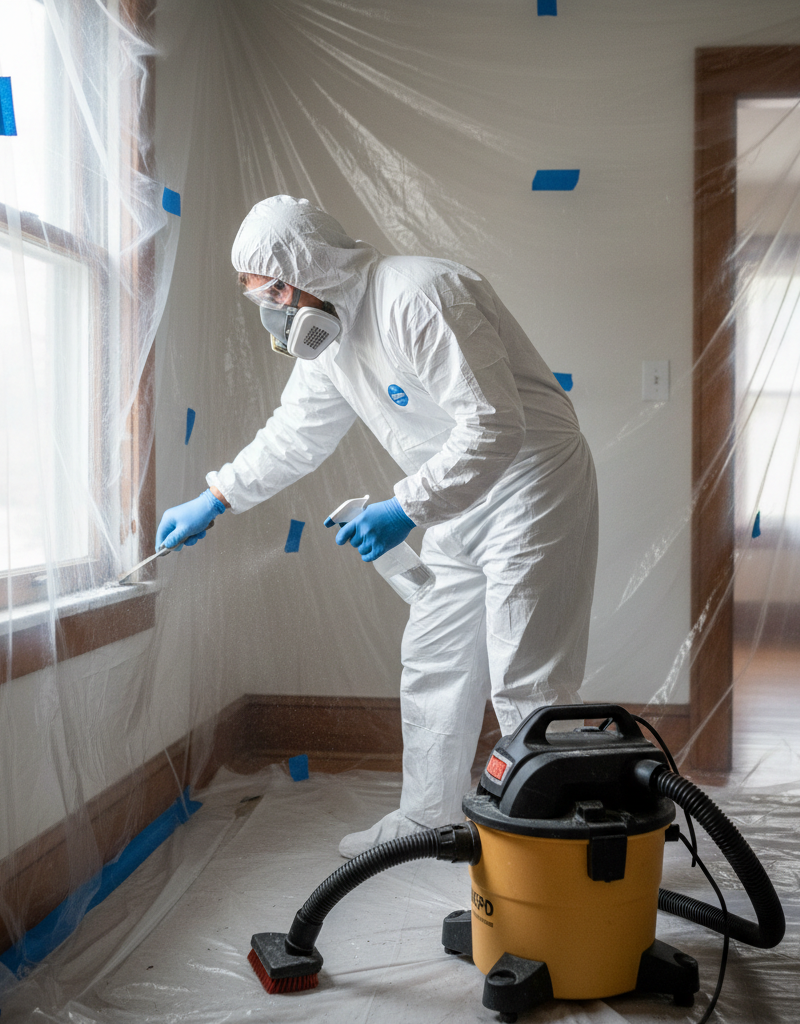
Step 3: Wear Personal Protective Equipment (PPE) – Protect yourself from inhaling or contacting lead dust.
- Respirator: Use an N100 or P100 particulate respirator (half-mask is usually sufficient, full-face if available). Ensure it's properly fitted and creates a tight seal. Basic paper dust masks are not adequate.
- Disposable Coveralls: Wear disposable coveralls to prevent lead dust from contaminating your clothing. Duct tape the cuffs of the coveralls over the gloves and boot covers.
- Gloves and Boot Covers: Use durable disposable gloves (nitrile or latex) and disposable boot covers over your shoes. Change gloves frequently if they become torn.
- Eyewear: Wear tight-fitting safety goggles or glasses with side shields to protect your eyes from dust.
Step 4: Use Lead-Safe Work Practices – Minimize dust generation during the repair.
- Wet Methods: Whenever possible, use wet scraping or sanding techniques. Lightly mist surfaces with water before scraping to keep dust down. Do not saturate, as this can create lead-contaminated wastewater.
- Tool Choice: Avoid power sanding, grit blasting, or open-flame burning of lead paint, as these methods generate massive amounts of lead dust. Instead, opt for hand scraping, chemical paint strippers (ensure proper ventilation and follow product safety data sheets), or heat guns set to low temperatures (below 1100°F / 593°C) that do not vaporize the paint.
- Containment: When using power tools minimally and only if absolutely necessary, ensure they are equipped with HEPA-filtered vacuum attachments to capture dust at the source.
Step 5: Conduct Thorough Cleanup – Remove lead dust completely, not just visibly.
- Heavy Debris: Carefully gather and double-bag all solid debris (paint chips, plastic sheeting, used PPE) in 6-mil plastic bags. Seal with duct tape.
- HEPA Vacuum: Use a HEPA-filtered vacuum cleaner (not a standard household vacuum) to thoroughly vacuum all surfaces: walls, floors, windowsills, and any exposed items. Vacuum twice, slowly and deliberately.
- Wet Wipe: Mix a solution of Trisodium Phosphate (TSP) cleaner or a specialized lead-specific cleaning solution according to manufacturer instructions. Using disposable rags, wet-wipe all vacuumed surfaces, rinsing the rags frequently in a separate bucket of clean water and changing the water often. Dispose of all rags and dirty water properly.
- Final Rinse: Once the TSP wash dries, use clean water and fresh disposable rags to wipe down all surfaces again.
Step 6: Proper Disposal – Bag and discard lead waste responsibly.
- Double Bagging: Place all contaminated waste – sheeting, rags, PPE, paint chips – into heavy-duty 6-mil plastic bags. Seal each bag with duct tape.
- Local Regulations: Contact your local waste management facility or public health department for specific guidance on disposing of lead-contaminated waste in your area. Regulations vary by municipality and state.
Common Causes
- Homes Built Before 1978: This is the absolute primary cause. Lead-based paint was legal and widely used until 1978, making any home built before this date a potential hazard. The older the home, the higher the likelihood and concentration of lead paint.
- Wear and Tear: Deteriorating lead paint, such as chipping, peeling, or chalking paint, naturally releases lead dust into the environment even without renovation activities. Areas with high friction, like windows and doors, are often the worst culprits.
- Renovation Activities: Any activity that disturbs painted surfaces, including sanding, scraping, drilling, cutting, or demolition, is a leading cause of lead dust generation and exposure.
- Aggressive Cleaning Methods: Using abrasive pads or harsh chemicals on lead-painted surfaces can degrade the paint and release lead particles.
- DIY Ignorance: Lack of awareness regarding lead paint hazards and improper lead-safe work practices by homeowners are significant contributors to lead exposure during repairs.
Common Mistakes
- Using a Standard Vacuum: A typical household vacuum does not have a HEPA filter and will simply suck up fine lead dust and blow it back into the air, spreading contamination throughout the entire house. Always use a HEPA-filtered vacuum.
- Dry Sanding or Scraping: These methods create vast amounts of airborne lead dust, which is the most dangerous form. Always use wet methods or localized exhaust with HEPA filtration if power tools are absolutely necessary.
- Not Sealing Off the Work Area: Failing to adequately seal doors, windows, and HVAC vents allows lead dust to escape the containment zone and spread to other living spaces.
- Inadequate PPE: Using a flimsy paper dust mask instead of an N100 or P100 respirator offers almost no protection against microscopic lead particles. Similarly, not wearing disposable clothing allows lead dust to be tracked throughout the home.
- Improper Disposal: Tossing lead-contaminated waste into regular household trash without double-bagging and checking local regulations can harm waste workers and further contaminate the environment.
- Ignoring Cleanup Protocols: A cursory wipe-down isn't enough. Lead dust is microscopic and requires thorough HEPA vacuuming followed by wet-wiping with specialized cleaners to ensure complete removal.
Cost & Time Breakdown
| Task | DIY cost | Pro cost | Time |
|---|---|---|---|
| Lead Test Kits | $20–$50 | $0 (included in inspection) | 5–10 min per test |
| Professional Lead Inspection | N/A | $300–$600 | 1–2 hours |
| Lead-Safe Supplies (PPE, plastic, tape, cleaner) | $100–$250 | $0 (included in project bid) | Shopping time |
| Containing Work Area | $0 (labor) | $100–$300 (labor) | 1–2 hours |
| Lead-Safe Renovation/Repair | $0 (labor) | $500–$5,000+ (project dependent) | Varies by project |
| Cleanup & Disposal | $0 (labor) | $150–$400 (labor) | 2–4 hours |
Tips & Prevention
- Regular Inspections: Periodically inspect painted surfaces, especially in high-traffic areas, for chipping, peeling, or chalking paint. Address deterioration promptly and safely.
- Maintain Intact Paint: If lead paint is intact and in good condition, the safest approach is often to encapsulate it with a new layer of non-lead paint or other covering rather than removing it.
- Window and Door Care: Old windows and doors are common sources of lead dust due to friction. Keep them well-maintained and clean sills and wells frequently with a damp cloth.
- Handwashing: Encourage frequent handwashing, especially for children, to prevent accidental ingestion of lead dust that may have settled on hands.
- Wet Cleaning: Regularly wet-wipe floors, windowsills, and other horizontal surfaces with a general all-purpose cleaner to pick up any settled dust before it becomes airborne.
- Professional Consultation: For any significant renovation work in a pre-1978 home, consult with an EPA-certified lead-safe renovator even if you plan to DIY. They can offer invaluable guidance and identify hidden risks.
When to Call a Professional
While many homeowners can tackle small, contained lead paint projects with diligent preparation, there are clear instances where professional intervention is not just recommended, but essential. If your lead paint project involves a large surface area (e.g., an entire room, exterior siding), requires extensive demolition, or utilizes methods like heat guns that could potentially volatilize lead, you should absolutely defer to a professional. Additionally, if initial lead testing reveals high concentrations of lead or if you're dealing with lead paint on frequently touched surfaces like windowsills or doorframes that are difficult to encapsulate, a certified lead abatement contractor has the specialized training, equipment (like negative air machines and elaborate containment systems), and disposal protocols to handle the hazard safely and legally. Attempting large-scale lead removal without proper certification and equipment can not only expose your family but also result in significant fines for improper waste disposal and violation of lead-safe work practices. Prioritize safety over saving a few dollars when dealing with widespread lead contamination.
Related Articles
Keep troubleshooting with these hand-picked guides from FixlyGuide:
- The Secret to Lush Raised Beds? It's Not Just About How You Water — Smart irrigation for raised garden beds isn't just about automation; it's about delivering the right amount of water precisely when your pl…
- The Hidden Reason Your GFCI Trips (It's Not Always a Faulty Outlet) — A continuously tripping GFCI outlet is a critical safety warning, often indicating moisture, a faulty appliance, or a wiring problem that r…
- The 5-Minute Trick to Vacation-Proof Your Garden (Before You Leave Town) — Prevent your garden from wilting while you're away with simple, proactive steps that ensure lush growth and minimal fuss upon your return.
- The Hidden Reason Your GFCI Trips (It’s Not Always a Bad Outlet) — A tripping GFCI outlet is a safety mechanism doing its job, often indicating a problem like moisture, a faulty appliance, or a wiring issue…
- The Sneaky Way a Gas Tax Freeze Could Raise Your Property Bill — A gas tax freeze promises immediate relief at the pump, but for homeowners, it can trigger hidden costs, from deteriorating roads to potent…
- The #1 Mistake Homeowners Make After Finding Missing Shingles (And How to Fix It Right) — Discover the crucial steps to take after a storm rips shingles from your roof, ensuring a proper, lasting repair and preventing costly futu…
This article was independently written by FixlyGuide based on the source topic.
Frequently asked questions
How do I know if my home has lead paint?+
The most definitive way is to have your home tested by a certified lead inspector. You can also purchase EPA-recognized lead test kits from hardware stores for a preliminary check, but these are less conclusive. If your home was built before 1978, assume lead paint is present.
What's the biggest danger with lead paint?+
The biggest danger is creating lead dust. When lead paint is disturbed through sanding, scraping, drilling, or demolition, microscopic lead particles become airborne or settle on surfaces, which can then be inhaled or ingested, leading to lead poisoning.
Can I renovate my old house if it has lead paint?+
Yes, but you must follow strict lead-safe work practices. This includes containing the work area, wearing appropriate personal protective equipment (PPE), using wet methods to minimize dust, and conducting thorough HEPA-filtered cleanup. For large projects, hiring a certified lead-safe renovator is highly recommended.
What kind of mask do I need for lead paint?+
You need at least an N100 or P100 particulate respirator. Standard paper dust masks do not provide adequate protection against the microscopic lead particles.
How do I dispose of lead paint waste?+
All lead-contaminated waste, including plastic sheeting, rags, and paint chips, should be double-bagged in heavy-duty 6-mil plastic bags and sealed with duct tape. Contact your local waste management facility for specific disposal regulations in your area.

Discussion
Loading comments…