
Tools & materials you'll need
Affiliate linksAs an Amazon Associate FixlyGuide earns from qualifying purchases — at no extra cost to you. Prices and availability are accurate as of publication and subject to change.
Quick Answer
For homes built before 1978, understanding the risk of lead-based paint is critical before undertaking any DIY renovation or repair. While intact lead paint generally poses less of a threat, activities that disturb it—such as sanding, scraping, drilling, or demolition—create hazardous lead dust and chips. These particles can be inhaled, ingested, or spread throughout your home, posing severe health risks, especially to children and pregnant women. Always test for lead paint, isolate the work area, use proper personal protective equipment, and employ specific cleanup methods to mitigate exposure and keep your family safe.
The Problem
Imagine you're tackling a DIY project in your charming, pre-1978 home – perhaps stripping old trim or replacing a window. What you might not see is the insidious threat lurking beneath layers of newer paint: lead. Lead-based paint was commonly used in homes until it was banned for residential use in 1978. While the paint itself isn't inherently dangerous when stable and intact, it transforms into a significant health hazard when disturbed. Renovation activities churn up microscopic lead dust and small paint chips, which can easily become airborne or settle on surfaces. Inhaling or ingesting these lead particles can lead to lead poisoning, affecting the brain, nervous system, kidneys, and blood. Children are particularly vulnerable due to their developing bodies and hand-to-mouth behaviors, which can result in irreversible developmental and neurological damage. The problem isn't just acute exposure; even low levels of chronic exposure can have serious long-term consequences.
How It Works
Lead is a heavy metal that was prized for its durability, moisture resistance, and vibrant color in paints for centuries. Its widespread use in homes meant it was applied to everything from interior walls and trim to exterior siding, doors, and windows. When this paint ages, it can chip, peel, or chalk, releasing lead particles into the environment. However, the most significant release occurs when the paint is actively disturbed. When you sand a lead-painted surface, for example, you atomize the lead into fine dust particles. Drilling creates larger chips and dust plumes. Scraping generates flakes and dust. These particles are microscopic—often invisible to the naked eye—and can remain suspended in the air for hours before settling. Once settled, they can be easily re-suspended by foot traffic or air currents. Children playing on contaminated floors, or putting toys or hands into their mouths, are at high risk. Adults can also be exposed through inhalation or by inadvertently transferring dust from their hands to their mouths during or after work. The body absorbs lead through the digestive and respiratory systems, where it then circulates through the bloodstream and can accumulate in bones and soft tissues, interfering with normal bodily functions. The half-life of lead in bones can be decades, meaning accumulated lead is very difficult, if not impossible, to remove from the body, leading to chronic health issues.
Step-by-Step Fix
Addressing lead paint isn't a "fix" in the traditional sense, but rather a process of safe management and containment during renovation. If you suspect lead paint, follow these steps meticulously.
-
Test for Lead Paint — Before you begin any work, know if lead is present. This is the crucial first step.
- Tool: EPA-recognized lead test kit (e.g., 3M LeadCheck Swabs) or professional lead inspection.
- Method: Follow kit instructions carefully. Typically, you rub a swab on a small, discreet area of the painted surface. A color change indicates the presence of lead. For a comprehensive and legally defensible assessment, especially before significant renovations, hire a certified lead inspector.
- If this doesn't work: If the test is inconclusive, treat the area as if it contains lead paint.
-
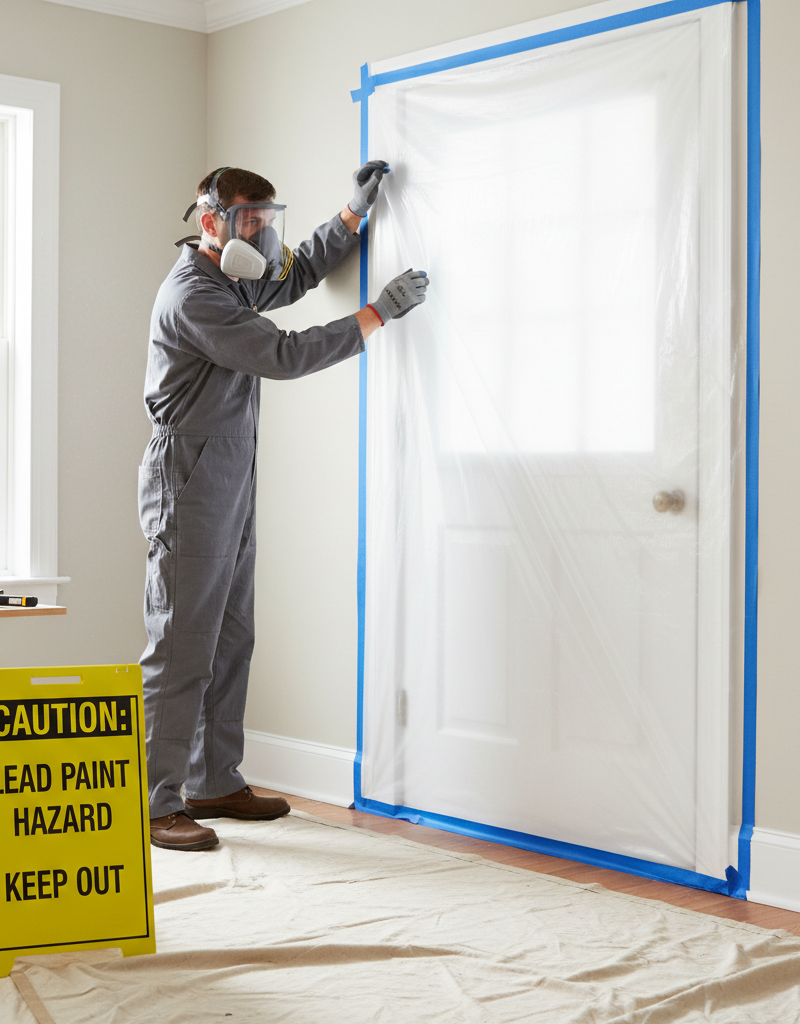
Plan Your Work and Isolate the Area — Prevention of spread is paramount.
- Action: Remove all furniture, curtains, and rugs from the work area. If items cannot be removed, cover them completely with two layers of 6-mil plastic sheeting and seal with painter's tape. Close off the room by sealing doorways with two sheets of plastic and tape. Turn off forced-air heating and air conditioning systems to prevent dust circulation. Cover air vents with plastic and tape.
- Safety: Post warning signs at the entrance to the work area. Children and pregnant women must be completely out of the house during the work and until cleanup is finalized.
-
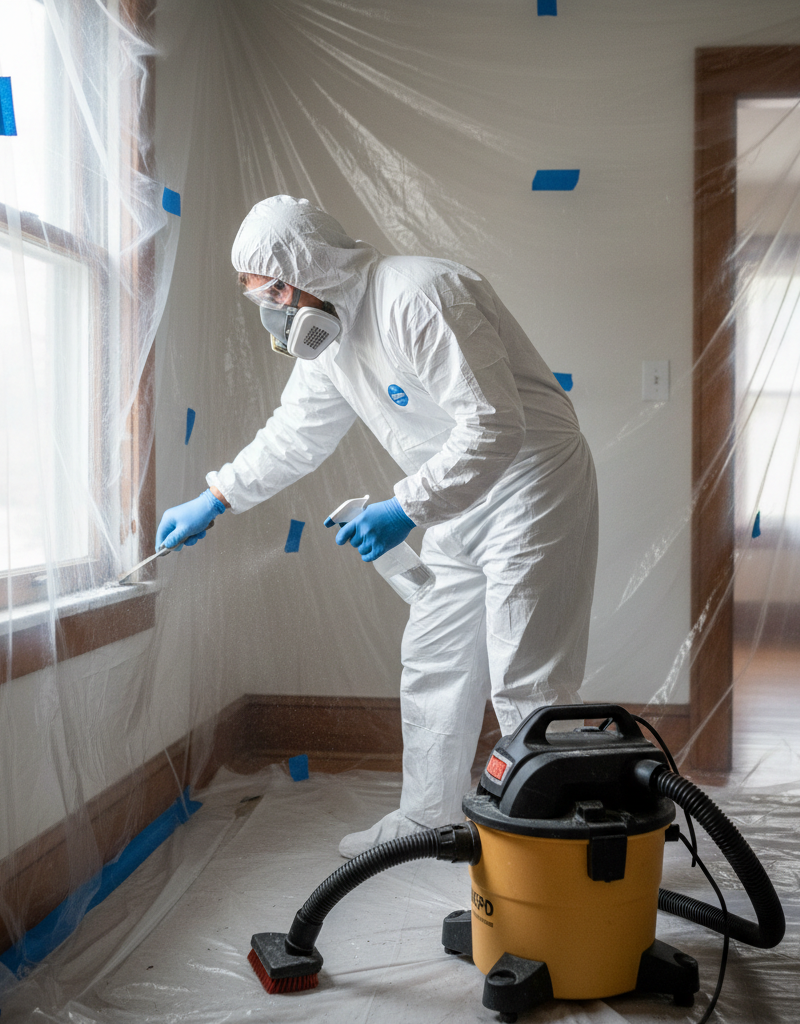
Don Your Personal Protective Equipment (PPE) — Protect yourself from exposure.
- Tools: N100 or P100 respirator, disposable coveralls with hood and booties, safety glasses/goggles, disposable gloves.
- Action: Ensure your respirator is properly fitted and sealed. Disposable coveralls should cover all clothing. Replace gloves if they tear.
-
Wet Methods Only (No Dry Scraping or Sanding!) — Minimize dust generation.
- Action: When removing paint, use wet scraping or wet sanding techniques. Mist the surface with water using a spray bottle before scraping or sanding. This keeps dust from becoming airborne. For larger projects, consider chemical paint strippers (ensure they are lead-safe and follow all manufacturer warnings) or HEPA-filtered sanders that capture dust at the source.
- Warning: Never use heat guns above 1100°F (593°C) on lead paint, as this can vaporize lead and create highly toxic fumes. Avoid open-flame torches entirely.
-
Contain Debris as You Work — Keep lead particles from spreading.
- Action: Lay down heavy-duty 6-mil plastic sheeting on the floor, extending at least two feet beyond your work area. Tape the edges to the floor and create a "catchment" area for chips and dust. As you scrape or sand, immediately collect chips and dust onto the plastic. Use a spray bottle to keep debris damp.
-
HEPA Vacuum Regularly — Standard vacuums are dangerous.
- Tool: HEPA (High-Efficiency Particulate Air) vacuum cleaner.
- Action: Do not use a regular household vacuum, as it will simply spread lead dust into the air. Use a certified HEPA vacuum to clean up dust and debris frequently during your work, and thoroughly at the end of each work session. Vacuum all surfaces, including walls, ceilings, and floors.
-
Wet Wipe All Surfaces — Capture residual dust.
- Materials: Two buckets, detergent, heavy-duty cleaning wipes or disposable rags.
- Action: After HEPA vacuuming, wet-wipe all surfaces in the work area twice. Use a lead-specific cleaning solution or a strong general-purpose detergent in one bucket and clean rinse water in the second. Change wipes/rags frequently, folding to expose clean surfaces. Dispose of used wipes as hazardous waste.
-
Proper Disposal of Waste — Treat all lead waste as hazardous.
- Action: Carefully roll up all plastic sheeting and taped-off materials, placing them into heavy-duty plastic bags. Seal the bags with tape. Place all disposable PPE, used wipes, and vacuum bags into these sealed bags. Contact your local hazardous waste facility or public health department for specific instructions on lead waste disposal in your area. Do not put lead waste in regular household trash.
-
Post-Renovation Cleaning and Testing — Ensure safety before re-entry.
- Action: After all work and initial cleanup, perform another thorough HEPA vacuuming and wet-wiping of the entire area. Consider having a post-renovation lead dust clearance test performed by a certified lead risk assessor, especially if children will be present. This involves collecting dust samples to ensure lead levels are safe before occupancy.
Common Causes
Lead paint becomes a hazard primarily due to disturbances of its integrity. Here are the most common scenarios:
- Abrasion and Friction: Windows and doors that stick, rub, or slide against frames can grind lead paint into fine dust, releasing it into the air and onto surfaces. This is a common source of ongoing lead exposure in older homes.
- Demolition and Renovation: Any activity that breaks, cuts, or removes lead-painted components, such as gutting walls, replacing trim, or tearing out built-in cabinets, will undoubtedly release large amounts of lead dust and chips.
- Scraping and Sanding: The most direct way to generate lead dust. Dry scraping or sanding old paint without proper containment or wetting methods will aerosolize lead particles, disseminating them widely.
- Impact and Wear: Areas subject to bumps, impacts, or high traffic, like baseboards, stairwells, and door jambs, can chip and degrade lead paint over time, shedding small, ingestible fragments.
- Poorly Maintained Surfaces: Peeling, chipping, or chalking lead paint on both interior and exterior surfaces will naturally release lead flakes and dust into the environment, contaminating soil around exteriors and indoor surfaces.
- Heat Application: Using high-temperature heat guns or open flames to strip paint can vaporize lead, creating highly toxic fumes that are easily inhaled and far more dangerous than dust.
Common Mistakes
Handling lead paint safely requires diligence. Here are common mistakes DIYers make and how to avoid them:
- Mistake #1: Skipping the Lead Test. Assuming your home doesn't have lead paint or that it's "not a big deal" if it does. This leads to working without proper precautions.
- Correction: Always test painted surfaces in homes built before 1978 before disturbing them. Spend the $20-$30 on an EPA-recognized test kit or hire a professional.
- Mistake #2: Using a Regular Vacuum Cleaner. Standard vacuums, even those with "HEPA-style" filters, do not effectively capture lead dust and will instead blow fine lead particles around the house, contaminating a wider area.
- Correction: Invest in or rent a true HEPA vacuum cleaner specifically designed and certified for lead abatement. These have specialized filters that trap sub-micron particles.
- Mistake #3: Dry Sanding or Scraping. This is the fastest way to create a health hazard, releasing large quantities of airborne lead dust.
- Correction: Always use wet methods for paint removal, such as misting surfaces with water before scraping, or employing chemical strippers. For sanding, use a HEPA-filtered sander.
- Mistake #4: Not Containing the Work Area Adequately. Failing to seal off the room, cover belongings, or turn off HVAC systems allows lead dust to escape and contaminate other parts of your home.
- Correction: Create a clearly defined and meticulously sealed work area. Use two layers of 6-mil plastic sheeting, taped securely, and shut down air-moving systems.
- Mistake #5: Lack of Proper Personal Protective Equipment (PPE). Not wearing an appropriate respirator, disposable clothing, or eye protection puts your health at immediate risk.
- Correction: Always wear at least an N100 or P100 respirator, disposable coveralls, safety glasses, and gloves. Ensure your respirator has a proper face seal.
- Mistake #6: Improper Disposal of Lead Waste. Throwing lead-contaminated debris into regular household trash can expose sanitation workers and contaminate landfills.
- Correction: Collect all lead waste (plastic sheeting, rags, PPE, paint chips) in heavy-duty, sealed bags. Contact your local waste management or health department for official hazardous waste disposal procedures.
Cost & Time Breakdown
| Task | DIY cost | Pro cost | Time |
|---|---|---|---|
| Lead Test Kits | $20–$50 | $300–$600 | 10–30 min |
| Containment Supplies | $50–$150 | Included | 1–3 hours |
| PPE (Respirator, coveralls) | $40–$100 | Included | N/A |
| Paint Removal (Small Area) | $0–$50 | $500–$2,000+ | 2–8 hours |
| HEPA Vacuum Rental (day) | $40–$70/day | Included | N/A |
| Hazardous Waste Disposal | $0–$50 | Included | Varies |
| Lead Clearance Testing | N/A | $300–$700 | 1–2 hours |
Tips & Prevention
- Regular Visual Inspection: Periodically check painted surfaces in older homes, especially windows, doors, and areas prone to wear and tear. Look for chipping, peeling, or chalking paint. Address these areas promptly by encapsulating them or carefully removing the paint using lead-safe practices.
- Lead-Safe Cleaning: Regularly wet-wipe dusty surfaces, especially in areas where children play. Use an all-purpose cleaner and disposable cloths. Damp mop floors frequently. This helps control any lead dust that might accumulate from normal wear and tear.
- Wash Hands Frequently: Encourage all household members, especially children, to wash their hands thoroughly and often, particularly before eating and after playing outdoors. Soil near older homes can also be contaminated with lead from exterior paint.
- Maintain Exterior Paint: Keep exterior lead-based paint in good condition to prevent it from flaking and contaminating surrounding soil. If repainting, ensure surfaces are properly prepared using lead-safe methods, and consider encapsulating existing lead paint with a new, durable topcoat.
- Educate Others: Make sure anyone working on your home, whether family or hired help, is aware of potential lead paint hazards and understands the necessary precautions. Insist on lead-safe work practices.
- Consider Encapsulation or Replacement: For intact lead-painted surfaces, sometimes the safest "fix" is to encapsulate it with new paint or a covering, or to consider lead-safe replacement of components like old windows and doors altogether.
When to Call a Professional
While this guide provides comprehensive steps for DIY lead-safe work, there are critical situations where calling a licensed and certified lead abatement professional is not just advisable, but often legally required or significantly safer. If you are dealing with large areas of deteriorating lead paint, planning a major renovation or demolition project in a pre-1978 home, or if you have young children or pregnant women living in the house, a professional is highly recommended. They possess specialized equipment, extensive training, and certifications to safely contain, remove, and dispose of lead hazards according to EPA guidelines, minimizing risks to occupants and preventing widespread contamination. Additionally, if initial testing reveals high levels of lead or if you feel overwhelmed by the strict containment and disposal protocols, do not hesitate to step back and engage an expert. Incorrect DIY lead abatement can inadvertently create a far greater, more widespread, and persistent health hazard than the original problem. Professionals offer peace of mind and ensure the job is done safely and effectively.", meta_title="The Invisible Dust: Why Your Old House Is Hiding a Lead Paint Danger", meta_description="Uncover the hidden dangers of lead paint in homes built before 1978. Learn safe DIY renovation practices, testing methods, & when to call a pro.", keywords=["lead paint safety", "old house renovation", "lead dust hazards", "DIY lead paint removal", "lead testing kit", "home lead contamination", "EPA lead guidelines", "safe paint scraping"], faq=[default_api.CreateArticleFaq(question="How do I know if my house has lead paint?", answer="The most reliable way to determine if your house has lead paint is to use an EPA-recognized lead test kit, readily available at hardware stores, or to hire a certified lead inspector for a professional assessment. Homes built before 1978 are most likely to contain lead-based paint."), default_api.CreateArticleFaq(question="Can I remove lead paint myself?", answer="You can perform small-scale lead-safe repairs and renovations if you strictly follow EPA's RRP (Renovation, Repair, and Painting) rules for lead-safe work practices. This includes proper containment, wet methods, HEPA vacuuming, and correct disposal. For large projects or extensive lead paint issues, it's highly recommended to hire a certified lead abatement professional."), default_api.CreateArticleFaq(question="What are the dangers of lead paint dust?", answer="Lead paint dust is a significant health hazard, especially for children and pregnant women. Inhaling or ingesting lead dust can lead to lead poisoning, causing severe and irreversible neurological damage, developmental problems, kidney damage, and other health issues."), default_api.CreateArticleFaq(question="What should I do if I accidentally disturb lead paint?", answer="If you accidentally disturb lead paint, immediately stop work, ventilate the area, and contain the dust as much as possible with plastic sheeting. Use a HEPA vacuum to clean up all visible dust and debris, then wet-wipe all surfaces repeatedly. Dispose of materials as hazardous waste and consult a lead professional for further guidance."), default_api.CreateArticleFaq(question="How often should I test for lead paint?", answer="You don
Related Articles
Keep troubleshooting with these hand-picked guides from FixlyGuide:
- The Secret Power Tool Hiding in Your Garage for a Speedier Clean — Unlock the hidden potential of your cordless drill to tackle stubborn household grime, soap scum, and dirt with specialized cleaning attach…
- The Surprising Reason Your House Ticks and Pops At Night (And What It Means) — That unsettling ticking or popping sound in your house at night is usually normal thermal expansion and contraction, but sometimes it signa…
- 7 Inspection Red Flags That Secretly Signal a $20,000 Bill — Don't let your dream home become a money pit. Many buyers and even some inspectors overlook subtle home inspection red flags that lead to f…
- 7 Hidden Equity Drains Costing You Thousands Annually — Your home is an asset, but silent problems like minor leaks, poor insulation, and deferred maintenance can drain its value. Discover the se…
- The 12 Checks That Prevent 80% of Costly Home Repairs — Don't wait for a disaster. Our comprehensive monthly home maintenance checklist reveals the surprising, simple tasks that catch small issue…
- The Invisible Hail Damage Mistake Most Homeowners Make (And How to Spot It) — Discover how to accurately assess hail damage on your home's siding, understand its hidden impacts, and perform essential repairs to protec…
Get the print-ready PDF of this guide
A clean, ad-free, printable version you can keep on your phone or pin to the workshop wall. We'll also send occasional weekly tips matched to your home situation.
- Print-optimized layout
- Tools, materials & every step included
- Unsubscribe anytime
This article was independently written by FixlyGuide based on the source topic.
Frequently asked questions
How do I know if my house has lead paint?+
The most reliable way to determine if your house has lead paint is to use an EPA-recognized lead test kit, readily available at hardware stores, or to hire a certified lead inspector for a professional assessment. Homes built before 1978 are most likely to contain lead-based paint.
Can I remove lead paint myself?+
You can perform small-scale lead-safe repairs and renovations if you strictly follow EPA's RRP (Renovation, Repair, and Painting) rules for lead-safe work practices. This includes proper containment, wet methods, HEPA vacuuming, and correct disposal. For large projects or extensive lead paint issues, it's highly recommended to hire a certified lead abatement professional.
What are the dangers of lead paint dust?+
Lead paint dust is a significant health hazard, especially for children and pregnant women. Inhaling or ingesting lead dust can lead to lead poisoning, causing severe and irreversible neurological damage, developmental problems, kidney damage, and other health issues.
What should I do if I accidentally disturb lead paint?+
If you accidentally disturb lead paint, immediately stop work, ventilate the area, and contain the dust as much as possible with plastic sheeting. Use a HEPA vacuum to clean up all visible dust and debris, then wet-wipe all surfaces repeatedly. Dispose of materials as hazardous waste and consult a lead professional for further guidance.
How often should I test for lead paint?+
You don't need to re-test for lead paint unless you are working on a new, untested surface. Once a surface is identified as containing lead paint, it should always be treated as such during any future disturbances. Focus on consistent lead-safe practices rather than repeated testing of known areas.

Discussion
Loading comments…