
Tools & materials you'll need
Affiliate linksAs an Amazon Associate FixlyGuide earns from qualifying purchases — at no extra cost to you. Prices and availability are accurate as of publication and subject to change.
Quick Answer
For homes constructed before 1978, the assumption should always be that lead-based paint is present, even if not immediately visible. The primary hazard isn't the stable, intact paint itself, but rather the microscopic dust and chips generated during aggressive renovation activities such as sanding, scraping, drilling, or demolition. Safe DIY practices demand strict containment of the work area, the use of appropriate tools and personal protective equipment, and a meticulous, specialized cleanup process to prevent lead exposure and contamination throughout the home.
The Problem
Your charming older home, particularly if it predates 1978, likely harbors a silent, invisible threat: lead-based paint. While layers of paint may seem benign, disturbing them during even simple DIY projects can unleash a hazard. When lead paint is cut, scraped, sanded, or pulverized, it creates fine dust particles and chips that, when inhaled or ingested, can cause serious health issues, especially in children and pregnant women. These particles can settle on surfaces throughout your home, becoming a persistent source of exposure long after the work is done. Traditional cleaning methods like sweeping or vacuuming with a standard household vacuum can actually spread lead dust further, exacerbating the problem. Ignoring these risks can lead to permanent neurological damage, developmental delays in children, and various other health complications for adults. It's not just about what you can see; it's about the invisible danger lurking in the dust.
How It Works
Lead, a heavy metal, was a common additive to paint for centuries, prized for its durability, vibrant color, and resistance to moisture. In the United States, lead-based paints were widely used in homes until the federal government banned their residential use in 1978. This means any home built before that year has a high likelihood of containing lead paint on interior and exterior surfaces, including walls, doors, windows, trim, and even cabinets.
When lead paint is disturbed, the paint film breaks down, releasing lead particles into the air and onto surfaces. These particles are often too small to see, yet they can be easily inhaled or inadvertently ingested. For instance, a child playing on a floor where lead dust has settled might put their hands in their mouth. Even pets can track lead dust throughout the house. The danger isn't just during the renovation; lead dust can remain in carpets, on furniture, and in HVAC systems for years if not properly remediated. Friction points, such as windows sashes sliding in their frames or doors rubbing against their jambs, can also generate lead dust over time, even with intact paint.
Lead adversely affects almost every organ system. In children, even low levels of lead exposure can lead to reduced IQ, learning disabilities, behavioral problems, and slowed growth. For adults, lead poisoning can cause high blood pressure, joint and muscle pain, headaches, memory problems, and reproductive issues. Because lead accumulates in the body, repeated small exposures are just as dangerous as a single large exposure. Understanding this mechanism underscores why proper precautions are not optional, but essential.
Step-by-Step Fix
1. Test Before You Touch — Before starting any renovation in a pre-1978 home, get a lead paint test.
- Use EPA-recognized lead test kits (available at hardware stores) for quick checks on small areas. Follow manufacturer instructions carefully.
- For more comprehensive and accurate results, especially for larger projects, hire a certified lead inspector. They use specialized equipment to identify lead paint on various surfaces without disturbing it, providing a detailed report on affected areas.
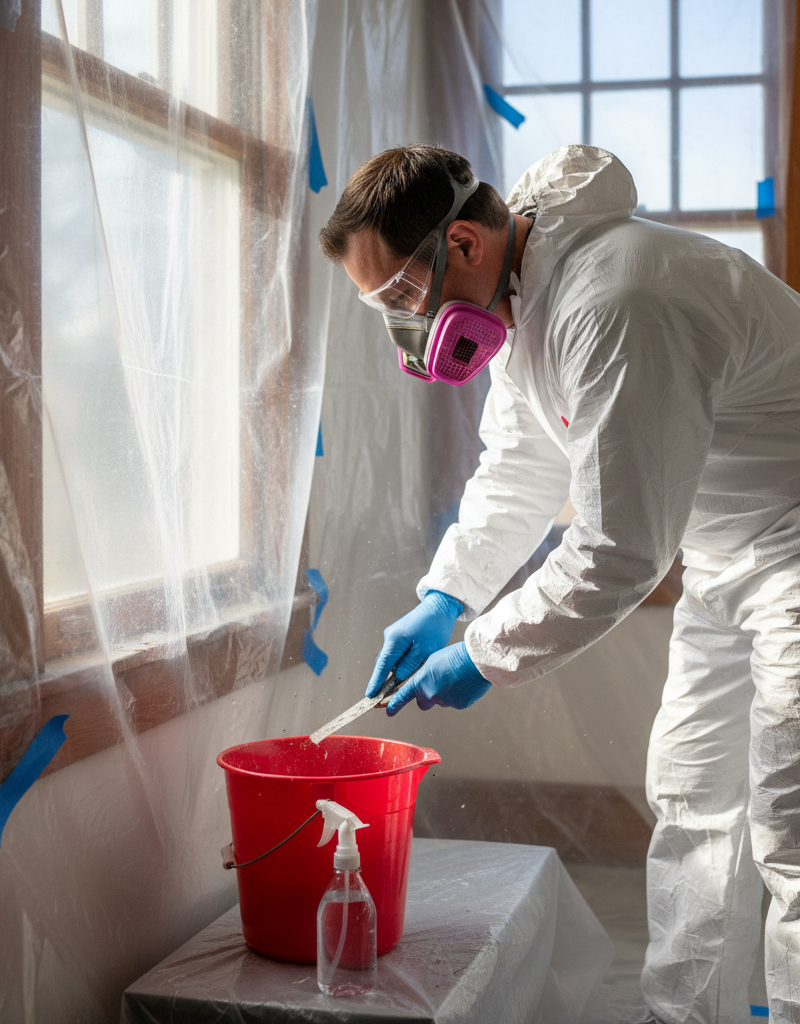
2. Isolate the Work Area — Create a contained environment to prevent lead dust spread.
- Remove all furniture, rugs, and personal belongings from the room.
- Seal off the renovation area completely from the rest of the house using heavy-duty plastic sheeting (6 mil minimum) taped securely over doorways, air vents, and windows. Extend sheeting at least 6 feet beyond the work zone.
- Turn off central heating and air conditioning to prevent air currents from carrying dust.
3. Gear Up for Safety — Protect yourself from lead dust exposure.
- Wear a NIOSH-approved respirator (N100 or P100 cartridges) that fits snugly over your nose and mouth. Dust masks are inadequate.
- Use disposable coveralls, gloves, and shoe covers. Change these before leaving the work area to avoid tracking lead dust.
- Protect your eyes with goggles or safety glasses.
4. Use Lead-Safe Work Practices — Minimize dust generation at all costs.
- Avoid power sanding, abrasive blasting, or using heat guns above 1100°F (which can vaporize lead).
- Instead, opt for wet scraping, wet sanding, or chemical paint removers (check for methylene chloride-free options). If sawing or drilling, use tools with HEPA-filtered vacuum attachments.
- Work slowly and deliberately to reduce airborne particles. Mist surfaces with water before scraping to keep dust down.
5. Collect Debris Properly — Manage contaminated waste as it's generated.
- Lay down thick plastic sheeting on the floor to catch all paint chips and dust.
- As you work, frequently mist debris with water to keep it from becoming airborne.
- Carefully fold and roll up the plastic sheeting, containing all debris inside. Seal it in heavy-duty trash bags or specific hazardous waste bags and label them.
6. Clean with Precision — Follow a strict, multi-stage cleaning protocol.
- Begin with a thorough HEPA-filtered vacuuming of all surfaces, including walls, floors, and windowsills. Standard vacuums recirculate lead dust.
- Next, wet-wipe all surfaces repeatedly with a strong detergent solution. Use disposable rags and change them frequently.
- Follow with a second wet-wiping using clean water. Repeat vacuuming and wet-wiping until no dust is visible on a white cloth.
7. Dispose of Waste Safely — Proper disposal prevents environmental contamination.
- Place all contaminated materials—plastic sheeting, used rags, disposable PPE, and lead paint chips—into heavy-duty plastic bags.
- Seal the bags tightly and label them clearly as
Related Articles
Keep troubleshooting with these hand-picked guides from FixlyGuide:
- The 3 Crucial Mistakes That Ruin Wall Stripes (And How to Fix Them) — Achieving crisp, professional-looking painted stripes on a wall is a rewarding DIY project, but it's easy to make common mistakes that lead…
- The Hidden Danger in Your Old Light Switch Wiring (and How to Spot It) — Discover the crucial, often-misunderstood safety hazard hidden in older light switch wiring, where white wires can be live, and learn how t…
- The One Pruning Mistake That Could Be Killing Your Shrubs (and How to Fix It) — Discover the crucial pruning mistake many homeowners make that can significantly damage or even kill their shrubs, and learn the simple fix.
- Is That Sweet Car Smell a Secret Killer? (& 6 Other Odors to Watch For) — Unusual odors in your car aren't just unpleasant; they're often critical warnings of underlying mechanical issues that could compromise saf…
- The 5-Minute Trick to Vacation-Proof Your Garden (Before You Leave Town) — Prevent your garden from wilting while you're away with simple, proactive steps that ensure lush growth and minimal fuss upon your return.
- The Dryer Vent Fire Trap: 3 Hidden Signs Your Home Is at Risk — Learn the critical signs your dryer vent is clogged and how to safely clean it to prevent a dangerous house fire.
This article was independently written by FixlyGuide based on the source topic.
Frequently asked questions
How do I know if my home has lead paint?+
If your home was built before 1978, assume lead paint is present. The most reliable way to confirm its presence and location is to hire a certified lead inspector or use an EPA-recognized lead test kit for DIY checks.
Is it safe to paint over lead paint?+
Encapsulating intact lead paint with a new layer of non-lead paint can be a temporary solution if the underlying lead paint is stable and not chipping. However, this is not a permanent fix, and if the surface is ever disturbed later, the lead hazard will resurface. It does not eliminate the lead risk.
What tools should I avoid when working with lead paint?+
Avoid any tools that create significant dust, such as power sanders, heat guns operating above 1100°F, open-flame torches, or abrasive blasting equipment. These methods can quickly release large amounts of lead dust or fumes into the air, making containment and cleanup extremely difficult and hazardous.
How do I clean up lead paint dust safely?+
Use a HEPA-filtered vacuum cleaner, not a standard household vacuum, to remove all visible dust. Follow this with repeated wet-wiping using a strong detergent solution and disposable rags. Dispose of all contaminated cleaning materials in sealed, heavy-duty plastic bags as hazardous waste.


Discussion
Loading comments…