
Tools & materials you'll need
Affiliate linksAs an Amazon Associate FixlyGuide earns from qualifying purchases — at no extra cost to you. Prices and availability are accurate as of publication and subject to change.
Quick Answer
Removing or disturbing lead-based paint in homes built before 1978 without proper precautions can release hazardous lead dust and chips into your home environment. This poses severe health risks, particularly for children and pregnant women. DIYers must understand the risks involved and either follow strict lead-safe work practices or, for extensive projects, call a certified lead abatement professional to avoid contamination and potential exposure.
The Problem
You're eager to tackle that bathroom remodel or strip that old trim, but if your home predates 1978, you're likely looking at more than just a paint job. Beneath those layers of modern latex could be lead-based paint, a silent but potent threat. When this paint is disturbed—through sanding, scraping, drilling, or demolition—it releases microscopic lead dust and chips into the air and onto surfaces throughout your home. This dust can be unknowingly ingested or inhaled, leading to lead poisoning, which can cause developmental delays in children, nervous system damage, kidney problems, and reproductive issues in adults.
The real problem isn't necessarily the paint itself when it's intact and well-maintained. It's the act of disrupting it without proper containment and cleanup. Many homeowners unknowingly create a hazardous environment, spreading lead particles throughout their homes, where they can linger for years, creating continuous exposure risks. The long-term health consequences coupled with the high cost of professional lead remediation make this a critical issue for any homeowner contemplating renovations in an older property.
How It Works
Lead-based paint was widely used in homes before 1978 due to its durability, vibrant color, and moisture resistance. The "lead" refers to the heavy metal lead (Pb) incorporated into the paint pigment and binder. When this paint is intact and encapsulated under layers of newer paint, it typically poses a low risk. The danger begins when the paint film is broken or deteriorated.
Imagine a surface covered in lead paint. This paint is made up of lead compounds tightly bound within a polymer matrix. When you sand it, you're essentially pulverizing that matrix, releasing fine lead particles into the air. Scraping chips off larger pieces. Drilling creates lead-contaminated dust and shavings. Even opening and closing old windows can generate friction that grinds lead paint into dust, which then settles on windowsills and floors.
Once airborne, lead dust is insidious. It's invisible to the naked eye but can travel far and wide, settling on floors, furniture, toys, and even in ventilation systems. Children are particularly vulnerable because they often play on floors, put their hands and objects in their mouths, and their developing bodies absorb lead more readily than adults. The dust can be tracked throughout the house, contaminating every room. When ingested, lead interferes with several bodily systems, particularly the nervous system and red blood cell production, making it a serious environmental hazard that transforms a simple renovation into a potentially life-altering event if not handled correctly.
Step-by-Step Fix
1. Identify Potential Lead Paint — Before you start any project, especially in a pre-1978 home, assume lead paint is present. You can purchase lead testing kits or hire a certified lead inspector to confirm. Home kits provide a quick indicator, often using a chemical reaction that changes color in the presence of lead. For critical areas, professional testing, which includes XRF (X-ray fluorescence) analysis or paint chip sampling, offers precise results about lead concentration.
- Tip: Test multiple layers if possible. Lead paint might be beneath newer coats.
- If your home was built after 1978, lead paint is highly unlikely to be present, but older homes or specific imported materials could still contain it.
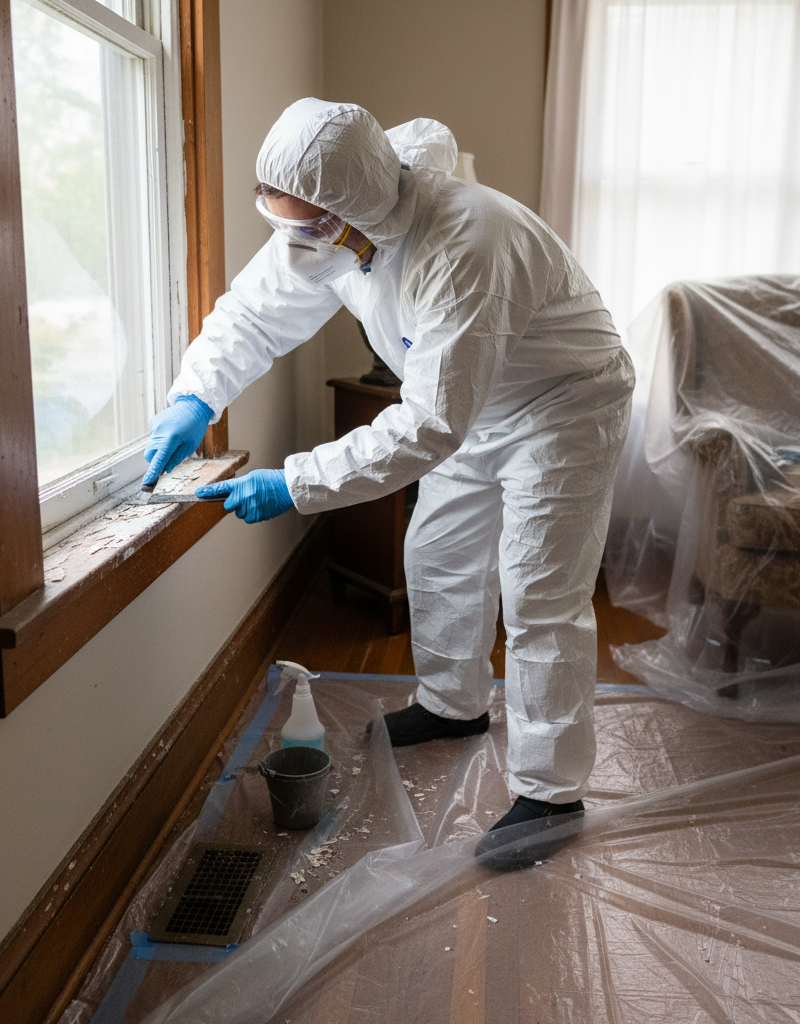
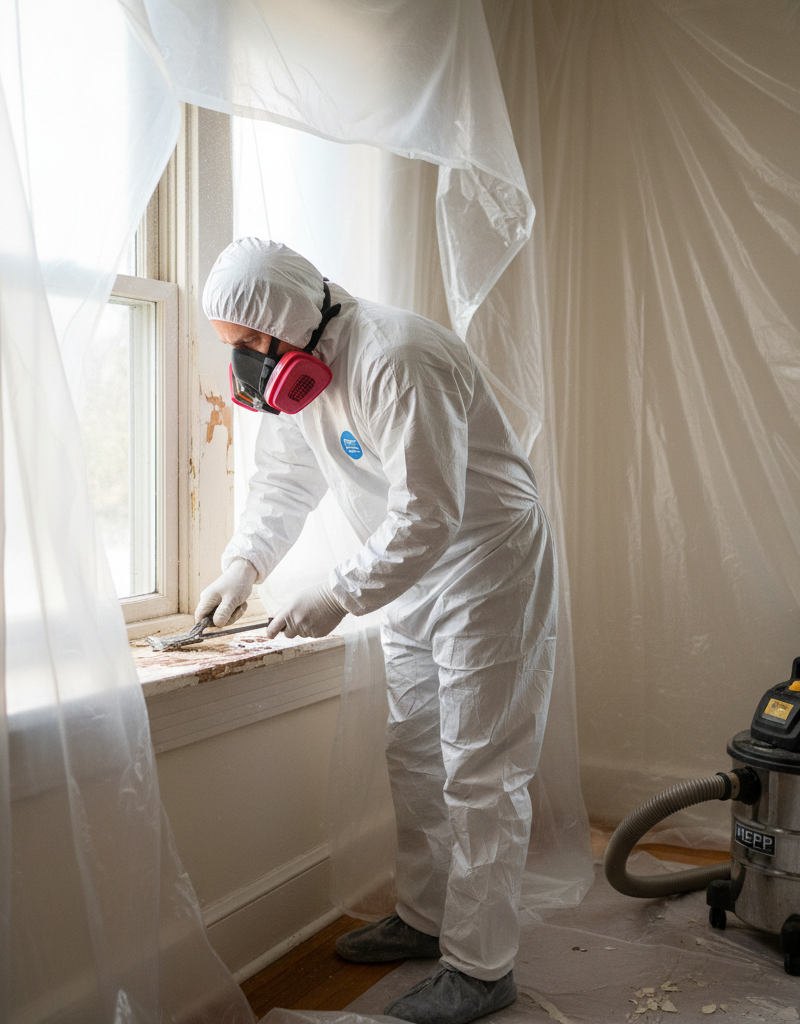
2. Isolate the Work Area — Establish a strict containment zone. Close and seal all doors and windows leading to other rooms with 6-mil plastic sheeting and painter's tape. Turn off forced-air heating and air conditioning systems to prevent dust from circulating throughout the house. Cover floors and furniture with at least two layers of 6-mil plastic sheeting. Seal off vents with plastic and tape as well.
- Safety: Ensure only authorized personnel are in the work area. Children and pets must be kept away.
- Tools: Use heavy-duty duct tape for sealing plastic. Ensure overlaps are generous.
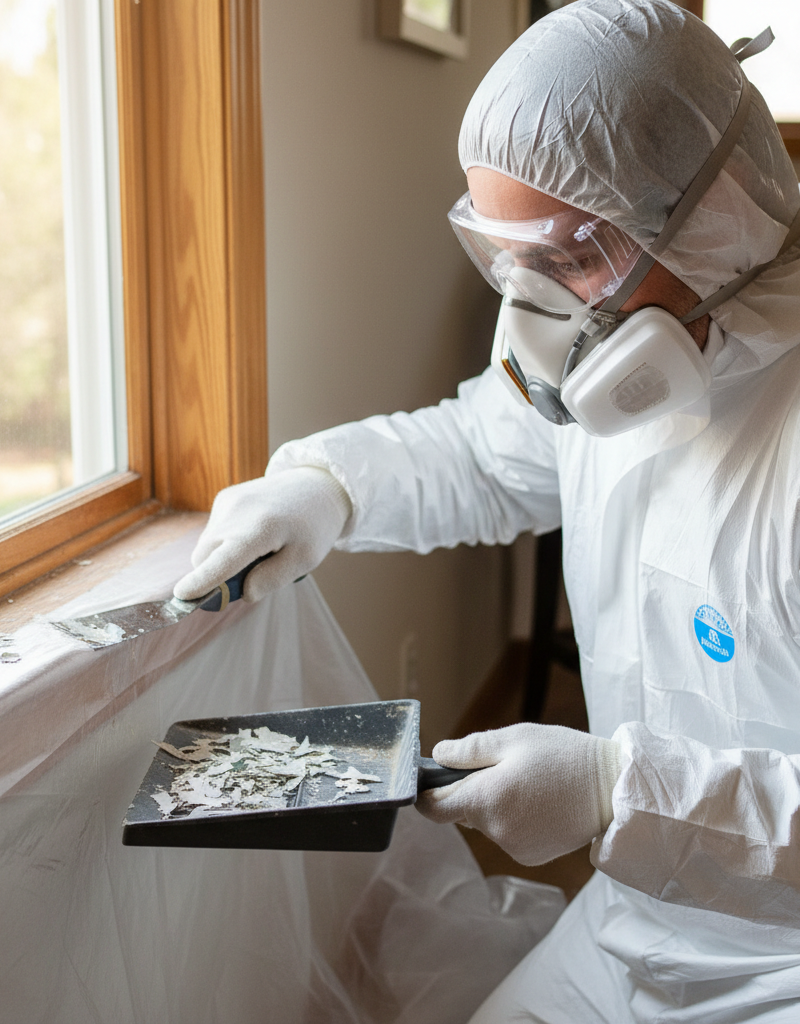
3. Dress for Protection — Wear appropriate personal protective equipment (PPE). This includes a NIOSH-approved P100 respirator, disposable coveralls, disposable shoe covers, safety glasses, and disposable gloves. Change out of these clothes before leaving the work area to avoid tracking lead dust.
- Safety: Fit-test your respirator properly to ensure a tight seal. Beards can compromise the seal.
- Material: Have multiple sets of disposable coveralls and gloves ready, especially for longer projects.
4. Wet Down Surfaces — Before scraping or sanding, lightly mist the painted surface with water using a spray bottle. This significantly reduces airborne dust. Do not drench surfaces, as excessive water can make paint removal harder or damage the substrate.
- Caution: Avoid using methods that generate large amounts of dust, like power sanding without HEPA vacuum attachment.
- Tools: A simple spray bottle filled with tap water is sufficient.
5. Use Lead-Safe Work Practices — Opt for methods that minimize dust creation. Use chemical strippers designed for lead paint (read labels carefully), wet scraping, or heat guns (set to low temperatures, below 1100°F or 593°C, to prevent lead vaporization). Avoid dry scraping, power sanding without a HEPA vacuum, or open-flame torching, as these are highly dangerous.
- If this doesn't work: For large areas or stubborn paint, consider hiring a lead-safe certified renovator. The cost of DIY mistakes can be far greater.
- Material: Lead-safe paint strippers are available; always follow manufacturer guidelines.
6. Collect Debris Safely — As you work, collect paint chips and dust immediately. Use heavy-duty plastic bags and seal them tightly. Do not use a household vacuum cleaner, as these are not designed to filter lead dust and will simply redistribute it into the air. Instead, use a HEPA-filtered vacuum cleaner.
- Tools: Dedicated HEPA vacuum cleaners are essential. Renting one is an option for smaller projects.
- Disposal: Check local regulations for lead-contaminated waste disposal. It often requires special handling.
7. Thorough Clean-Up — After removing all paint debris, clean the work area meticulously. First, HEPA vacuum all surfaces, including walls, floors, and any exposed items. Then, wet-wipe all surfaces twice with a general all-purpose cleaner and disposable cloths. Repeat the HEPA vacuuming and wet-wiping process. Dispose of all cleaning materials (plastic sheeting, cloths, PPE) as lead-contaminated waste.
- Tip: Clean from top to bottom, working inwards on walls and outwards on floors.
- Safety: Do not shake or agitate used plastic or cloths during disposal.
8. Containment Removal and Final Clean-up — Carefully roll up the plastic sheeting from the floor towards the center, containing any remaining debris. Mist the plastic as you roll it to minimize dust. Wrap it securely and place it in heavy-duty disposal bags. Finally, HEPA vacuum and wet-wipe the now exposed floor and any remaining surfaces in the room that were under the plastic containment.
- Pro Tip: Consider running an air purifier with a HEPA filter in the room for a few hours after cleanup to capture any lingering airborne particles.
Common Causes
- Age of Home: The most common cause for concern is any structure built before 1978, the year lead-based paint was banned for residential use in the United States. Many homes pre-dating this still contain lead paint under layers of newer paint.
- Renovation Activities: Any activity that disturbs painted surfaces, such as sanding, scraping, drilling, demolition, or even aggressive cleaning, can create hazardous lead dust and chips.
- Friction and Impact: Areas subject to wear and tear, like windows and doors (where painted surfaces rub together), stair treads, and railings, can generate lead dust over time, even with seemingly intact paint.
- Deteriorated Paint: Peeling, chipping, cracking, or chalking lead paint in poor condition is a direct pathway for lead exposure as it readily releases particles into the environment.
- Outdoor Painted Surfaces: Exterior lead paint, especially on siding, fences, or window sills, can contaminate soil around the house as it weathers and chips, posing risks to children playing outdoors.
Common Mistakes
- Ignoring the Age of Your Home: Many homeowners overlook the 1978 cutoff, assuming their house is "too new" or that newer paint layers fully encapsulate the lead, leading them to unknowingly disturb it.
- Using a Regular Vacuum Cleaner: Standard household vacuums, even those with "HEPA-like" filters, are not designed to trap microscopic lead particles and will simply redistribute them into the air, making the problem worse.
- Dry Scraping or Power Sanding Without HEPA: These methods generate enormous amounts of lead dust and should be strictly avoided for lead paint removal unless you have specialized, integrated HEPA dust collection systems.
- Inadequate Personal Protective Equipment (PPE): Not wearing a NIOSH-approved P100 respirator, disposable coveralls, and gloves leaves you directly vulnerable to inhaling or ingesting lead dust.
- Poor Containment: Failing to properly seal off the work area with plastic sheeting allows lead dust to escape and contaminate other parts of your home, creating a widespread hazard.
- Improper Disposal: Throwing lead-contaminated waste into regular household trash can lead to environmental contamination and may violate local regulations, potentially resulting in fines.
Cost & Time Breakdown
| Task | DIY cost | Pro cost | Time |
|---|---|---|---|
| Lead Paint Test (DIY) | $20–$50 | N/A | 5–15 min |
| Lead Paint Test (Pro) | N/A | $200–$600 | 1–3 hours |
| Safety Gear & Containment | $100–$300 | Included | 1–2 hours |
| Small Area Paint Removal | $0–$100 | $500–$2,000 | 2–8 hours |
| Whole Room Abatement | Not Recommended | $2,000–$10,000+ | 1–5 days |
| Lead Contaminated Waste Fees | $50–$200 | Included | As needed |
Tips & Prevention
- Regular Inspections: Periodically check painted surfaces in older homes for signs of deterioration (peeling, chipping, chalking). Address any issues promptly and safely.
- Encapsulation: For intact lead paint, the safest and often most cost-effective solution is encapsulation—covering it with new paint, drywall, or other materials. This traps the lead paint and prevents its release.
- Wet Cleaning: Regularly wet-wipe windowsills, floors, and other surfaces in older homes to remove any settled dust, even if you haven't been renovating. Use an all-purpose cleaner and disposable cloths.
- Good Hygiene: Wash hands frequently, especially before eating, and ensure children do the same. Remove shoes before entering the house to avoid tracking in contaminated soil.
- Professional Assessment: If you are unsure about the presence of lead paint or the scope of your project, invest in a professional lead risk assessment before starting any work.
- Educate Yourself: Understand the risks and regulations surrounding lead paint. EPA and local health department websites offer valuable resources for homeowners.
When to Call a Professional
You should always call a certified lead abatement professional or an EPA lead-safe certified renovator if you plan to disturb a large area of suspected lead paint, if the paint is severely deteriorated over a significant area, or if you are dealing with lead paint on components that experience friction, such as windows or doors. Professionals have the specialized equipment, experience, and certifications to safely contain, remove, and dispose of lead-contaminated materials according to strict regulatory guidelines. Attempting extensive lead paint removal on your own without the proper training and equipment can lead to widespread contamination, serious health consequences for your family, and potentially tens of thousands of dollars in professional remediation costs to fix amateur mistakes. If you have children under six, or a pregnant family member, it is especially critical to consult with a professional to minimize any risk of exposure during renovations. Remember, lead poisoning is preventable, but mistakes can be irreversible. If you have any doubt, call a professional.
Related Articles
Keep troubleshooting with these hand-picked guides from FixlyGuide:
- 7 Inspection Red Flags That Secretly Signal a $20,000 Bill — Don't let your dream home become a money pit. Many buyers and even some inspectors overlook subtle home inspection red flags that lead to f…
- The 12 Checks That Prevent 80% of Costly Home Repairs — Don't wait for a disaster. Our comprehensive monthly home maintenance checklist reveals the surprising, simple tasks that catch small issue…
- The Single Board Secret to Attracting Bluebirds: A Quick DIY House — Discover how to construct an ideal bluebird house using just one cedar board, providing a safe and inviting home for these cherished backya…
- The 7 Critical Household Filters You're Forgetting (And What They Cost You) — Neglected household filters are quietly costing you money, diminishing air quality, and paving the way for expensive repairs. Discover the…
- 7 Hidden Equity Drains Costing You Thousands Annually — Your home is an asset, but silent problems like minor leaks, poor insulation, and deferred maintenance can drain its value. Discover the se…
- The 7 Critical Home Inspection Mistakes Most Homeowners Make (and How to Spot Them) — Discover the crucial home inspection mistakes homeowners commonly overlook and learn how to identify potential problems before they become…
This article was independently written by FixlyGuide based on the source topic.
Frequently asked questions
How do I know if my house has lead paint?+
If your home was built before 1978, assume lead paint is present. You can use DIY lead test kits for a quick check, but for definitive results and a comprehensive understanding of lead hazards, hire a certified lead inspector for professional testing (XRF analysis or laboratory paint chip testing).
Is it safe to paint over lead paint?+
Yes, encapsulating intact lead paint by painting over it with new, high-quality paint is often the safest and most recommended method, provided the underlying lead paint is not peeling, chipping, or chalking. This seals the lead paint, preventing dust release. However, it's a temporary solution if the encapsulated layer is later disturbed.
What are the health risks of lead paint exposure?+
Lead exposure can cause serious health problems, especially in young children and pregnant women. In children, it can lead to developmental delays, learning difficulties, nervous system damage, speech problems, and reduced IQ. In adults, it can cause high blood pressure, joint and muscle pain, memory problems, kidney damage, and reproductive issues. Even low levels of lead can be harmful.
Can a regular vacuum cleaner clean up lead dust?+
No, a regular vacuum cleaner is not designed to trap microscopic lead particles and will exhaust them back into the air, spreading the contamination. Only use a HEPA-filtered vacuum cleaner specifically designed for lead dust, or a shop-vac with a certified HEPA filter attachment, for lead-safe cleanup.
When should I call a professional for lead paint removal?+
You should call a certified lead abatement professional for any extensive lead paint removal projects, especially if the paint is substantially deteriorated, if you're dealing with friction surfaces like windows, or if children or pregnant women are present in the home. Professionals have the necessary training, equipment, and certifications for safe containment, removal, and disposal, minimizing risks far better than a DIY approach for complex situations.
Discussion
Loading comments…