Tools & materials you'll need
Affiliate links- Amazon5-gallon bucketFor collecting water during flushing
As an Amazon Associate FixlyGuide earns from qualifying purchases — at no extra cost to you. Prices and availability are accurate as of publication and subject to change.
Quick Answer
Low water pressure throughout your entire house generally indicates a problem with the main water supply entering your home, rather than an isolated fixture issue. Common culprits include a partially closed main water shut-off valve, a failing pressure regulator, sediment buildup in water heaters or supply pipes, or even municipal issues. Begin troubleshooting by ensuring your main shut-off valve is fully open and checking your water pressure regulator if you have one. If these quick checks don't resolve the problem, you'll need to investigate further into your home's plumbing system or contact your water utility.
The Problem
There's nothing quite as frustrating as stepping into the shower, turning on the kitchen faucet, or trying to do laundry, only to be met with a weak, trickling stream of water. When low water pressure impacts every faucet and fixture in your home, it signals a systemic issue. This isn't just about convenience; consistent water pressure is essential for efficient appliance operation, proper hygiene, and even fire safety. A whole-house pressure drop means the problem lies upstream of individual fixtures, likely at the point where water enters your home, or within major components of your plumbing system and not due to a simple clogged aerator.
The implications of low water pressure go beyond annoyance. Dishwashers may not clean effectively, washing machines struggle to fill, and even showering becomes an exercise in patience. Furthermore, a sudden and significant drop in pressure can sometimes indicate a more serious issue like a burst pipe or a main line blockage, which requires immediate attention. Understanding the potential causes and how to systematically diagnose them can save you time, money, and a lot of headaches.
How It Works
Your home's water supply system is a network designed to deliver potable water at a consistent flow and pressure to every fixture. Water typically enters your property from a municipal main or a private well. For municipal systems, the water travels through a service line to your house, passing through a main shut-off valve and often a water meter. Many homes also have a pressure reducing valve (PRV), or pressure regulator, installed near the main shut-off valve. This device is crucial; it takes the higher pressure from the municipal supply (which can be 80-100 psi or more) and reduces it to a safer, more manageable level for your home's plumbing, typically between 40-60 psi.
From there, the water branches into your home's hot and cold supply lines. The cold water goes directly to fixtures, while a portion is diverted to your water heater – either a tank-style or tankless unit – where it’s heated before being distributed as hot water. The internal diameter of your pipes, the number of turns and fittings, and the elevation changes all contribute to minor pressure losses due to friction. However, the overall system is designed to maintain adequate pressure throughout. When this balance is disrupted by external factors like municipal supply issues, problems with the PRV, or internal obstructions like sediment buildup, the result is a noticeable drop in pressure across all fixtures. Understanding this basic flow helps in pinpointing where the interruption in pressure might be occurring.
Step-by-Step Fix
1. Check Your Main Shut-Off Valve – The simplest fix, often overlooked.
- Action: Locate your home's main water shut-off valve. It's typically near your water meter, where the main water line enters your house (often in a basement, utility closet, or outside near the foundation). Ensure it is fully open. If it's a gate valve (with a round handle), turn it clockwise until it stops, then counter-clockwise one full turn to ensure it's fully open and not stuck. If it's a ball valve (with a lever handle), ensure the handle is parallel to the pipe.
- Why this works: Sometimes, a service technician or even a family member might partially close this valve, leading to a house-wide pressure drop. It’s a common, easy-to-fix issue.
- If this doesn't work: If the valve is fully open and pressure is still low, proceed to the next step.
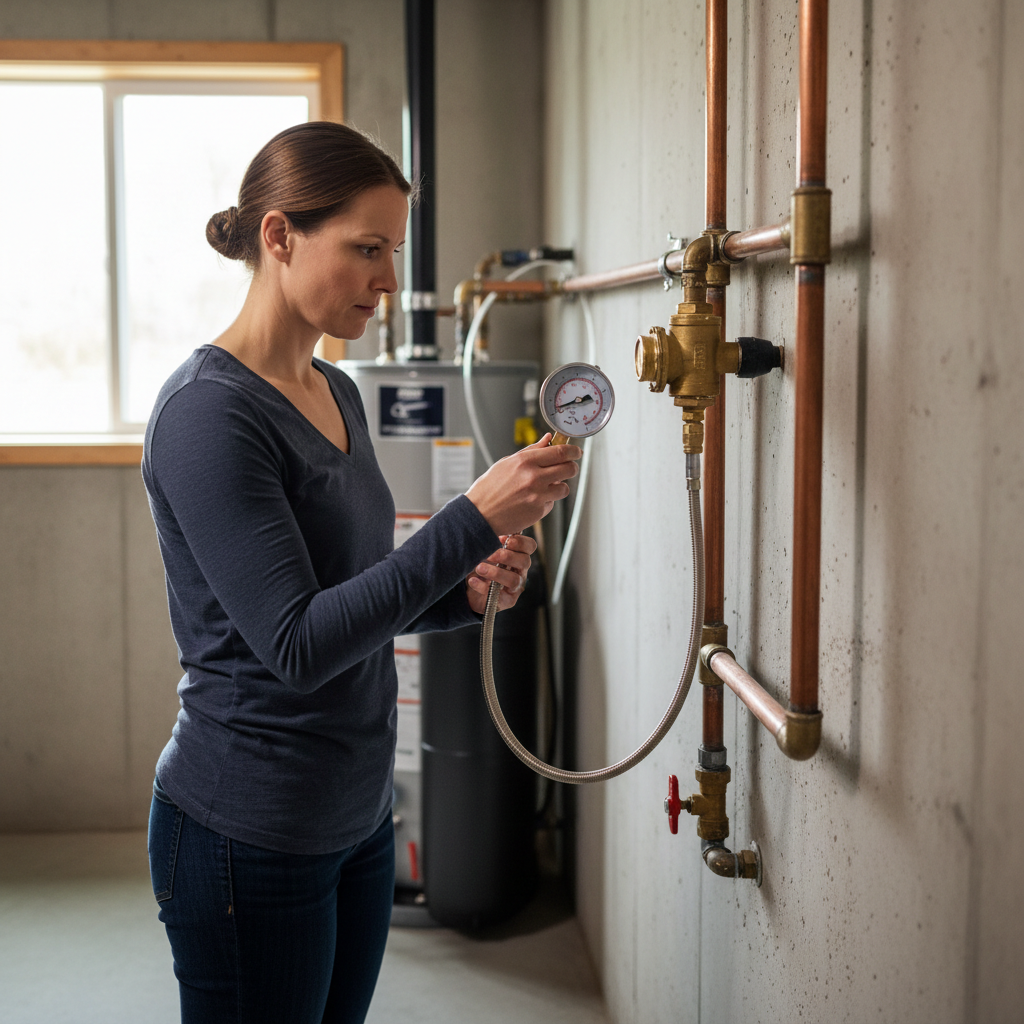
2. Test Your Water Pressure Regulator (PRV) – A common culprit for declining pressure.
- Action: If your home has a pressure regulating valve (PRV), often a bell-shaped device located on your main water line after the shut-off valve, you’ll need a water pressure gauge to test it. Screw the gauge onto an exterior hose bib (ensure no other water is running in the house). Open the hose bib fully and read the pressure. A healthy range is 40-60 psi. If it's significantly lower, the PRV may be failing or set too low. Adjust the screw on top of the PRV (loosen for higher pressure, tighten for lower) with a wrench, making small adjustments (a quarter-turn at a time) and retesting until the desired pressure is reached.
- Safety: Do not exceed 70 psi. Higher pressures can damage your plumbing and appliances.
- If this doesn't work: If the PRV is unresponsive to adjustments, or pressure remains low, it might need replacement. This is a job for an experienced DIYer or a plumber, as it involves soldering or specialized fittings.
3. Inspect Your Water Heater for Sediment Buildup – A silent restrictor of hot water flow.
- Action: Sediment buildup in the bottom of a tank-style water heater can restrict flow, especially for hot water, but if severe, it can impact overall pressure. Carefully drain a few gallons from the water heater's drain valve into a bucket. Observe the water for rust, sand, or other debris. If the flow is weak or the water contains significant gunk, your water heater needs flushing. Even if the sediment isn't the primary cause of whole-house low pressure, flushing your water heater annually is good maintenance.
- Procedure for flushing (caution): Turn off the cold water supply to the heater and the power/gas. Attach a garden hose to the drain valve and direct it to a floor drain or outside. Open the drain valve and a hot water faucet upstairs to break any vacuum. Let it drain until clear. Close the drain valve, remove the hose, and refill the tank before restoring power/gas. Refer to your water heater's manual for specific instructions.
- If this doesn't work: If flushing doesn't improve pressure or if you have a tankless water heater (which still benefits from descaling), consider if sediment is an issue in the main lines.
4. Check for Leaks in Your Main Water Line – A hidden drain on your pressure.
- Action: Turn off all water-using appliances and fixtures in your home. Go to your water meter and note the reading. Wait 15-30 minutes without using any water. Check the meter again. If the reading has changed, you likely have a leak somewhere in your system. This leak could be subtle and underground, or more obvious inside your home (behind walls, under floors).
- Diagnostics: Listen for hissing sounds in walls or under floors. Look for damp spots in your yard along the service line, or unusually green patches of grass. Small leaks can significantly reduce pressure over time.
- If this doesn't work: If a leak is detected but its location is not obvious, professional leak detection services can pinpoint the exact source without destructive guesswork.
5. Evaluate for Corroded or Mineral-Clogged Pipes – A long-term aging problem.
- Action: Older homes, especially those with galvanized steel pipes, are highly susceptible to internal corrosion and mineral buildup. This buildup narrows the internal diameter of the pipes, restricting water flow and reducing pressure. If your home is older than 50 years and still has original galvanized plumbing, this is a very strong suspect. You might notice rust-colored water occasionally, particularly after the water sits in the pipes for a while.
- Inspection: While difficult to inspect without opening walls, you might be able to see the condition of pipes near exposed sections, like under sinks or in the basement. Look for rust, discoloration, or scale buildup at pipe junctions.
- If this doesn't work: There isn't a DIY fix for internal pipe corrosion beyond replacing the affected sections or repiping the entire house. This is a significant undertaking definitely requiring a professional plumber.
6. Contact Your Water Utility for External Issues – When the problem isn't in your home.
- Action: If you've tried all the above steps and still have low pressure, the issue might be outside your property line. Contact your neighbors to see if they are experiencing similar pressure problems. If they are, it points to a municipal issue such as a broken water main, an open fire hydrant, maintenance being done on the system, or local drought restrictions affecting pressure.
- Information: Your water utility can provide information on current service interruptions, scheduled maintenance, or explain if there's a wider issue affecting your neighborhood's water pressure.
- If this doesn't work: If your neighbors have normal pressure, then the issue is definitely isolated to your property, and you'll need to re-evaluate your in-home diagnostics, possibly calling a professional.
Common Causes
- Partially Closed Main Shut-Off Valve: The most common and easiest fix. If someone accidentally bumped or partially closed your home's main water valve, it will restrict the incoming flow.
- Failing Pressure Reducing Valve (PRV): Over time, the internal components of a PRV can wear out, causing it to malfunction and reduce the overall water pressure or become stuck. This is a very frequent cause in homes with these devices.
- Sediment Buildup in Water Heater: In areas with hard water, mineral deposits (calcium, magnesium) and rust can accumulate in the bottom of a hot water tank, restricting the flow of hot water out of the tank and sometimes even impacting the cold water inlet if the buildup is severe enough.
- Corroded or Clogged Pipes (especially Galvanized Steel): Older galvanized steel pipes are notorious for corroding internally and accumulating mineral scale over decades, effectively shrinking their diameter and significantly reducing flow throughout the house.
- Water Leaks: Even a small, persistent leak in your main service line or within your home's walls can divert enough water to cause a noticeable drop in pressure felt throughout the house.
- Municipal Supply Issues: Problems external to your home, such as a burst water main in your neighborhood, routine maintenance on the municipal water system, or even regional drought conditions, can lead to lower pressure at the source.
Common Mistakes
- Adjusting the PRV Without a Gauge: Guessing at PRV adjustments can lead to dangerously high pressure and potential damage to piping and appliances, or unnecessarily low pressure. Always use a water pressure gauge.
- Ignoring Localized Pressure Drops: Assuming a whole-house issue when only one shower has low pressure. Always confirm the pressure issue is truly systemic before tackling main lines. A single fixture usually means a clogged aerator or showerhead.
- Overlooking the Main Shut-Off Valve: Many homeowners jump to complex diagnostics before checking the simplest potential cause. Always start here.
- Flushing the Water Heater Improperly: Draining a hot water tank without turning off the cold water supply first can create a vacuum, potentially damaging the tank. Ensure power/gas is off and a hot water faucet is open to prevent this.
- Not Communicating with Neighbors/Utility: Wasting time troubleshooting an internal problem when the issue is external and affects the whole neighborhood is a common mistake. Verify external causes first.
- Attempting Complex Plumbing Repairs Without Experience: Replacing a PRV, main line repair, or extensive repiping are advanced tasks. Incorrectly tackling these can lead to leaks, water damage, or even burst pipes. Know when to call a professional.
Cost & Time Breakdown
| Task | DIY Cost | Pro Cost | Time |
|---|---|---|---|
| Check main shut-off valve | $0 | $0 | 5-10 minutes |
| Test/Adjust PRV | $15-$25 (gauge) | $150-$300 | 15-30 minutes |
| Water heater flush | $0 (materials) | $100-$250 | 30-60 minutes |
| Leak detection (DIY) | $0 | $300-$800 | 30-60 minutes |
| PRV replacement | $100-$200 | $400-$800 | 2-4 hours |
| Main line re-piping | N/A | $3,000-$10,000+ | 3-7 days |
Tips & Prevention
- Regular PRV Checks: If you have a PRV, test it with a pressure gauge annually to ensure it's functioning correctly and maintaining optimal pressure. These devices typically last 10-15 years but can fail sooner.
- Annual Water Heater Flush: Flush your tank-style water heater annually to remove sediment buildup. This not only helps maintain water pressure but also extends the life of your heater and improves efficiency.
- Water Filtration: Consider a whole-house water filtration system if you have consistently hard water or a lot of sediment in your municipal supply. This can help reduce mineral buildup in pipes, fixtures, and appliances.
- Know Your Plumbing Layout: Familiarize yourself with the location of your main shut-off valve, water meter, and pressure regulator. Knowing where these crucial components are will speed up diagnosis and emergency shut-offs.
- Monitor for Leaks: Periodically check your water meter for unexplained usage, especially during seasons when you don't irrigate. Address any visible leaks (drips, damp spots) promptly.
- Upgrade Old Plumbing: If you have an older home with galvanized steel pipes, start budgeting for a repipe. While expensive, it's often the only long-term solution for persistent low pressure caused by corroded plumbing and will significantly improve water quality and pressure.
When to Call a Professional
While many low-pressure issues can be diagnosed and even fixed by a determined homeowner, certain situations absolutely warrant calling a licensed plumber. If you've located a significant leak in your main service line that requires excavation, or if you suspect extensive corrosion in your walls, these are not DIY projects. Similarly, attempting to replace a pressure regulating valve (PRV) without proper tools, knowledge of soldering or fitting types, and experience with high-pressure water systems can lead to further damage, leaks, or even scalding injuries. Any issue involving your home's main water supply beyond the simple manipulation of a valve should be approached with caution. If your city water utility confirms optimal pressure to your property line but you still have extremely low pressure indoors, or if you detect a persistent underground leak, a professional can use specialized equipment to pinpoint exact problems and execute complex repairs safely and effectively, ensuring your home's plumbing integrity and compliance with local codes.
Related Articles
Keep troubleshooting with these hand-picked guides from FixlyGuide:
- The Secret Culprit Behind Your Whole-House Low Water Pressure (It's Not Always the City) — Whole-house low water pressure can be a frustrating and complex issue, ranging from simple fixes homeowners can do to signs that require a…
- The 4 Hidden Reasons Your Entire Home Has Low Water Pressure (And the Easy Fixes) — Low water pressure throughout your entire home can be a frustrating and often misunderstood problem, with several common culprits. Learn to…
- The 4 Hidden Reasons Your Entire Home Has Low Water Pressure — Low water pressure throughout your house can stem from several hidden issues, ranging from municipal supply problems to your home's main sh…
- The #1 Mistake Homeowners Make When Diagnosing Low Water Pressure (It's Not Your Pipes!) — Low water pressure throughout your house often points to a single, easily overlooked culprit: your main water shut-off valve.
- The #1 Mistake Homeowners Make When Diagnosing Low Water Pressure (It's Not Your Pipes) — Discover the most common, overlooked culprit behind low water pressure impacting your entire home and learn how to fix it yourself with bas…
- The 5-Minute Trick to Restore Your Kitchen Sink Sprayer's Lost Pressure — Restore your kitchen sink sprayer's low pressure with a quick, simple trick that often takes less than five minutes and requires no special…
Recommended for DIYers & woodworkers
Sponsored
The Top 20 Tools for Workshops of Any Budget
No stationary machines or power tools required — plus 3 fundamental tools that can't be bought at any price.
Get the free guide
Ted's Woodworking — The #1 Woodworking Resource
Detailed instructions, dimensioned drawings, materials & cutting lists, and 3D schematics for every skill level.
See the plansSponsored: links above are affiliate links. FixlyGuide may earn a commission on qualifying purchases — at no extra cost to you.
Frequently asked questions
Why is my water pressure suddenly low throughout the entire house?+
A sudden, whole-house drop in water pressure can indicate a partially closed main shut-off valve, a failing pressure reducing valve (PRV), a significant leak in your main water line, or an issue with your municipal water supply such as a broken main or maintenance work. Check your main shut-off valve first.
How do I check my home's water pressure?+
You can check your home's water pressure using a water pressure gauge, which can be purchased at any hardware store. Simply screw the gauge onto an exterior hose bib (ensure no other water is running in the house), open the faucet fully, and read the dial. Ideal household pressure is typically between 40-60 psi.
Can a clogged water heater cause low water pressure?+
Yes, sediment buildup in the bottom of a tank-style water heater can significantly restrict the flow of hot water out of the tank, leading to low hot water pressure. If the buildup is severe, it can even affect overall household pressure by impacting the cold water inlet. Regular flushing can prevent this.
What is a pressure reducing valve (PRV) and how does it relate to water pressure?+
A pressure reducing valve (PRV) is a plumbing device installed on your main water line that reduces the high incoming municipal water pressure to a safe, consistent level (typically 40-60 psi) for your home's plumbing system. If a PRV fails, it can become stuck, causing dramatically low water pressure throughout the house or, less commonly, dangerously high pressure.
Should I call a plumber or my water company for low pressure?+
It depends on your initial diagnostics. If you've checked your main shut-off valve and PRV and suspect the issue is outside your property (e.g., your neighbors also have low pressure, or you see workers in the street), call your water company. If the problem is isolated to your home and you've exhausted basic troubleshooting or suspect a complex internal issue like a main line leak or pipe corrosion, call a licensed plumber.


Discussion
Loading comments…