Tools & materials you'll need
Affiliate linksAs an Amazon Associate FixlyGuide earns from qualifying purchases — at no extra cost to you. Prices and availability are accurate as of publication and subject to change.
Quick Answer
Ice dams are destructive forces that can lead to significant water damage inside your home, including stained ceilings, damaged insulation, and even structural issues. The safest and most effective way for a homeowner to address an existing ice dam is by using a calcium chloride-filled stocking or pantyhose to create channels for trapped water to drain. This method, combined with addressing the root cause through proper attic insulation and ventilation, prevents further dam formation and protects your home.
The Problem
That formidable ridge of ice along your roof's edge isn't just an unsightly winter decoration; it’s a ticking time bomb for your home. Ice dams aren't just heavy; they prevent meltwater from draining off your roof. This trapped water then backs up under your shingles, seeps into your attic, and trickles down through walls and ceilings, causing water stains, peeling paint, ruined insulation, and even compromised structural integrity. The cost of repairing internal water damage can quickly escalate into thousands of dollars, far outweighing the effort of prevention or safe removal.
The real danger of ice dams isn't always visible until it's too late. Water penetration can lead to mold growth in unseen cavities, deteriorating wood, and weakening of your roof deck. Furthermore, large ice dams can tear off gutters and even pull fascia boards away from the house due to sheer weight. Attempting to remove them incorrectly with blunt force, like an axe or shovel, can severely damage your roof, leading to even more leaks and expensive repairs.
How It Works
Understanding how ice dams form is crucial to preventing and removing them. It all boils down to a heat imbalance. Your attic, ideally, should be as cold as the outdoors in winter. However, warmth from your living space often rises and escapes into the attic, either through poorly sealed ceiling penetrations (light fixtures, attic hatches, plumbing stacks) or inadequate insulation.
This escaping heat warms the roof decking from underneath, causing snow on the upper parts of the roof to melt. As this meltwater flows down the roof, it reaches the colder eaves, which are typically unheated and extend beyond the exterior walls. At this point, the water temperature drops below freezing, and it refreezes, forming a barrier of ice. This initial barrier then traps subsequent meltwater, causing it to pool behind the dam. As more water melts and refreezes, the ice dam grows larger and thicker, forcing water further and further back under your roof shingles. Standard asphalt shingles are designed to shed water downwards, not to create a watertight seal against standing water backing up underneath them. Once water gets under the shingles, it travels along the roof deck, finds nail holes or seams, and eventually makes its way into your attic and home.
Effective ice dam prevention almost always involves improving attic insulation and ventilation. Insulation minimizes heat transfer from your home into the attic, while proper ventilation (soffit and ridge vents) allows any heat that does enter the attic to escape, keeping the roof deck surface uniformly cold. This prevents the initial melting that is the root cause of ice dam formation.
Step-by-Step Fix
Before you begin, always prioritize safety. Working on a slippery roof, especially with ice, is inherently dangerous. If you are uncomfortable with heights, or if the ice dam is extensive and difficult to reach, call a professional.
1. Assess the Situation Safely – Identify the extent and potential dangers.
- Examine the ice dam from the ground first. Note its size, location, and whether there are icicles posing a fall hazard. Do not get on the roof if it's heavily iced or if you don't have proper safety gear.
- Look for signs of interior water damage, such as ceiling stains, which indicate water is already penetrating your home. This will determine the urgency.
2. Gather Your Tools and Materials – Prepare everything you need before climbing.
- Your primary tool will be calcium chloride de-icer. Avoid rock salt (sodium chloride) as it can damage roofs, gutters, and landscaping. Calcium chloride is much safer for roofing materials.
- You'll also need old pantyhose, tube socks, or pillowcases to hold the calcium chloride.
- A sturdy ladder, safety rope or harness (if working on a steep roof), and slip-resistant footwear are essential.
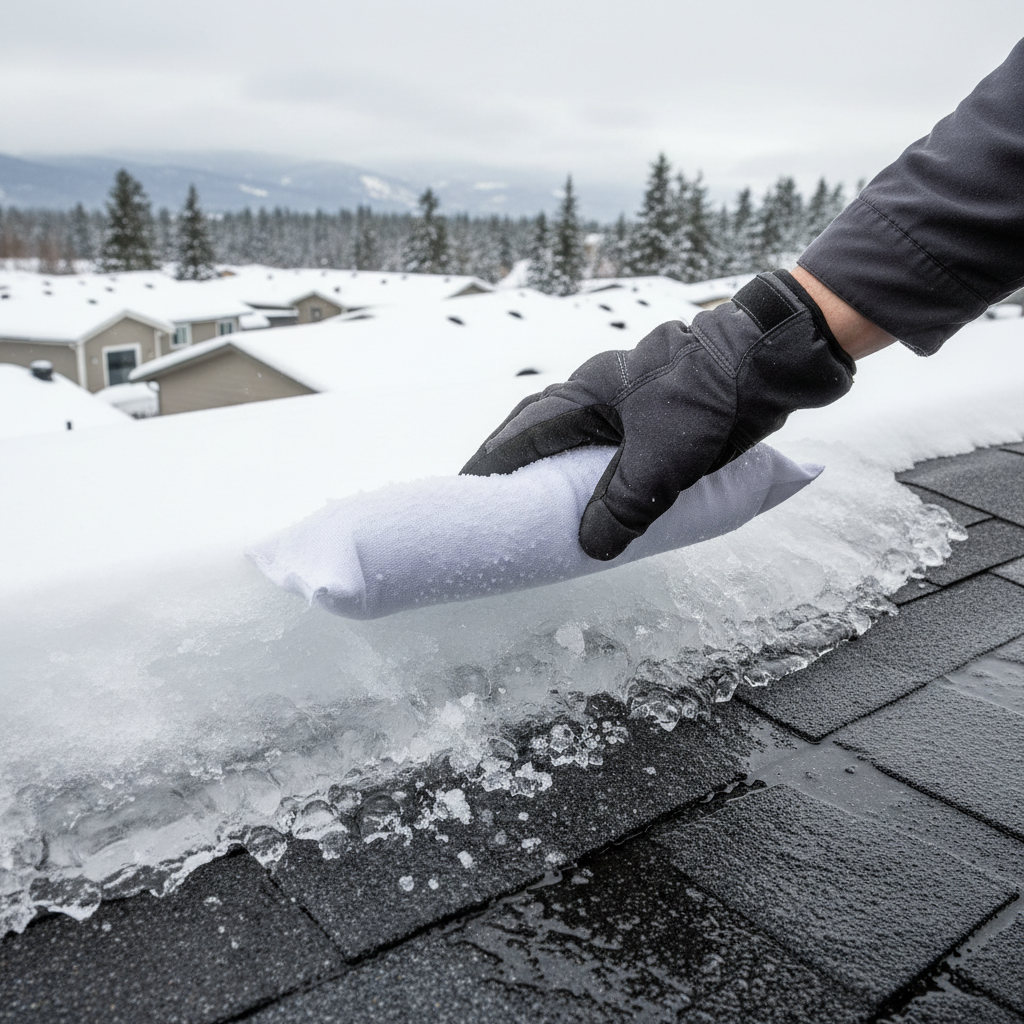
3. Fill Your De-icing Socks – Prepare your melting agents.
- Carefully pour calcium chloride crystals into a length of old pantyhose or a tube sock. Tie off the ends securely to prevent spills.
- Aim for a diameter that's easy to handle and place on the roof, typically 2-3 inches. Make several of these; you may need more than you think.
4. Safely Position Your Ladder – Ensure a stable platform.
- Place your ladder on a firm, level surface, extending at least three feet above the roofline. Have someone spot for you if possible.
- Secure the ladder at the top if necessary with bungee cords or rope to prevent it from slipping.
5. Create Melt Channels – Focus on drainage, not total removal.
- Carefully climb onto the roof, if safe to do so. Always use extreme caution on an icy roof.
- Place the filled pantyhose or socks perpendicular to the ice dam, spanning from the top of the ice dam down to the gutter. The idea is to melt channels through the ice, allowing trapped water to drain, not to melt the entire dam.
- Position them every 4-6 feet along the length of the dam, especially over areas where water is accumulating.
6. Be Patient and Monitor – Allow the calcium chloride to work.
- Calcium chloride works by lowering the freezing point of water. It will slowly melt channels, often taking several hours, depending on the ice thickness and temperature.
- Do not attempt to chip away at the ice dam while the calcium chloride is working. This can cause significant damage to shingles and gutters.
7. Address the Roof Rake Alternatively – For lower, accessible portions of the roof.
- If the ice dam is reachable from the ground using a roof rake (never stand on the ice dam to use a roof rake), you can try to chip away at the very edge of the dam, creating a small channel for drainage.
- Only do this gently and avoid scraping the rake directly against the shingles, as this can damage them. This method is less effective than calcium chloride for creating deep channels.
8. Clean Up Residue – After the dam has drained and largely melted.
- Once the ice has melted and drained, carefully remove the pantyhose/socks. Rinse any residue on the roof or gutters thoroughly with water to prevent staining or corrosion.
- Inspect your gutters for any remaining ice or blockages and clear if necessary.
Common Causes
- Poor Attic Insulation: The most prevalent cause. Insufficient insulation in the attic allows heat from the living space to readily transfer to the roof decking.
- Lack of Attic Ventilation: Even with good insulation, a poorly ventilated attic can trap heat, warming the roof deck. Soffit and ridge vents create an air current that flushes out warm air.
- Attic Air Leaks: Gaps around can lights, exhaust fans, plumbing stacks, dropped ceilings, and attic hatches act as superhighways for warm, moist air to escape directly into the attic, heating specific spots on the roof.
- Snow Accumulation: While not a direct cause, heavy snow acts as an insulating blanket, trapping heat on the roof and exacerbating the melting/refreezing cycle.
- Inconsistent Roof Temperatures: Uneven heating of the roof surface due to complex rooflines or varying insulation levels can create ideal conditions for dam formation.
Common Mistakes
- Using Rock Salt (Sodium Chloride): Rock salt can corrode aluminum gutters, damage asphalt shingles, and harm plants and shrubs below. Always opt for calcium chloride.
- Aggressively Hitting the Ice Dam: Using an axe, chisel, or even a shovel to smash ice dams can easily damage shingles, punctures the roof membrane, and leads to costly leaks. Don't do it.
- Applying Heat Directly: Using a blowtorch or heat gun on an ice dam is extremely dangerous, a fire hazard, and can damage roofing materials or even start a house fire.
- Ignoring the Root Cause: Simply removing an ice dam without addressing why it formed (insulation, ventilation, air leaks) means it will just reform with the next snowfall.
- Not Using Safety Gear: Working on an icy roof without proper fall protection (harness, sturdy ladder on level ground) is incredibly risky. Falls from roofs can lead to severe injury or death.
- Standing Under Melting Icicles: As the ice dam melts, large icicles can fall. Always be aware of your surroundings and avoid standing directly beneath them.
Cost & Time Breakdown
| Task | DIY Cost | Pro Cost | Time |
|---|---|---|---|
| Calcium Chloride De-icer | $30-$50 | Included in service | 30 mins |
| Ladder/Safety Gear (if needed) | $0-$300 | Included in service | 0 |
| Applying De-icer | $0 (your labor) | $200-$600 | 1-2 hours |
| Total for Removal | $30-$350 | $200-$600+ | 1-2 hours |
| Attic Insulation/Ventilation | $500-$2,000+ | $2,000-$5,000+ | 1-3 days |
Tips & Prevention
- Inspect and Seal Attic Air Leaks: Before winter, seal any gaps or cracks in your attic floor that allow warm air to rise. Use expanding foam for larger gaps and caulk for smaller ones around pipes and wires. Check recessed lights and the attic hatch, which are common culprits.
- Ensure Adequate Attic Insulation: Aim for an R-value of R-38 to R-60 for most attics, depending on your climate zone. This creates a thermal barrier, preventing heat transfer to the roof deck. A uniformly cold attic is your best defense.
- Maintain Proper Attic Ventilation: Ensure your soffit vents are clear and not blocked by insulation. Combine them with a ridge vent or gable vents to create a continuous airflow, flushing out any heat that accumulates in the attic.
- Clear Snow Promptly: After a heavy snowfall, use a roof rake (from the ground!) to carefully remove the bottom few feet of snow from your roof. This reduces the snow load and minimizes the material available for melting and refreezing.
- Keep Gutters Clean: Clogged gutters can prevent proper drainage, exacerbating ice dam problems. Clear leaves and debris from your gutters before winter sets in.
- Monitor Roof for Warning Signs: Look for icicles forming beyond the roof edge, especially thick or numerous ones, and check your attic for any signs of frost on the underside of the roof deck or water stains on insulation or wood.
When to Call a Professional
If your ice dam is extensive, spans a significant portion of your roof, or if you are uncomfortable working on a ladder on an icy surface, it
Related Articles
Keep troubleshooting with these hand-picked guides from FixlyGuide:
- The $30 Trick to Melting Ice Dams (Before They Destroy Your Roof) — Discover how to safely remove ice dams from your roof instantly with common household items, preventing costly damage. Stay safe while tack…
- The $30 Secret to Banishing Ice Dams From Your Roof (Before They Destroy It) — Learn safe and effective methods to remove ice dams from your roof and prevent costly damage to your home's structure and interior.
- The #1 Mistake Homeowners Make Removing Ice Dams (And 3 Safer Fixes) — Discover the safest and most effective ways to remove ice dams from your roof, avoiding common mistakes that can cause severe damage to you…
- The $20 Trick That Melts Ice Dams (and Saves Your Roof) — Discover a surprisingly simple, budget-friendly method to safely remove ice dams and prevent costly roof damage to your home.
- The $5 Secret to Preventing Ice Dams (and Why Your Neighbors Still Get Them) — Discover the surprising truth about ice dams and how a simple, inexpensive solution can protect your home from costly winter damage.
- The $7 Trick That Unclogs Your AC Drain Line (and Prevents Nasty Surprises) — Discover the simple, inexpensive method to clear your AC's clogged drain line and prevent costly water damage and reduced cooling efficienc…
Recommended for DIYers & woodworkers
Sponsored
The Top 20 Tools for Workshops of Any Budget
No stationary machines or power tools required — plus 3 fundamental tools that can't be bought at any price.
Get the free guide
Ted's Woodworking — The #1 Woodworking Resource
Detailed instructions, dimensioned drawings, materials & cutting lists, and 3D schematics for every skill level.
See the plansSponsored: links above are affiliate links. FixlyGuide may earn a commission on qualifying purchases — at no extra cost to you.
Frequently asked questions
What causes ice dams?+
Ice dams form when heat from your home's interior escapes into the attic, warming the roof deck and melting snow. This meltwater then refreezes at the colder roof eaves, creating a barrier that traps more water behind it.
Is rock salt (sodium chloride) safe for ice dam removal?+
No, avoid using rock salt. It can corrode metal gutters, damage most roofing materials, and harm landscaping plants. Always opt for calcium chloride, which is much safer for your home and environment.
How do I prevent ice dams from forming?+
The most effective prevention involves proper attic insulation (R-38 to R-60), adequate attic ventilation (soffit and ridge vents), and sealing all air leaks from your living space into the attic. Also, gently remove snow from the lower portion of your roof with a roof rake after heavy snowfall.


Discussion
Loading comments…