
Tools & materials you'll need
Affiliate links- AmazonRoof rake1 · Extendable handle for safely reaching roof from ground
- AmazonSturdy extension ladder1 · Ensure it's rated for your weight and includes gear
- AmazonRubber mallet or plastic shovel1 · For gently breaking loosened ice
- AmazonSafety glasses1
- AmazonNon-slip winter boots1 pair · Essential for traction if working near roof
As an Amazon Associate FixlyGuide earns from qualifying purchases — at no extra cost to you. Prices and availability are accurate as of publication and subject to change.
Quick Answer
Ice dams are destructive barriers of ice that form at the edges of your roof, preventing melting snow from draining properly. They are primarily caused by heat escaping from your home, warming the roof deck, and causing snow to melt. This meltwater then flows down to the unheated eaves, refreezes, and builds up. Safely removing existing ice dams involves methods like using calcium chloride ice melt in pantyhose or a steam-based ice dam remover, followed by addressing the underlying issues of heat loss and inadequate attic ventilation. Never use sharp tools or rock salt directly on your roof.
The Problem
Many homeowners dread the sight of icicles, but the true menace lurks unseen: the ice dam. These thick, formidable ridges of ice form along the eaves of your roof, just above or within the gutters, after heavy snowfall and fluctuating temperatures. They create a critical barrier, preventing additional melting snow and ice from draining off the roof properly. Instead, this trapped water backs up, often pooling underneath shingles. Because shingles are designed to shed water downward, not resist standing water, this pooled water can seep into your attic, walls, and even ceilings. The consequences are severe: stained ceilings, ruined insulation, mold growth, warped drywall, structural damage, and rotting fascia boards. The cycle often repeats, with each freeze-thaw event compounding the damage and increasing the risk to your home's structural integrity.
How It Works
Understanding ice dams starts with understanding basic thermodynamics and how your roof system interacts with heat. There are three primary ingredients for an ice dam: snow on the roof, below-freezing outdoor temperatures, and a warm roof surface. Most homeowners assume their roof is uniformly cold in winter, but this is rarely true. Your home's interior, particularly the living space, generates significant heat. This heat rises and, if not properly contained and vented, leaks into your attic space.
Even with a modest amount of attic insulation, some heat inevitably radiates through the ceiling and into the attic. If your attic lacks sufficient insulation, lacks proper ventilation, or has air leaks (from recessed lights, attic hatches, plumbing stacks, etc.), this heat accumulates in the attic. The warmed attic air then heats the roof deck from below. When snow falls and accumulates on this inadequately insulated roof, the areas directly over the heated living space become slightly warmer, causing the snow to melt.
This meltwater then flows down the roof slope. As it reaches the eaves, which typically extend beyond the exterior walls and are therefore unheated (and often significantly colder), the water almost instantly refreezes. This frozen water forms the initial ridge of an ice dam. Subsequent melting snow adds to this ridge, causing it to grow thicker and higher, eventually creating a substantial barrier. The water then backs up behind this barrier, creating a pool that puts immense pressure on your roofing materials, seeking any tiny gap or compromised shingle to leak into your home. The deeper the snow and the longer the freeze-thaw cycles, the more severe the ice dam becomes.
Step-by-Step Fix
Safety First — Always prioritize your safety. Working on a slippery roof in winter conditions is inherently dangerous. If you're uncomfortable, call a professional. Wear non-slip footwear and use a sturdy ladder with a helper spotting you.
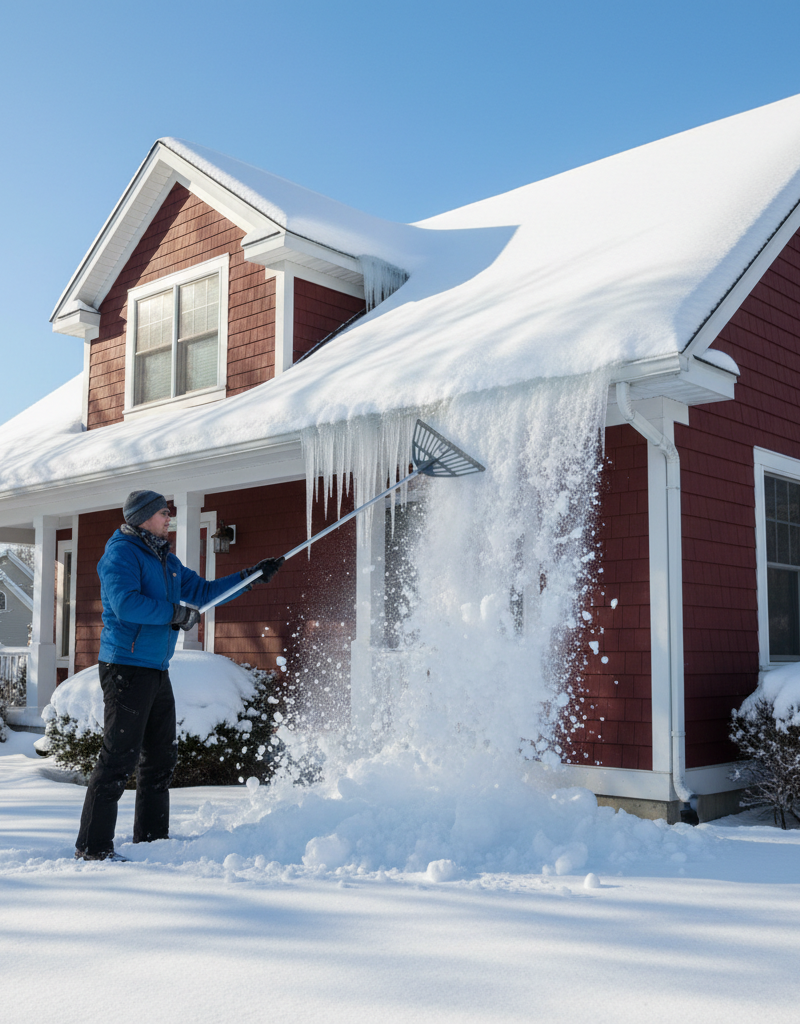
Clear the Immediate Snow — Before tackling the ice, remove as much loose snow as possible from the roof, especially near the eaves.
- Use a long-handled roof rake. Stand safely on the ground.
- Pull snow down in 2-3 foot sections, working upwards from the eave.
- Avoid raking too aggressively, which can damage shingles.
- Clear snow several feet up from the edge, if possible, to reduce the source of meltwater.
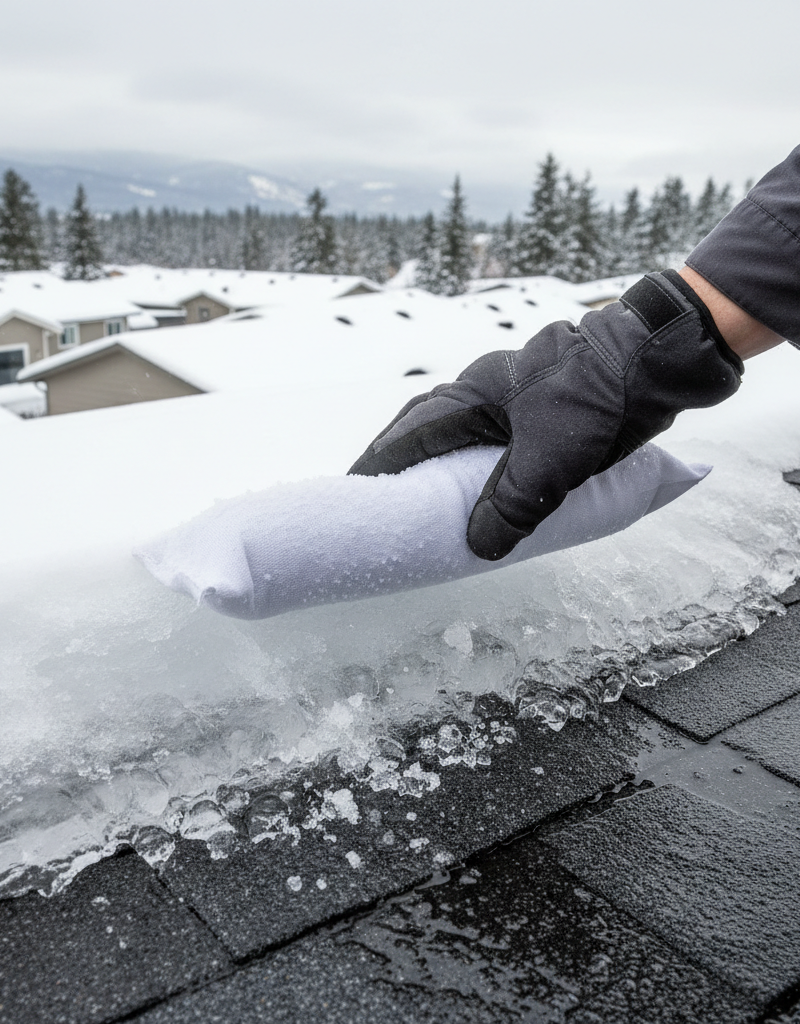
Melt Channels with Calcium Chloride — Create channels through the ice dam to allow trapped water to drain.
- Materials: Obtain calcium chloride ice melt (NOT rock salt or sodium chloride, which can damage roofing) and several old pantyhose or socks.
- Preparation: Fill the pantyhose or socks with 1-2 cups of calcium chloride. Tie off the ends securely.
- Placement: Carefully place the filled pantyhose parallel to the eave, directly over the deepest part of the ice dam. Space them about 2-3 feet apart.
- Wait: The calcium chloride will slowly melt through the ice, creating channels. This can take several hours, depending on the ice thickness and temperature.
- Safety Note: Do not attempt to climb onto the roof to place these if it is icy or steep. Use a sturdy ladder from the ground, or consider calling a professional.
Steam Away the Ice (for severe dams) — For large, stubborn ice dams, a professional low-pressure steam treatment is the safest and most effective method.
- DIY Alternative (with caution): While professional steam is best, some homeowners use a wallpaper steamer from a ladder. This is a slow, tedious, and potentially dangerous DIY method due to working at height with steam. Proceed with extreme caution and ensure electrical safety.
- Process: Hold the steamer plate against the ice, allowing the steam to melt a channel. Gradually work your way through the ice.
- Never use a pressure washer or chipping tools, as these will severely damage shingles and gutters.
Break Up Loosened Ice — Once channels are established or the ice has softened, gently remove smaller pieces.
- Use a rubber mallet or plastic shovel to gently tap and dislodge small, manageable sections of ice.
- Crucial: Do not pry or chip aggressively. If the ice isn't breaking easily, it's not ready or requires further melting.
- Direct falling ice away from people, plants, and vehicles.
Clear Gutters (after ice dam removal) — Ensure gutters are free of ice and debris to facilitate proper drainage.
- Once the ice dam is removed, carefully remove any remaining ice or debris from the gutters.
- Use a gutter scoop or a small hand trowel.
- Ensure downspouts are clear to allow water to flow away from the foundation.
Inspect for Damage — After the ice is removed, visually inspect your roof and attic for signs of damage.
- Exterior: Look for lifted, cracked, or missing shingles, damaged flashing, and bent or detached gutters.
- Interior: In the attic, check for water stains on the underside of the roof deck, beams, or insulation. In living spaces, inspect ceilings and walls for new stains, peeling paint, or dampness.
- Document any damage with photos for insurance purposes.
Address the Root Cause — Implement long-term solutions to prevent future ice dams.
- Attic Insulation: Ensure your attic has adequate insulation. The recommended R-value varies by region, but generally ranges from R-38 to R-60.
- Air Sealing: Seal all air leaks from the living space into the attic. Common culprits include attic hatches, plumbing vents, electrical penetrations, and recessed lights. Use caulk, spray foam, or weatherstripping.
- Attic Ventilation: Ensure proper attic ventilation (soffit and ridge vents working in tandem) to keep the attic temperature closer to the outdoor temperature. This prevents the roof deck from heating up.
Common Causes
- Inadequate Attic Insulation: This is the primary culprit. Insufficient insulation in your attic allows heat from your living space to easily transfer through the ceiling and into the attic. This warms the roof deck, melting the snow from below.
- Poor Attic Ventilation: Even with good insulation, if your attic isn't properly vented, warm air can get trapped. Proper ventilation (e.g., continuous soffit vents combined with a ridge vent) creates an airflow that flushes out warm air and keeps the attic temperature consistent with the outside air, preventing localized roof warming.
- Air Leaks into the Attic: Small gaps, cracks, and penetrations in your ceiling (around light fixtures, exhaust fan ducts, plumbing stacks, attic hatches, and wiring) allow warm, moist air directly from your home to bypass insulation and enter the attic, creating
Related Articles
Keep troubleshooting with these hand-picked guides from FixlyGuide:
- The #1 Mistake Homeowners Make with Ice Dams (and How to Fix It SAFELY) — Most homeowners approach ice dam removal incorrectly, creating more damage or safety risks. Learn the right, safe methods to protect your r…
- The 3 Hidden Reasons Your Roof Gets Ice Dams (and the Only Safe Way to Remove Them) — Discover the real causes of ice dams and the safest, most effective methods for removal, preventing costly roof and water damage this winte…
- The $30 Trick to Melting Ice Dams (Before They Destroy Your Roof) — Discover how to safely remove ice dams from your roof instantly with common household items, preventing costly damage. Stay safe while tack…
- The $30 Secret to Banishing Ice Dams Without Damaging Your Roof — Discover how a simple, inexpensive trick can safely eliminate dangerous ice dams from your roof and prevent costly damage to your home.
- The $20 Trick That Melts Ice Dams (and Saves Your Roof) — Discover a surprisingly simple, budget-friendly method to safely remove ice dams and prevent costly roof damage to your home.
- The #1 Gutter Mistake You're Making (And 3 Hidden Causes of Overflow) — Overflowing gutters in heavy rain are often a sign of a deeper issue than just debris, leading to potential foundation damage and costly re…
Recommended for DIYers & woodworkers
Sponsored
The Top 20 Tools for Workshops of Any Budget
No stationary machines or power tools required — plus 3 fundamental tools that can't be bought at any price.
Get the free guide
Ted's Woodworking — The #1 Woodworking Resource
Detailed instructions, dimensioned drawings, materials & cutting lists, and 3D schematics for every skill level.
See the plansSponsored: links above are affiliate links. FixlyGuide may earn a commission on qualifying purchases — at no extra cost to you.
Frequently asked questions
What causes ice dams on a roof?+
Ice dams are caused by a combination of snow on the roof, freezing outdoor temperatures, and heat escaping from your home's interior into the attic. This heat melts the snow from below, and the water then refreezes when it reaches the colder, unheated eaves of the roof.
Is it safe to chip away at ice dams?+
No, it is generally unsafe and highly destructive to chip away at ice dams with sharp tools like axes or shovels. This can severely damage your shingles, gutters, and underlying roof structure, leading to costly repairs. Gentler methods using ice melt or steam are much safer.
How can I prevent ice dams from forming?+
The most effective way to prevent ice dams is to ensure your attic has adequate insulation to prevent heat loss, proper air sealing to stop warm air leaks, and sufficient ventilation (soffit and ridge vents) to keep the attic temperature consistent with the outside air.
Can ice dams damage my roof?+
Yes, ice dams can cause significant damage. They prevent meltwater from draining, causing it to pool and seep under your shingles, leading to water damage in your attic, ceilings, and walls. They can also damage gutters, fascia boards, and exterior paint.
When should I call a professional for ice dam removal?+
You should call a professional if the ice dams are extensive, if you cannot safely reach them from the ground, or if you suspect water has already infiltrated your home. Professionals have specialized equipment like low-pressure steam removers that safely dislodge large ice dams without damaging your roof.

Discussion
Loading comments…