
Tools & materials you'll need
Affiliate links- AmazonRoof rake with extension handle1 · For safely removing snow from the ground
- AmazonSturdy ladder1 · For accessing higher areas if necessary, ensure it's stable on soft ground
- AmazonRubber gloves1 pair · To protect hands when handling ice melt
- AmazonCommercial-grade steam cleaner1 · Optional, for rental only; specifically designed for ice dam removal
- AmazonWarm water hose1 · If temperatures allow for clearing gutters/downspouts
As an Amazon Associate FixlyGuide earns from qualifying purchases — at no extra cost to you. Prices and availability are accurate as of publication and subject to change.
Quick Answer
Removing ice dams safely requires a methodical approach that prioritizes both personal safety and the integrity of your roof. The absolute safest method involves using a calcium chloride-filled sock or pantyhose to melt channels through the dam, allowing trapped water to drain. For larger, more stubborn dams, a professional-grade steam cleaner is an effective and roof-friendly option. Avoid using hammers, chisels, or other sharp objects, as these can cause significant, costly damage to shingles, gutters, and the underlying roof structure. Similarly, never use rock salt, as it can corrode flashing and destroy vegetation.
The Problem
You wake up after a heavy snowfall and a few days of fluctuating temperatures to see a thick, icy ridge forming along the eaves of your roof. This isn't just an aesthetic inconvenience; it's an ice dam, and it's a serious threat to your home. An ice dam forms when snow on the warmer parts of your roof melts, runs down to the colder eaves, and refreezes. This process continues, building up a wall of ice that prevents subsequent meltwater from draining off the roof. The water then pools behind the dam, seeps under your shingles, and can cause significant water damage to your attic, ceilings, walls, insulation, and even structural elements. This can lead to mold growth, ruined drywall, peeling paint, and compromised insulation effectiveness. Ignoring an ice dam can result in thousands of dollars in repairs.
How It Works
Understanding how an ice dam forms is key to preventing and safely resolving it. The primary culprit is a temperature difference across your roof surface. Heat escapes from your home's living space and attic through the ceiling and insulation. This warmth radiates up, melting the snow on the main part of the roof. As this meltwater flows down the roof slope, it reaches the overhangs and eaves, which are typically colder because they extend beyond the heated envelope of the house and lack insulation directly beneath them. When the meltwater hits these colder areas, it refreezes, forming the initial ridge of ice. As more snow melts and refreezes, this ice dam grows, acting like a barrier. Water continues to melt higher up the roof, but instead of draining into the gutters, it gets trapped behind the ice dam. This ponded water then backs up underneath the shingles. Standard shingles are designed to shed water over their surface, not to be submerged. Once water gets under the shingles, it can penetrate the roofing felt and plywood decking, eventually leading to leaks inside your home. The cycle of melting and refreezing also puts immense stress on gutters, often tearing them away from the fascia, and can even damage the roof's edge and fascia boards themselves.
Step-by-Step Fix
SAFETY NOTE: Always work with a partner, especially when using ladders or working on a slippery roof. Ensure your ladder is stable on firm, level ground. Wear non-slip footwear and cold-weather gear. If you're uncomfortable on a ladder or roof, or if the ice dam is extensive, call a professional. Never use a power washer on your roof; it can strip shingles and force water further under them.
1. Assess the Situation — Evaluate the size and extent of the ice dam.
*   Before attempting any removal, carefully observe the ice dam. Note its thickness, length, and if any water appears to be backing up or actively leaking into your home. This assessment will help you determine the best approach. If the dam is small and localized, a DIY method might suffice. If it's massive or if you see significant interior leaking, it's often best to call a professional immediately.
*   Tools: Binoculars (for a safe ground-level view).
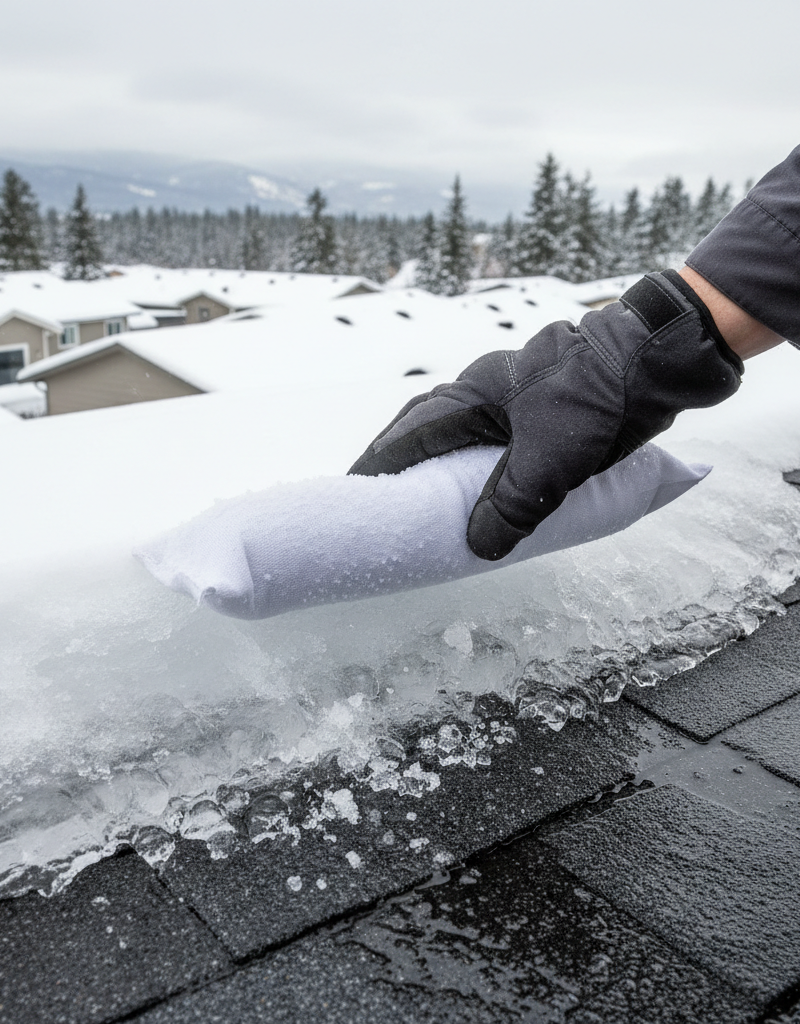
2. Create Drainage Channels with Calcium Chloride — Safely melt pathways for trapped water.
*   This is generally the safest DIY method. Fill an old nylon stocking or a pair of pantyhose with calcium chloride ice melt (NOT rock salt, which can damage your roof and plants). Lay the filled stocking across the ice dam, perpendicular to the eave, directly over where water is pooling. The calcium chloride will slowly melt through the ice, creating a channel for the trapped water to drain. Repeat this every few feet along the dam. This method is slow but effective and minimizes roof damage.
*   Materials: Calcium chloride ice melt (flakes or pellets), old nylon stocking/pantyhose, rubber gloves.
*   Pro Tip: Place large tarps or plastic sheeting over foundation plantings and shrubs below to protect them from calcium chloride runoff.
3. Remove Snow from the Roof — Reduce the source of meltwater.
*   Carefully use a roof rake with a long extension handle to pull snow off the lower sections of your roof, especially the areas directly above the ice dam and the eaves. Removing this snow prevents further meltwater from contributing to the dam's growth. Work from the ground whenever possible. If you must use a ladder, ensure it's securely placed and use extreme caution on icy surfaces.
*   Tools: Roof rake with extension handle, sturdy ladder.
*   Safety: Never stand directly under falling snow or ice. Clear people and pets from the area below before raking. Avoid pulling snow aggressively near shingles to prevent damage.
4. Consider a Steam Cleaner (for stubborn dams) — Gently melt thick ice without damage.
*   For larger, more established ice dams, a professional-grade steam cleaner can be highly effective. Steam melts the ice without the destructive force of chipping. You can rent commercial steam cleaners designed for ice dam removal. Direct the steam nozzle at the ice dam to melt channels and break it into smaller, manageable pieces that can then be gently guided off the roof. Move slowly and methodically.
*   Tools: Commercial-grade steam cleaner designed for ice dam removal (rental), extension cords (outdoor rated).
*   Caution: Consumer-grade pressure washers are NOT steam cleaners and should never be used on a roof for ice removal due to their high pressure and cold water output, which can severely damage shingles.
5. Clear Gutters and Downspouts — Ensure proper drainage once dam is gone.
*   Once the ice dam is mostly removed or channels are established, ensure your gutters and downspouts are clear of ice and debris. Even a partially cleared gutter can cause new damming. Use a warm water hose (if temperatures allow) or a small, blunt tool to gently clear any remaining ice or blockages in the downspouts. Never use sharp objects that could puncture the gutter.
*   Materials: Warm water hose, garden hose with sprayer, small plastic scoop.
*   If this doesn't work: If downspouts are completely frozen solid, a professional plumber with a steamer may be needed to thaw them without damage.
6. Post-Removal Inspection — Check for damage and leaks.
*   After the ice dam is removed and the roof is clear, perform a thorough inspection of your roof, gutters, and interior ceilings. Look for loosened or cracked shingles, damaged fascia boards, bent gutters, or any signs of water stains inside your attic or on interior walls. Document any damage with photos and schedule repairs promptly.
*   Tools: Flashlight (for attic inspection), camera/smartphone.
Common Causes
- Poor Attic Insulation: Warmer air from your living space leaks into the attic, heating the roof deck and melting snow from underneath. This is the single biggest contributor to ice dams.
- Inadequate Attic Ventilation: Proper attic ventilation allows cold outside air to circulate, keeping the roof deck temperature closer to the ambient outdoor temperature and preventing premature snow melt.
- Air Leaks into the Attic: Gaps around recessed lights, unsealed attic hatches, plumbing vents, and electrical wiring penetrations allow warm conditioned air to escape into the attic, directly contributing to roof heating.
- Uneven Roof Temperatures: Design flaws or inconsistencies in insulation and ventilation can lead to specific areas of the roof being warmer than others, creating prime conditions for ice dam formation.
- Heavy Snowfall Followed by Freezing Temperatures: Abundant snow provides the material, and subsequent freezing cycles provide the conditions for dams to grow rapidly.
- Clogged Gutters: Leaves and debris in gutters can prevent proper drainage, allowing water to sit and freeze, contributing to dam formation even without existing roof issues.
Common Mistakes
- Chipping Away at Ice with Tools: Using a hammer, chisel, or shovel to break up ice dams is incredibly risky. It can easily crack shingles, damage roofing felt, puncture rubber membranes, and dent or tear gutters. The repair costs often far outweigh the perceived speed benefit.
- Using Rock Salt (Sodium Chloride): While rock salt melts ice, it is highly corrosive. It can damage metal flashing, concrete, and even kill shrubs or plants below where it runs off. Always opt for calcium chloride, which is less damaging.
- Applying Heat Directly with Torches or Heat Guns: Direct, intense heat can damage shingles, melt roofing membrane, and is a significant fire hazard. Never use open flames or high-temperature heat guns on your roof for ice dam removal.
- Relying on Pressure Washers: Standard pressure washers use cold, high-pressure water. This combination can strip granules from shingles, force water underneath them, leading to internal leaks, and won't effectively melt large volumes of ice without significant roof damage.
- Ignoring the Root Cause: Simply removing an ice dam without addressing the underlying issues (like poor insulation or ventilation) means it will likely return with the next freeze-thaw cycle. Focus on prevention for long-term solutions.
- Working Alone or Without Safety Gear: Slippery roofs and ladders in winter conditions are extremely dangerous. Always have a spotter, wear appropriate non-slip footwear, and use a sturdy, properly secured ladder. If it feels unsafe, it probably is.
Cost & Time Breakdown
| Task | DIY cost | Pro cost | Time |
|---|---|---|---|
| Calcium Chloride Method | $20–$50 | N/A | 1–4 hours |
| Roof Rake Snow Removal | $0–$100 | $100–$300 | 30 min–2 hours |
| Steam Cleaner Rental | $75–$150/day | Included in service | 2–6 hours |
| Full Pro Ice Dam Removal | N/A | $500–$3,000+ | 2–8 hours |
| Gutter/Downspout Thawing | $0–$20 | $100–$250 | 30 min–1 hour |
Tips & Prevention
- Improve Attic Insulation: Ensure your attic has adequate insulation (R-49 to R-60 in most cold climates) to prevent heat loss from your home into the attic space. This is the most critical step.
- Seal Air Leaks in the Attic: Meticulously seal any penetrations in your attic floor or ceiling below that allow warm air to escape. Use expanding foam for larger gaps and silicone caulk for smaller ones around light fixtures, vents, and pipes.
- Ensure Proper Attic Ventilation: Install or inspect soffit and ridge vents to ensure a continuous flow of cold air through the attic. This keeps the roof deck cold, preventing snow from melting prematurely. Ensure vents are not blocked by insulation or debris.
- Clear Gutters Regularly: Keep gutters free of leaves, twigs, and other debris, especially before winter. Clogged gutters can contribute significantly to ice dam formation by preventing proper water drainage.
- Roof Rake After Heavy Snowfall: After significant snowfall, use a roof rake to remove the bottom few feet of snow from your roof. This reduces the amount of snow that can melt and contribute to ice dam formation.
- Consider Heat Cables: For persistent problem areas, consult with a professional about installing self-regulating heat cables along the eaves and in gutters. These can prevent ice formation but should be installed correctly to avoid energy waste or fire hazards.
When to Call a Professional
You should absolutely call a licensed and insured professional for ice dam removal if the ice dam is extensive, exceptionally thick, or if you are already experiencing significant leaks inside your home. Professionals have specialized steaming equipment and safety training for working on icy roofs. Any ice dam that requires you to work on an unstable ladder or walk on a slippery roof presents a high risk of serious injury. Furthermore, if you suspect high-voltage heating cables are required, or if the roof pitch is steep and dangerous, a professional should always be called. Attempting dangerous DIY can void insurance and cause more damage; a pro ensures the job is done safely and effectively, often with guarantees against roof damage.
Related Articles
Keep troubleshooting with these hand-picked guides from FixlyGuide:
- The #1 Mistake Homeowners Make with Ice Dams (and How to Fix It SAFELY) — Most homeowners approach ice dam removal incorrectly, creating more damage or safety risks. Learn the right, safe methods to protect your r…
- The $30 Secret to Banishing Ice Dams From Your Roof (Before They Destroy It) — Learn safe and effective methods to remove ice dams from your roof and prevent costly damage to your home's structure and interior.
- The $30 Trick to Melting Ice Dams (Before They Destroy Your Roof) — Discover how to safely remove ice dams from your roof instantly with common household items, preventing costly damage. Stay safe while tack…
- The $30 Secret to Banishing Ice Dams Without Damaging Your Roof — Discover how a simple, inexpensive trick can safely eliminate dangerous ice dams from your roof and prevent costly damage to your home.
- The 3 Critical Mistakes Homeowners Make Inspecting Their Roof (From the Ground) — Learn how to spot damaging roof problems safely from the ground, avoiding common pitfalls and knowing exactly what to look for.
- Is Your Gutter Sagging After Every Storm? The Hidden Flaw Most Homeowners Miss — Discover the overlooked reason your gutters sag after every storm and learn the lasting fix that most homeowners miss.
Recommended for DIYers & woodworkers
Sponsored
The Top 20 Tools for Workshops of Any Budget
No stationary machines or power tools required — plus 3 fundamental tools that can't be bought at any price.
Get the free guide
Ted's Woodworking — The #1 Woodworking Resource
Detailed instructions, dimensioned drawings, materials & cutting lists, and 3D schematics for every skill level.
See the plansSponsored: links above are affiliate links. FixlyGuide may earn a commission on qualifying purchases — at no extra cost to you.
Frequently asked questions
What is an ice dam and why is it bad?+
An ice dam is a ridge of ice that forms at the edge of a roof and prevents melting snow from draining off. Water then backs up behind this dam, seeps under shingles, and can cause severe water damage to your roof, attic, walls, and ceilings, leading to mold and costly repairs.
Can I use rock salt to melt ice dams?+
No, you should never use rock salt (sodium chloride) to melt ice dams. Rock salt is highly corrosive and can damage your roof shingles, metal flashing, and surrounding vegetation. Instead, use calcium chloride ice melt, which is less damaging.
What is the safest DIY way to remove an ice dam?+
The safest DIY method is to fill an old nylon stocking or pantyhose with calcium chloride ice melt and lay it across the ice dam, perpendicular to the eave. The calcium chloride will slowly melt channels through the ice, allowing trapped water to drain without damaging your roof.
When should I call a professional for ice dam removal?+
Call a professional if the ice dam is very large and thick, if you are experiencing significant interior leaks, if you're uncomfortable working on a ladder or icy roof, or if your roof has a steep pitch. Professionals have specialized equipment and training for safe and effective removal.
How can I prevent ice dams from forming in the first place?+
The best prevention involves improving your attic's insulation to reduce heat loss, ensuring adequate attic ventilation to keep the roof deck cold, and sealing all air leaks from your home into the attic. Regularly clearing gutters and using a roof rake after heavy snow can also help.
Can I use a pressure washer to remove ice dams?+
No, never use a pressure washer to remove ice dams. The high-pressure, cold water can severely damage your roof shingles, force water underneath them, and contribute to internal leaks. If using a machine, opt for a professional-grade steam cleaner.


Discussion
Loading comments…