Tools & materials you'll need
Affiliate links- AmazonExterior-grade screws or nails1 box · 2-3 inches long, corrosion-resistant
- AmazonExterior-grade wood (treated pine, cedar, composite)Varies · For fascia replacement
- AmazonVented soffit panels (vinyl, fiber cement, plywood)Varies · If replacing soffit
- AmazonExterior-grade caulk1 tube · Paintable, high-quality sealant
- AmazonWood hardener (epoxy-based)1 container · If treating minor underlying rot
As an Amazon Associate FixlyGuide earns from qualifying purchases — at no extra cost to you. Prices and availability are accurate as of publication and subject to change.
Quick Answer
Rotting soffit and fascia are not just cosmetic issues; they are often the canary in the coal mine for more significant moisture problems impacting your home's structure. The quick fix is to identify and eliminate the source of moisture – often a clogged gutter, leaking roof, or inadequate attic ventilation. Once the moisture source is addressed, carefully remove the damaged wood, treat any underlying mold or mildew, and install new, rot-resistant materials, ensuring proper ventilation is established or restored. Early intervention and a thorough understanding of the root cause can prevent minor damage from escalating into costly structural repairs.
The Problem
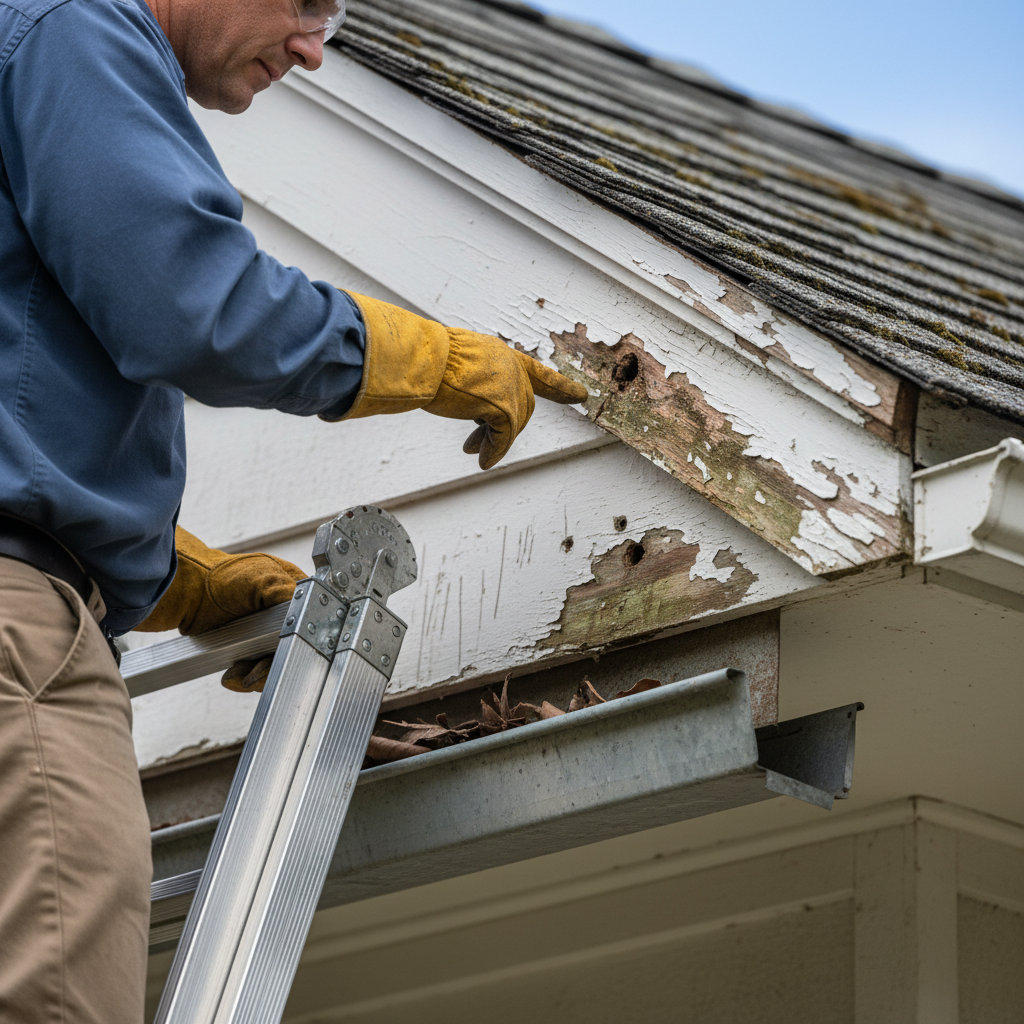
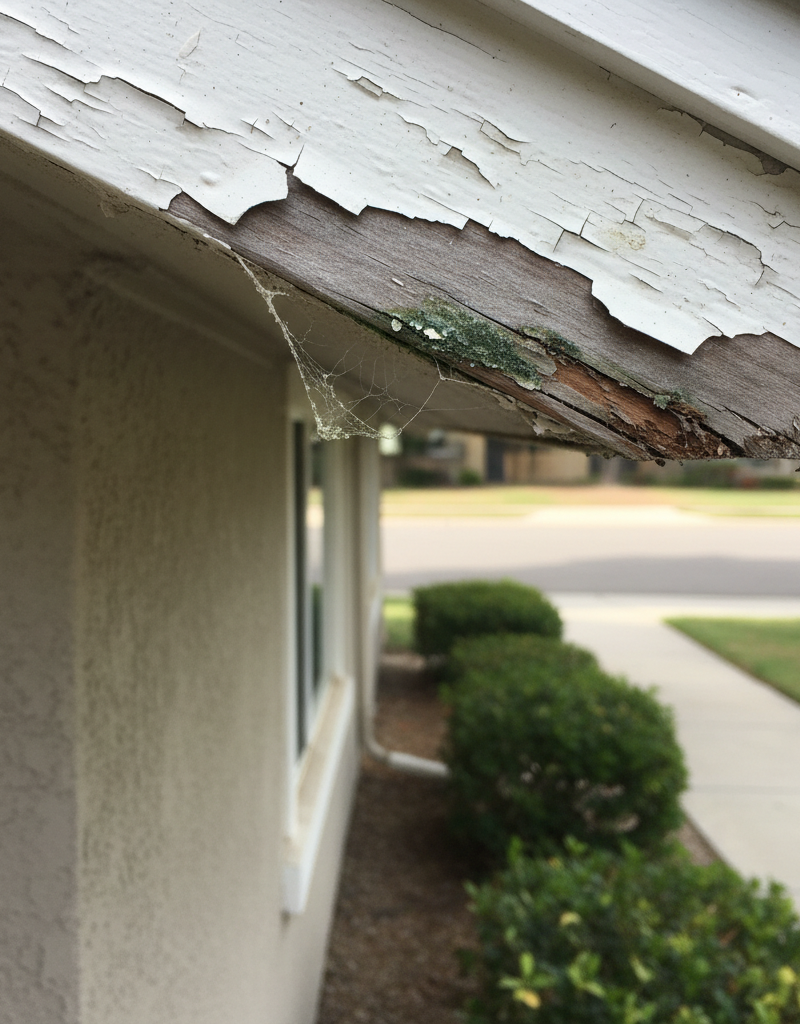
You wake up one morning, step outside, and notice a dark, soggy patch on the underside of your roof eaves – your soffit. Or perhaps the trim board directly above your gutters, the fascia, is peeling paint and feels soft to the touch. This isn't just an aesthetic flaw; it's a critical indicator of moisture intrusion, a silent aggressor that can compromise the integrity of your roof, attic, and even the structural framing of your home. Left unaddressed, rotted soffit and fascia can lead to a cascade of problems: compromised attic ventilation, invitations for pests like wasps, birds, and rodents to nest; water penetration into your walls and attic causing mold, mildew, and wood rot; and ultimately, significant structural damage that can cost thousands to repair. Homeowners often mistake this for simple wear and tear, patching it up without understanding the true cause, only to find the problem recurring within months or a year. This article will equip you with the knowledge and steps to accurately diagnose the hidden reasons behind soffit and fascia rot and provide a durable, professional-grade DIY solution.
How It Works
To understand why soffit and fascia rot, we first need a basic grasp of their function and how your roof system works. The soffit is the finished surface on the underside of your roof's eaves, the part of the roof that extends beyond the exterior walls. Its primary role, especially when perforated or vented, is to facilitate air intake for your attic. This fresh air enters through the soffit vents, flows up into the attic, and exits through exhaust vents typically located on the roof ridge. This continuous airflow is vital for several reasons: it helps regulate attic temperature, preventing heat buildup in summer that can prematurely age your roof shingles and increase cooling costs. More critically, in winter, it helps prevent moisture buildup. Warm, moist air from your living space, if it infiltrates the attic, can condense on cold surfaces like the underside of the roof deck. Proper ventilation carries this moisture out, preventing condensation, mold growth, and, importantly, ice dam formation.
The fascia board is mounted vertically, directly behind your gutters, protecting the ends of your roof rafters from the elements. It provides a finished edge for your roof and serves as the attachment point for your gutters. Together, the soffit and fascia create a crucial barrier, shielding the vulnerable components of your roof structure – the rafter tails and eaves sheathing – from rain, snow, and wind. When either of these components fails, this protective barrier is compromised. Water, instead of being channeled away by gutters, can wick into the unprotected wood, leading to rot. Poor attic ventilation exacerbates this by trapping moisture, leading to a damp, humid environment where wood rot fungi thrive. Even small leaks from the roof or overloaded gutters can saturate these areas, initiating the decay process. Understanding this interplay between ventilation, drainage, and structural protection is key to both diagnosing and permanently fixing issues.
Step-by-Step Fix
For most homeowners, fixing a localized section of rotted soffit or fascia is a manageable project. The key is thorough preparation and addressing the root cause.
-
Safety First – Assess the Area – Before starting any work, especially on a ladder, ensure your ladder is stable on level ground. Wear non-slip shoes, gloves, and eye protection. If working at significant heights or near electrical lines, consider professional help. Set up a secure workspace, and if working alone, have a plan for emergencies. Do not attempt if you are uncomfortable on ladders or if the damage is extensive and requires major structural repair.
-
Diagnose the Moisture Source – This is the most critical step. Ignoring this means the rot will return. Look for:
- Clogged or Damaged Gutters: Are gutters overflowing during rain? Is there debris in them? Are they sloped correctly (1/4-inch per 10 feet toward the downspout)? Are there any cracks or detached sections allowing water to spill? Clean gutters thoroughly. Use a hose to test drainage.
- Roof Leaks: Inspect the roof shingles directly above the damaged area. Look for missing, cracked, curled, or damaged shingles. Check flashing around chimneys, skylights, and vent pipes. Repair any roof issues before proceeding. This might involve replacing shingles or sealing flashing.
- Poor Attic Ventilation: Feel for trapped heat or excessive humidity in the attic. Is there insulation blocking soffit vents? Are existing soffit vents insufficient or clogged with paint/debris? Clear any blockages in existing vents. Consider adding more soffit or ridge vents if ventilation is inadequate.
- Condensation: In cold climates, warm, moist air from the living space rising into a poorly ventilated attic can condense on the underside of the roof deck and drip onto the soffit/fascia. Improve attic insulation and seal air leaks from the living space into the attic.
-
Remove Damaged Material – Use a utility knife or a oscillating multi-tool to carefully cut out the visibly rotted sections of soffit or fascia. Extend your cuts slightly beyond the visible rot into sound wood to ensure all damaged material is removed. If the underlying rafter tails or sub-fascia are also rotted, you will need to replace those sections as well. Wear a dust mask to avoid inhaling wood dust and mold spores. Be prepared to remove sections of gutter if fascia is being replaced.
-
Inspect and Treat Underlying Structure – Once the damaged material is removed, thoroughly inspect the remaining wood (rafter tails, sub-fascia, wall sheathing) for any signs of mold, mildew, or further rot. If superficial mold is present, scrub it with a solution of 1 part bleach to 10 parts water or a dedicated mold killer. Let it dry completely. For isolated, minor rot in structural members, you might use a wood hardener (epoxy-based consolidant) to strengthen the wood after drying. If structural members like rafter tails are significantly compromised, this becomes an advanced repair; consider professional help.
-
Prepare and Measure New Material – Measure the dimensions of the removed sections carefully. For soffit, often plywood, fiber cement, or vinyl panels are used. For fascia, exterior-grade lumber (like treated pine, cedar, or composite) is common. Cut your new material to size, ensuring a precise fit. If using wood, prime all six sides (front, back, and edges) of the new wood before installation to maximize its resistance to moisture.
-
Install New Soffit (if applicable) – If replacing soffit panels, secure them to the existing soffit framing (lookouts) using exterior-grade screws or nails. Ensure any new soffit panels that are meant for ventilation have pre-drilled holes or are vented-soffit products. Maintain consistent spacing and alignment with existing soffit. Pre-drill pilot holes for screws to prevent wood splitting.
-
Install New Fascia – Position the new fascia board against the rafter tails and sub-fascia. Secure it firmly with exterior-grade nails or screws, typically 2-3 inches long, spaced every 16-24 inches, or two nails per rafter tail. Ensure the top edge of the fascia is flush with the top edge of the roof sheathing, and the bottom edge extends slightly below the rafter tails to provide a drip edge for the gutters. Use a level to ensure the fascia is straight. If you removed gutters, reattach them now, ensuring proper slope.
-
Seal and Finish – Fill any nail holes or minor gaps with exterior-grade wood filler and sand smooth once dry. Caulk all seams and edges where the new material meets existing surfaces with a high-quality, exterior-grade, paintable sealant to prevent water intrusion. This includes the seam between the soffit and the house wall, and between the fascia and the roof deck. Apply caulk evenly and smooth with a wet finger or caulking tool.
-
Paint or Finish – Once all repairs are complete and sealants are dry, prime any unprimed wood surfaces and paint the new soffit and fascia to match your existing trim. Use two coats of a high-quality exterior paint. Ensure good weather conditions for painting to allow proper curing.
Common Causes
- Clogged or Damaged Gutters: The number one culprit. Overflowing gutters dump water directly onto fascia and soffit, leading to saturation and rot.
- Leaky Roof: Missing, damaged, or aged shingles, improper flashing, or compromised underlayment can allow water to penetrate the roof deck and wick into the soffit and fascia.
- Inadequate Attic Ventilation: Without proper airflow, warm, moist air from the house rises into the attic and condenses on cold surfaces, leading to damp wood and mold, which then spreads to soffit and fascia.
- Ice Dams: In cold climates, poor attic ventilation and insulation can lead to melting snow refreezing at the cold eaves, creating ice dams that trap water, forcing it under shingles and into fascia and soffit.
- Poorly Installed Drip Edge: The metal flashing installed at the edge of the roof deck, under the shingles, that directs water into the gutters. If missing or improperly installed, water can flow behind the fascia.
- Gutter Drainage Issues: Gutters that don't slope correctly or are undersized for the roof area can lead to standing water and eventual overflow.
- Incorrect Material Selection: Using interior-grade lumber or unprimed wood in exterior, exposed locations predisposes it to rot.
Common Mistakes
- Ignoring the Root Cause: Patching rotten wood without fixing the underlying moisture problem (e.g., clogged gutters, roof leak) guarantees the rot will return soon.
- Not Extending Cuts Enough: Only cutting out the visibly rotted wood often leaves microscopic fungal spores in the surrounding seemingly sound wood, allowing the rot to continue spreading.
- Using Interior-Grade Materials: Replacing exterior elements with materials not rated for outdoor use or without proper sealing/priming will lead to premature failure.
- Blocking Soffit Vents: When insulating the attic, accidentally or deliberately covering soffit vents prevents proper airflow, leading to moisture buildup.
- Improper Ladder Safety: Working at heights without a stable ladder, proper footing, or a spotter can lead to serious injury. Always follow ladder safety protocols, including the 4:1 rule for extension ladders.
- Inadequate Sealing: Failing to caulk all seams and edges after repair allows water to re-enter, restarting the rot cycle.
- Skipping Primer: Only painting new wood without a proper primer coat can reduce paint adhesion and moisture protection.
Cost & Time Breakdown
| Task | DIY Cost | Pro Cost | Time |
|---|---|---|---|
| Diagnose Moisture Source | $0 | $75–$150 (inspection) | 30 minutes–1 hour |
| Materials (wood, sealant, paint) | $30–$100 | Included in labor | N/A |
| Basic Soffit/Fascia Patch | $50–$200 for materials | $300–$800 per section | 2–4 hours |
| Major Fascia Replacement | $100–$300 for materials | $800–$1,500+ per section | 4–8 hours |
| Gutter Cleaning/Repair | $0–$50 | $100–$300 | 1–2 hours |
| Roof Leak Repair (minor) | $20–$100 | $200–$500+ | 1–3 hours |
Tips & Prevention
- Annual Gutter Cleaning: Clean gutters at least twice a year, in spring and fall, to prevent clogs and overflow. Consider gutter guards if debris is a persistent problem.
- Regular Roof Inspections: Periodically inspect your roof (from the ground with binoculars or safely on a ladder) for damaged, missing, or curling shingles, and check flashing around penetrations. Address minor issues promptly.
- Check Attic Ventilation: Ensure soffit vents are clear and unblocked by insulation. In warm weather, confirm that your attic isn't excessively hot, indicating poor airflow. Use baffles to keep insulation away from soffit vents.
- Maintain Exterior Paint: Keep exterior wood trim, including fascia, well-painted and sealed. Paint acts as a crucial protective barrier against moisture.
- Proper Gutter Pitch: Confirm your gutters are sloped correctly (1/4 inch per 10 feet) toward the downspouts to ensure efficient water drainage.
- Install Drip Edge: If your roof lacks a drip edge, consider having one installed during your next roof repair or replacement. It's a small but effective barrier against water intrusion.
When to Call a Professional
While localized soffit and fascia repairs are often DIY-friendly, there are several situations where calling a licensed professional is highly recommended to prevent further damage or ensure safety. If the rot is widespread, affecting more than a small, isolated section, it often indicates a significant underlying problem such as extensive roof damage or major structural rot in the rafter tails or sub-fascia. Repairing structural components requires specialized carpentry skills and an understanding of roof loads, making it a job best left to experienced contractors. Similarly, if the repair involves working at extreme heights, particularly on multi-story homes or steeply pitched roofs, the risk of serious injury outweighs the potential savings of a DIY approach. Any suspicion of a major roof leak that you cannot identify or fix yourself, or recurring moisture problems despite your repairs, warrants a professional roof inspection. Finally, if you suspect hidden issues like pest infestations (termites, carpenter ants) attracted by the moisture, or extensive mold growth that could pose health risks, a professional will have the expertise and equipment to assess and remediate these conditions safely and effectively.
Related Articles
Keep troubleshooting with these hand-picked guides from FixlyGuide:
- The #1 Mistake Homeowners Make When Spotting Soffit Damage — Ignoring early signs of soffit and fascia damage can lead to costly structural issues. Learn to identify and fix common problems the right…
- The 5 Hidden Signs Your Soffit and Fascia Are Failing (Before It's Too Late) — Learn to identify the key signs of damaged soffit and fascia to prevent costly structural issues and protect your home's integrity.
- The #1 Mistake Homeowners Make When Spotting Soffit Damage — Ignoring early soffit and fascia damage can lead to costly structural repairs, but many homeowners misdiagnose the problem, compounding the…
- Is Your Roofline Hiding a $10,000 Secret? 7 Warnings Your Soffit & Fascia Are Failing — Discover the critical signs of soffit and fascia damage that could indicate widespread problems and how to properly address them before the…
- The 7 Overlooked Home Inspection Items That Cost Homeowners Thousands Annually — Discover the seven most commonly missed home inspection items that lead to costly repairs for homeowners every year and learn how to perfor…
- The Secret Culprit Behind Your Leaky Refrigerator (It's Not What You Think) — Discover the often-overlooked reason your refrigerator is leaking water and how a simple, inexpensive fix can prevent costly damage.
Get the print-ready PDF of this guide
A clean, ad-free, printable version you can keep on your phone or pin to the workshop wall. We'll also send occasional weekly tips matched to your home situation.
- Print-optimized layout
- Tools, materials & every step included
- Unsubscribe anytime
Recommended for DIYers & woodworkers
Sponsored
The Top 20 Tools for Workshops of Any Budget
No stationary machines or power tools required — plus 3 fundamental tools that can't be bought at any price.
Get the free guide
Ted's Woodworking — The #1 Woodworking Resource
Detailed instructions, dimensioned drawings, materials & cutting lists, and 3D schematics for every skill level.
See the plansSponsored: links above are affiliate links. FixlyGuide may earn a commission on qualifying purchases — at no extra cost to you.
Frequently asked questions
How much does it cost to repair rotted soffit and fascia?+
DIY repair for a small section of rotted soffit or fascia can cost $30-$100 for materials if you already own basic tools. If you need to hire a professional, expect to pay $300-$800 per section, depending on the extent of the damage and region.
What causes soffit and fascia to rot?+
The primary cause is moisture intrusion, most commonly from clogged or overflowing gutters, leaky roofs, inadequate attic ventilation leading to condensation, or poorly installed drip edges. Addressing the moisture source is crucial for a lasting repair.
Can I replace rotted fascia myself?+
Yes, localized fascia replacement is a moderate DIY project for homeowners comfortable with basic carpentry and ladder safety. The most important step is accurately diagnosing and fixing the underlying moisture problem first. If the damage is extensive or structural, a professional should be called.
How do I prevent soffit and fascia from rotting?+
Regular maintenance is key: clean your gutters annually, inspect your roof for damage, ensure proper attic ventilation by keeping soffit vents clear, and maintain a good coat of exterior paint on your trim. Ensure gutters have the correct slope and a drip edge is installed.
What tools do I need to fix soffit and fascia?+
For a typical repair, you'll need a ladder, utility knife or oscillating tool, measuring tape, hammer or drill, exterior-grade nails or screws, caulk gun, exterior wood filler, sandpaper, primer, and exterior paint. Safety glasses and gloves are also essential.


Discussion
Loading comments…