
Tools & materials you'll need
Affiliate links- AmazonOld Towels
As an Amazon Associate FixlyGuide earns from qualifying purchases — at no extra cost to you. Prices and availability are accurate as of publication and subject to change.
Quick Answer
To safely thaw a frozen pipe, identify the frozen section and shut off the main water supply if the pipe has already burst. Apply gentle, indirect heat using a hairdryer on a low setting, a heat gun on its lowest setting (held at a safe distance), or towels soaked in hot water. Work from the faucet back towards the frozen area, gradually warming the pipe until water flow is restored. Once thawed, turn the water back on slowly and check for leaks. If the pipe is visibly split or leaks after thawing, immediately shut off the water and call a plumber.
The Problem
Few things cause more homeowner panic than a frozen pipe. The immediate concern, of course, isn't just the lack of water; it's the impending disaster of a burst pipe. When water freezes, it expands with immense force—up to 2,000 pounds per square inch. This pressure can easily split even the most robust copper or PEX pipes, leading to significant water damage, structural issues, and costly repairs. The problem typically arises in unheated areas like basements, crawl spaces, garages, and exterior walls where water lines are exposed to freezing temperatures. Ignoring a frozen pipe, or attempting to thaw it improperly, can turn a minor inconvenience into a catastrophic flood. Early detection and safe, methodical thawing are crucial to preventing thousands of dollars in damage.
How It Works
Water expands by about 9% when it freezes. In a closed plumbing system, this expansion creates immense pressure between the ice blockage and the nearest closed faucet or other obstruction. Think of it like a bottle of water left in the freezer—the water expands, and the bottle eventually cracks. With pipes, the pressure builds up in sections between the ice blockage and the nearest fixture where water can exit. This is why the pipe often bursts not at the point of the freeze, but further down the line where the pressure accumulates. The most vulnerable spots are usually where the pipe bends, connects, or has a pre-existing weakness. Thawing a frozen pipe involves slowly introducing heat to the ice blockage, allowing it to melt and relieve the pressure while minimizing further stress on the pipe material. The goal is a gradual temperature increase, not a rapid thermal shock, which could also damage the pipe. As the ice melts, the water can flow again, allowing fresh, warmer water to help complete the thawing process.
Step-by-Step Fix
Safety First — Before attempting any thawing, locate your main water shut-off valve and know how to use it. If the pipe has already burst and water is escaping, immediately shut off the main water supply and call a professional. Never use open flames (such as a propane torch) or high-wattage heating devices directly on pipes, as this can cause fire, scalding, or further pipe damage.
-
Locate the Freeze — Find the section of pipe that is frozen.
- Turn on all faucets in your home, starting with the one furthest from the main water inlet. No water or a trickle of water indicates a frozen pipe. Trace the pipe back from the non-flowing faucet towards the main water supply. Common freeze points are exterior walls, crawl spaces, unheated basements, and under sinks.
- Look for visible frost or ice on the exterior of the pipe. Sometimes, the pipe may even appear slightly swollen.
-
Open Faucets — Allow water (and steam) to escape as the pipe thaws.
- Keep the faucet associated with the frozen pipe open. This provides an escape route for trapped steam and melting ice, which helps relieve pressure and speeds up the thawing process.
-
Clear the Area — Remove any obstacles around the pipe.
- Move insulation, furniture, or anything else that obstructs access to the frozen section. Ensure you have ample space to work safely and effectively.
-
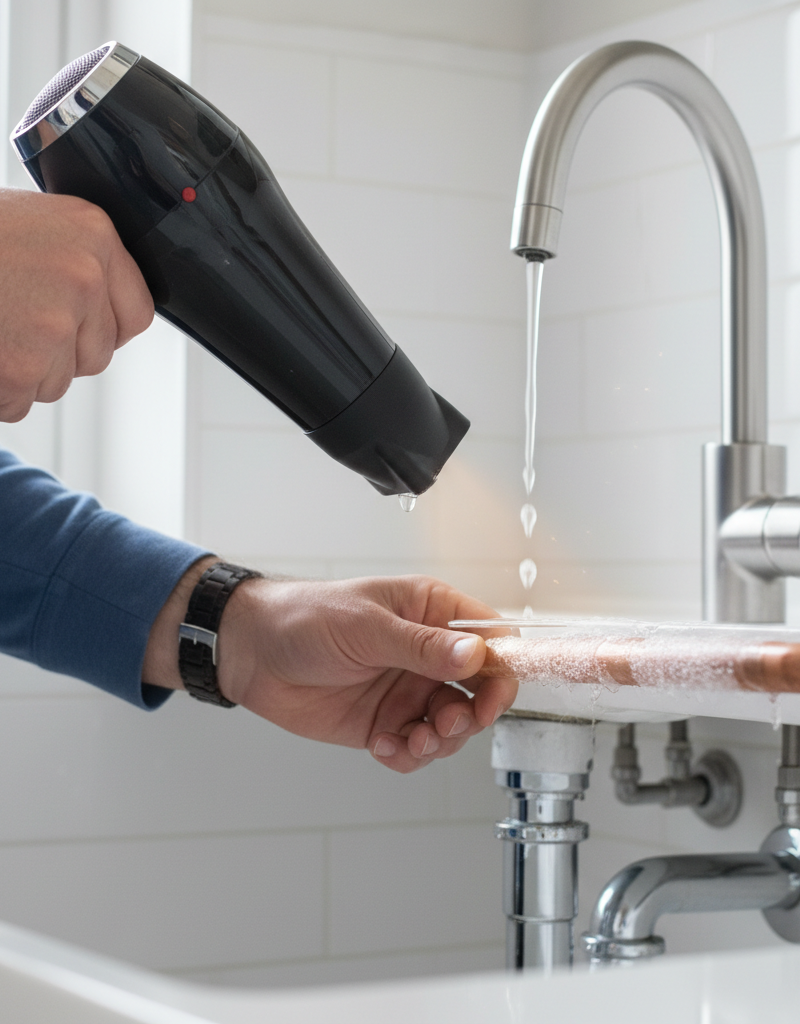
Apply Gentle Heat (Option 1: Hairdryer) — Use a hairdryer on a low to medium setting.
- Hold the hairdryer approximately 6-12 inches away from the pipe. Move it back and forth continuously along the frozen section, working from the faucet connection back towards the main water supply. This helps push the melted water out of the pipe.
- Avoid concentrating heat in one spot for too long, as this can cause localized overheating and damage. Patience is key.
-
Apply Gentle Heat (Option 2: Heat Gun) — Use a heat gun on its lowest setting with extreme caution.
- If using a heat gun, select the lowest heat setting. Hold the gun at least 8-12 inches away from the pipe and keep it moving constantly. A heat gun gets much hotter than a hairdryer, so caution is paramount.
- If this doesn't work: If you suspect a plastic (PEX or PVC) pipe, use ONLY a hairdryer or warm towels. A heat gun can easily melt or warp plastic pipes.
-
Apply Gentle Heat (Option 3: Warm Towels) — For a more gradual approach, or if electricity is a concern.
- Soak several towels in hot water (as hot as you can comfortably handle). Wring them out so they are damp but not dripping.
- Wrap the hot towels around the frozen section of the pipe. Replace them with fresh hot towels every 5-10 minutes as they cool.
- This method is slower but very safe, especially for plastic pipes or pipes in confined spaces.
-
Monitor Water Flow — Watch for signs of thawing.
- Listen for dripping sounds and observe if water begins to trickle from the open faucet. As soon as a trickle begins, continue applying heat until the water flow returns to normal.
- Once water flows freely, slowly turn off the faucet. Wait a few minutes, then check for any drips or leaks along the thawed section of pipe before returning the area to normal.
-
Inspect for Damage — After thawing, thoroughly check the pipe.
- Examine the entire thawed section for any cracks, bulges, or leaks. A small hairline crack might not leak under low pressure but could burst once full pressure is restored. Pay close attention to joints and bends.
- If you find a leak: Immediately shut off the main water supply and call a licensed plumber. Even a small leak can cause significant damage over time.
Common Causes
- Lack of Insulation: Pipes running through uninsulated or poorly insulated areas (crawl spaces, attics, exterior walls, garages) are highly susceptible to freezing when temperatures drop below freezing (32°F or 0°C).
- Sudden Temperature Drops: A rapid and sustained drop in ambient temperature, especially when combined with insufficient insulation, is a primary trigger for pipe freezing.
- Exposed Pipes: Outdoor faucets, sprinkler system lines, and garden hoses left connected can freeze solid, and this freeze can extend back into the main house plumbing.
- Drafts and Open Vents: Cold air entering foundation vents, open garage doors, or unsealed cracks in exterior walls can create localized freezing conditions around pipes.
- Vacant Homes/Low Thermostat Settings: During colder months, if a home is left unoccupied or the thermostat is set too low (below 55°F or 13°C), the ambient temperature within walls and unheated areas can drop to freezing.
- Poorly Circulated Heat: In larger homes or homes with inefficient heating systems, certain rooms or areas may not receive adequate warmth, leading to colder pipe temperatures.
Common Mistakes
- Using an Open Flame: Never use a propane torch, blowtorch, or any open flame to thaw pipes. This is an extreme fire hazard, can scorch or melt plastic pipes, and can cause metal pipes to crack due to rapid thermal expansion.
- Ignoring the Main Water Shut-Off: Failing to know where your main water shut-off valve is or ignoring the need to use it if a pipe has burst. This can lead to uncontrolled flooding.
- Applying Immediate High Heat: Concentrating high heat on one spot with a powerful heat source. This can cause rapid expansion, leading to further pipe damage, especially in weaker areas.
- Not Opening Faucets: Attempting to thaw a pipe without opening the connected faucet. This traps steam and melting water, increasing pressure and making the thawing process less effective and potentially more dangerous.
- Thawing from the Wrong Direction: Thawing from the main water supply towards the faucet. Always work from the faucet back towards the freeze so melted water has an escape route.
- Assuming No Leaks: Not thoroughly inspecting the pipe for damage AFTER thawing. Even a small pinhole leak can cause significant water damage over time and should be addressed immediately.
Cost & Time Breakdown
| Task | DIY cost | Pro cost | Time |
|---|---|---|---|
| Thawing a typical frozen pipe | $0–$20 | $150–$350 | 20–60 minutes |
| Inspecting for leaks | $0 | (Included) | 5–15 minutes |
| Repairing a burst pipe | $5–$50 (parts) | $300–$800+ | 1–4 hours |
| Water damage clean up | Varies | $1,000–$10,000+ | Days to weeks |
Tips & Prevention
- Insulate Pipes: Add insulation sleeves to pipes in unheated areas like basements, crawl spaces, and attics. Foam pipe insulation is inexpensive and easy to install.
- Seal Air Leaks: Seal cracks and holes in exterior walls and foundations near pipes with caulk or expandable foam. Pay attention to openings around outdoor faucets and utility lines.
- Disconnect Hoses: Disconnect and drain all garden hoses before winter. Close off the supply valve to outdoor faucets, if available, and drain the line.
- Open Cabinet Doors: During extreme cold snaps, open cabinet doors under sinks on exterior walls to allow warmer room air to circulate around the pipes.
- Drip Faucets: If temperatures are expected to drop significantly, allow a slow, steady drip from a faucet served by exposed pipes. Moving water is less likely to freeze.
- Maintain Heat: Keep your thermostat set to at least 55°F (13°C) even when away from home during winter months. This maintains a baseline temperature throughout your house.
- Locate Shut-Offs: Know the location of your main water shut-off valve and individual fixture shut-off valves. This is critical in an emergency.
When to Call a Professional
You should call a licensed plumber immediately if you suspect a deeply frozen pipe, if multiple pipes are frozen, or if you cannot locate the frozen section. Crucially, if you find any visible cracks, bulges, or leaks in a pipe—even a minor drip—after thawing, do not restore full water pressure. A small crack can quickly turn into a significant flood under full system pressure. If you are dealing with a burst pipe where water is actively flowing, shut off your main water supply immediately and contact a professional. Also call a plumber if you have attempted safe thawing methods for an hour without success, as the blockage might be extensive or in an inaccessible location requiring specialized equipment like pipe-thawing machines.
Related Articles
Keep troubleshooting with these hand-picked guides from FixlyGuide:
- The 3 Hidden Dangers of Frozen Pipes (And How to Thaw Them Safely) — Safely thawing a frozen pipe is crucial to prevent bursting, water damage, and costly repairs; acting quickly and correctly can save your h…
- The 90-Minute Hidden Danger of a Frozen Pipe (And the DIY Fix) — Thawing a frozen pipe quickly and safely is crucial to prevent bursting and extensive water damage to your home.
- The 3 Hidden Reasons Your Pipes Freeze (and How to Thaw Them Fast) — Discover the real culprits behind frozen pipes and learn safe, effective methods to thaw them quickly, preventing costly damage to your hom…
- The 3 Hidden Reasons Your Pipes Freeze (And How to Thaw Them Fast) — Discover the real culprits behind frozen pipes and learn a step-by-step method to safely thaw them, preventing costly damage.
- The 3 Hidden Dangers of Frozen Pipes (And How to Thaw Them Safely) — Frozen pipes can burst, causing extensive water damage. Learn to safely thaw them and prevent costly repairs.
- The $30 Trick to Melting Ice Dams (Before They Destroy Your Roof) — Discover how to safely remove ice dams from your roof instantly with common household items, preventing costly damage. Stay safe while tack…
Get the print-ready PDF of this guide
A clean, ad-free, printable version you can keep on your phone or pin to the workshop wall. We'll also send occasional weekly tips matched to your home situation.
- Print-optimized layout
- Tools, materials & every step included
- Unsubscribe anytime
Frequently asked questions
How do I know if my pipe is frozen?+
The most common sign is no water, or only a trickle, coming from a faucet, particularly if it's an exposed pipe or on an exterior wall during cold weather. You might also see frost or a slight bulge on the pipe's surface.
What's the best tool to thaw a frozen pipe?+
For most DIYers, a hairdryer on a low setting or towels soaked in hot water are the safest and most effective tools. A heat gun can be used on its lowest setting, held at a safe distance, but exercise extreme caution, especially with plastic pipes.
How long does it take to thaw a frozen pipe?+
The time varies depending on the pipe's size, material, and the extent of the freeze. Smaller, easily accessible pipes might thaw in 20-30 minutes, while larger or more deeply frozen sections could take an hour or more of continuous, gentle heating.
Can I use boiling water to thaw a pipe?+
Avoid pouring boiling water directly onto a frozen pipe, especially if it's a plastic pipe, as the sudden extreme temperature change can cause the pipe to crack or burst. Use hot water-soaked towels instead, which provide more gentle, consistent heat.


Discussion
Loading comments…