Tools & materials you'll need
Affiliate links- AmazonOld Towels3-5
As an Amazon Associate FixlyGuide earns from qualifying purchases — at no extra cost to you. Prices and availability are accurate as of publication and subject to change.
Quick Answer
The quickest and safest way to thaw a frozen pipe is to apply gentle, indirect heat using a hairdryer, heat gun on a low setting, or warm towels. Begin thawing from the faucet side of the frozen section and move towards the main water supply to allow melted water to escape. Crucially, turn on the affected faucet before you start thawing to relieve pressure and allow water to flow out as it melts. Ensure you locate the main water shut-off valve beforehand in case the pipe bursts.
The Problem
You wake up on a frigid morning, turn on your faucet, and nothing comes out—or perhaps just a trickle. The dreaded frozen pipe has struck. This isn't just an inconvenience; it's a ticking time bomb. When water freezes, it expands. This expansion creates immense pressure within your pipes, potentially leading to cracks or even a complete burst. A burst pipe can unleash hundreds of gallons of water per hour into your home, causing catastrophic damage to walls, floors, ceilings, and personal belongings. The cost of such water damage can easily run into thousands, or even tens of thousands, of dollars, not to mention the stress and disruption of remediation. Identifying a frozen pipe early and knowing how to thaw it safely is paramount to protecting your home.
How It Works
Water expands by about 9% when it freezes into ice. If this expansion occurs in a confined space, like inside a metal or plastic pipe, it generates tremendous pressure, often exceeding 2,000 pounds per square inch (psi). Standard residential water pressure is usually between 40-80 psi, giving you an idea of the forces at play. The critical point isn't necessarily where the ice plug forms, but the pressure buildup between the ice plug and the closed faucet. As water freezes and expands, it pushes against the trapped water column ahead of it, creating immense hydraulic pressure. If this pressure exceeds the pipe's structural integrity, the pipe will burst, usually at a weak point or a joint.
The goal of thawing is two-fold: first, to introduce heat gradually to melt the ice, and second, to relieve the pressure as the ice melts. This is why opening the faucet is so important; it provides an outlet for the expanding water and melting ice, preventing further pressure buildup. When heat is applied, the outermost layer of ice begins to melt, reducing its volume and allowing the water to flow. By starting the thawing process at the faucet end, you create an escape route for this melted water and trapped air, mitigating the risk of a rupture as the plug continues to melt.
Step-by-Step Fix
1. Locate the Frozen Section — Find the blockage by looking for visible frost or condensation.
Assess all accessible pipes, especially those in unheated areas like basements, crawl spaces, attics, outer walls, or beneath sinks near exterior walls. Look for frost on the outside of the pipe or listen for a faint humming sound if the pipe is partially frozen. You'll likely notice reduced water flow or no flow from a specific faucet.
- Safety Tip: Before doing anything, locate your main water shut-off valve. If a pipe bursts during thawing, you'll need to turn off the water immediately to prevent significant damage. Know its location and how to operate it.
2. Open the Faucet — Allow pressure to escape and water to flow out.
Turn on both the hot and cold taps of the affected faucet. Even if only a trickle comes out, leave them open. This provides an escape path for water as the ice melts and relieves pressure within the pipe, significantly reducing the risk of a burst.
3. Prepare the Area — Clear obstructions and protect surrounding surfaces.
Before applying heat, clear away any items obstructing access to the pipe. Lay down old towels or a bucket to catch any drips or minor leaks that might occur during the thawing process. This is particularly important if the pipe is in a sensitive area like under a sink.
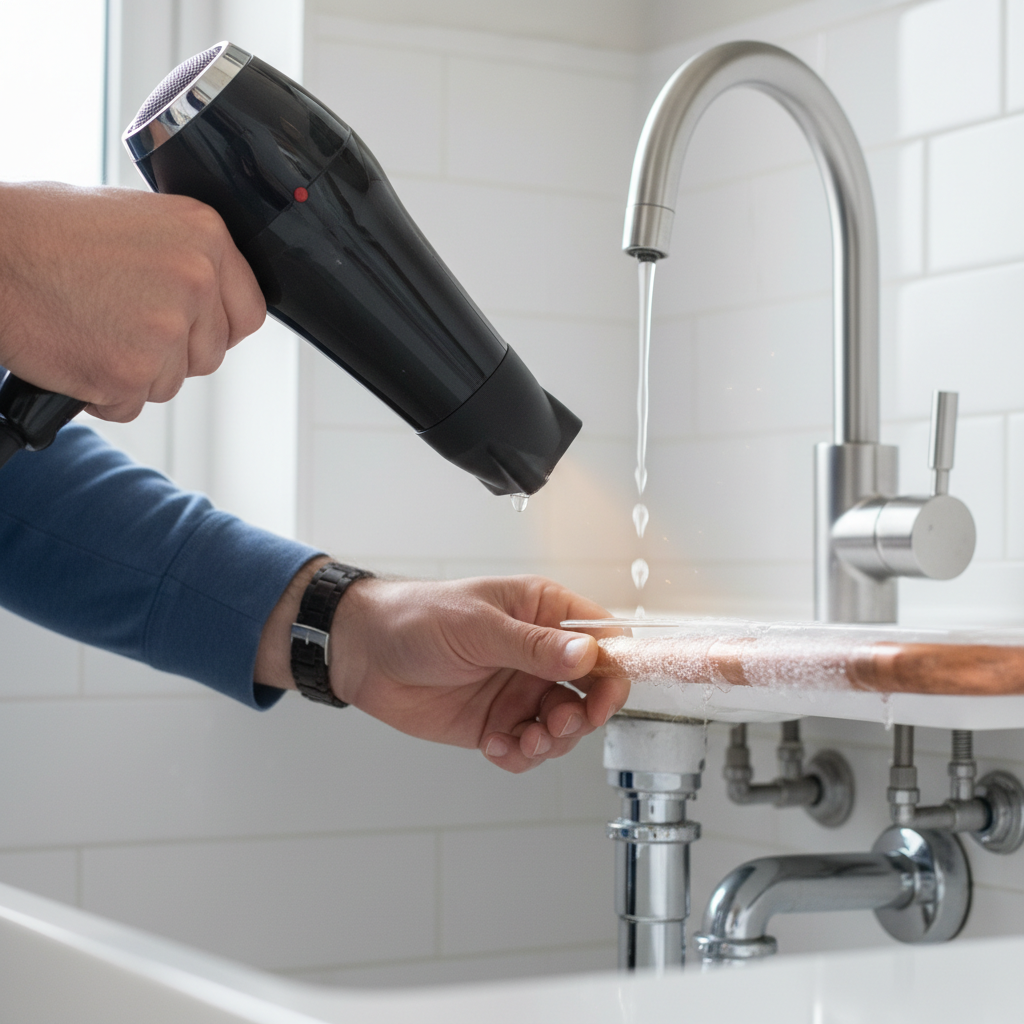
4. Apply Gentle, Gradual Heat — Use a safe heat source, moving it continuously.
Starting from the faucet end of the frozen section and moving backward towards the main water supply, apply heat evenly. Do not concentrate heat in one spot for too long. Good methods include:
- Hair Dryer: This is often the safest and most controllable option. Keep it moving back and forth along the frozen section.
- Heat Gun (on low setting): If using a heat gun, keep it at least 6-8 inches away from the pipe and move it constantly to prevent overheating and damaging the pipe material, especially with plastic (PEX) pipes. Never use a heat gun on flammable materials.
- Warm Towels: Soak towels in hot water, wring them out, and wrap them around the pipe. Replace them frequently as they cool. This is a slower but very safe method.
- Portable Space Heater: Position a small electric space heater (with appropriate safety clearances) near the frozen pipe to warm the entire area. This is ideal for exposed pipes in basements or crawl spaces. Ensure no flammable materials are near the heater.
5. Monitor for Water Flow — Watch for improving water pressure.
Continue applying heat until water flow returns to normal from the open faucet. This indicates the ice plug has completely melted. Be patient; this can take anywhere from 15 minutes to a few hours, depending on the severity of the freeze and the length of the frozen section.
6. Check for Leaks — Inspect the pipe thoroughly after thawing and restore water supply.
Once thawed and water is flowing freely, carefully inspect the newly thawed pipe section for any signs of leaks, drips, or cracks. The expansion of ice can sometimes cause hairline fractures that are only visible once water pressure is restored. If you find a leak, immediately turn off the main water supply and call a plumber. If no leaks are present, you can turn off the faucet(s) and resume normal water usage.
7. Prevent Future Freezes — Insulate and seal to protect your pipes.
After successfully thawing, take steps to prevent a recurrence. Insulate exposed pipes, seal air leaks around pipes entering your home, and consider letting a small trickle of water run from vulnerable faucets during extreme cold snaps. We discuss more in ## Tips & Prevention.
Common Causes
- Lack of Insulation: Pipes running through unheated spaces (crawl spaces, attics, garages) or along exterior walls without sufficient insulation are highly susceptible to freezing.
- Unsealed Openings: Cracks or gaps in exterior walls, foundations, or around utility penetrations allow cold air to infiltrate, chilling pipes to freezing temperatures.
- Severe Cold Weather: Prolonged periods of sub-freezing temperatures, especially coupled with high winds, can overwhelm even moderately insulated pipes.
- Thermostat Set Too Low: When homes are unoccupied or during nights, setting the thermostat too low (below 55°F or 13°C) can cause interior pipe temperatures to drop low enough to freeze.
- Poorly Circulated Air: Pipes in cabinets or tight, unheated enclosures may not benefit from the home's heating, making them vulnerable.
Common Mistakes
- Ignoring the Main Water Shut-Off: Failing to know where your main water shut-off valve is before starting is a huge mistake. If the pipe bursts, every second counts in preventing massive water damage.
- Using Open Flames: Never, ever use a propane torch, kerosene heater, or any open flame to thaw pipes. This is an extreme fire hazard and can rapidly overheat and damage plastic (PEX) pipes or even cause copper pipes to burst from rapid, uneven expansion.
- Concentrating Heat in One Spot: Leaving a heat source, like a heat gun or hair dryer, in one fixed position can cause the pipe material to overheat and warp (plastic) or even burst due to rapid pressure changes in isolated spots.
- Thawing from the Wrong Direction: Starting to thaw from the middle or the main supply end of the ice plug without an open path for the melting water will only increase internal pressure, making a burst more likely.
- Forgetting to Open Faucets: Keeping faucets closed during thawing is a critical error. The open faucet provides the essential pressure relief and drainage path for melting ice.
- Neglecting Post-Thaw Inspection: Assuming the problem is solved once water flows again without thoroughly checking for leaks is risky. Small cracks might only become apparent under full water pressure.
Cost & Time Breakdown
| Task | DIY Cost | Pro Cost | Time |
|---|---|---|---|
| Thawing a single pipe | $0–$25 | $100–$300 | 30 min – 2 hours |
| Minor leak repair | $10–$50 | $150–$400 | 1–3 hours |
| Burst pipe repair (localized) | $50–$200 | $300–$800+ | 2–5 hours |
| Water damage clean-up | $100–$500+ | $1,000–$10,000+ | Days to weeks |
Tips & Prevention
- Insulate Exposed Pipes: Wrap pipes in unheated areas (crawl spaces, attics, basements, exterior walls) with foam pipe insulation or heat tape. This is a small investment with huge returns.
- Seal Air Leaks: Use caulk or expanding foam to seal cracks and openings in foundation walls and around exterior penetrations for water pipes or electrical wiring. Even small drafts can chill pipes.
- Maintain Indoor Temperature: During cold snaps, keep your thermostat set to at least 55°F (13°C), even if you're away. Open cabinet doors under sinks to allow warmer room air to circulate around pipes in exterior walls.
- Trickle Faucets: If temperatures are expected to drop significantly and you have known vulnerable pipes, let a small trickle of water run from both hot and cold taps overnight. Moving water is less likely to freeze.
- Drain Outdoor Hoses: Disconnect and drain garden hoses in the fall. If your outdoor spigots aren't frost-proof, close the interior shut-off valve for the spigot and then open the outdoor spigot to drain any remaining water.
- Vacation Preparedness: If leaving your home for an extended period during winter, turn off the main water supply and drain your pipes. Alternatively, ensure your heating system is functioning and set to a safe temperature.
When to Call a Professional
While thawing a visible, accessible frozen pipe is often a manageable DIY task, there are clear instances when a professional plumber is essential. If you cannot locate the frozen section, suspect the freezing is deep within a wall or ceiling, or if the pipe appears to have already burst (indicated by a strong smell of standing water, bulging drywall, or visible cracks once thawed), stop immediately and call a licensed plumber. Additionally, if the pipe in question is a gas line (which visually might resemble a water pipe but feels heavier and typically has a yellow coating or connection), do not attempt to thaw it yourself; gas lines require specialized expertise and represent a significant safety hazard. Plumbers have specialized equipment like thermal imaging cameras to precisely locate hidden frozen sections and professional-grade pipe thawing machines that can safely thaw pipes without damage, a capability beyond most DIY toolkits. They can also effectively repair any leaks or bursts that may have occurred.
Related Articles
Keep troubleshooting with these hand-picked guides from FixlyGuide:
- The 90-Minute Hidden Danger of a Frozen Pipe (And the DIY Fix) — Thawing a frozen pipe quickly and safely is crucial to prevent bursting and extensive water damage to your home.
- The 3 Hidden Dangers of Frozen Pipes (And How to Thaw Them Safely) — Frozen pipes can burst, causing extensive water damage. Learn to safely thaw them and prevent costly repairs.
- The 3 Hidden Reasons Your Pipes Freeze (and How to Thaw Them Fast) — Discover the real culprits behind frozen pipes and learn safe, effective methods to thaw them quickly, preventing costly damage to your hom…
- The 3 Hidden Reasons Your Pipes Freeze (And How to Thaw Them Fast) — Discover the real culprits behind frozen pipes and learn a step-by-step method to safely thaw them, preventing costly damage.
- The 3 Hidden Reasons Your Pipe Froze (And How to Thaw It Fast) — Thawing a frozen pipe safely requires understanding the underlying causes and applying gentle, consistent heat to prevent further damage.
- The #1 Hidden Culprit Behind Your Whole-House Low Water Pressure (It's Not Your City!) — Discover the most common, often overlooked cause of low water pressure throughout your entire home and how to fix it yourself.
Frequently asked questions
How long does it take to thaw a frozen pipe?+
The time required to thaw a frozen pipe varies depending on the pipe's location, the severity of the freeze, and the method of thawing. It can range from 15 minutes for a minor surface freeze to several hours for a deeply frozen section.
Can I use a torch to thaw a frozen pipe?+
Absolutely not. Using an open flame torch to thaw pipes is extremely dangerous. It poses a significant fire hazard and can cause metal pipes to burst from rapid, uneven heating, or melt plastic pipes entirely. Always use gentle, indirect heat sources like a hairdryer or warm towels.
What should I do if my pipe bursts while thawing?+
If a pipe bursts during or after thawing, immediately shut off the main water supply to your home. This is why locating and knowing how to operate your main shut-off valve beforehand is crucial. Then, open all faucets to drain remaining water and call a licensed plumber for emergency repair.
How can I prevent pipes from freezing in the future?+
To prevent pipes from freezing, insulate exposed pipes in unheated areas, seal air leaks in exterior walls, keep your home's thermostat set to at least 55°F (13°C) during cold weather, and consider letting a small trickle of water run from vulnerable faucets during extreme cold snaps.
Why did only one pipe freeze?+
Only one pipe may freeze if it's located in an unusually cold spot, such as against an uninsulated exterior wall, in a drafty cabinet, or in a section of pipe that is more exposed to cold air like in a crawlspace or unheated garage, while other pipes are adequately protected by insulation or warmer ambient temperatures.


Discussion
Loading comments…