
Tools & materials you'll need
Affiliate linksAs an Amazon Associate FixlyGuide earns from qualifying purchases — at no extra cost to you. Prices and availability are accurate as of publication and subject to change.
How it works
Your air conditioning system is controlled by a precise electrical sequence. The process begins at the thermostat, which acts as the system's brain. When the indoor temperature rises above your setpoint, the thermostat closes a circuit, sending a low-voltage 24-volt AC signal through a bundle of small wires to the air handler (your indoor unit). This signal energizes a control board, which simultaneously activates the indoor blower fan and relays the 24V signal to the outdoor condenser unit.
At the outdoor unit, this 24V signal powers a small electromagnet in a switch called the contactor. When energized, the contactor pulls in, closing a high-voltage circuit. This allows 240 volts of electricity to flow from your main electrical panel, through an outdoor disconnect switch, and finally to the two primary components: the compressor and the condenser fan motor. The compressor pumps refrigerant and the fan dissipates heat. Any break in this chain—from a dead thermostat battery to a tripped safety switch or a faulty contactor—will prevent the system from starting. Understanding this sequence of low-voltage signals triggering high-voltage components is key to diagnosing why your unit remains silent.
Step-by-Step Fix
Follow these diagnostic steps in order, starting with the simplest and most common solutions. Do not proceed to steps involving electrical panel access if you are not comfortable and knowledgeable about high-voltage safety.
1. Verify Thermostat Settings — Confirm the most basic user inputs before assuming a system fault. This resolves a surprising number of "no cool" calls and requires no tools.
Set the thermostat mode to "Cool" and lower the setpoint at least 5°F below the current room temperature to ensure it is actively calling for cooling. If you have a digital thermostat, check the display; if it is blank or dim, the batteries may be dead.
- Tools: None. Possibly a small screwdriver or coin to open the battery compartment.
- Safety: None for battery replacement.
- If this doesn't work: If the screen is blank even with new batteries, the thermostat may not be receiving 24V power from the air handler, pointing to a downstream issue.
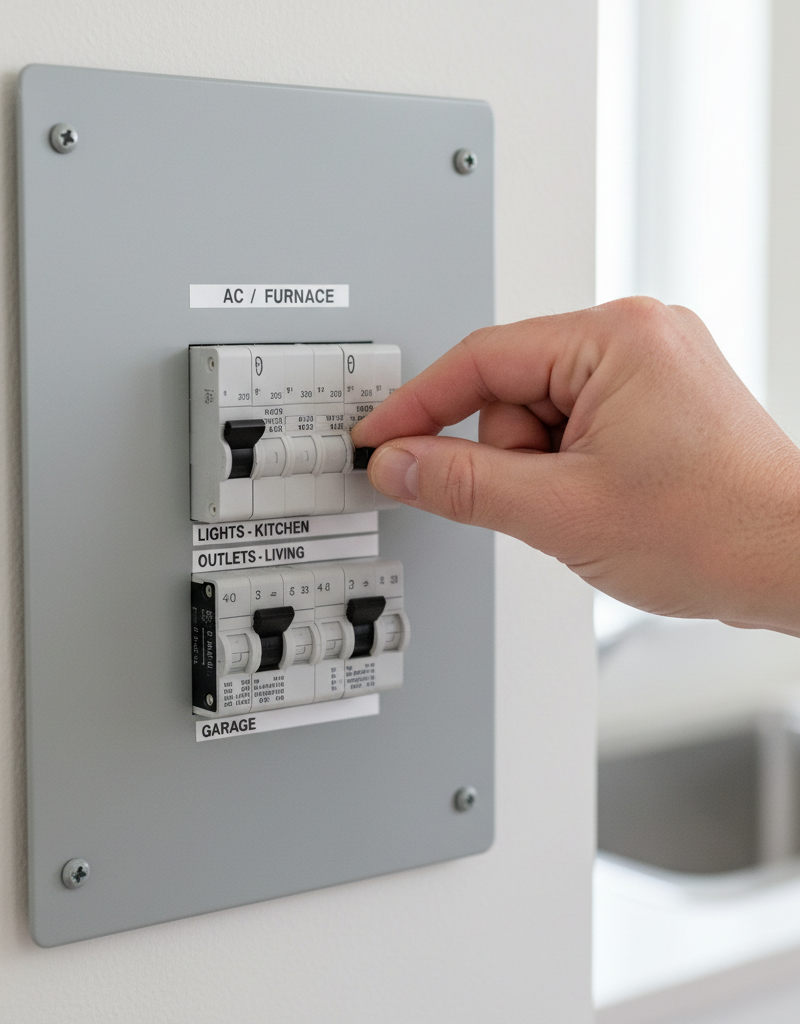
2. Inspect the Main Electrical Panel — Locate and check the circuit breakers that power your HVAC system. A temporary power surge may have tripped a breaker as a safety measure.
Your AC system typically has two separate breakers in your home's main panel. One is a double-pole breaker (two switches linked together) that controls the 240V outdoor condenser, and the other is a single-pole breaker controlling the 120V indoor air handler/furnace. Look for a breaker handle that is in the middle "tripped" position or fully "off."
- To Reset: Firmly push the breaker handle all the way to the "Off" position, then back to the "On" position. A simple push to "On" from the tripped position will not work.
- Safety: If the breaker trips again immediately, you have a direct short circuit. Do not reset it again. Stop and call a professional HVAC technician.
3. Check the Outdoor Disconnect Switch — Verify the dedicated power cutoff switch for the outdoor unit is engaged. This is often overlooked and can be shut off during other yard work or service.
Near your outdoor condenser unit, there will be a small metal box mounted to the wall. This is the service disconnect. It contains either a breaker-style switch or a pull-out block with fuses.
- If it's a breaker: Ensure it is in the "On" position.
- If it's a pull-out: Gently pull the handle straight out. Inspect the fuses (if present) for signs of being blown. Re-insert the pull-out; some designs can be inserted upside-down to disconnect power, so make sure the "On" marking is facing up.
- Safety: This is the primary safety cutoff for any work on the outdoor unit. Always use it in conjunction with the main breaker.
4. Examine the Condensate Drain Line and Overflow Switch — A clogged drain is one of the most common reasons an AC system will shut down completely. This is a built-in safety feature to prevent water damage.
The indoor evaporator coil produces condensation, which collects in a drain pan and flows out through a PVC pipe. If this line clogs with algae and debris, water backs up and triggers a small float switch. This switch is wired into the 24V circuit and breaks the connection to the thermostat, shutting off the system.
- To Check: Locate the PVC drain line coming from your indoor air handler. Look for a small float switch either in the primary drain line (a "T" fitting with wires coming out) or in a secondary drain pan under the unit. If you see standing water in the pan or the switch is visibly tripped, you've found the issue.
- To Clear: Use a wet/dry shop vacuum to suck the clog out from the exterior termination point of the drain line. You may need an adapter to get a good seal. You should hear the clog clear and may pull a significant amount of water.
5. Reset the Unit's Internal Safety Switches — Some systems have manually resettable high-pressure or low-pressure switches.
A dirty outdoor coil or a failing fan motor can cause system pressure to rise too high, tripping a high-pressure lockout switch to protect the compressor.
- How to Reset: Turn off all power to the unit at the breaker and the disconnect. Remove the service panel on the outdoor condenser (usually a corner panel held by a few screws). Look for a small button, often with a red rubber cover, on or near the compressor plumbing lines. Press it firmly once.
- Safety: You MUST kill all power before opening the service panel. 240V electricity is present and extremely dangerous.
6. Check the Air Handler Power Switch — Many indoor units have a standard light switch installed nearby for service purposes.
Look on the side of the furnace or air handler itself, or on a nearby wall or ceiling joist. These switches are frequently mistaken for light switches and can be accidentally turned off. Ensure it is in the "On" position.
7. Inspect the Air Filter — A severely clogged air filter can cause the indoor coil to freeze, leading to a shutdown.
While a dirty filter typically causes poor cooling performance, an extremely blocked filter can reduce airflow so drastically that the evaporator coil turns into a block of ice. A low-pressure safety switch may detect this condition and shut down the outdoor unit to prevent damage.
- Action: Turn the system off at the thermostat and replace the air filter. Allow several hours for the ice on the coil to melt completely before attempting to restart the AC. You can speed this up by running the system fan in "Fan Only" mode.
8. Listen for the Contactor "Click" — This simple audio cue can help you determine if the problem is low-voltage or high-voltage.
Turn the thermostat to "Cool" and the temperature down. Go outside and stand next to the condenser unit. Listen for a distinct "click" or "thunk" sound a few moments after the system should have started.
- If you hear a click but nothing happens: The low-voltage 24V signal is reaching the contactor successfully. The problem lies in the high-voltage side: a bad capacitor, a failed compressor, or a faulty fan motor. This usually requires a professional.
- If you hear no click: The 24V signal is not reaching the outdoor unit. The problem is in the low-voltage circuit: the thermostat, its wiring, a safety switch (like the condensate overflow), or the indoor unit's control board.
Common mistakes
Avoiding these common pitfalls will save you time, money, and potential danger during your diagnosis.
- Repeatedly resetting a circuit breaker. If a breaker trips immediately after you reset it, there is a dangerous electrical short in the system. Further attempts to reset it can lead to fire or severe equipment damage. Stop and call an electrician or HVAC technician immediately.
- Ignoring electrical safety. Homeowners often underestimate the danger of the 240V circuit powering the outdoor unit. Always turn off power at both the main breaker panel and the outdoor disconnect switch before opening any access panels. Never touch wiring, capacitors, or terminals without first verifying power is off.
- Replacing the thermostat first. While a thermostat can fail, it's not the most common culprit for a no-start condition. Performing the simple electrical and safety switch checks first will often reveal the true cause, preventing you from spending money on a part you don't need.
- Using the wrong type of fuse. If you find a blown fuse in a disconnect box or on a control board, it must be replaced with one of the exact same amperage and type (e.g., time-delay). Using a larger fuse negates the safety protection and creates a serious fire hazard.
- Poking at components with a multimeter without proper training. While a multimeter is a powerful diagnostic tool, testing live high-voltage circuits is extremely dangerous. One wrong move can cause a deadly shock or an arc flash explosion. Leave live voltage testing to qualified professionals.
Cost & time breakdown
This table outlines the potential costs and time involved for various repair scenarios, comparing DIY efforts with professional service.
| Task | DIY Cost | Pro Cost | Time |
|---|---|---|---|
| Replace Thermostat Batteries | $5 - $10 | $100 - $150 (part of service call) | 5 minutes |
| Reset Breaker / Disconnect | $0 | $100 - $150 (service call fee) | 10 minutes |
| Clear Condensate Drain Line | $0 - $20 (for wet/dry vac) | $125 - $250 | 30-60 minutes |
| Replace Outdoor Disconnect Fuses | $10 - $20 | $100 - $175 | 15 minutes |
| Replace Contactor | $20 - $50 (part only) | $175 - $450 | 1-2 hours (Pro) |
| Replace Run Capacitor | $15 - $40 (part only) | $150 - $400 | 1-2 hours (Pro) |
When to call a pro
While many "no-start" issues are simple DIY fixes, certain symptoms are clear indicators that you need professional help. Your safety and the health of your expensive HVAC system are paramount. Call a qualified HVAC technician if you encounter any of the following:
- The circuit breaker trips instantly and repeatedly upon being reset. This signifies a direct short in a major component like the compressor, which requires expert diagnosis.
- You hear a loud buzzing or humming from the outdoor unit, but the fan and compressor do not start. This points to a failed starting capacitor or a seized motor, both of which involve high-voltage components.
- You smell acrid, burning electrical odors from any part of the system. Immediately shut off all power at the breaker panel and call for service.
- You have performed all the steps outlined above—checking power, thermostat, drain lines, and filters—and the system still refuses to turn on.
- You are uncomfortable or inexperienced with working around electricity. The 240 volts in an outdoor unit can be lethal.
Prevention & maintenance
Consistent, simple maintenance is the most effective way to prevent unexpected shutdowns and costly repairs.
- Change your air filter religiously. The single most important maintenance task. Check it monthly and replace it when dirty, typically every 1-3 months depending on your home's conditions.
- Clean the outdoor condenser coil annually. Before the cooling season begins, shut off power to the outdoor unit and use a garden hose with a gentle nozzle to spray water from the inside of the unit out through the fins, washing away accumulated dirt, dust, and debris.
- Maintain clearance around the outdoor unit. Keep bushes, weeds, and any stored items at least 2 feet away from all sides of the condenser to ensure proper airflow.
- Clear the condensate drain line. Every 2-3 months during cooling season, pour a mixture of one cup of distilled vinegar and one cup of water down the condensate drain access tee to kill algae and prevent clogs.
- Schedule an annual professional tune-up. A technician will perform critical checks that go beyond basic DIY, including testing capacitors, measuring refrigerant pressures, cleaning indoor coils, and inspecting electrical connections for wear and tear.
Related Articles
Keep troubleshooting with these hand-picked guides from FixlyGuide:
- AC Blowing Warm Air? Easy Fixes for Common AC Problems — Discover the most common reasons your AC is blowing warm air and learn simple, actionable steps to troubleshoot and fix the issue yourself,…
- The Hidden Reason Your Furnace Short Cycles — And Why Most Homeowners Get It Wrong — Furnace short cycling, characterized by frequent on-off cycles, often points to a few common issues, most of which are surprisingly easy fo…
- Why Your AC is Blowing Warm Air: Troubleshooting and Fixes — If your AC is blowing warm air, it's often due to a clogged air filter, dirty condenser coils, or a tri
Frequently asked questions
Why would my AC suddenly stop working?+
The most common reasons an AC unit suddenly stops working include a tripped circuit breaker, an incorrectly set thermostat, a clogged air filter restricting airflow, or a dirty outdoor condenser unit preventing proper heat dissipation.
What's the first thing I should check if my AC unit isn't turning on?+
Always start by checking your thermostat settings to ensure it's in cool mode and set below the current room temperature. Next, inspect your home's electrical panel for any tripped circuit breakers related to the AC or furnace.
Can a dirty filter prevent my AC from turning on?+
While a dirty filter won't directly prevent the AC from turning on electrically, severe airflow restriction can cause the evaporator coil to freeze up. If the coil is frozen, the system might shut down on a safety limit switch, making it seem like it won't turn on. Fixing this involves turning the AC off and letting the ice melt, then replacing the filter.
When should I call a professional for my AC not turning on?+
You should call a professional if, after checking your thermostat and circuit breakers, the AC still doesn't turn on. Also, contact a technician if you hear unusual noises, smell burning, see water leakage from the indoor unit, or suspect a refrigerant leak.


Discussion
Loading comments…