
Tools & materials you'll need
Affiliate links- AmazonPower core aerator1 · Most homeowners rent these from equipment rental stores.
- AmazonGarden hose or sprinkler systemFor watering lawn before aeration.
- AmazonWork gloves1 pair
- AmazonSafety glasses1 pair
- AmazonSturdy closed-toe shoesPersonal protective equipment.
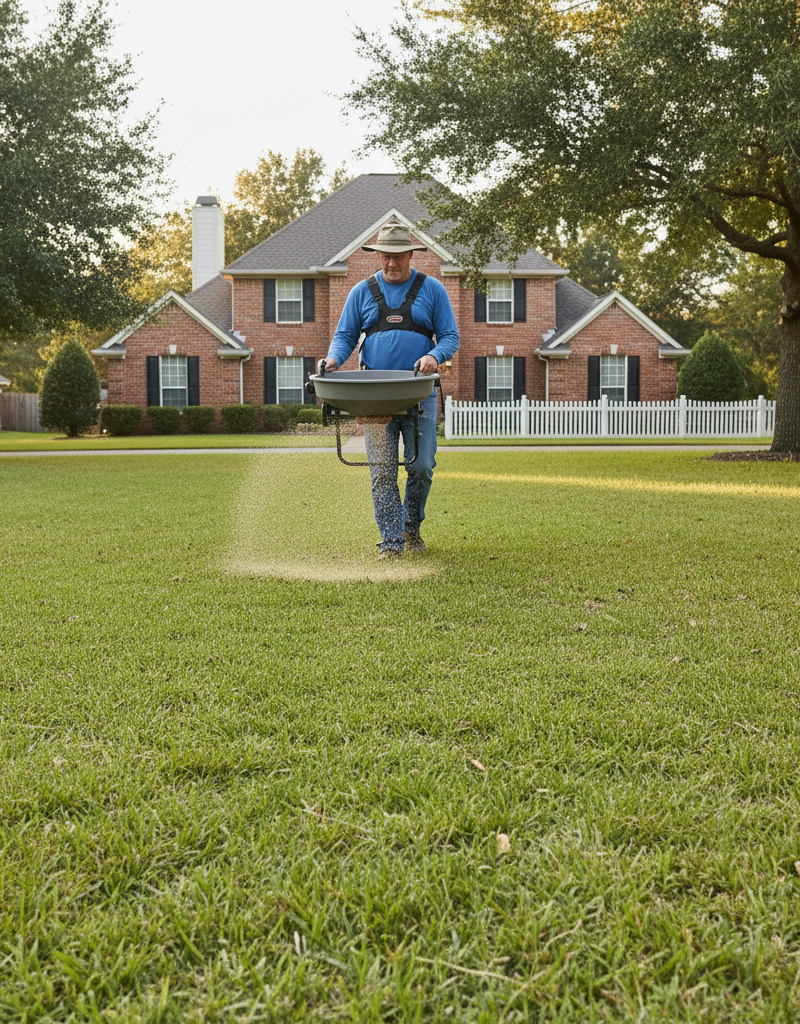
- AmazonBroadcast spreader1 · For applying seed and fertilizer.
As an Amazon Associate FixlyGuide earns from qualifying purchases — at no extra cost to you. Prices and availability are accurate as of publication and subject to change.
Quick Answer
Many homeowners aerate their lawns at the wrong time, unknowingly hindering their turf's recovery instead of helping it. The absolute best time to aerate your lawn hinges entirely on whether you have cool-season or warm-season grass. For cool-season varieties like fescue, rye, or bluegrass, aim for early autumn (late August to October) or early spring (March to April). If you're dealing with warm-season grasses such as Bermuda, zoysia, or St. Augustine, the sweet spot is late spring through early summer (April to June). This timing allows your grass to quickly fill in the punched holes and leverage the benefits of increased air, water, and nutrient penetration during its peak growth period.
The Problem
Have you ever fertilized your lawn repeatedly, watered diligently, yet still found it struggling with thin patches, poor color, or excessive thatch? The unseen culprit is often soil compaction. Over time, foot traffic, heavy equipment, and even rainfall can compress soil particles, reducing the pore space essential for air, water, and nutrient movement to grass roots. This compaction chokes your lawn, preventing vital resources from reaching where they're needed most. Without adequate air and water, roots can't grow deep and strong, making your grass more susceptible to drought, disease, and insect infestations. Furthermore, a dense layer of thatch – dead grass clippings and organic matter – can accumulate, creating a barrier that prevents water and nutrients from even reaching the soil surface. This combination of compaction and thatch can turn a seemingly healthy lawn into a weak, struggling turf, despite your best efforts.
How It Works
Aeration, specifically core aeration, mechanically removes small plugs of soil and thatch from your lawn, creating tiny channels that penetrate the compacted layers. Imagine your soil as a sponge. When it's compacted, it's like a squashed sponge – unable to absorb much. Aeration is like fluffing up that sponge, restoring its ability to take in and hold water, air, and nutrients. Each removed plug creates a small cavity, allowing oxygen to reach the roots, water to penetrate deeper into the soil profile rather than running off, and fertilizers to get directly to the root zone. This process also helps break down the thatch layer by introducing soil microorganisms that assist in decomposition. For cool-season grasses, aerating in autumn allows the grass to recover before winter dormancy and then take full advantage of spring growth. For warm-season grasses, late spring/early summer aeration ensures the turf is actively growing and can quickly repair any disturbance, filling in the holes and strengthening its root system for the stressful summer months. The ultimate goal is to create an environment where roots can grow deeper, leading to a more drought-tolerant, robust, and vibrant lawn that can better withstand environmental stresses.
Safety Note: When operating any lawn equipment, including aerators, always wear appropriate personal protective equipment (PPE) such as sturdy closed-toe shoes, safety glasses, and hearing protection. Ensure your hands and feet are clear of moving parts. Read your equipment's manual thoroughly before operation.
Step-by-Step Fix
Here's how to properly aerate your lawn, ensuring you maximize its benefits:
-
Determine Your Grass Type – Warm vs. Cool Season
- Before anything else, identify whether you have cool-season grass (fescue, rye, bluegrass) or warm-season grass (Bermuda, zoysia, St. Augustine). This dictates your aeration window.
- If you're unsure: Consult a local garden center or university extension office. They can often help identify common grass types in your region.
-
Choose the Right Aeration Season – Timing is Everything
- Cool-Season Grasses: Early fall (late August to October) is ideal. The grass is actively growing, recovering well, and preparing for winter dormancy. Early spring (March to April) is a secondary option, but allow sufficient time for broadleaf weed control application if needed, as aeration can bring dormant weed seeds to the surface.
- Warm-Season Grasses: Late spring to early summer (April to June) is best. This is when these grasses are growing most vigorously and can quickly fill in the aerated areas.
-
Prepare Your Lawn – Mow and Water
- Mow your lawn to its regular height a day or two before aeration. Shorter grass makes it easier for the aerator to penetrate the soil.
- Water your lawn thoroughly the day before aeration, aiming for about 1 inch of water. The soil should be moist, but not saturated or muddy. This allows the aerator tines to penetrate more deeply and pull out plugs more easily.
- Avoid: Aerating extremely dry or waterlogged soil. Dry soil is too hard for penetration, and waterlogged soil can lead to excessive compaction from the aerator's weight.
-
Mark Obstacles – Prevent Damage
- Mark sprinkler heads, shallow utility lines, invisible dog fences, and other buried obstacles with flags or spray paint. Striking these with an aerator can cause significant damage and costly repairs.
-
Select Your Aerator – Rental or Purchase
- Core Aerator (recommended): This type pulls out plugs of soil, creating the most effective channels. You can rent a walk-behind power aerator from a local equipment rental store. These are heavy but highly effective for larger lawns.
- Spike Aerator (less effective): While easier to use, spike aerators just punch holes without removing soil, which can increase compaction around the holes. Use only for very minor issues or small areas.
- Manual Core Aerator: For very small areas or spot treatment, a hand-held core aerator can be used, but it's labor-intensive.
-
Operate the Aerator – Systematic Coverage
- Start at the edges of your lawn and work your way inward. For power aerators, use a consistent, overlapping pattern to ensure even coverage. Aim for holes approximately 2-4 inches deep and 2-4 inches apart.
- Make two passes over particularly compacted areas, high-traffic zones, or sloped areas prone to runoff.
- Pro Tip: If renting a power aerator, familiarize yourself with its controls and operation before starting. Some require a bit of practice to maneuver effectively.
-
Leave the Cores – Natural Decomposition
- Resist the urge to rake up the soil cores. These cores contain beneficial microorganisms and will break down naturally within a week or two, returning valuable nutrients and organic matter to your lawn.
- Foot traffic, rain, or a light pass with a lawnmower (with discharge set to mulch) will help break them down faster.
-
Post-Aeration Care – Water and Overseed
- Immediately after aeration, water your lawn lightly to help the soil settle. Continue a regular watering schedule, ensuring the exposed roots don't dry out.
- Overseeding (Highly Recommended): This is the absolute best time to overseed, especially if your lawn is thin or patchy. The aeration holes provide ideal seed-to-soil contact, dramatically improving germination rates. Apply a high-quality grass seed appropriate for your region and grass type.
- Fertilize: After overseeding, apply a starter fertilizer. If not overseeding, apply your regular lawn fertilizer to capitalize on the improved nutrient access.
- Weed Control (Important): Avoid applying pre-emergent herbicides for at least 6-8 weeks after overseeding, as they will prevent grass seed germination.
Common Causes
- Heavy Foot Traffic: Play areas, pathways, or even routine walking compact the soil over time.
- Heavy Lawn Equipment: Repeated use of heavy mowers or tractors compresses the soil, especially in the same travel paths.
- Clay Soil: Soils with a high clay content are naturally more prone to compaction due to their small particle size.
- Construction Activity: Freshly built homes often have severely compacted soil from heavy machinery and construction materials.
- Overwatering: Constantly soggy soil can contribute to compaction and reduce air pockets.
- Thatch Buildup: A thick layer of undecomposed organic matter on the soil surface prevents air and water from reaching the soil, indirectly contributing to anaerobic conditions that worsen compaction.
Common Mistakes
- Aerating at the Wrong Time: The biggest mistake! Aerating during a grass type's dormant period or during extreme heat can stress the lawn and potentially cause more harm than good. Always time it with active growth.
- Not Watering Beforehand: Attempting to aerate dry, rock-hard soil will result in shallow plug removal, excessive strain on the equipment, and poor overall results. Moist soil is key for deep, clean plugs.
- Only Spike Aerating: While easier, spike aerators push soil particles aside rather than removing them, potentially increasing compaction in some areas. Core aeration is far more effective for true compaction relief.
- Removing the Cores: The soil cores left on your lawn contain valuable microbes and nutrients. Raking them up removes these benefits and unnecessary extra work.
- Ignoring Post-Aeration Steps: Not overseeding or fertilizing after aeration is a missed opportunity. The open holes are perfect for seed germination and nutrient absorption, making it the ideal time to revitalize your lawn.
- Not Marking Obstacles: Hitting a sprinkler head or an underground cable with a power aerator is a common, costly mistake. Always mark everything before you start.
Cost & Time Breakdown
| Task | DIY Cost | Pro Cost | Time |
|---|---|---|---|
| Equipment Rental | $70–$120/day | N/A | 1–3 hours |
| Grass Seed | $30–$100 | Included in service | 30–60 minutes |
| Starter Fertilizer | $20–$50 | Included in service | 15–30 minutes |
| Your Labor | $0 | $150–$400 | 2–4 hours |
| Total (DIY) | $120–$270 | $150–$400+ | 2–5 hours |
Tips & Prevention
- Follow Proper Mowing Height: Mowing your grass too short stresses it and can contribute to compaction over time. Maintain the recommended height for your turf type, usually 2.5–3.5 inches.
- Vary Traffic Patterns: If possible, change pathways for mowers and foot traffic to distribute pressure more evenly.
- Topdressing: Applying a thin layer of compost or sand after aeration (and before or with overseeding) can improve soil structure over time, especially in clay soils.
- Rainfall/Irrigation: Ensure your lawn receives adequate water, but avoid overwatering, which can lead to soggy soil and increased compaction.
- Regular Soil Tests: Conduct a soil test every 2-3 years to understand your soil's pH and nutrient levels. This guides your fertilization strategy and helps prevent deficiencies that weaken turf.
- Remove Thatch: If thatch buildup is consistently more than 0.5 inches, consider regular dethatching (power raking) in conjunction with aeration to keep it in check.
When to Call a Professional
While aerating a lawn can be a satisfying DIY project, there are specific scenarios where calling a professional lawn care service or landscaper is highly advisable. If your lawn is exceptionally large (over 10,000 sq ft), the sheer physical effort and time involved in renting and operating a heavy power aerator might be prohibitive. Professionals have commercial-grade equipment that can complete the job much faster and often more thoroughly. Furthermore, if your lawn has severe compaction issues, significant drainage problems, or if you're unsure about your grass type or the best timing for aeration in your specific microclimate, a professional can provide expert diagnosis and ensure the task is performed optimally. They can also recommend and apply appropriate amendments, seed, and fertilizer tailored to your lawn's unique needs, taking the guesswork out of the process and guaranteeing the best possible results.
Related Articles
Keep troubleshooting with these hand-picked guides from FixlyGuide:
- The #1 Lawn Aeration Mistake Most Homeowners Make (And How to Fix It) — Timing is everything when it comes to lawn aeration, and doing it at the wrong time can do more harm than good for your grass.
- The #1 Lawn Aeration Mistake Most Homeowners Make (And When to REALLY Do It) — Learn the surprising truth about when to aerate your lawn for maximum health and how a simple timing mistake can sabotage your efforts.
- The #1 Lawn Aeration Mistake Most Homeowners Make (And When to REALLY Do It) — Discover the crucial mistake many homeowners make with lawn aeration and learn the optimal timing for a healthier, more vibrant lawn.
- The #1 Lawn Aeration Mistake Most Homeowners Make (And When to REALLY Do It) — Discover the crucial mistake many homeowners make with lawn aeration and learn the optimal timing for a thriving, healthy lawn.
- The #1 Pruning Mistake Homeowners Make (And How to Time It Right) — Pruning at the wrong time can severely damage your trees. Learn the optimal timing for different tree types to promote health and vibrant g…
- The #1 Mistake Homeowners Make With HVAC Filters (And How Often to Really Change Them) — Discover the crucial mistake most homeowners make with HVAC filters and the specific schedule you should follow to avoid costly HVAC issues…
Get the print-ready PDF of this guide
A clean, ad-free, printable version you can keep on your phone or pin to the workshop wall. Free with a FixlyGuide account.
- Print-optimized layout
- Tools, materials & every step included
- Saved to your account
Frequently asked questions
How often should I aerate my lawn?+
For most home lawns, annual aeration is sufficient. However, if you have heavy clay soil, high-traffic areas, or persistent thatch buildup, you might benefit from aerating twice a year, typically in both the early spring and early fall for cool-season grasses, or late spring and late summer for warm-season grasses.
What's the difference between spike aeration and core aeration?+
Spike aeration uses solid tines to poke holes in the soil, which can actually increase compaction around the holes. Core aeration, on the other hand, removes small plugs of soil (cores), creating channels that effectively decompact the soil and allow for better air, water, and nutrient penetration. Core aeration is significantly more effective for addressing soil compaction.
Should I fertilize immediately after aerating?+
Yes, fertilizing immediately after aeration is highly recommended. The open holes created by aeration provide direct pathways for fertilizer to reach the grass roots, maximizing nutrient absorption and promoting vigorous growth. If you are overseeding, use a starter fertilizer. If not, your regular lawn fertilizer will work well.
Can I aerate when it's very hot or dry?+
No, you should avoid aerating during very hot or dry conditions. Aerating during these times can stress your lawn, as the exposed roots are more susceptible to drying out. Always aerate when your grass is actively growing and the soil is moist, but not waterlogged, to ensure quick recovery and optimal benefits.


Discussion
Loading comments…