
Tools & materials you'll need
Affiliate links- AmazonNew HVAC filterCorrect size and MERV rating for your system
As an Amazon Associate FixlyGuide earns from qualifying purchases — at no extra cost to you. Prices and availability are accurate as of publication and subject to change.
Quick Answer
Most HVAC manufacturers and technicians recommend changing your air filter every 1 to 3 months. However, this is a generalization. The actual frequency can be as often as every 20-45 days if you have pets, allergies, or multiple occupants, or as long as 6 months if you live alone, have no pets, and minimal dust. The key isn't a rigid schedule, but rather understanding the factors that impact filter load and checking your filter regularly for visible dirt and debris.
The Problem
Many homeowners treat HVAC filter replacement as an afterthought or follow a generic, infrequent schedule. The problem is that a dirty, clogged HVAC filter is far more than just a minor inconvenience; it's a direct threat to your HVAC system's health, your energy bills, and your indoor air quality. A dirty filter restricts airflow, forcing your furnace or air conditioner to work harder, consume more energy, and experience increased wear and tear on critical components. This often manifests as reduced cooling or heating efficiency, uneven temperatures, strange noises, and ultimately, premature system failure. Furthermore, a clogged filter becomes less effective at trapping airborne particles, leading to a build-up of dust, allergens, and pollutants inside your home.
How It Works
Your HVAC system, whether it's a furnace, air conditioner, or heat pump, relies on a blower motor to circulate air throughout your home through a network of ducts. Before this air reaches the blower and heat exchange coils, it passes through an air filter. The primary purpose of this filter is to protect the sensitive internal components of your HVAC system from dust, dirt, pet dander, pollen, and other airborne particulates. Without a filter, these contaminants would build up on the evaporator coil of your AC unit and the blower motor itself, severely impeding their efficiency and lifespan. The filter's effectiveness is measured by its MERV (Minimum Efficiency Reporting Value) rating, which indicates how well it captures particles of various sizes. A higher MERV rating means better filtration but can also lead to more restricted airflow if not changed regularly, especially with older or undersized systems. As air passes through the filter, airborne particles become trapped in its fibrous material. Over time, these trapped particles accumulate, forming a dense barrier that reduces the amount of air that can flow through the filter and into the HVAC system. This reduced airflow is the root cause of many HVAC problems stemming from a dirty filter.
Step-by-Step Fix
1. Gather Your Supplies — Have the Right Filter Ready
- Tools & Materials: New HVAC filter (correct size and MERV rating), permanent marker.
- Pre-step: Before you begin, locate your current filter's size printed on its frame (e.g., 20x25x1). Note the MERV rating. It's best to have a replacement filter on hand before starting.
2. Power Down Your HVAC System — Ensure Safety First
- Safety First: Always turn off your HVAC system at the thermostat and at the main breaker or disconnect switch near the indoor unit. This prevents the system from accidentally starting while your hands are near moving parts or electrical components.
3. Locate the Filter Slot — Often Near the Air Handler
- Location: The filter slot is typically found at the return air vent, often on the wall or ceiling, or, more commonly, directly at the air handler unit (furnace). Look for a rectangular slot or an access panel. In some systems, the filter might be inside the furnace cabinet itself.
- If you can't find it: Consult your HVAC system's owner's manual. A quick online search for your furnace or air handler model number can also provide diagrams.
4. Note Airflow Direction — Crucial for Proper Installation
- Directional Arrow: Before removing the old filter, observe the arrow printed on its frame. This arrow indicates the direction of airflow, which should always point towards the furnace/air handler and away from the return ductwork. Make a mental note or take a photo.
5. Remove the Old Filter — Gently Slide It Out
- Extraction: Carefully slide the old filter out from its slot. It might be dusty, so avoid tilting it too much to prevent spilling debris. You might want to have a trash bag ready.
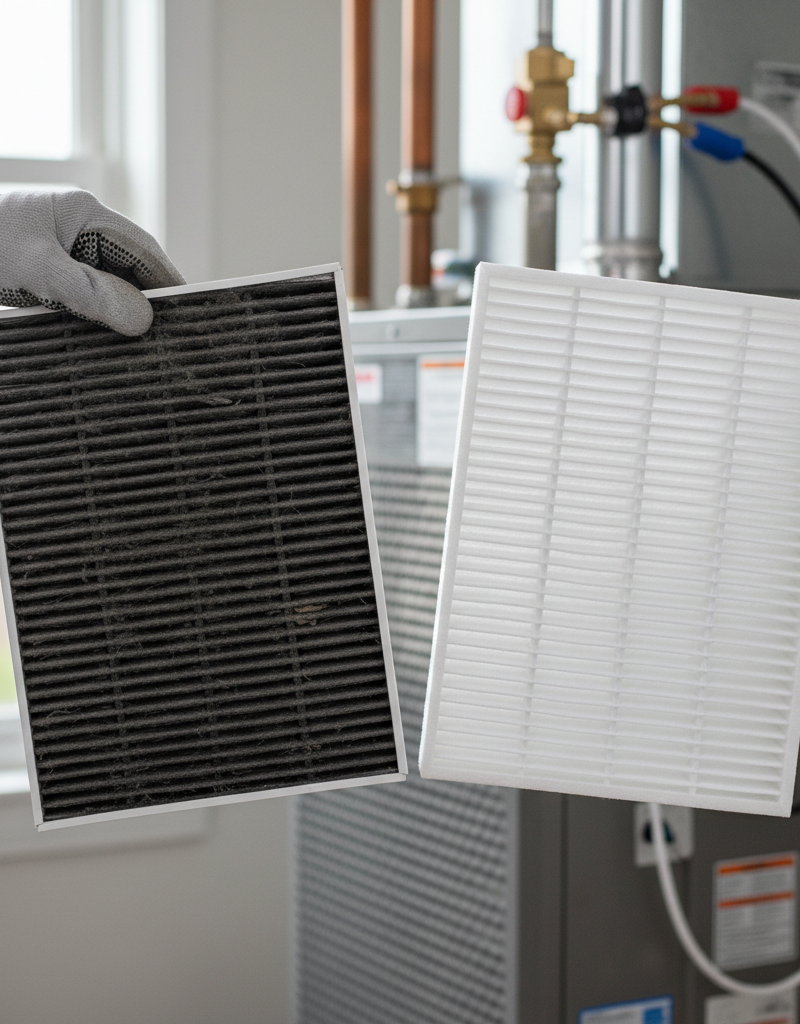
- Inspect the build-up: This is your best visual indicator of how often you should be changing it. A filter caked with dust well before its scheduled change means you need to increase frequency.
6. Insert the New Filter — Match Airflow Direction
- Alignment: With the airflow arrow on the new filter pointing in the correct direction (towards the furnace/air handler), slide the fresh filter into the slot until it's fully seated and snug. Do not force it if it feels too tight; double-check the size.
7. Mark the Installation Date — For Future Reference
- Tracking: Use a permanent marker to write the current date on the border of the new filter. This simple step helps you track how long the filter has been in service and assists in establishing a more accurate replacement schedule.
8. Restore Power & Test — Verify Operation
- Re-energize: Turn the power back on at the breaker or disconnect switch, then at the thermostat. Set your system to run (e.g., set the AC to a low temperature or the heat to a high temperature) to ensure it's operating correctly.
- Listen: Listen for any unusual sounds. The system should sound smoother with better airflow.
Common Causes
- Pets: Pet hair and dander significantly increase filter load, requiring more frequent changes. Even one pet can reduce filter life by half.
- Allergies/Asthma Sufferers: Individuals with respiratory sensitivities benefit from cleaner air, necessitating more frequent filter changes, possibly with higher MERV filters.
- High Occupancy: More people in a home generate more dust, skin cells, and tracked-in dirt, leading to faster filter clogging.
- Dusty Environments: Homes near construction sites, busy roads, or those with frequent DIY projects will accumulate dust faster.
- Smoking Indoors: Smoke particles quickly clog filters and leave residues, demanding very frequent replacement.
- Infrequent Vacuuming/Cleaning: A lack of regular cleaning allows more dust to become airborne and subsequently trapped in the HVAC filter.
- Poor Ductwork Sealing: Leaky ducts can pull unfiltered air from attics, crawl spaces, or basements, quickly dirtying filters.
- Low-Quality Filters: Inexpensive, low MERV filters (typically MERV 1-4) have less surface area and are designed to capture only larger particles, clogging faster than higher-quality filters designed for finer particle capture.
Common Mistakes
- Ignoring the Airflow Direction Arrow: Installing a filter backward forces air against its intended flow path, reducing efficiency and potentially damaging the filter medium. Fix: Always check the arrow and ensure it points towards the furnace/air handler.
- Buying the Wrong Size: An ill-fitting filter leaves gaps, allowing unfiltered air to bypass the filter and enter your HVAC system, rendering the filter useless and dirtying coils. Fix: Always verify the exact dimensions (length x width x thickness) on your old filter's frame before purchasing a new one.
- Choosing Too High of a MERV Rating for Your System: While higher MERV filters capture more particles, they also restrict airflow more. Older or less powerful HVAC systems might struggle with very high MERV filters (above 10-11), leading to reduced efficiency, increased strain on the blower motor, and potential overheating. Fix: Consult your HVAC system's manual or a professional to determine the maximum recommended MERV rating for your specific unit. For most residential systems, MERV 8-11 is a good balance of filtration and airflow.
- Forgetting to Turn Off the Power: Changing a filter with the system running can pull unexpected dust into the blower or, more dangerously, expose your hands to moving parts. Fix: Always kill the power at both the thermostat and the main disconnect/breaker for the HVAC unit.
- Waiting for the System to Fail: Many homeowners only think about filters when their AC isn't cooling properly or the furnace isn't heating. By then, significant strain and damage might have occurred. Fix: Implement a proactive schedule based on your home's conditions and perform regular visual checks.
- Stockpiling Filters in Humid Environments: Storing filters in damp basements or garages can promote mold growth on the filter medium, which you'll then introduce into your air system. Fix: Store filters in a dry, cool place inside your living space.
Cost & Time Breakdown
| Task | DIY Cost | Pro Cost | Time |
|---|---|---|---|
| Filter purchase | $5–$30 | N/A | N/A |
| Filter replacement | $0 | Included in service | 5–10 minutes |
| HVAC inspection | N/A | $80–$200 | 30–60 minutes |
| Coil cleaning (if needed) | N/A | $200–$500 | 1–3 hours |
Tips & Prevention
- Monthly Visual Checks: Make it a habit to visually inspect your filter once a month. If it looks visibly dirty or clogged, change it regardless of the last replacement date. Hold it up to a light; if you can't see the light through it, it's time for a change.
- Set a Reminder: Use a calendar reminder, a smartphone app, or even write the next change-by date on the filter itself to stay on schedule.
- Stock Up: Buy filters in multi-packs or when they are on sale to ensure you always have the correct size and MERV rating on hand.
- Improve Home Cleanliness: Regular vacuuming (especially if you have pets), dusting, and mopping reduce the overall particulate load in your home's air, extending filter life.
- Consider Smart Thermostats: Some smart thermostats can remind you when it's time to change your filter, based on system run time.
- Duct Cleaning (Periodically): While not a substitute for filter changes, professional duct cleaning every 3-5 years can reduce the amount of dust circulating through your system, potentially extending filter life.
When to Call a Professional
While changing an HVAC filter is a straightforward DIY task, there are specific situations where a professional HVAC technician should be called. If you notice a significant reduction in airflow even after changing the filter, it could indicate a deeper problem like a failing blower motor, a clogged evaporator coil (which can happen if filters are neglected for too long), or obstructed ductwork. Sudden, unexplained increases in your energy bills despite regular filter changes also warrant a professional inspection, as this points to system inefficiency. If your system is making unusual noises—squealing, grinding, or banging—especially after a filter change, it could signal a bearing issue in the blower motor or another mechanical failure. Lastly, if you're unsure about the correct filter size or MERV rating for your specific system, or if your system regularly struggles with airflow even with clean filters, a qualified technician can provide an accurate diagnosis, recommend the appropriate filter type, and address any underlying issues to keep your HVAC running efficiently and safely.
Related Articles
Keep troubleshooting with these hand-picked guides from FixlyGuide:
- The #1 HVAC Mistake Costing You Money (and How Often to REALLY Change Your Filter) — Your HVAC filter's lifespan isn't one-size-fits-all; discover the real factors and save money, improve air quality, and prevent costly brea…
- The #1 HVAC Mistake Costing You Hundreds (And How Often to Really Change Your Filter) — Discover the surprising truth about how often you should change your HVAC filter and prevent common problems that can cost you hundreds in…
- Why Your House is Humid Despite AC & How to Fix It — Even with your AC running, high indoor humidity can make your home uncomfortable. Often, common issues like oversized units or clogged filt…
- The #1 HVAC Mistake That Costs Homeowners $500 Every Year — Discover the crucial HVAC maintenance step homeowners often overlook, leading to higher energy bills, frequent repairs, and premature syste…
- The #1 Mistake Homeowners Make When Heat Pumps Stop Heating in Winter — Discover the crucial mistake most homeowners make when their heat pump struggles in cold weather and how to fix it, potentially saving hund…
- The 7 Critical Home Inspection Mistakes Most Homeowners Make (and How to Spot Them) — Discover the crucial home inspection mistakes homeowners commonly overlook and learn how to identify potential problems before they become…
Frequently asked questions
How often should I change my HVAC filter if I have pets?+
If you have pets that shed, you should plan to change your HVAC filter every 30-45 days. Pet dander and hair significantly increase the load on your filter, requiring more frequent replacement to maintain efficiency and air quality.
Can a dirty HVAC filter cause my AC to freeze up?+
Yes, a dirty HVAC filter is a very common cause of an AC unit freezing up. When the filter is clogged, it restricts airflow over the evaporator coil, causing the refrigerant inside to get too cold and freeze the moisture on the coil. This leads to reduced cooling and potential damage to the system.
What MERV rating should I use for my home's HVAC filter?+
For most residential homes, a MERV rating between 8 and 11 provides a good balance of filtration efficiency and airflow. Filters with higher MERV ratings (13+) are excellent for air quality but can restrict airflow too much for older or less powerful systems. Always check your HVAC unit's manual for its recommended maximum MERV rating.
What happens if I don't change my HVAC filter?+
Not changing your HVAC filter regularly can lead to several problems: reduced system efficiency, higher energy bills, poor indoor air quality, increased wear and tear on the blower motor and other components, and ultimately, a higher risk of costly system breakdowns.
How do I know what size HVAC filter to buy?+
The easiest way to find your HVAC filter size is to look at the existing filter. The dimensions (e.g., 20x25x1) are typically printed on the cardboard frame of the filter. Always use the exact size to ensure a proper fit and prevent air bypass.


Discussion
Loading comments…