
Tools & materials you'll need
Affiliate linksAs an Amazon Associate FixlyGuide earns from qualifying purchases — at no extra cost to you. Prices and availability are accurate as of publication and subject to change.
Quick Answer
Is your invigorating shower now a sad dribble? The likely culprit isn't your plumbing, but rather tiny mineral deposits slowly choking your showerhead. Hard water leaves behind calcium and magnesium, which accumulate in the nozzles, restricting flow and distorting the spray. Fortunately, you can often restore full pressure and a perfect spray pattern with a quick soak in white vinegar or a scrub with a baking soda paste – common household items that dissolve these mineral villain without harsh chemicals.
The Problem
Many homeowners experience a gradual but noticeable decline in their shower's performance. What starts as a powerful, even spray might become a weak, erratic stream, or worse, a frustrating drip. This isn't just an annoyance; it can make rinsing off soap or shampoo difficult and extend shower times, wasting water. The core issue is almost always mineral buildup, particularly calcium carbonate and magnesium, which are dissolved in "hard water." As water flows through the tiny apertures of your showerhead, it evaporates, leaving these minerals behind. Over time, these deposits accumulate, partially or fully blocking the nozzles, leading to reduced water pressure, uneven spray patterns, and even premature wear on your showerhead.
How It Works
To understand how to fix a clogged showerhead, it helps to know how water travels to it and why minerals accumulate. Your home's water supply, whether from a municipal source or a well, carries dissolved minerals. The "hardness" of water is determined by its concentration of these minerals, primarily calcium and magnesium ions. When this hard water passes through your showerhead, especially during hot showers, some of the water evaporates, leaving the minerals to crystallize and adhere to the internal surfaces and the small spray nozzles. This process is similar to how limescale forms inside kettles or on faucets.
Showerheads are designed with numerous small openings to create a broad and consistent spray. Any obstruction in these nozzles disrupts the water's path, causing it to exit at odd angles or with reduced force. Think of it like a garden hose: if you pinch the end, the water sprays differently. Inside your showerhead, the intricate channels and tiny holes become choke points. Acids, like those found in white vinegar, react chemically with these alkaline mineral deposits (calcium carbonate, for example). The acid breaks down the chemical bonds of the minerals, dissolving them into the solution. Similarly, baking soda, a mild abrasive and alkaline substance, can physically scrub away softer deposits and react with some acidic components of grime. Understanding this interaction between minerals and common household cleaners is the key to effectively clearing the blockages and restoring your shower to its former glory.
Step-by-Step Fix
-
Prep the Area Safely — Before starting, ensure the bathroom is well-ventilated, especially if you're sensitive to vinegar fumes. Lay down a towel or old sheet in the tub or shower pan to catch any drips or falling debris. This also provides a cushioned surface if you need to set down the showerhead. If your showerhead is very old or plastic, consider testing the solution on an inconspicuous spot first.
-
Choose Your Weapon: Vinegar Soak (Best for Detached Heads) — For thorough cleaning, especially if your showerhead can be easily unscrewed, this method is ideal. Unscrew the showerhead counter-clockwise by hand or with an adjustable wrench if needed. Place the showerhead into a bucket or bowl, ensuring it's fully submerged in undiluted white vinegar. Leave it to soak for at least 4-8 hours, or overnight for severe buildup. The vinegar will slowly dissolve the mineral deposits.
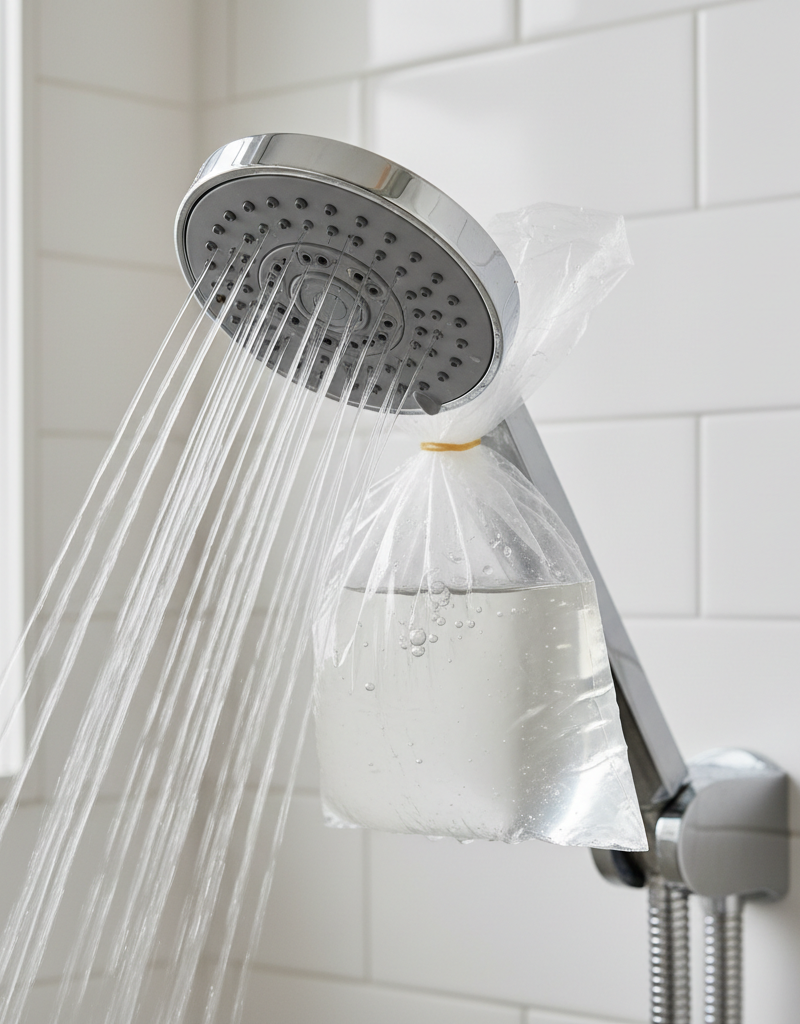
- If your showerhead is fixed and cannot be easily removed: Fill a sturdy plastic bag (like a Ziploc) with enough white vinegar to submerge the showerhead completely. Secure the bag around the showerhead and pipe using a rubber band or zip tie, ensuring no leaks, and let it soak for the same duration.
-
Choose Your Weapon: Baking Soda Paste (Best for Attached Heads & Mild Buildup) — If detaching your showerhead isn't feasible or you prefer a less aggressive approach, a baking soda paste can work wonders. Mix 1/2 cup of baking soda with a few tablespoons of water to create a thick paste. Apply this paste generously to all the clogged nozzles and the face of the showerhead. Let it sit for 30-60 minutes, allowing it to penetrate and loosen the mineral deposits.
- Safety Note: Always wear gloves when handling cleaning agents, even mild ones like vinegar and baking soda, to protect your skin.
-
Scrub Away the Grime — After soaking or pasting, gently scrub the showerhead. Use an old toothbrush or a small non-metallic brush (like a grout brush) to dislodge any softened mineral deposits from the nozzles and the face of the showerhead. For stubborn clogs in individual nozzles, a toothpick or a straightened paper clip can carefully poke through the openings. Be gentle to avoid scratching or damaging the finish.
-
Rinse Thoroughly — Whether you detached and soaked or scrubbed an attached head, copious rinsing is crucial. If detached, rinse under running water, ensuring all vinegar or baking soda residue and loosened debris are flushed away. If attached, turn on the shower to its hottest setting and let it run for 5-10 minutes. This flushes out any remaining particles from inside the showerhead and the pipe, verifying that the nozzles are clear.
-
Reassemble (If Detached) — If you removed your showerhead, ensure the rubber washer (gasket) is correctly seated inside the showerhead connector. If it's old, cracked, or missing, replace it with a new one (available at hardware stores for less than a dollar). Apply a few wraps of plumber's tape (PTFE tape) clockwise around the threads of the shower arm before screwing the showerhead back on. Tighten by hand until snug, then give it a quarter-turn with a wrench if needed, being careful not to overtighten.
- If the spray is still uneven: Double-check if any internal screens or flow restrictors within the showerhead are also clogged and clean them as well. Some older showerheads have a small screen where they connect to the arm that can also accumulate debris.
-
Test Your Work — Turn on the shower and observe the spray pattern and pressure. You should notice a significant improvement, with water flowing freely and evenly from all nozzles. Revel in your restored shower experience!
Common Causes
- Hard Water: This is by far the most prevalent cause. Water containing high levels of dissolved minerals, especially calcium and magnesium, will inevitably leave deposits as it evaporates. The harder your water, the faster your showerhead will clog.
- Infrequent Cleaning: Neglecting routine cleaning allows mineral buildup to accumulate over long periods, making it harder to remove once severe.
- Hot Water Temperatures: While not a direct cause, hotter water can accelerate the rate at which minerals precipitate out of the water and crystalize, contributing to faster buildup.
- Old or Damaged Showerheads: Older showerheads, especially those with small or intricate nozzles, are more susceptible to clogging. The internal components can also degrade, making them less efficient at preventing buildup.
- Construction Debris: In newer homes or after plumbing work, small fragments of pipe sealant, solder, or sediment can occasionally travel through the pipes and lodge in the showerhead.
Common Mistakes
- Using Harsh Chemicals: Many homeowners reach for strong, abrasive chemical cleaners. These can damage the finish of your showerhead, corrode internal components, and release harmful fumes. Vinegar and baking soda are far safer and usually just as effective.
- Forgetting the Gasket/Washer: When reinstalling a detached showerhead, forgetting to replace a worn or missing rubber washer (gasket) at the connection point will lead to leaks, regardless of how tightly you screw it on.
- Overtightening the Showerhead: While you want a snug connection, overtightening with a wrench can strip the threads on the shower arm or crack the showerhead's housing, leading to costly repairs.
- Not Soaking Long Enough: For severe mineral buildup, a quick 30-minute soak simply won't cut it. Allowing adequate time (several hours or overnight) for the vinegar to chemically break down the deposits is crucial for a thorough clean.
- Ignoring Internal Components: Focusing only on the nozzles and forgetting to clean any internal screens or flow restrictors can leave residual clogs that still impact pressure and spray.
- Skipping the Plumber's Tape: While not always strictly necessary for a hand-tight connection, skipping plumber's tape (PTFE tape) on the shower arm threads increases the risk of minor leaks over time, even with a good washer.
Cost & Time Breakdown
| Task | DIY cost | Pro cost | Time |
|---|---|---|---|
| Showerhead Cleaning | $2–$5 | $100–$250 | 30 min – overnight |
| Replacing Worn Washer | $1 | Included in cleaning | 5 min |
| Replacing Showerhead (DIY) | $20–$100 | — | 15–30 min |
| Plumber Callout (if needed) | — | $150–$400+ | 1–3 hours |
Tips & Prevention
- Regular Wiping: After each shower, quickly wipe down the face of your showerhead with a cloth to remove standing water. This prevents minerals from drying and forming deposits.
- Monthly Vinegar Spritz: Keep a spray bottle filled with a 50/50 mix of white vinegar and water. Once a month, give your showerhead a quick spray and let it sit for 10-15 minutes before rinsing. This proactively dissolves minor mineral accumulation.
- Soft Water System: If you live in an area with extremely hard water, consider installing a whole-house water softener. This is a significant investment but will dramatically reduce mineral buildup throughout your entire plumbing system, extending the life of fixtures and appliances.
- Flexible Nozzle Showerheads: When replacing a showerhead, look for models with flexible rubber nozzles. These are designed so you can simply rub them with your finger to dislodge mineral deposits, making cleaning very easy.
- Showerhead Replacement: Even with diligent cleaning, showerheads don't last forever. If your showerhead is old, severely corroded, or consistently re-clogging despite cleaning, consider replacing it. Most basic showerheads are affordable and easy to install.
- Check for Internal Screens: Periodically unscrew your showerhead and check for any debris caught in internal screens or flow restrictors. Clean these with an old toothbrush.
When to Call a Professional
While most showerhead clogging issues are straightforward DIY fixes, there are times when a professional plumber is the right call. If cleaning doesn't restore your water pressure, or if the water pressure issue extends to other fixtures in your home, it could indicate a larger plumbing problem like a clogged main pipe, a faulty pressure regulator, or issues with your water heater. If you've cleaned the showerhead thoroughly and verified there are no internal clogs, but the water pressure remains low, a plumber can diagnose underlying plumbing system problems. Additionally, if your showerhead is stuck and you can't remove it without risk of damaging the shower arm or wall plumbing, a professional has the tools and expertise to handle it without causing further issues. Never try to force a stuck showerhead with excessive leverage, as this could lead to a more expensive repair.
Related Articles
Keep troubleshooting with these hand-picked guides from FixlyGuide:
- The Secret Power Tool Hiding in Your Garage for a Speedier Clean — Unlock the hidden potential of your cordless drill to tackle stubborn household grime, soap scum, and dirt with specialized cleaning attach…
- The Surprising Trick to Cutting Your Dryer Bill By $100 Per Year — Installing a clothesline can significantly reduce your energy bills and add a fresh scent to your laundry. This guide covers how to choose…
- The Surprising Yard Tool That Vaporizes Weeds (No Chemicals Needed) — A weed torch offers an efficient, chemical-free method for removing unwanted plants from hardscaped areas like driveways, patios, and grave…
- The 3 Hidden Ways Your — Uncover the surprising habits and hidden household issues that are silently increasing your homeownership costs and learn how to fix them.
- Is a Wall-Mounted Pressure Washer Right for Your Garage? The Unvarnished Truth — Discover if a wall-mounted pressure washer is the right cleaning solution for your home, offering a powerful and space-saving alternative t…
- The One Trick to Unjam a Humming Garbage Disposal (Without Calling a Plumber) — A humming garbage disposal that won't spin usually indicates a jam that homeowners can often fix themselves with a simple tool and a few st…
Get the print-ready PDF of this guide
A clean, ad-free, printable version you can keep on your phone or pin to the workshop wall. We'll also send occasional weekly tips matched to your home situation.
- Print-optimized layout
- Tools, materials & every step included
- Unsubscribe anytime
This article was independently written by FixlyGuide based on the source topic.
Frequently asked questions
How often should I clean my shower head?+
For optimal performance, clean your shower head every 1–3 months, especially if you have hard water. Regular cleaning prevents significant mineral buildup that can lead to reduced pressure and uneven spray.
Can Coca-Cola clean a shower head?+
While Coca-Cola contains phosphoric acid, which can dissolve some mineral deposits, it's generally less effective and more expensive than white vinegar. White vinegar provides a higher concentration of acetic acid, making it the preferred and more cost-effective solution for shower head cleaning.
What if my shower head is still clogged after cleaning?+
If your shower head remains clogged after a thorough cleaning, check for debris in internal screens or flow restrictors. If the problem persists, it might indicate a larger plumbing issue in your home, such as a clogged pipe or a faulty pressure regulator, and it would be wise to consult a professional plumber.


Discussion
Loading comments…