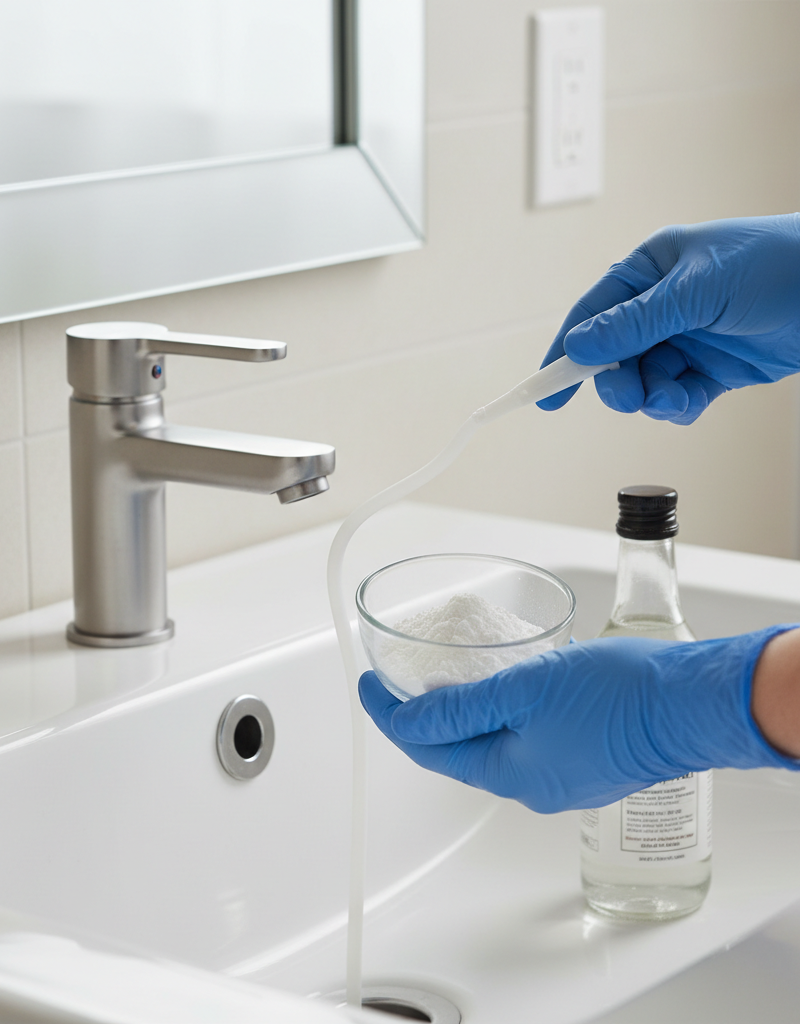
Tools & materials you'll need
Affiliate links- AmazonOld toothbrush or small brush
As an Amazon Associate FixlyGuide earns from qualifying purchases — at no extra cost to you. Prices and availability are accurate as of publication and subject to change.
Quick Answer
Mineral buildup, primarily from hard water, is a common culprit behind reduced shower head pressure and erratic spray patterns. By soaking your shower head in a white vinegar solution, the acetic acid dissolves these mineral deposits, restoring optimal water flow and spray performance within an hour.
The Problem
Ever stepped into a shower expecting a refreshing cascade, only to be met with a weak dribble or a barrage of needles shooting in every direction? The culprit is almost always mineral buildup. Over time, calcium, magnesium, and other dissolved solids present in hard water accumulate inside and around the spray nozzles of your shower head. This unseen enemy progressively restricts the water flow, creating blockages that reduce pressure, distort spray patterns, and can even shorten the lifespan of your shower head. It's a gradual degradation that many homeowners mistake for general plumbing issues, but the solution is often surprisingly simple and inexpensive.
How It Works
Hard water is water with a high concentration of dissolved minerals, predominantly calcium carbonate and magnesium. As water flows through your shower head and evaporates, these minerals are left behind, forming stubborn, crusty deposits known as limescale. This limescale adheres to the interior surfaces and, crucially, clogs the tiny orifices through which water is meant to spray. Imagine dozens of miniature dams forming within your shower head, each one impeding the free flow of water.
White vinegar, at roughly 5% acetic acid, is a mild acid that reacts chemically with the alkaline mineral deposits. The acetic acid works to dissolve the bonds holding the limescale together. When the shower head is submerged, the vinegar penetrates the mineral layers, slowly breaking them down into a soluble form that can then be easily rinsed away. This chemical reaction is the key to restoring your shower head's original performance, clearing both visible and invisible blockages without harsh scrubbing or specialized tools. The longer the contact time and the stronger the vinegar solution (though standard white vinegar is usually sufficient), the more effective the dissolution process will be. Heat can also accelerate this reaction, which is why slightly warm vinegar can sometimes yield faster results, though cold vinegar still works effectively given enough time.
Step-by-Step Fix
1. Gather Your Supplies — Before you begin, ensure you have all necessary items within reach. This makes the process smoother and prevents interruptions.
- Locate a sturdy plastic bag (a bread bag or a gallon-sized freezer bag works well).
- Ensure you have a rubber band, zip tie, or string to secure the bag around the shower head.
- Have at least one cup of white distilled vinegar ready.
- A soft brush (like an old toothbrush) or a microfiber cloth will be useful for a final clean.
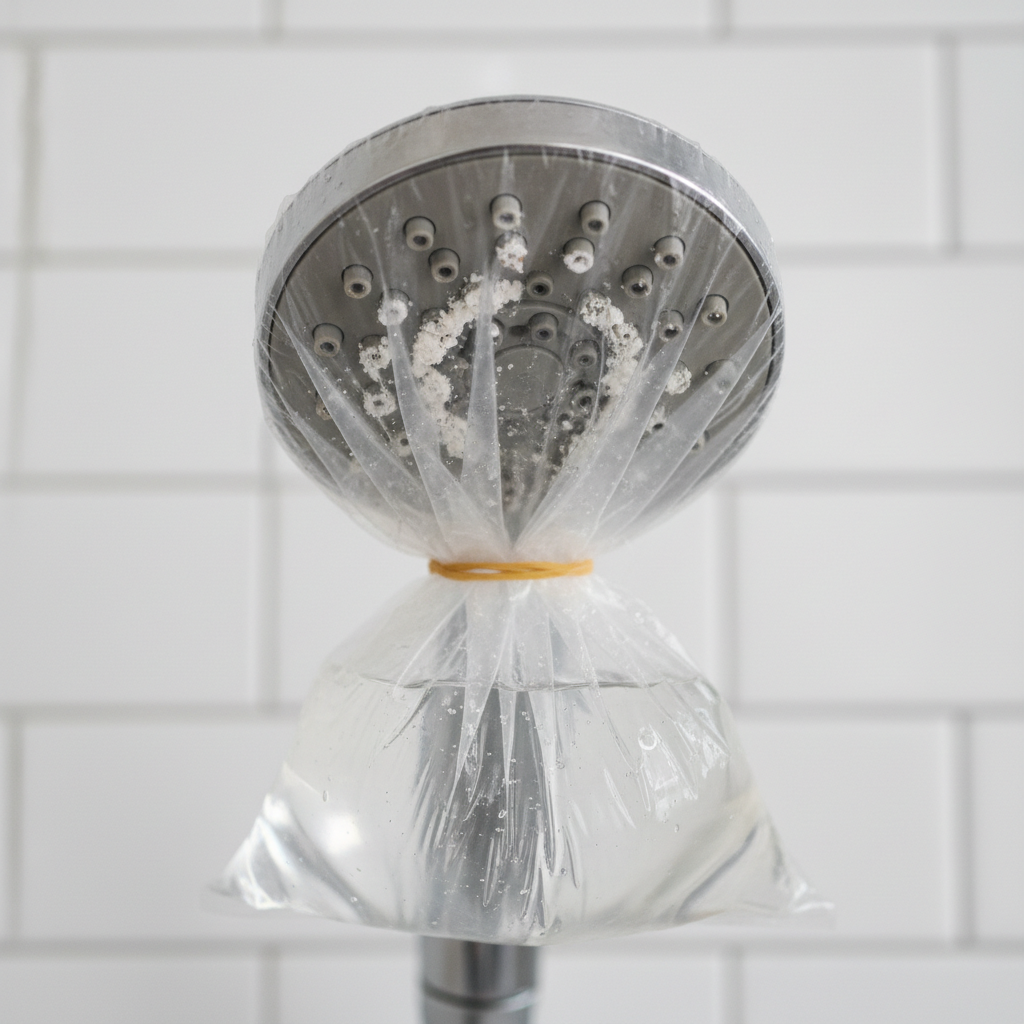
2. Position the Bag — Carefully secure the bag around your shower head, making sure it can hold liquid without spilling.
- Place the plastic bag around the shower head so that the entire head, especially the spray nozzles, will be submerged when filled.
- Use a rubber band, zip tie, or string to cinch the top of the bag tightly around the neck of the shower head. It needs to be snug enough to prevent leaks.
3. Add the Vinegar — Pour enough white vinegar into the bag to fully submerge the mineral-crusted parts.
- Slowly pour undiluted white distilled vinegar into the secured bag until the most affected areas of the shower head are completely immersed.
- Safety Note: While vinegar is generally safe, avoid splashing it into your eyes. If you have sensitive skin, wearing gloves is a good precaution.
4. Let it Soak — Allow ample time for the acetic acid to break down the mineral deposits.
- For moderate buildup, let the shower head soak for at least 1 hour.
- For severe blockages or very hard water areas, you can let it soak for 3-4 hours, or even overnight (up to 8 hours) if undisturbed.
- Avoid leaving it for days, as prolonged acidic exposure isn't ideal for all finishes, though it's generally safe for common chrome or plastic fixtures.
5. Remove the Bag — Carefully take down the bag and dispose of the vinegar solution.
- After the soaking period, carefully remove the rubber band or tie.
- Slowly lower the bag, allowing the vinegar solution to drain into the tub or shower pan. Discard the spent vinegar.
6. Scrub Away Residue — Address any remaining stubborn deposits with a gentle scrub.
- With the shower head now exposed, use an old toothbrush or a microfiber cloth to gently scrub away any softened mineral deposits that remain around the nozzles or on the faceplate.
- For very stubborn spots, a toothpick or a small pin can be used with extreme caution to carefully clear individual clogged holes. Do NOT use metal tools on delicate finishes.
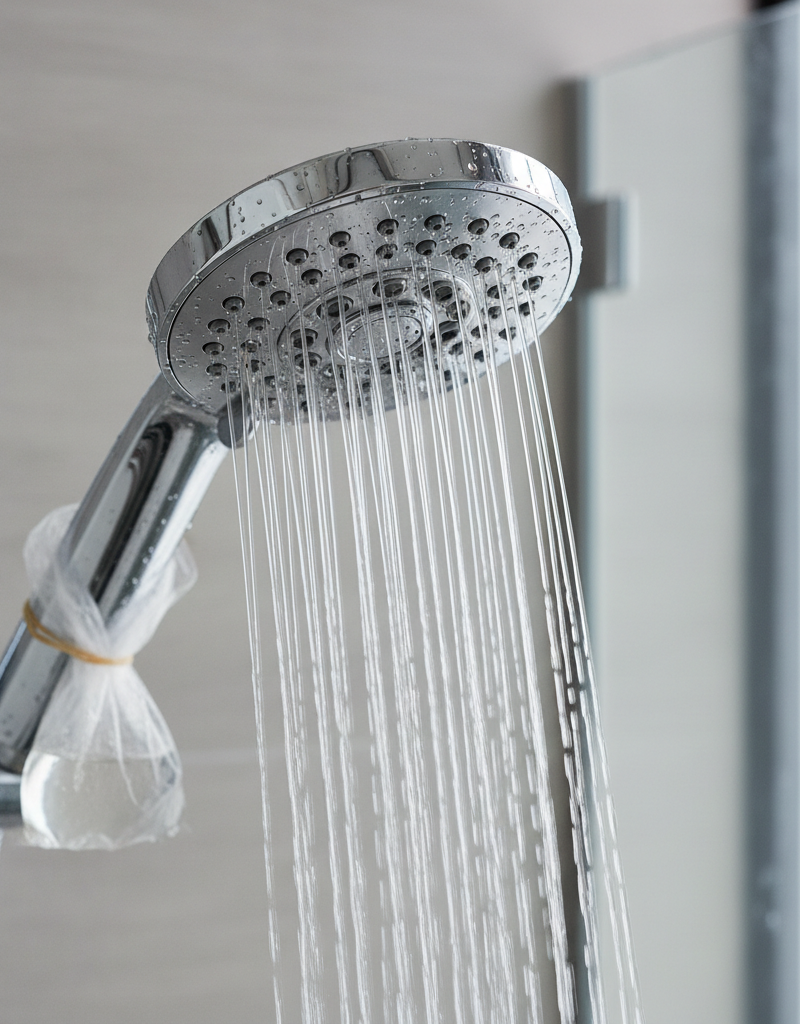
7. Flush the System — Rinse the shower head thoroughly to clear out loosened debris.
- Turn on the hot water and let it run through the shower head at full pressure for several minutes. This flushes out any internal debris dislodged by the vinegar.
- Observe the spray pattern; it should be significantly improved with a more consistent flow.
8. Dry and Inspect — Give your shower head a final wipe-down and check for optimal performance.
- Wipe down the shower head with a clean cloth to prevent new water spots.
- If the issue persists, consider repeating the soaking process for a longer duration, as some buildup can be very tenacious. However, if pressure is still low or inconsistent across all fixtures, the problem might lie deeper in your plumbing system, requiring professional assessment.
Common Causes
- Hard Water: This is by far the most significant cause. Water with a high concentration of dissolved minerals (calcium and magnesium) leaves behind scale deposits as it evaporates. These deposits accumulate in and around the shower head nozzles, progressively reducing water flow and distorting the spray pattern.
- Infrequent Cleaning: Neglecting regular cleaning allows mineral buildup to harden and become more extensive over time. A quick wipe-down every few weeks can prevent severe blockages.
- High Water Temperature: Hot water tends to accelerate the precipitation of minerals from hard water, potentially leading to faster scaling in shower heads that are frequently exposed to very hot water.
- Old Plumbing: While the shower head itself might be the primary issue, older homes with galvanized steel pipes can experience internal corrosion and scale buildup within the pipes, which can then break off and contribute to shower head blockages. This is less common but worth noting.
- Low-Quality Shower Heads: Some cheaper shower heads use materials or designs that are more susceptible to mineral adhesion and clogging, or have very small orifices that clog more easily.
Common Mistakes
- Using Abrasive Cleaners or Tools: Harsh chemical cleaners, steel wool, or metal picks can scratch and damage the finish of your shower head, making it more prone to future mineral adhesion and corrosion. Stick to vinegar and soft brushes.
- Not Soaking Long Enough: Rushing the process means the vinegar doesn't have adequate time to fully dissolve stubborn mineral deposits. Patience is key; a longer soak often yields better results, especially for severe buildup.
- Ignoring the Problem: Allowing mineral buildup to persist not only reduces shower performance but can also lead to more serious issues like internal damage to the shower head or even back pressure affecting other fixtures over time. Address it early!
- Disassembling a Non-Removable Head: Many modern shower heads are not designed for disassembly by homeowners. Attempting to force them apart can damage seals and internal components, leading to leaks or complete failure. The bag-and-vinegar method is designed specifically for these types.
- Assuming it's a Plumbing Issue: While whole-house water pressure problems can exist, a localized issue with a single shower head almost always points to mineral buildup. Don't immediately jump to expensive plumbing diagnostics before trying a simple vinegar soak.
Cost & Time Breakdown
| Task | DIY cost | Pro cost | Time |
|---|---|---|---|
| Gather supplies & setup | $2-$5 | N/A | 5-10 minutes |
| Vinegar soak | $0 | N/A | 1-8 hours |
| Scrub & flush | $0 | N/A | 10-15 minutes |
| Repeat soak (if needed) | $0 | N/A | 1-8 hours |
| New shower head (if necessary) | $20-$100 | N/A | 10-20 minutes |
Tips & Prevention
- Regular Wipes: After each shower, quickly wipe down the shower head with a dry cloth or towel. This removes much of the standing water and prevents new mineral deposits from forming.
- Monthly Mini-Soak: For homes with very hard water, consider a shorter, 30-minute vinegar soak once a month to prevent significant buildup from accumulating.
- Install a Water Softener: The most effective long-term solution for hard water issues throughout your home, including shower heads, is installing a water softening system. This removes minerals before they even reach your fixtures.
- Consider a Filtering Shower Head: Some shower heads come with integrated filters designed to reduce mineral content, though these filters require periodic replacement.
- Check for Leaks: A constantly dripping shower head allows minerals to accumulate more rapidly. Address any drips promptly to extend the life of your fixtures and prevent buildup.
- Understand Your Water: Knowing your home's water hardness level (you can get a test kit) can help you anticipate and proactively manage mineral buildup.
When to Call a Professional
While a vinegar soak is incredibly effective for most clogged shower heads, there are instances when professional help is warranted. If, after thorough cleaning and flushing, your shower still exhibits consistently low water pressure across all fixtures in your bathroom or home, the problem likely extends beyond the shower head itself. This could indicate a blockage in the pipes, a malfunctioning pressure regulator, or an issue with your main water supply line. Additionally, if you notice significant rust-colored water, banging noises in your pipes, or persistent leaks from the shower arm or wall, these are signs of deeper plumbing problems that a licensed plumber should diagnose and repair. Do not attempt to open walls or cut pipes yourself if you suspect these more complex issues; call a professional to avoid costly damage and ensure proper repair.
Related Articles
Keep troubleshooting with these hand-picked guides from FixlyGuide:
- The Secret to Lush Raised Beds? It's Not Just About How You Water — Smart irrigation for raised garden beds isn't just about automation; it's about delivering the right amount of water precisely when your pl…
- The Hidden Reason Your GFCI Trips (It's Not Always a Faulty Outlet) — A continuously tripping GFCI outlet is a critical safety warning, often indicating moisture, a faulty appliance, or a wiring problem that r…
- The 5-Minute Trick to Vacation-Proof Your Garden (Before You Leave Town) — Prevent your garden from wilting while you're away with simple, proactive steps that ensure lush growth and minimal fuss upon your return.
- The Hidden Reason Your AC Isn't Cooling (And Why Most Homeowners Get It Wrong) — Is your central AC blowing warm air or struggling to cool your home? The culprit is often a silent but serious issue many homeowners overlo…
- The 6 Cleaning Secrets Hiding in Your Power Drill (Plus Attachments to Master) — Your power drill isn't just for DIY projects; with the right attachments, it's a powerful and efficient cleaning tool for tackling tough gr…
- The 5-Minute Trick to Restore Your Kitchen Sink Sprayer's Lost Pressure — Restore your kitchen sink sprayer's low pressure with a quick, simple trick that often takes less than five minutes and requires no special…
This article was independently written by FixlyGuide based on the source topic.
Frequently asked questions
How often should I clean my shower head?+
For homes with hard water, cleaning your shower head every 1 to 3 months is ideal. If you have soft water, every 6 months to a year should suffice to prevent significant mineral buildup and maintain optimal flow.
Can I use any type of vinegar?+
White distilled vinegar is highly recommended due to its ideal acidity (around 5% acetic acid) and lack of dyes or other additives that could stain your fixtures. Other vinegars, like apple cider vinegar, might work but are less effective and could leave residue.
What if vinegar doesn't work?+
If a thorough vinegar soak doesn't restore your shower head's performance, the problem might be more complex. This could indicate severe internal pipe corrosion, a faulty pressure balancing valve, or an issue with your home's main water pressure. In such cases, it's best to consult a licensed plumber.
Is it safe to leave a shower head in vinegar overnight?+
Yes, for most chrome-plated or plastic shower heads, leaving it to soak in white vinegar overnight (up to 8 hours) is generally safe and highly effective for dissolving stubborn mineral buildup. Avoid prolonged soaking for days, as highly acidic conditions can potentially affect some delicate finishes over time.

Discussion
Loading comments…