
Tools & materials you'll need
Affiliate links- AmazonHeavy-Duty Toggle BoltsSnaptoggles or similar, rated for high loads
As an Amazon Associate FixlyGuide earns from qualifying purchases — at no extra cost to you. Prices and availability are accurate as of publication and subject to change.
Quick Answer
Installing floating shelves into drywall can be tricky because drywall alone isn't strong enough to support significant weight. The quick answer to a secure installation is identifying and utilizing wall studs whenever possible. When studs aren't available at your desired location, you must use heavy-duty, toggle-style drywall anchors rated for the combined weight of your shelf and its intended contents. Simply screwing into drywall or using inadequate anchors will almost certainly lead to sagging shelves, damaged walls, or even dangerous collapses.
The Problem
Floating shelves offer a sleek, minimalist look, but their installation presents a unique challenge, especially in rooms with only drywall construction. The core problem lies in the cantilevered design of floating shelves: the weight of the shelf and anything placed on it creates a strong downward force and rotational leverage on the mounting hardware. Standard drywall is a relatively soft material, made of gypsum plaster pressed between two sheets of paper. It has excellent compressive strength (pushing in) but very poor tensile strength (pulling out) and shear strength (tearing along a plane). This means that a screw driven directly into drywall will easily pull out under the stress of a floating shelf, leading to loosened hardware, crumbling drywall around the mounting points, unsightly cracks, and potentially a collapsed shelf that can damage belongings or even injure someone.
Homeowners frequently underestimate the forces at play or overestimate the capabilities of standard drywall anchors, resulting in shelves that quickly sag, tilt, or pull away from the wall. The frustration of multiple attempts, patching holes, and the fear of a costly repair (or even injury) is a common pain point.
How It Works
To understand a secure installation, it's essential to grasp how different mounting methods interact with drywall and wall studs. In most modern homes, walls are framed with vertical lumber (studs) typically spaced 16 or 24 inches on center, covered by drywall. These studs provide a solid wood core for screws to bite into, offering superior holding power. When you screw into a stud, the threads of the screw grip the wood fibers, and the shear strength of the screw itself becomes the primary factor in its load capacity.
When a stud isn't accessible, you must rely on drywall anchors. These anchors work by distributing the load over a larger area of the drywall or by creating a strong brace behind the drywall. There are several types:
- Expansion Anchors: These include plastic conical anchors or self-drilling metal anchors. They expand as a screw is driven into them, creating friction and a small amount of outward pressure against the drywall. They are generally suitable only for very light loads (up to 10-20 lbs) and are often insufficient for floating shelves due to the leverage.
- Toggle Anchors (Toggle Bolts/Snaptoggles): These are the workhorses for heavy loads in drywall. They consist of a bolt and a wing or channel that collapses to go through a pre-drilled hole, then springs open behind the drywall. When tightened, the wing/channel presses firmly against the back surface of the drywall, significantly distributing the load and preventing pull-through. They can often hold 50-100+ pounds per anchor, depending on the specific model and drywall thickness.
- Molly Bolts (Sleeve Anchors): Similar to toggle bolts, these have a metal sleeve that expands behind the drywall as a screw is tightened, creating a flange that clamps onto the back of the drywall. They are good for moderate to heavy loads but generally less strong than toggle bolts.
Floating shelves themselves typically mount using one of two common systems: a hidden metal bracket with rods that slide into corresponding holes in the back of the shelf, or a French cleat system where two interlocking wood or metal pieces (one on the wall, one on the shelf) securely join together. Both systems require extremely robust wall mounting points to counteract the significant leverage created by the shelf's depth.
Step-by-Step Fix
Always begin with safety. Wear safety glasses, especially when drilling. Make sure you know if there are any electrical wires or pipes behind the wall before drilling by carefully using a stud finder with a wire detection feature.
1. Plan Your Shelf Placement Clearly
— Determine the exact height and horizontal position for your floating shelf. Use a pencil and a level to lightly mark the top and bottom edges of where the shelf will sit on the wall. Consider what you'll be placing on the shelf so you can accurately estimate the total weight.
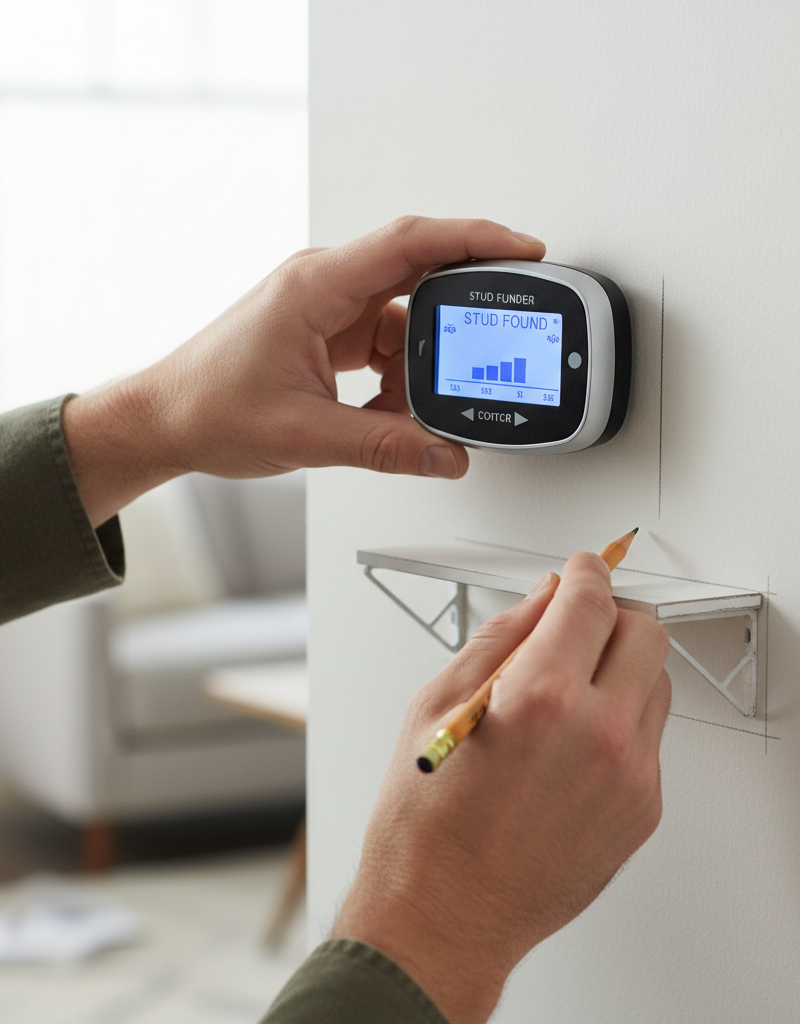
2. Locate Wall Studs (Your Best Bet)
— Use a reliable stud finder to scan the wall horizontally along your marked shelf line. Move the stud finder slowly across the wall. Mark the center of any studs you find with a pencil. Your goal is to align as many of the shelf's mounting points as possible with studs. Ideally, both ends of a longer shelf (or at least two strong points) should hit studs for maximum stability. * Pro Tip: Tap the wall. A hollow sound indicates drywall, a dull, solid sound suggests a stud. This isn't foolproof but can help confirm stud finder readings. * If no studs align: Don't despair, but prepare to use heavy-duty toggle-style drywall anchors.
3. Transfer Mounting Bracket Holes to the Wall
— Hold the shelf's mounting bracket (the part that attaches to the wall) against the wall at your desired location, ensuring it is perfectly level using a spirit or laser level. Use your pencil to mark the exact locations of all screw holes through the bracket onto the wall. Double-check that all marks are perfectly level and spaced correctly according to the bracket.
4. Drill Pilot Holes
— Based on whether you're hitting studs or using anchors: * For Studs: Select a drill bit slightly smaller than the diameter of your mounting screws. Drill pilot holes directly into the center of the marked stud locations. The pilot hole depth should be slightly less than the screw length. * For Heavy-Duty Toggle Anchors (e.g., Snaptoggles): Refer to the anchor manufacturer's instructions for the correct drill bit size. This is crucial – too small, and the anchor won't fit; too large, and it won't hold securely. Most toggle bolts require a larger hole (e.g., 1/2-inch or 5/8-inch) to accommodate the toggling mechanism. Drill these holes precisely at your marked spots. * Safety Note: When drilling, apply steady pressure. Be aware of what's behind the wall. Stop immediately if you hit unexpected resistance or hear a different sound.
5. Install Drywall Anchors (If Necessary)
— If you're using toggle anchors: * Push the toggling mechanism through the drilled hole until it springs open behind the drywall. Pull the plastic straps or bolt back towards you until the toggling mechanism is snug against the inside of the drywall. Slide the plastic collar/washer down the straps until it sits flush against the wall surface. Snap off the excess straps or tighten the bolt partially until the anchor is secure but can still accommodate your bracket. * Common Mistake: Forgetting to fully deploy the toggle or not pulling it snug against the back of the drywall. This will result in a weak connection.
6. Attach the Mounting Bracket to the Wall
— Position the shelf's mounting bracket over the pilot holes or installed anchors. Use the appropriate screws (wood screws for studs, machine screws for toggle anchors) and a drill/driver or screwdriver to firmly attach the bracket to the wall. Tighten securely, but do not overtighten, especially with drywall anchors, as this can strip the threads or damage the drywall. The bracket should be completely flush and immovably fixed to the wall. * If this doesn't work: If the screws spin or the bracket feels loose, you likely stripped a pilot hole in a stud or improperly installed an anchor. Remove the screws/anchors, patch the hole, and try again slightly offset or with a larger/different anchor.
7. Install the Floating Shelf
— Carefully slide the floating shelf onto the installed bracket. Many floating shelf designs will have set screws on the underside of the shelf near the wall to further secure it to the bracket rods. Use a small screwdriver to tighten these set screws, preventing the shelf from shifting or lifting off the bracket. * Check for level: Once installed, use your level one last time to confirm the shelf is perfectly horizontal.
8. Test the Shelf's Strength
— Before loading it with items, gently put some weight on the shelf by pressing down evenly across its surface. Observe if there's any noticeable give, creaking, or movement. Start with lighter items and gradually increase the load to ensure confidence in the installation.
Common Causes
- Underestimating Weight & Leverage: Homeowners often only consider the weight of the shelf itself, forgetting the weight of books, decor, or dishes. Floating shelves create significant leverage, meaning a small weight at the front of the shelf exerts a much larger pulling force on the wall anchors.
- Incorrect Anchor Selection: Using flimsy plastic anchors or even self-drilling metal anchors for substantial floating shelves. These are rarely strong enough to counteract the leverage.
- Failure to Locate Studs: Not bothering to use a stud finder or misinterpreting its readings, leading to all anchors being placed in drywall alone when a stud was available.
- Improper Anchor Installation: Not drilling the correct size pilot hole for an anchor, failing to fully engage a toggle bolt behind the drywall, or overtightening anchors until they strip the drywall.
- Skipping Pilot Holes: Driving screws directly into studs without pilot holes can split the wood, reducing holding power.
- Uneven Installation: An unlevel bracket puts uneven stress on the anchors, making one side bear more load and increasing the risk of failure.
Common Mistakes
- Mistake: Using plastic conical anchors for floating shelves.
- Instead: Always opt for heavy-duty toggle bolts (like Snaptoggles) or Molly bolts if you cannot hit a stud. These are designed for much higher loads and the rotational forces of floating shelves.
- Mistake: Relying on a cheap stud finder that gives inconsistent readings.
- Instead: Invest in a quality electronic stud finder. Double-check readings by scanning in both directions and across multiple points. Consider tapping the wall or drilling a tiny exploratory hole (easily patched) if you're unsure.
- Mistake: Ignoring the manufacturer's weight rating for anchors or the shelf itself.
- Instead: Always check the maximum weight capacity for your chosen anchors and the shelf. Assume the actual load will be higher than you initially think and choose anchors accordingly.
- Mistake: Overtightening screws or anchors, especially into drywall.
- Instead: Tighten until snug and secure, but stop immediately if you feel the screw stripping or the anchor starting to pull away from the wall. Overtightening can damage the drywall or the anchor's mechanism.
- Mistake: Not ensuring the mounting bracket is perfectly level before drilling.
- Instead: Use a long level (at least 24 inches for most shelves) to mark your line and double-check the bracket level before drilling any holes. An unlevel shelf is unsightly and puts undue stress on the mounting points.
- Mistake: Not securing the shelf to the bracket with set screws.
- Instead: Always locate and tighten any provided set screws on the underside of the shelf once it's mounted. This prevents the shelf from accidentally sliding off the bracket, which is a significant safety hazard.
Cost & Time Breakdown
| Task | DIY Cost | Pro Cost | Time |
|---|---|---|---|
| Basic Tools & Materials (stud finder, level, drill bits, pencil) | $30–$80 (one-time) | N/A | N/A |
| High-Quality Toggle Anchors (e.g., Snaptoggles, 4-6 pack) | $10–$25 | N/A | N/A |
| Floating Shelf (price varies widely) | $20–$200+ | N/A | N/A |
| Install 1-2 Floating Shelves (DIY) | $0–$25 (anchors) | $150–$300 (handyman) | 1–2 hours |
| Patching & Repainting Wall (due to mistakes) | $10–$30 (spackle, sandpaper, paint) | $75–$150 | 30 mins – 1 hour |
Tips & Prevention
- Always Overestimate Weight: When planning what to put on your shelf, round up your weight estimate significantly. What feels light can quickly add up, especially with books or ceramic dishes.
- Routinely Check for Wiggle: Every few months, gently jiggle your floating shelves. If you feel any movement or see new cracks around the mounting points, address it immediately by tightening screws or upgrading anchors before the problem escalates.
- Replace Worn Hardware: If you're reusing an old shelf or re-installing a shelf that previously failed, always use new, heavy-duty anchors. Old anchors can be compromised.
- Choose the Right Mounting System: When purchasing floating shelves, consider the mounting system. French cleats and robust hidden metal brackets with multiple attachment points offer superior stability compared to simpler methods.
- Install into Studs Whenever Possible: This is the golden rule. Take the time to adjust your shelf's placement slightly if it means hitting one or more studs. It will always be the most secure option.
- Warning Signs: Sagging, visible cracks in the drywall around the bracket, a wobbly shelf, or screws that feel loose are all immediate warning signs that your shelf is failing and needs intervention. Remove items from the shelf until it can be properly secured.
When to Call a Professional
While installing floating shelves can be a satisfying DIY project, there are definite instances when calling a professional is the smarter and safer choice. If you've attempted to install a shelf and experienced repeated failures, such as anchors pulling out, crumbling drywall, or a shelf that simply won't stay level, a professional handyman or carpenter can correctly diagnose the issue and ensure a secure installation. You should also call a pro if you're dealing with exceptionally heavy or long shelves (over 4 feet), trying to install into unusual wall materials (e.g., plaster and lath, concrete, or metal studs without the right tools), or if you require precise alignment of multiple shelves for a built-in look. Furthermore, if you're concerned about hitting electrical wires or plumbing behind your walls, especially in older homes where stud finders might be less reliable, a professional has the experience and advanced tools to identify hidden obstacles and ensure a safe, damage-free installation. They can prevent costly mistakes and provide peace of mind that your shelves are truly secure for years to come. Do not hesitate to call a professional if you feel out of your depth or if safety is a concern.
Related Articles
Keep troubleshooting with these hand-picked guides from FixlyGuide:
- The #1 Mistake Homeowners Make Installing Floating Shelves (and How to Fix It) — Discover the crucial error many DIYers make when mounting floating shelves into drywall and learn the simple steps to ensure a secure, sag-…
- The #1 Mistake Homeowners Make Installing Floating Shelves (and How to Fix It) — Discover the crucial mistake homeowners make installing floating shelves into drywall and learn the correct, secure method to prevent saggi…
- The #1 Mistake Homeowners Make Installing Floating Shelves (and How to Fix It) — Discover the most common error DIYers make when mounting floating shelves into drywall and how to ensure your shelves are sturdy and secure.
- The 3 Drywall Anchors That Will NEVER Fail Your Heavy Mirror (And 2 to Avoid) — Safely hanging a heavy mirror on drywall requires choosing the right anchors and proper installation to prevent frustrating falls and damag…
- The Giant Drywall Hole: 3 Hidden Mistakes That Make Fixing It Worse — Don’t just spackle over that huge drywall hole; learn the right way to repair it and avoid common mistakes that lead to an even bigger head…
- Is Your Gutter Sagging After Every Storm? The Hidden Flaw Most Homeowners Miss — Discover the overlooked reason your gutters sag after every storm and learn the lasting fix that most homeowners miss.
Recommended for DIYers & woodworkers
Sponsored
The Top 20 Tools for Workshops of Any Budget
No stationary machines or power tools required — plus 3 fundamental tools that can't be bought at any price.
Get the free guide
Ted's Woodworking — The #1 Woodworking Resource
Detailed instructions, dimensioned drawings, materials & cutting lists, and 3D schematics for every skill level.
See the plansSponsored: links above are affiliate links. FixlyGuide may earn a commission on qualifying purchases — at no extra cost to you.
Frequently asked questions
Can I install floating shelves into drywall without studs?+
Yes, but you must use heavy-duty toggle-style drywall anchors (like Snaptoggles or Molly bolts) rated for the combined weight of your shelf and its contents. Standard plastic anchors are usually insufficient due to the leverage created by floating shelves.
What kind of anchors should I use for heavy floating shelves in drywall?+
For heavy floating shelves, always use toggle bolts (e.g., Snaptoggles, butterfly anchors) or robust Molly bolts. These anchors distribute the weight over a larger area behind the drywall, providing significantly more holding power than simple expansion anchors.
How much weight can a floating shelf hold in drywall?+
The weight capacity depends entirely on the anchors used and the shelf's construction. A single heavy-duty toggle bolt can hold 50-100+ lbs in drywall. Always check the anchor manufacturer's rating and distribute weight across multiple, properly installed anchors, and never exceed the shelf's own weight limit.
How do I find studs in my wall for floating shelves?+
Use an electronic stud finder. Move it slowly horizontally across the wall at the desired shelf height. It will beep or light up when it detects a stud. Confirm by drilling a small exploratory hole or by lightly tapping the wall – a solid sound indicates a stud.
Why did my floating shelf pull out of the wall?+
Most likely, it pulled out because inadequate anchors were used for the weight and leverage of the shelf, anchors were improperly installed, or studs were missed. Drywall alone cannot hold a floating shelf's weight without proper heavy-duty anchoring.


Discussion
Loading comments…