Tools & materials you'll need
Affiliate linksAs an Amazon Associate FixlyGuide earns from qualifying purchases — at no extra cost to you. Prices and availability are accurate as of publication and subject to change.
Quick Answer
Lead-based paint is a significant hazard in many older homes, specifically those built before 1978. The danger isn't usually from intact paint, but from activities like sanding, scraping, drilling, or demolition that create lead-contaminated dust. This invisible dust can be inhaled or ingested, leading to serious health problems, particularly in young children and pregnant women. Always test for lead paint before disturbing painted surfaces in an older home, and then follow strict containment and cleanup protocols if lead is present.
The Problem
Imagine undertaking a seemingly harmless DIY project—sanding down an old window sill, scraping peeling paint from a doorframe, or even drilling into a wall to hang a shelf. For millions of homeowners, especially those living in houses built before 1978, these routine tasks could be unknowingly releasing a silent, invisible toxin: lead dust. This isn't theoretical; it's a very real and present danger. Lead-based paint was widely used in homes for its durability and vibrant colors until its ban for residential use in 1978. When this paint deteriorates or is disturbed, microscopic lead particles become airborne or settle on surfaces, creating a toxic environment.
The human body easily absorbs lead, and once it enters the system, it can affect nearly every organ and system. Children are particularly vulnerable because their developing nervous systems are more susceptible to lead's neurotoxic effects, which can result in learning disabilities, behavioral problems, and even reduced IQ. Adults can suffer from high blood pressure, joint and muscle pain, memory and concentration problems, and reproductive issues. The problem is exacerbated because lead dust is often invisible and odorless, making detection impossible without specialized testing. Many homeowners proceed with renovations, blissful in their ignorance, only to inadvertently contaminate their living spaces and put their families at risk. This article will illuminate the specific renovation activities that are most likely to unleash this hidden danger and provide the practical steps needed to protect your home and loved ones.
How It Works
Understanding how lead paint becomes a hazard requires a look into the material itself and how it breaks down. Lead, as a heavy metal, was incorporated into paint formulations primarily for three reasons: it made paint more durable, helped it dry faster, and produced richer, more vibrant colors. This made it a popular choice for both interior and exterior surfaces, including walls, trim, doors, windows, and even furniture.
When lead paint is intact and in good condition, it generally poses a low risk because the lead is encapsulated within the paint film. The danger emerges when this paint film is disturbed. Imagine the layers of paint on an old doorframe. Over decades, these layers might chip, peel, or become chalky. When you then sand, scrape, drill, or demolish these surfaces, you are effectively breaking down the paint matrix and releasing lead particles. These particles are often microscopic, far too small to see with the naked eye. A single paint chip the size of a postage stamp can contain enough lead to poison a child.
Once liberated, these tiny lead particles become airborne in the form of dust. This dust can then settle on floors, furniture, toys, and other household surfaces. Gravity pulls the larger particles down quickly, but the finest particles can remain suspended in the air for hours, making them easy to inhale. Children, with their hand-to-mouth behaviors, are especially prone to ingesting settled lead dust. They might crawl on a contaminated floor, then put their hands in their mouths, directly transferring lead. The dust can also be tracked throughout the house on shoes and clothing, spreading the contamination far beyond the initial work area. This process creates a continuous cycle of exposure if proper containment and cleaning are not implemented, making a seemingly small renovation task a long-term health threat.
Step-by-Step Fix
1. Identify the Risk Level — Before touching any painted surface in a pre-1978 home, assume lead paint is present. * Get a Lead Test Kit: Purchase EPA-recognized lead test kits from hardware stores. These typically involve swabbing the painted surface. Follow package directions carefully. False negatives can occur, so professional testing is always recommended for extensive renovations. * Professional Inspection: For larger projects or if you're unsure about DIY testing, hire an EPA-certified lead inspector. They use X-ray fluorescence (XRF) analyzers for non-destructive, highly accurate lead detection and can provide a detailed risk assessment.
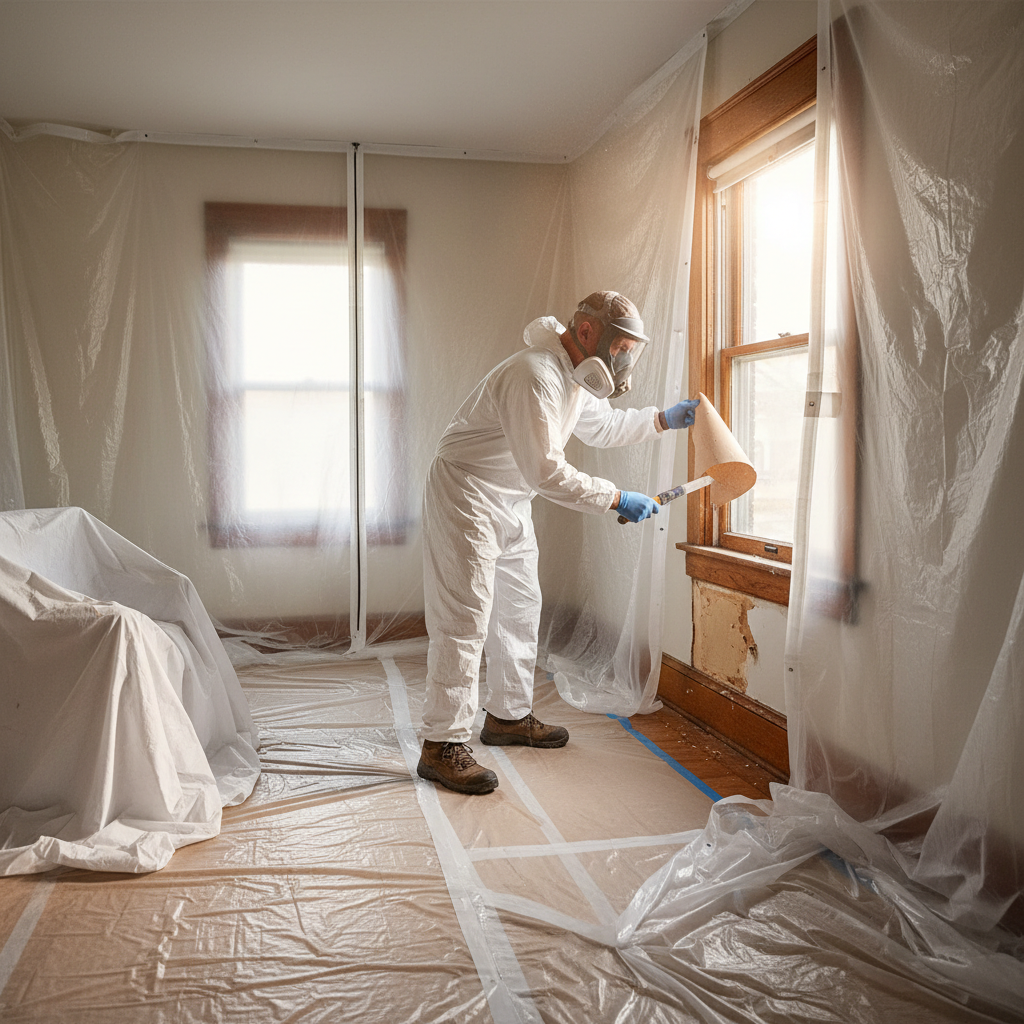
2. Prepare the Work Area for Containment — Isolate the work zone to prevent lead dust spread. * Clear the Room: Remove all furniture, curtains, rugs, and anything else that can absorb dust. For items that cannot be removed, cover them completely with two layers of 6-mil plastic sheeting, taped securely. * Seal Off: Use 6-mil plastic sheeting and painter's tape to seal all doors, windows, and HVAC vents leading out of the work area. This creates an airtight barrier. Turn off central HVAC systems to prevent dust circulation. * Floor Protection: Cover the entire floor of the work area with two layers of 6-mil plastic sheeting, extending up the walls by at least 6 inches. Tape all seams with strong duct tape.
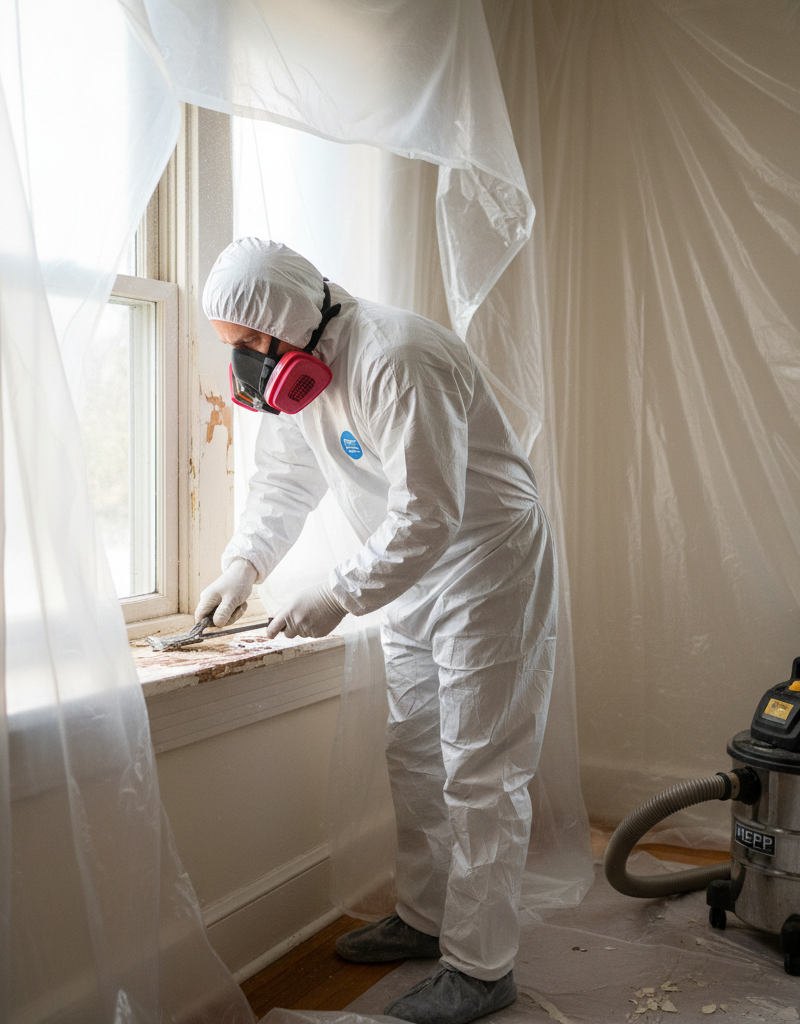
3. Gear Up for Safety — Protect yourself from inhaling or ingesting lead particles. * Respirator: Wear an N100 or P100 NIOSH-approved respirator. Dust masks are NOT sufficient. Ensure a tight seal by performing a user seal check. * Protective Clothing: Don disposable coveralls, shoe covers, safety glasses, and chemical-resistant gloves. Change out of these clothes before leaving the work area. * Hygiene: Do not eat, drink, or smoke in the work area. Keep children and pets completely out of the work zone.
4. Control Dust During Work — Minimize the creation of lead dust at the source. * Wet Methods: For scraping or sanding, mist the surface with water before disturbing it. This helps to bind the lead dust and prevent it from becoming airborne. Use a spray bottle and re-mist frequently. * Avoid High-Dust Tools: Never use power sanders, heat guns above 1100°F (which can vaporize lead), or open-flame torches on suspected lead paint. These tools generate excessive dust or fumes. * Specialized Tools: If power tools are necessary, use ones equipped with HEPA-filtered vacuum attachments to capture dust at the source. Still, exercise extreme caution.
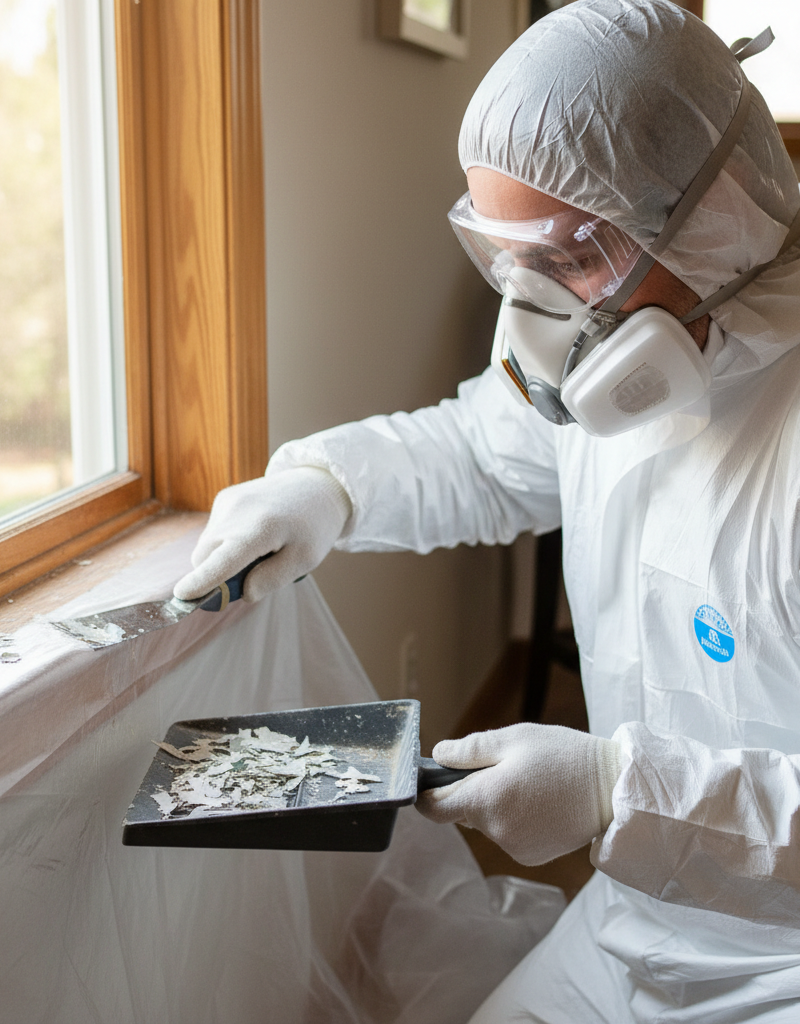
5. Capture Debris Carefully — Collect all paint chips and dust as you work. * Plastic Sheeting: Let paint chips and dust fall onto the protected floor sheeting. Do not sweep or dry-vacuum, as this will aerosolize lead particles. * HEPA Vacuum: Use an EPA-approved HEPA vacuum to clean up immediately after generating debris and throughout the project. Standard shop vacuums or household vacuums will just blow lead dust into the air. * Bagging: Carefully fold the plastic sheeting inward to contain debris, then seal it in heavy-duty plastic bags (e.g., 6-mil construction bags). Double-bag for extra security.
6. Thorough Initial Cleanup — Once the work is done, begin the multi-stage cleaning process. * Remove Sheeting: Carefully roll up the outermost layer of plastic sheeting from the floor and walls, folding soiled sides inward. Place it into a heavy-duty plastic bag and seal. * HEPA Vacuum Entire Area: Thoroughly vacuum all surfaces in the work area, including walls, ceilings, fixtures, and floors, using a HEPA vacuum. Pay close attention to corners and crevices. * Wet Wipe Surfaces: Use a solution of an all-purpose cleaner and warm water to wet-wipe all surfaces (walls, trim, exposed floors). Use disposable wipes or rags and dispose of them after each use or rinse in a separate bucket of water. Repeat this process twice.
7. Final Verification and Disposal — Ensure the area is truly clean and dispose of waste properly. * Repeat Wet Cleaning: After several days, repeat the wet-wiping process to catch any settled dust that may have been missed or became airborne again. * Waste Disposal: Lead-contaminated waste must be disposed of according to local, state, and federal regulations. Contact your local public works department or waste management facility for specific instructions. Do not simply put it in regular household trash. * Clearance Testing: For significant projects, consider hiring a lead professional for clearance testing. They will take dust wipe samples to ensure the area is truly clean and safe for re-occupancy.
Common Causes
- Age of Home: The most common cause is simply owning a home built before 1978. The older the home, the higher the likelihood of lead-based paint being present, particularly on original surfaces.
- Friction Surfaces: Windows and doors with lead-painted frames or sills are high-risk areas. The constant opening and closing, or rubbing of wood against wood, creates friction that grinds the paint into fine lead dust.
- Impact Surfaces: Door frames, baseboards, and stairs can suffer impacts from daily living, leading to chips, cracks, and the release of lead particles, especially in high-traffic areas.
- Exterior Paint: Peeling or chalking exterior lead paint on siding, porches, and fences is a source of lead, which can then be tracked inside the home or contaminate the soil around the foundation.
- Poor Renovation Practices: DIY renovations that involve dry scraping, power sanding, or demolition of painted surfaces without proper containment are the leading cause of lead dust release and spread within a home.
- Water Damage: Moisture can exacerbate paint deterioration, causing lead paint to peel, blister, and flake more rapidly, increasing the risk of dust and chip generation.
Common Mistakes
- Ignoring the Age of the Home: Assuming an older home doesn't have lead paint. Always test if your home was built before 1978; it's better to be safe than sorry.
- Using a Regular Vacuum: Household vacuums, even those with
Related Articles
Keep troubleshooting with these hand-picked guides from FixlyGuide:
- 7 Inspection Red Flags That Secretly Signal a $20,000 Bill — Don't let your dream home become a money pit. Many buyers and even some inspectors overlook subtle home inspection red flags that lead to f…
- The 12 Checks That Prevent 80% of Costly Home Repairs — Don't wait for a disaster. Our comprehensive monthly home maintenance checklist reveals the surprising, simple tasks that catch small issue…
- 7 Hidden Equity Drains Costing You Thousands Annually — Your home is an asset, but silent problems like minor leaks, poor insulation, and deferred maintenance can drain its value. Discover the se…
- The Surprising Trick to Cutting Your Dryer Bill By $100 Per Year — Installing a clothesline can significantly reduce your energy bills and add a fresh scent to your laundry. This guide covers how to choose…
- Is a Wall-Mounted Pressure Washer Right for Your Garage? The Unvarnished Truth — Discover if a wall-mounted pressure washer is the right cleaning solution for your home, offering a powerful and space-saving alternative t…
- The 7 Critical Home Inspection Mistakes Most Homeowners Make (and How to Spot Them) — Discover the crucial home inspection mistakes homeowners commonly overlook and learn how to identify potential problems before they become…
This article was independently written by FixlyGuide based on the source topic.
Frequently asked questions
What is the biggest danger with lead paint?+
The biggest danger with lead paint is the creation and spread of lead-contaminated dust. When lead paint is sanded, scraped, or otherwise disturbed, very fine particles of lead are released into the air and onto surfaces. This dust can be easily inhaled or ingested, particularly by children, leading to serious health problems.
How do I know if my house has lead paint?+
If your home was built before 1978, it likely contains lead-based paint. The most reliable way to confirm is to use an EPA-recognized lead test kit, available at hardware stores, or to hire a certified lead inspector for professional testing, especially before major renovations.
Can I remove lead paint myself?+
While minor, extremely controlled lead paint removal is possible for DIYers with strict adherence to safety protocols, it's generally not recommended for large areas or if you're not fully confident. Creating lead dust is a serious risk. For significant removal, especially if children or pregnant women are present, calling an EPA-certified lead abatement professional is the safest option.
What tools should I avoid when working with lead paint?+
Avoid any tools that create significant dust or high heat. This includes power sanders, heat guns operating above 1100°F, and open-flame torches. These tools aerosolize lead particles, making them extremely dangerous. Opt for wet scraping, chemical strippers, or hand sanding with HEPA vacuum attachments if necessary.

Discussion
Loading comments…