
Tools & materials you'll need
Affiliate links- AmazonLead Test Kits1-2 · to confirm presence of lead paint
- AmazonDisposable Coveralls1-2 sets
- AmazonDisposable Glovesmultiple pairs
- Amazon6-mil Plastic Sheeting1-2 rolls · heavy duty for containment
- AmazonPainter's Tape1-2 rolls · strong adhesive
- AmazonHeavy Duty Plastic Bagsmultiple · for waste disposal
As an Amazon Associate FixlyGuide earns from qualifying purchases — at no extra cost to you. Prices and availability are accurate as of publication and subject to change.
Quick Answer
If your home was constructed before 1978, there's a high probability that some of its painted surfaces contain lead-based paint. The danger isn't typically intact paint, but rather the creation of lead-contaminated dust when this paint is disturbed by activities like sanding, scraping, drilling, or demolition. Preventing the spread of this invisible dust, protecting yourself and your family, and ensuring proper cleanup are paramount to safely renovating an older home.
The Problem
You're excited about that renovation project – perhaps updating a dated kitchen or opening up a wall to create an open-concept living space. But if your home predates 1978, there's an unseen danger lurking beneath those layers of paint: lead. Lead is a potent neurotoxin, particularly harmful to young children and pregnant women, but dangerous for everyone. When lead paint is disturbed during renovation activities, it releases microscopic dust particles into the air. This lead dust can settle on surfaces, be inhaled, or ingested, leading to a host of serious health problems including developmental delays in children, learning disabilities, behavioral issues, kidney damage, and even nervous system damage. The problem isn't always obvious; lead dust is often invisible, making proper precautions and testing absolutely critical to ensure your renovation doesn't inadvertently harm your family's health, now or for years to come.
How It Works
Lead-based paint was commonly used in homes for its durability and vibrant colors until it was banned for residential use in 1978. When this paint is intact and in good condition, it generally poses a low risk. The hazard escalates dramatically when the paint is chipped, peeling, or, more importantly, when it is disturbed through activities that generate dust or fumes. Think about sanding a door frame, scraping old paint from a window sill, drilling into a wall, or even vigorous cleaning of painted surfaces. Each of these actions can release lead particles into the air. These particles are incredibly fine, often invisible to the naked eye, and can remain airborne for hours, then settle on floors, carpets, furniture, and toys. Once settled, they can be easily re-aerosolized by walking through a room or opening a window. Children are especially vulnerable because they frequently put their hands in their mouths after touching contaminated surfaces, and their developing bodies absorb lead more readily than adults. Lead abatement involves isolating the work area, using high-efficiency particulate air (HEPA) filters for vacuuming, and carefully sealing and disposing of all contaminated materials to prevent lead from spreading throughout your home and into the environment.
Step-by-Step Fix
1. Test Before You Start – Don't assume, know. Before any renovation work, test suspect surfaces for lead paint. Lead test kits are available at most hardware stores and provide a quick indication. For more accurate results, consider professional lead testing. This step is crucial for planning your safety measures.
- If your home was built before 1978, assume lead paint is present until proven otherwise.
2. Prepare and Contain the Work Area – Create a sealed environment. Isolate the work area to prevent dust from spreading. This means closing off the room from the rest of the house. Remove all furniture, curtains, rugs, and anything else movable. If items cannot be removed, cover them completely with 6-mil plastic sheeting and seal seams with painter's tape. Turn off forced-air heating and air conditioning systems to prevent dust circulation. Cover air vents and returns with plastic and tape. Lay down heavy-duty plastic sheeting (at least 6-mil) on the floor, extending at least two feet beyond the work area in all directions. Overlap seams and tape them securely.
- Use two layers of plastic on the floor for extra protection against tears.
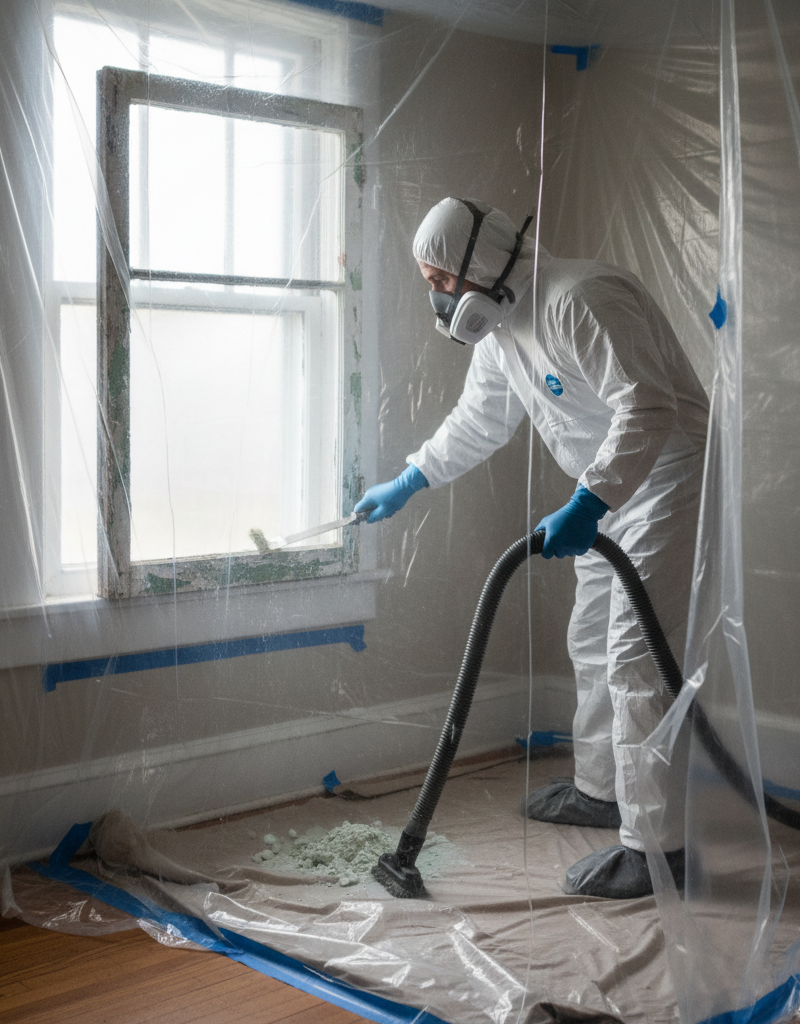
3. Don Your Personal Protective Equipment (PPE) – Protect yourself from inhalation and contact. Before starting any work, put on your PPE. This includes a fit-tested N100 or P100 respirator, disposable coveralls, disposable shoe covers, and safety glasses or goggles. Disposable gloves are also essential. Ensure your respirator fits snugly to create a seal against your face.
- Never use a basic dust mask; it won't filter lead particles.
- Consider a full-face respirator for enhanced protection.
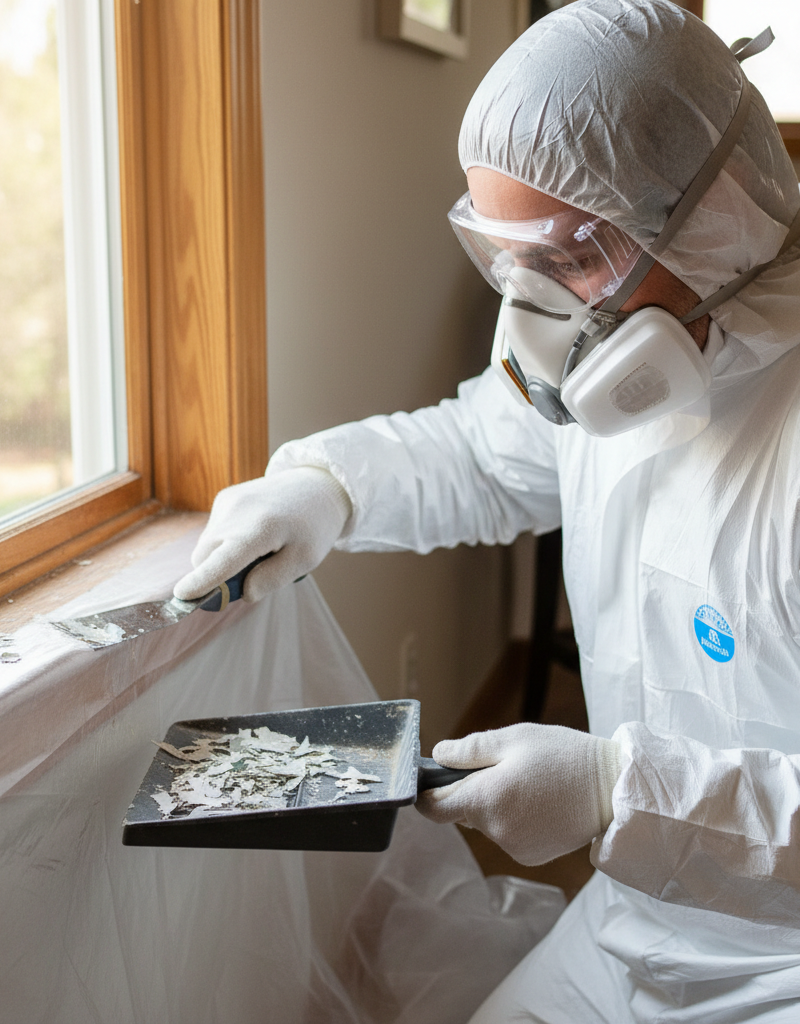
4. Use Lead-Safe Work Practices – Minimize dust generation. Avoid power sanding, grinding, or using heat guns at high temperatures, as these methods create significant lead dust and fumes. Instead, opt for wet sanding, wet scraping, or chemical strippers designed for lead paint. When drilling, use a shroud and HEPA vacuum attachment. If you must use power tools, ensure they have HEPA-filtered dust collection systems. Keep surfaces moist with water in a spray bottle to suppress dust.
- Collect paint chips and debris in heavy-duty plastic bags immediately.
5. Clean As You Go (and Thoroughly Afterward) – Don't leave lead behind. Periodically clean the work area during your project using a HEPA-filtered vacuum cleaner. Ordinary vacuums will just spread the lead dust. After completing the work, thoroughly clean all surfaces. First, pre-clean with wet disposable cloths to collect larger debris. Then, use a lead-specific cleaner or a mixture of trisodium phosphate (TSP) and water, along with new disposable cloths, to wipe down all surfaces from top to bottom. Repeat this wiping process several times with fresh cloths. Vacuum all surfaces, including walls and ceilings, with a HEPA vacuum. Dispose of all used cloths, plastic sheeting, and PPE in heavy-duty plastic bags, sealed and labeled as lead waste.
- Never dry sweep or use a regular vacuum, as this will spread lead dust.
- Double-bag all waste and consult your local waste management for proper disposal of lead-contaminated materials.
6. Inspect and Re-Clean – Ensure no residue remains. After the initial thorough cleaning, let the area sit for a day or two. Then, inspect for any visible dust or debris. If found, repeat the HEPA vacuuming and wet wiping process. Consider purchasing lead test kits to swab surfaces to ensure they are clean. A professional lead dust clearance test by a certified inspector offers the highest assurance.
- Don't rush this step; residual lead dust is a major hazard.
Common Causes
The primary cause of lead paint hazards in homes is the natural aging and deterioration of lead-based paint, particularly in high-friction or high-impact areas. Windows and doors are prime culprits, as the friction of opening and closing can create lead dust. Impact areas like doorframes, baseboards, and stairs also commonly show wear. However, the most significant cause of new lead hazards during renovations is inadequate preparation and unsafe work practices by homeowners or contractors. Ignoring the presence of lead, failing to contain the work area, using dust-generating tools without proper collection, and improper cleanup methods are all critical errors that turn a contained issue into a widespread contamination. Even seemingly minor projects, like installing a new shelf or patching a wall, can pose a risk if lead paint is disturbed without precautions.
Common Mistakes
- Assuming no lead paint: Not testing old homes (pre-1978) for lead paint, leading to work without proper precautions.
- Using standard dust masks: Relying on regular dust masks instead of N100 or P100 respirators, which don't filter microscopic lead particles effectively.
- Dry sanding/scraping: Using power sanders or dry scraping which create large amounts of invisible, airborne lead dust.
- Ignoring containment: Failing to properly seal off the work area, allowing lead dust to spread throughout the house.
- Using a regular vacuum cleaner: Standard vacuums don't trap lead particles and instead exhaust them back into the air, spreading contamination.
- Improper disposal: Not double-bagging and sealing lead-contaminated waste or disposing of it in regular household trash, leading to environmental contamination.
Cost & Time Breakdown
| Task | DIY Cost | Pro Cost | Time |
|---|---|---|---|
| Lead Test Kits | $20–$50 | $200–$600 | 15 mins |
| PPE (Respirator, Coveralls, Gloves) | $50–$100 | N/A | N/A |
| Plastic Sheeting & Tape | $30–$70 | N/A | 1–2 hours |
| HEPA Vacuum Rental | $40–$70/day | N/A | N/A |
| Lead-Safe Cleaners | $20–$40 | N/A | N/A |
| Professional Risk Assessment | N/A | $300–$800 | 1–3 hours |
| Professional Abatement Services | N/A | $2,000–$20,000+ | Days to weeks |
Tips & Prevention
- Regular Inspections: Periodically check painted surfaces, especially windows, doors, and areas with friction, for chipping or peeling paint. Address issues promptly and safely.
- Lead-Safe Maintenance: If you live in an older home, assume lead paint is present. When performing even minor repairs, use wet methods, contain the area, and clean thoroughly.
- Educate Occupants: Inform all household members, particularly those involved in DIY projects, about the dangers of lead and proper safety protocols.
- Professional Testing: Before major renovations, invest in professional lead testing to identify specific hazards and create a targeted plan.
- Encapsulation: For intact lead paint, consider encapsulation (covering it with a new, durable coating or material) as a safer alternative to removal, provided the underlying surface is sound.
- Handwashing: Encourage frequent handwashing for everyone, especially children, to reduce involuntary lead ingestion from contaminated surfaces.
When to Call a Professional
While many homeowners can manage small-scale, non-intrusive lead paint repairs with extreme caution, there are definite instances where calling a licensed lead abatement professional is not just recommended, but essential. If a renovation project involves extensive removal of lead paint, particularly in high-friction areas like windows and doors, or demolition of painted components, the risk of widespread contamination is too high for DIY. Signs such as large areas of deteriorated lead paint (more than a few square feet), concerns about lead contamination in soil, or if you have young children or pregnant individuals in the home, warrant professional intervention. A certified lead abatement contractor has the specialized training, equipment, and protocols to safely contain, remove, and dispose of lead-based paint, ensuring your home is truly safe. They can also perform lead clearance testing to confirm the area is free of hazardous lead dust after the work is complete, providing peace of mind that no invisible dust remains lurking in your home.
Related Articles
Keep troubleshooting with these hand-picked guides from FixlyGuide:
- 7 Inspection Red Flags That Secretly Signal a $20,000 Bill — Don't let your dream home become a money pit. Many buyers and even some inspectors overlook subtle home inspection red flags that lead to f…
- 7 Hidden Equity Drains Costing You Thousands Annually — Your home is an asset, but silent problems like minor leaks, poor insulation, and deferred maintenance can drain its value. Discover the se…
- The 12 Checks That Prevent 80% of Costly Home Repairs — Don't wait for a disaster. Our comprehensive monthly home maintenance checklist reveals the surprising, simple tasks that catch small issue…
- The Surprising Trick to Cutting Your Dryer Bill By $100 Per Year — Installing a clothesline can significantly reduce your energy bills and add a fresh scent to your laundry. This guide covers how to choose…
- Is a Wall-Mounted Pressure Washer Right for Your Garage? The Unvarnished Truth — Discover if a wall-mounted pressure washer is the right cleaning solution for your home, offering a powerful and space-saving alternative t…
- What's That Burning Dust Smell When Your Heat Kicks On? The HVAC Secret — That weird smell when your furnace starts isn't always serious, but understanding its cause can prevent bigger issues and improve home air…
This article was independently written by FixlyGuide based on the source topic.
Frequently asked questions
How do I know if my home has lead paint?+
If your home was built before 1978, assume lead paint is present. You can purchase lead test kits at hardware stores for a quick check, or hire a certified lead inspector for more accurate results.
What are the most dangerous activities for lead paint?+
Activities that create dust or fumes are most dangerous, including dry sanding, scraping, grinding, using heat guns, or demolition of painted surfaces. Wet methods are generally safer as they suppress dust.
Can I use a regular vacuum cleaner for lead dust?+
No. Regular vacuum cleaners do not trap microscopic lead particles and will instead spread them into the air. Always use a HEPA-filtered vacuum specifically designed for lead dust cleanup.
What protective gear do I need for lead paint work?+
You need a fit-tested N100 or P100 respirator, disposable coveralls, disposable shoe covers, safety glasses or goggles, and disposable gloves. A basic dust mask is NOT sufficient.
When should I call a professional for lead paint?+
Call a licensed lead abatement professional for extensive lead paint removal, demolition of painted components, if large areas of paint are deteriorating, if soil contamination is suspected, or if young children or pregnant individuals are in the home.

Discussion
Loading comments…