Tools & materials you'll need
Affiliate links- AmazonAdjustable crescent wrenchFor stubborn valves or hose bibs
- AmazonWater pressure gaugeScrew-on type for hose bibs
- AmazonBucket or large bowlFor draining water if cleaning aerators
- AmazonSlotted screwdriverFor some aerators or PRV adjustments
- AmazonOld toothbrush or small brushFor cleaning aerator screens
- AmazonGarden hoseFor draining water heater
As an Amazon Associate FixlyGuide earns from qualifying purchases — at no extra cost to you. Prices and availability are accurate as of publication and subject to change.
Quick Answer
Experiencing low water pressure throughout your entire home can be incredibly frustrating, making everything from showering to washing dishes a chore. While it's easy to assume the problem lies with your municipal water supply, the most frequent, and often overlooked, culprit is a partially closed main water shut-off valve. This can happen accidentally after a repair or routine maintenance. A simple check and adjustment of this valve can frequently resolve the issue. If the main valve isn't the problem, your pressure reducing valve (PRV) or mineral buildup in your pipes and fixtures could be to blame.
The Problem
You're trying to rinse shampoo out of your hair, but the shower barely dribbles. The washing machine takes an eternity to fill, and even the kitchen faucet is weak. When low water pressure affects every faucet and appliance in your house, it signals a systemic issue within your home's plumbing system, not an isolated fixture problem. This widespread reduction in flow can significantly impact daily life, hinting at a bottleneck in the main water supply entering your home or a failing component designed to manage that pressure.
How It Works
Your home's water pressure begins with the municipal supply line (or well pump), which delivers water to your property. Before entering your house, this water typically passes through your main outdoor shut-off valve (usually near your water meter) and then directly to your main indoor shut-off valve. From there, it often goes through a pressure reducing valve (PRV), which is a bell-shaped device designed to lower and regulate the incoming high street pressure to a safe, constant level (typically 50-70 PSI) for your home's plumbing. Without a PRV, high street pressure could damage your internal pipes and fixtures. After the PRV, the water branches off, supplying your cold water lines and flowing into your water heater for the hot water supply. Each fixture, from a toilet to a showerhead, has its own internal mechanisms that control flow, but the overall pressure originates from this main supply system. Any restriction or malfunction at the primary points—the main shut-off valves, the PRV, or the main supply lines—will affect your entire home's water pressure. Mineral deposits, particularly in older galvanized pipes or within the water heater itself, can also gradually reduce the internal diameter of pipes, choking off water flow over time.
Step-by-Step Fix
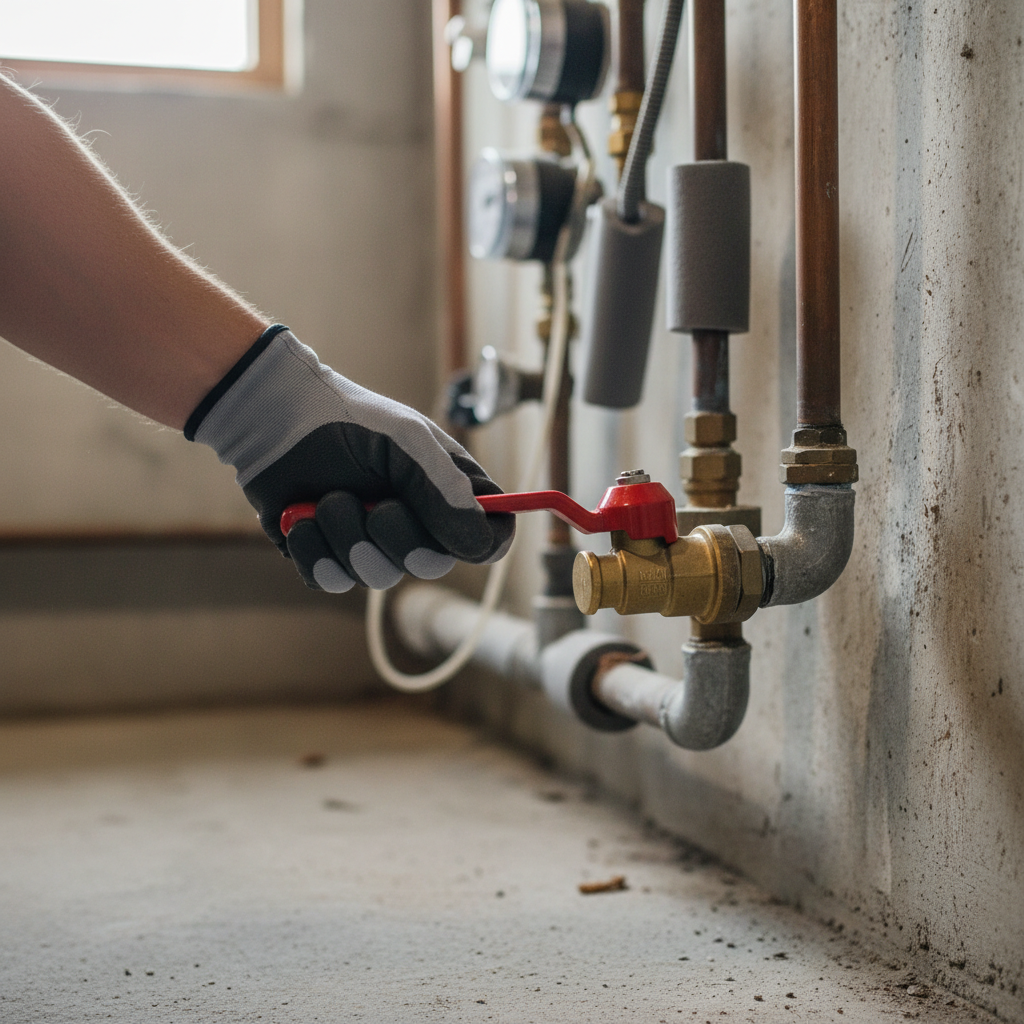
1. Check Your Main Shut-Off Valve — The most common and easiest fix.
Locate your main water shut-off valve. This is typically a gate valve with a circular handle or a ball valve with a lever handle. It's usually found where the main water line enters your house, often in a basement, utility closet, or near the water heater. Ensure it is fully open. For gate valves, turn counter-clockwise until it stops. For ball valves, the lever should be parallel with the pipe. Sometimes, after a repair or maintenance, this valve is not fully reopened, restricting flow.
- If this doesn't work: Proceed to the next step. If you found the valve partially closed and now fully open, but pressure hasn't returned, wait a few minutes for the system to repressurize and check again.
2. Check Your Water Meter Valve — Ensure the external supply is fully open.
There are usually two shut-off valves near your outdoor water meter: one on the street side (owned by the utility) and one on your house side (owned by you). Check your homeowner's side valve and ensure it's fully open. Use a appropriate wrench if it's a gate valve without a handle, but do not tamper with the utility's side valve.
- Safety Note: Be careful not to cross-thread or overtighten valves. If you see signs of leakage, stop and call a plumber.
3. Test Your Pressure Reducing Valve (PRV) — A common point of failure for whole-house pressure loss.
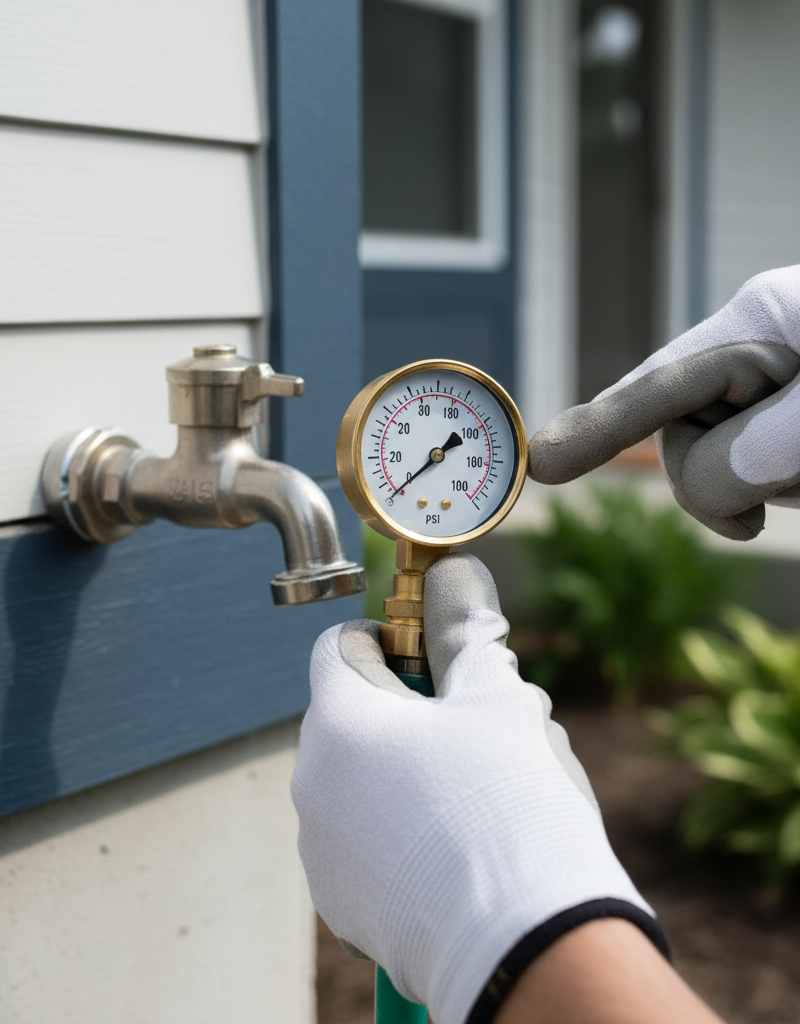
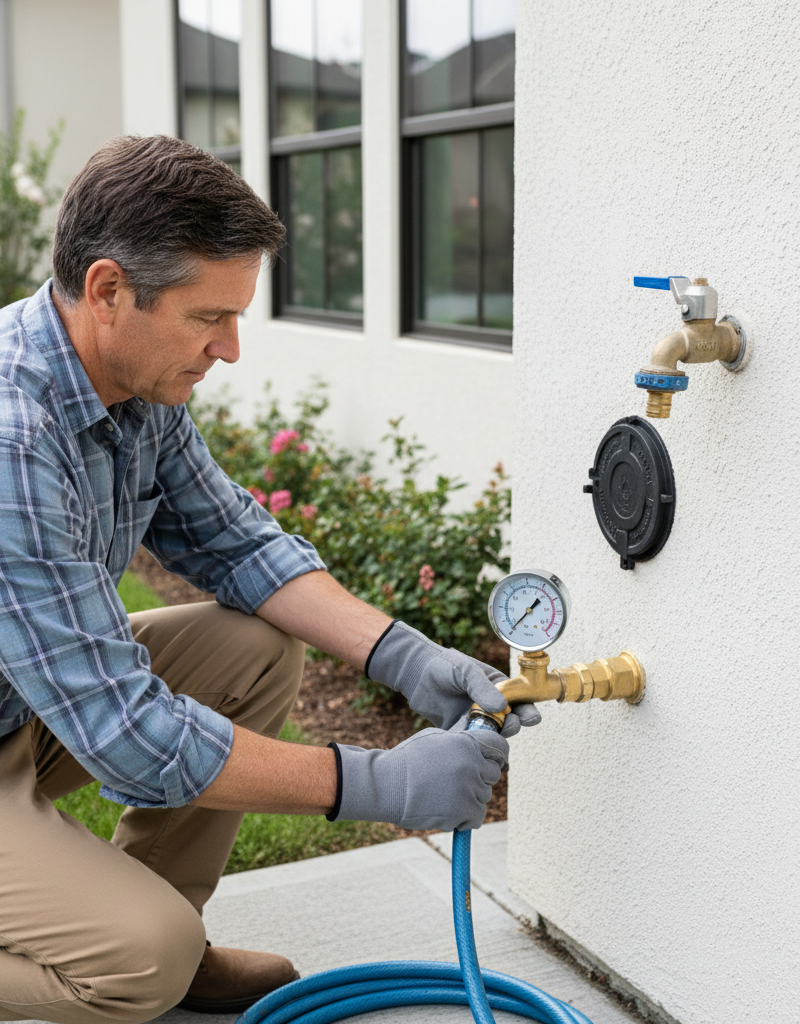
Your PRV is usually a bell-shaped or cylindrical device located where the main water line enters your home, after the main shut-off valve. You'll need a water pressure gauge (available at hardware stores). Screw the gauge onto an outside hose bib or a utility sink faucet. Turn on the water fully and note the reading. A healthy reading is typically between 50-70 PSI. If it's significantly lower (e.g., below 40 PSI), your PRV might be failing.
- If the reading is low: The PRV likely needs adjustment or replacement. Adjusting a PRV usually involves loosening a locknut and turning a screw to increase pressure. Turn clockwise for higher pressure. Make small adjustments (quarter turns) and retest. Do not set pressure above 75 PSI.
- Pro Callout: Replacing a PRV involves soldering or significant plumbing work and is best left to a licensed plumber.
4. System Flush or Aerator/Filter Check — Addressing sediment and mineral buildup.
Turn off your main water supply. Open all faucets (hot and cold) downstairs, then flush all toilets. Next, open all faucets upstairs. This helps to drain the system. While the system is drained, remove aerators from all affected faucets and check for sediment or mineral buildup. Clean them thoroughly with vinegar and a brush. For showerheads, unscrew them and soak them in a descaling solution or vinegar overnight. Turn the main water supply back on slowly and allow the system to refill and purge air.
- If this helps some but not completely: You might have significant mineral buildup in your pipes themselves, especially if your home has older galvanized steel pipes or you're in a hard water area. This is a more extensive plumbing issue requiring professional assessment.
5. Inspect Your Water Heater Shut-Off Valve and Drain — Hot water pressure specifically.
If the low pressure primarily affects hot water, check the cold water supply shut-off valve leading into your water heater. Ensure it's fully open. Sediment buildup inside the water heater tank can also restrict flow. You can attempt to drain a few gallons from the water heater's drain valve (ensure a hose is attached and leads to a suitable drain) to flush out some sediment.
- Safety Note: Water heaters involve potential for scalding hot water and electrical/gas connections. Exercise extreme caution. If in doubt, call a professional.
6. Check for Leaks — Hidden leaks can divert pressure.
Even a small, unnoticed leak in your main supply line or within walls can cause a drop in overall pressure. Look for unusually wet patches in your yard, particularly between the meter and your house, or unexplained dampness on interior walls or ceilings. Listen for hissing sounds. You can perform a simple leak test: turn off all water-using appliances and faucets, note your water meter reading, wait 30 minutes to an hour without using any water, then check the meter again. If the reading has changed, you likely have a leak.
- Pro Callout: Locating and repairing hidden leaks often requires specialized equipment and expertise.
Common Causes
- Partially Closed Main Shut-Off Valve: The most frequent culprit. The main water valve (either inside or outside near the meter) might not be fully open, often after a repair or absent-minded adjustment.
- Failing Pressure Reducing Valve (PRV): If your home has a PRV, it can fail over time, restricting water flow or providing inconsistent pressure.
- Mineral Buildup (Hard Water Deposits): In homes with hard water, mineral deposits (limescale) can accumulate inside pipes, especially older galvanized steel pipes, gradually constricting the internal diameter and reducing water flow throughout the system.
- Clogged Water Heater: Sediment buildup in the bottom of your water heater tank can restrict flow, particularly impacting hot water pressure.
- Hidden Water Leak: A leak in the main supply line or within your home's walls can divert a significant volume of water, leading to a noticeable drop in pressure throughout the house.
- Problem with Water Utility Supply: While less common, sometimes the issue can originate with the municipal water supply (e.g., work being done in the neighborhood, a broken main, or even low pressure from the source). It's worth a quick check with neighbors or your utility company if all else fails.
Common Mistakes
- Immediately Calling a Plumber: Many homeowners skip the basic checks, like ensuring the main shut-off valve is fully open, leading to unnecessary service calls for simple fixes.
- Ignoring Only Hot Water Pressure: If only hot water pressure is low, it points to a water heater issue, not necessarily the entire home's cold water supply. Assuming it's a whole-house issue can lead you down the wrong diagnostic path.
- Over-tightening Valves: Forcing a stubborn valve can damage internal components, leading to leaks or further flow restrictions. Use appropriate tools gently.
- Adjusting the PRV Without a Gauge: Guessing about PRV settings can lead to either continued low pressure or dangerously high pressure that can damage fixtures and appliances. Always use a pressure gauge.
- Not Checking Neighbor's Pressure: If your neighbors are also experiencing low pressure, it strongly suggests a municipal supply issue, saving you time and money on internal diagnostics.
- Confusing Flow with Pressure: A partially clogged aerator reduces flow, not necessarily pressure at the main line. Always differentiate between a single fixture issue and a whole-house problem.
Cost & Time Breakdown
| Task | DIY Cost | Pro Cost | Time |
|---|---|---|---|
| Check Main Shut-Off Valve | $0 | $75–$150 | 10–15 minutes |
| Test & Adjust PRV (DIY part) | $15–$25 (gauge) | $200–$600 (repl.) | 30–60 minutes |
| Clean Aerators/Showerheads | $0–$10 (vinegar) | $150–$300 | 20–45 minutes |
| Flush Water Heater | $0 (hose) | $150–$250 | 30–60 minutes |
| PRV Replacement | Not Recommended | $400–$800 | 2–4 hours (pro) |
| Leak Detection & Repair | Not Recommended | $300–$1000+ | Varies (pro) |
Tips & Prevention
- Regularly Check Main Valves: Periodically check your main water shut-off valves (indoor and outdoor) to ensure they are fully open and operating smoothly. This can help prevent accidental partial closures.
- Install a Whole-House Water Filter: If you have hard water, a whole-house filter can reduce mineral buildup in your pipes and water-using appliances, prolonging their life and maintaining pressure.
- Drain Your Water Heater Annually: Flushing a few gallons from your water heater yearly helps remove sediment that can build up and restrict hot water flow. Consult your water heater's manual for specific instructions.
- Monitor Water Pressure: Consider installing a permanent water pressure gauge on an outdoor spigot to easily monitor your system's pressure and catch drops early.
- Know Your PRV: If your home has a PRV, know its location and learn how to test it. They typically have a lifespan of 10-15 years.
- Descaling Fixtures: Regularly clean aerators and showerheads, especially if you live in a hard water area, to prevent localized clogs that can mimic low pressure.
When to Call a Professional
While many low-pressure issues can be resolved with DIY troubleshooting, some situations absolutely require a licensed plumbing professional. If you've checked your main shut-off valves and tested your PRV without success, or if you suspect a hidden leak, it's time to call a pro. Issues like replacing a faulty pressure reducing valve, which often involves cutting and soldering pipes, converting from galvanized to PEX or copper piping, or diagnosing mysterious leaks within walls or underground, are complex and beyond the scope of most homeowners. Additionally, if the problem lies with your water heater, especially if it's a gas model or you're uncomfortable with electrical work, a professional can safely diagnose and repair or replace it. A professional plumber has the specialized tools and expertise to accurately diagnose the root cause and ensure repairs are done correctly and to code, preventing further damage or safety hazards.
Related Articles
Keep troubleshooting with these hand-picked guides from FixlyGuide:
- The Secret Culprit Behind Your Whole-House Low Water Pressure (It's Not Always the City) — Whole-house low water pressure can be a frustrating and complex issue, ranging from simple fixes homeowners can do to signs that require a…
- The #1 Mistake Homeowners Make When Diagnosing Low Water Pressure (It's Not Your Pipes) — Discover the most common, overlooked culprit behind low water pressure impacting your entire home and learn how to fix it yourself with bas…
- The #1 Mistake Homeowners Make When Diagnosing Low Water Pressure (and What to Check First) — Before you call a plumber, learn the most common overlooked cause of low water pressure affecting your entire home and how to easily check…
- The #1 Mistake Homeowners Make When Diagnosing Low Water Pressure (It's Not Your Pipes!) — Discover the most common, often overlooked culprit behind low water pressure impacting your entire home and how to easily fix it.
- The #1 Hidden Culprit Behind Your Whole-House Low Water Pressure (It's Not Your City!) — Discover the most common, often overlooked cause of low water pressure throughout your entire home and how to fix it yourself.
- The 5-Minute Trick to Restore Your Kitchen Sink Sprayer's Lost Pressure — Restore your kitchen sink sprayer's low pressure with a quick, simple trick that often takes less than five minutes and requires no special…
Recommended for DIYers & woodworkers
Sponsored
The Top 20 Tools for Workshops of Any Budget
No stationary machines or power tools required — plus 3 fundamental tools that can't be bought at any price.
Get the free guide
Ted's Woodworking — The #1 Woodworking Resource
Detailed instructions, dimensioned drawings, materials & cutting lists, and 3D schematics for every skill level.
See the plansSponsored: links above are affiliate links. FixlyGuide may earn a commission on qualifying purchases — at no extra cost to you.
Frequently asked questions
Why is my water pressure suddenly low in the whole house?+
The most common and often overlooked reason for a sudden drop in whole-house water pressure is a partially closed main water shut-off valve, either inside your home or near your outdoor water meter. Always check these first.
How do I test my home's water pressure?+
You can easily test your home's water pressure using a water pressure gauge, available at any hardware store. Simply screw it onto an outside hose bib or laundry room faucet and open the water fully. A healthy reading is typically between 50-70 PSI.
Can a bad water heater cause low water pressure?+
Yes, a water heater can cause low pressure, especially for hot water. Sediment buildup in the tank can restrict flow, or the cold water shut-off valve leading to the heater may not be fully open. If only hot water pressure is affected, start troubleshooting your water heater.
What's the difference between low flow and low pressure?+
Low pressure is a systemic issue impacting the force of water from your main supply. Low flow is typically a localized problem at a single fixture (e.g., a clogged aerator or showerhead) where the water pressure coming into the fixture might be fine, but the quantity of water coming out is reduced.
When should I call a plumber for low water pressure?+
You should call a plumber if you've checked all main shut-off valves, tested your pressure reducing valve (PRV) without success, suspect a hidden leak, or if the problem requires complex pipe work like PRV replacement or pipe descaling. For any gas or major electrical water heater issues, always call a pro.

Discussion
Loading comments…