Tools & materials you'll need
Affiliate links- AmazonWhite VinegarFor cleaning mineral buildup
- AmazonPlumber's Silicone GreaseEssential for O-rings, not petroleum jelly
- AmazonReplacement Tub Spout1 · If diverter is in spout, match connection type
- AmazonReplacement Shower Cartridge1 · If diverter is integrated into single handle, brand/model specific
- AmazonTowels and BucketFor cleanup during water shut-off
As an Amazon Associate FixlyGuide earns from qualifying purchases — at no extra cost to you. Prices and availability are accurate as of publication and subject to change.
Quick Answer
If you're facing the frustrating issue of no hot water in just one shower, while other showers and faucets in your home are delivering perfectly hot water, the problem almost certainly lies with the shower's diverter valve. Rather than pointing to a major water heater malfunction, this localized issue often means a small component is preventing the full flow of hot water to your showerhead. Fixing it involves either cleaning or replacing the diverter mechanism, which can typically be done in under an hour without specialized plumbing experience.
The Problem
Imagine stepping into your morning shower, expecting a blast of comforting warmth, only to be met with an icy spray. But here's the kicker: your kitchen sink is scalding, your washing machine is happily churning with hot water, and even the kids' bathroom down the hall has hot showers. This specific scenario — localized lack of hot water to just one shower — is a classic sign of a problem within the shower's own plumbing, not your main water heater. The most frequent cause is a faulty diverter valve. This valve, integral to your shower's operation, is designed to direct water flow precisely where it needs to go: either down to the tub spout or up to the showerhead. When it malfunctions, it can prevent hot water from reaching its intended destination, leading to a chilly surprise.
How It Works
To understand why a diverter valve can steal your hot water, let's look at how your shower assembly works. When you turn on your shower, water from both the hot and cold supply lines enters a mixing valve. This valve, often controlled by your shower handle, blends the hot and cold water to achieve your desired temperature. After the mixing valve, the tempered water then travels to the diverter valve.
There are a few common types of diverter valves in showers:
- Tub Spout Diverter: This is the most common type for tub/shower combos. It's typically a small knob or lever on the tub spout itself. When you pull or twist it, it seals off the opening to the tub spout, forcing water upwards to the showerhead. When released, water flows out the tub spout.
- Two- or Three-Handle Shower Diverter: Older shower systems might have separate hot, cold, and diverter handles. The diverter handle specifically switches flow between the tub spout and showerhead, or even between multiple showerheads/body sprays.
- Single-Handle Cartridge Diverter: Some modern single-handle shower valves integrate the diverter function directly into the main cartridge. Twisting the handle past a certain point might engage the showerhead, or there could be a separate pull-up or push-down knob on the handle.
Regardless of the type, the principle is the same: the diverter creates a seal to redirect water. If this seal is compromised — perhaps by mineral buildup (calcium, magnesium) accumulating on the rubber O-rings or seats, or if the O-rings themselves have become brittle, cracked, or simply worn out over years of use — it won't fully close. This small opening allows cold water to continue flowing into the 'hot' path of your shower system, essentially diluting any hot water that's trying to get through, resulting in a significantly reduced hot water supply, or even no hot water at all, specifically at that one showerhead. It's like having a small leak in your hot water line that's constantly being fed by cold water from the tub spout side, preventing pressure buildup for the hot water to reach the showerhead properly.
Step-by-Step Fix
Safety Note: Always turn off the main water supply to your home before working on plumbing fixtures to prevent accidental flooding. Have towels and a bucket handy.
1. Identify Your Diverter Type — Locate the mechanism
- Determine if your diverter is on the tub spout, a separate handle, or integrated into a single-handle cartridge. This will dictate your next steps. For tub spout diverters, the fix is often the simplest. For integrated cartridge diverters, you'll be working deeper within the shower valve.
2. Turn Off Water Supply — Prevent flooding
- Locate your home's main water shut-off valve, usually in the basement, utility closet, or near your water meter outside. Turn it clockwise until the water flow stops completely. Open a faucet downstairs to relieve any pressure and ensure the water is off.
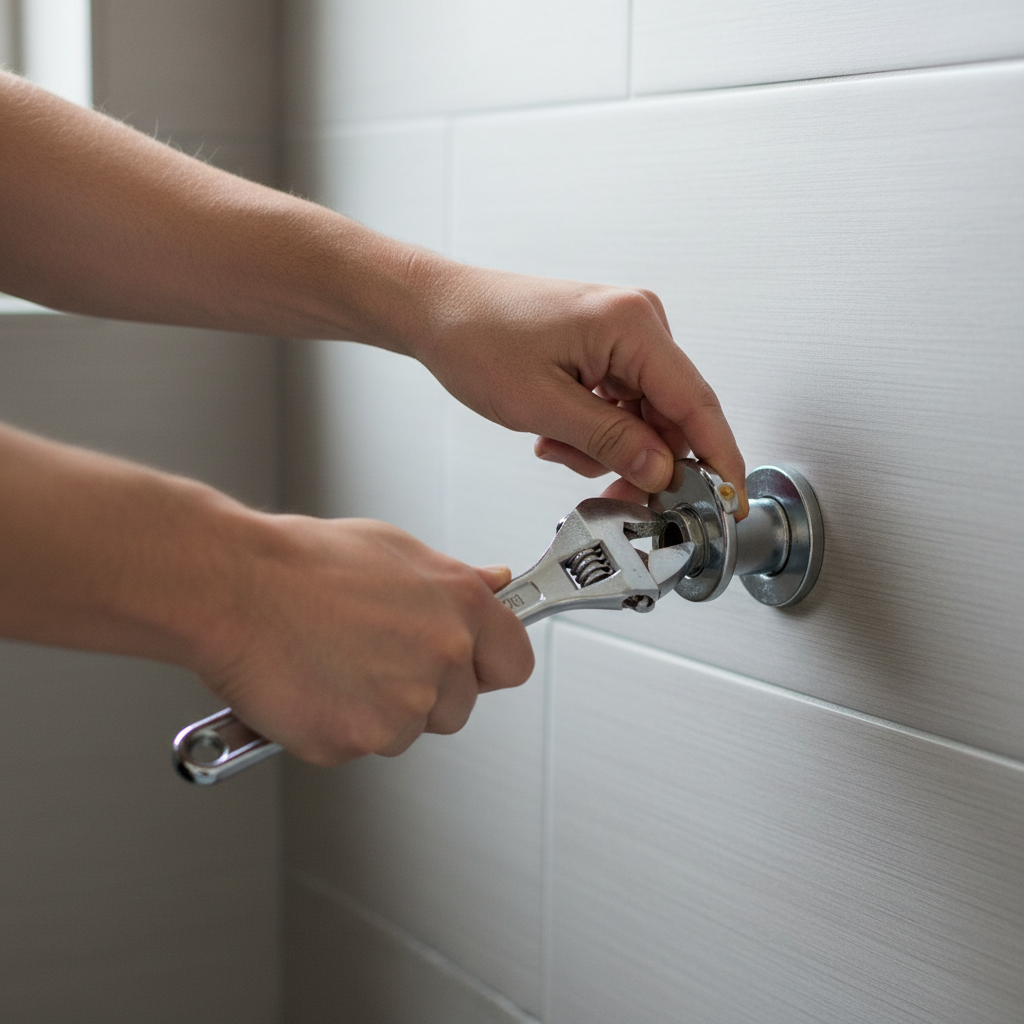
3. Disassemble the Tub Spout Diverter (If Applicable) — Access the diverter mechanism
- Set Screw Type: Look for a small set screw on the underside of the tub spout, near the wall. Use an Allen wrench to loosen it. The spout should then slide off the copper pipe or threaded nipple.
- Threaded Type: Some older spouts simply twist off counter-clockwise. You might need a pipe wrench, but wrap the spout with a cloth to protect the finish.
- Note: Once the spout is off, you'll often see the diverter gate or a small O-ring assembly inside the spout itself, or at the end of the pipe where the spout attaches. Examine these for mineral buildup, cracks, or wear.
4. Clean or Replace Tub Spout Diverter Components — Restore proper seal
- If possible, carefully remove the diverter stem, O-rings, or gate from the spout.
- Cleaning: Soak mineral-encrusted parts in white vinegar for 30 minutes to an hour to dissolve buildup. Use a soft brush (like an old toothbrush) to scrub away any remaining debris.
- Replacement: If O-rings are cracked, brittle, or the diverter gate is damaged, it's best to replace the entire tub spout. A new spout is often inexpensive and comes with a fresh, functioning diverter.
- Alternative: If you can't access or repair the diverter within the existing spout, simply replacing the entire tub spout is a common and effective solution.
5. Disassemble and Inspect Shower Handle Diverter (If Applicable) — Access internal components
- For diverters controlled by a separate handle or integrated into a single-handle system, you'll need to remove the handle and trim plate.
- Handle Removal: Pop off any decorative caps (usually concealing a screw). Unscrew the handle screw and pull the handle off.
- Trim Plate Removal: Unscrew the screws holding the trim plate to the wall and carefully pull it away.
- Cartridge Removal: You'll likely see a cartridge or a stem with O-rings inside the valve body. Consult your shower valve's manual if you have it, as removal methods vary. Often, there's a retainer clip or a nut holding the cartridge in place. Gently pull the cartridge straight out.
6. Clean or Replace Diverter Cartridge/Stem — Restore valve function
- Inspect the cartridge or stem (and any visible O-rings) for mineral buildup, wear, or damage.
- Cleaning: Soak the cartridge in white vinegar to remove mineral deposits. Use a soft brush.
- Replacement: Most often, if the internal diverter is faulty, the entire cartridge needs to be replaced. Take the old cartridge to a plumbing supply store or hardware store to find an exact match. Note down the brand and model of your shower valve if possible.
- Lubrication: Before reinserting a cleaned or new cartridge, apply a thin layer of plumber's silicone grease to the O-rings to ensure a smooth seal and prevent future sticking.
7. Reassemble and Test — Restore water and check functionality
- Carefully reassemble all components in reverse order. Ensure all screws are snug, but do not overtighten, especially on plastic parts.
- Slowly turn your main water supply back on.
- Test the shower. Run the hot water for a few minutes. If the diverter is working correctly, you should now have consistent hot water flowing from the showerhead when the diverter is engaged, and water flowing from the tub spout when disengaged.
Common Causes
- Mineral Buildup: Hard water contains minerals like calcium and magnesium. Over time, these can accumulate on the rubber O-rings, seals, and moving parts of the diverter valve, preventing it from forming a tight seal. This allows cold water to bypass the hot water flow.
- Worn O-rings/Seals: Rubber O-rings naturally degrade, harden, crack, or become brittle with age and exposure to hot water and chemicals. A compromised O-ring can no longer create a watertight seal, leading to water redirection issues.
- Damaged Diverter Mechanism: Physical damage to the diverter gate, stem, or internal cartridge can occur from forceful operation, manufacturing defects, or corrosion.
- Improper Installation: While less common for an existing system, if a new tub spout or shower valve was recently installed, an improperly seated diverter or misaligned components could cause problems from the outset.
- Corrosion: Over decades, metal components within older diverters can corrode, leading to rough surfaces that prevent smooth operation or a proper seal.
Common Mistakes
- Ignoring the Main Water Shutoff: Forgetting to turn off the main water supply before starting work can lead to a sudden, uncontrollable gush of water, making the repair much messier and potentially causing water damage. Always triple-check it's off.
- Over-tightening Screws: Especially with plastic components inside the shower valve, over-tightening screws can strip threads, crack plastic, or damage the brass valve body, leading to more costly repairs or leaks. Tighten until snug, then a quarter turn more.
- Using the Wrong Replacement Parts: Shower cartridges and diverter components are often brand and model-specific. Trying to force a generic part into a valve designed for another can cause leaks, improper function, or damage to the valve body. Always bring the old part with you or know your valve's make and model.
- Failing to Clean Thoroughly: If you're cleaning a diverter rather than replacing it, not fully removing all mineral buildup or debris will result in the problem recurring quickly. Use vinegar and a brush diligently.
- Mistaking the Problem for a Water Heater Issue: Jumping to conclusions about a failing water heater when only one shower lacks hot water leads to unnecessary expense and effort. Always diagnose locally first if the problem is isolated.
- Using Standard Grease: Regular petroleum-based grease can degrade rubber O-rings and seals over time. Always use plumber's silicone grease specifically designed for plumbing applications.
Cost & Time Breakdown
| Task | DIY Cost | Pro Cost | Time |
|---|---|---|---|
| New Tub Spout | $20–$50 | Included in labor | 15–30 min |
| Diverter Cartridge Replacement | $30–$80 | Included in labor | 30–60 min |
| Plumber's Silicone Grease | $5–$10 | N/A | 5 min |
| Total (DIY) | $25–$90 | $150–$350+ | 30–90 min |
A professional plumber may charge $75–$150 per hour, plus the cost of parts, making a diverter repair a relatively quick but often expensive service call.
Tips & Prevention
- Regular Cleaning: If you have hard water, periodically (every 1-2 years) remove and clean your tub spout diverter or shower cartridge. Soaking components in white vinegar can prevent significant mineral buildup.
- Use Plumber's Silicone Grease: Whenever you're working on a shower valve or diverter, apply a thin layer of plumber's silicone grease to O-rings and seals. This lubricates them for smooth operation and extends their lifespan.
- Gentle Operation: Avoid forcing the diverter mechanism. If it feels stiff, don't try to muscle it; this could damage internal components. It's a sign that it needs cleaning or replacement.
- Water Softener: For homes with particularly hard water, installing a whole-house water softener can significantly reduce mineral buildup in all your plumbing fixtures, including diverter valves.
- Know Your Brand: Keep the brand and model information for your shower valve (often found on the trim plate or in your home's original documentation). This makes finding replacement parts much easier.
- Listen for Drips: If you hear water dripping or running into the tub even when the diverter is engaged for the shower, it's a clear sign your diverter isn't sealing properly and might need attention soon.
When to Call a Professional
While a diverter valve issue is often a straightforward DIY fix, there are times when calling a licensed professional plumber is the wisest course of action. If you're unable to identify the type of diverter, cannot locate or remove the set screw, or are struggling to extract the cartridge without excessive force, stop and call a pro. If, after replacing the diverter, you still have no hot water, or if you notice any leaks from behind the wall or around the valve body, a plumber can accurately diagnose more complex issues, such as problems with the mixing valve itself, cross-connection hot and cold lines, or issues deeper within your main plumbing system that require specialized tools and expertise. Furthermore, if you suspect any damage to the in-wall plumbing, don't hesitate; water damage can be far more costly than a service call.
Related Articles
Keep troubleshooting with these hand-picked guides from FixlyGuide:
- The #1 Reason Your Shower Goes Cold (It's Not Your Water Heater) — The true culprit behind a suddenly cold shower often isn't a failing water heater, but a simple, fixable issue with your shower valve.
- The #1 Hidden Culprit Behind Your Whole-House Low Water Pressure (It's Not Your City!) — Discover the most common, often overlooked cause of low water pressure throughout your entire home and how to fix it yourself.
- One Shower, No Hot Water? The Hidden Diverter Valve Trick — If only one shower in your home lacks hot water, the diverter valve is often the overlooked culprit, easily fixed without a plumber.
- The #1 Mistake Homeowners Make When Diagnosing Low Water Pressure (It's Not Your Pipes!) — Discover the most common, often overlooked culprit behind low water pressure impacting your entire home and how to easily fix it.
- The 4 Hidden Reasons Your Shower Runs Cold – And How to Fix It FAST — Learn the surprising causes behind a cold shower and discover simple, effective DIY fixes to restore hot water quickly.
- The 3 Hidden Reasons Your Toilet Tank Fills Slowly (And How to Fix Each) — Discover the common culprits behind a slow-filling toilet tank, from crucial valve issues to subtle obstructions, and learn how to restore…
Recommended for DIYers & woodworkers
Sponsored
The Top 20 Tools for Workshops of Any Budget
No stationary machines or power tools required — plus 3 fundamental tools that can't be bought at any price.
Get the free guide
Ted's Woodworking — The #1 Woodworking Resource
Detailed instructions, dimensioned drawings, materials & cutting lists, and 3D schematics for every skill level.
See the plansSponsored: links above are affiliate links. FixlyGuide may earn a commission on qualifying purchases — at no extra cost to you.
Frequently asked questions
Why is there hot water everywhere else but not my shower?+
If all other hot water fixtures in your home are working correctly, but one specific shower lacks hot water, the problem is localized to that shower's plumbing. The most common cause is a faulty diverter valve that isn't properly directing hot water to the showerhead.
How do I know if my diverter valve is bad?+
Signs of a bad diverter valve include: water flowing from both the tub spout and showerhead simultaneously (even if the diverter is engaged), very weak or no hot water specifically in the shower, or the diverter knob/handle feeling loose or stiff and not staying in position.
Can I replace a tub spout diverter myself?+
Yes, replacing a tub spout with a built-in diverter is one of the easiest plumbing DIYs. Often, it involves loosening a set screw or simply twisting the old spout off. Just be sure to get a replacement spout that matches your existing pipe connection type.
What's the difference between a mixing valve and a diverter valve?+
A mixing valve blends hot and cold water to achieve your desired temperature. A diverter valve, located after the mixing valve, then directs that tempered water either to the tub spout or up to the showerhead. They perform distinct functions within the shower system.
How long does a shower diverter valve last?+
The lifespan of a shower diverter valve varies widely based on water quality and usage, but typically they last anywhere from 5 to 20 years. Hard water areas might see components wear out faster due to mineral buildup.


Discussion
Loading comments…