
Tools & materials you'll need
Affiliate linksAs an Amazon Associate FixlyGuide earns from qualifying purchases — at no extra cost to you. Prices and availability are accurate as of publication and subject to change.
Quick Answer
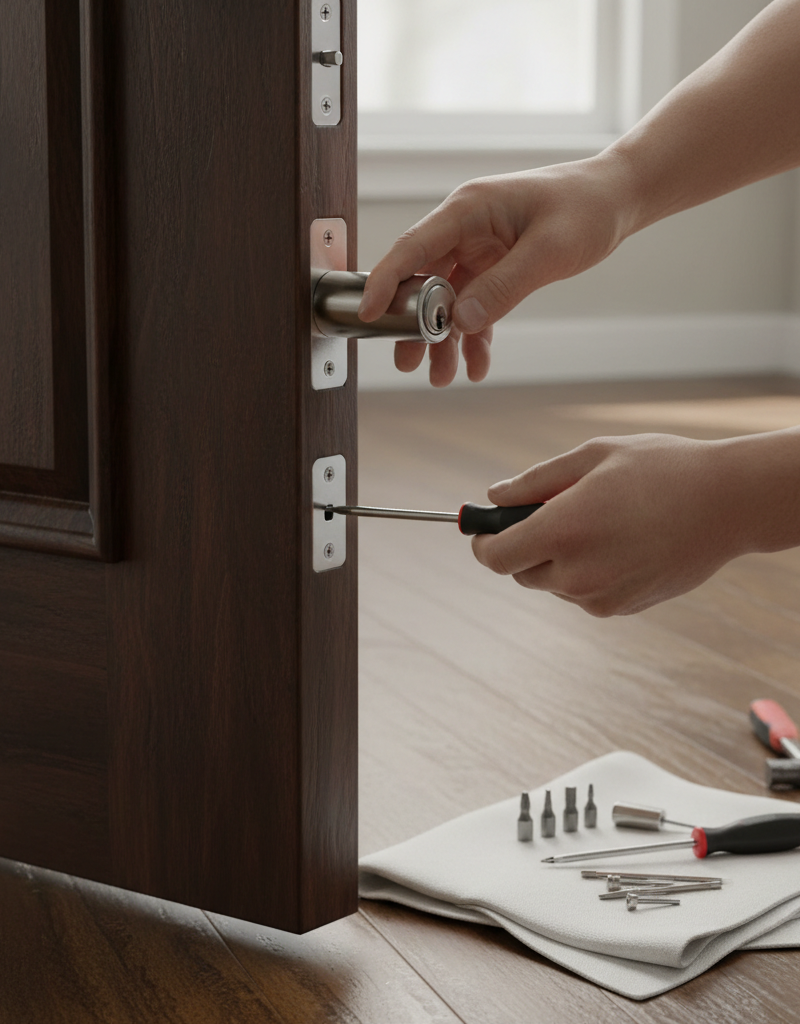
Replacing a deadbolt is a straightforward DIY task that significantly boosts your home's security and ensures smooth operation of your entry points. The process generally involves unscrewing and removing your existing deadbolt components (both the interior and exterior halves, and the latch mechanism), then installing the new deadbolt, paying close attention to spindle alignment and latch direction. Most homeowners can complete this vital upgrade in less than 30 minutes with just a screwdriver, resulting in a more secure and functional door.
The Problem
Is your deadbolt sticky, refusing to turn smoothly, or perhaps not locking at all? Maybe you've moved into a new home and want to rekey for better security, or your current deadbolt just looks outdated and worn. A malfunctioning or insecure deadbolt isn't just an annoyance; it's a significant security vulnerability. Over time, internal mechanisms can wear out, making locks easy to pick or force open. Older deadbolts may lack modern security features like anti-bump pins, drill resistance, or larger throws. A deadbolt that's difficult to operate can also be a fire hazard, hindering a quick exit in an emergency. Addressing this problem promptly by replacing the deadbolt is crucial for peace of mind and the safety of your home and family.
How It Works
A deadbolt lock, at its core, is a simple yet effective security device. Unlike a spring latch, a deadbolt extends a solid metal bolt directly into the door frame's strike plate, making it far more resistant to forced entry. The mechanism inside the lock is a cylinder that houses a series of pins. When the correct key is inserted, these pins align perfectly with a shear line, allowing the cylinder to rotate. This rotation, in turn, engages a cam that retracts or extends the deadbolt. On the interior side, a thumb turn provides manual control of the bolt's movement.
There are two main parts visible on a deadbolt: the outside cylinder and the inside thumb turn unit. These two components are connected by two long screws that pass through the door. Between them, inside the edge of the door, is the latch bolt assembly. This assembly includes the deadbolt itself and a cylinder component that accepts a flat metal spindle from the interior/exterior mechanisms. When you turn the key or thumb turn, this spindle rotates the cam, pushing or pulling the deadbolt within the door's edge. A crucial measurement for a deadbolt is the 'backset,' which is the distance from the edge of the door to the center of the bore hole (the large hole where the lock body sits) – typically 2-3/8 inches or 2-3/4 inches. Ensuring your new deadbolt matches this backset is vital for proper installation and alignment with the existing holes in your door.
Step-by-Step Fix
Always work with the door open but securely held, to avoid accidentally locking yourself out or damaging the door frame.
-
Preparation and Safety Check — Before you begin, gather all your tools and the new deadbolt kit. Inspect the new deadbolt to familiarize yourself with its components. Read the manufacturer's instructions, as there can be slight variations. Ensure the area is well-lit.
- Safety Note: While not high-voltage, dropping tools or working with a door that could swing shut can lead to pinched fingers. Keep pets and children away from the work area.
-
Remove Interior Screws — Locate the two visible screws on the interior side of the deadbolt. These screws typically run horizontally or vertically and secure both the interior and exterior halves of the deadbolt together. Use a Phillips head screwdriver to loosen and remove both screws completely. Keep these screws in a safe place, though you will likely use the new ones provided with your new deadbolt.
-
Separate Interior and Exterior Halves — Once the screws are removed, the interior thumb-turn mechanism should pull straight off the door. The exterior keyed cylinder will then also be loose and can be gently wiggled and pulled straight out from the other side. If it's sticky, apply gentle pressure while wiggling. Sometimes a slight tap on the exterior side can help dislodge it.
-
Remove the Latch Mechanism — With the main body components removed, you'll see the latch mechanism (the part with the actual deadbolt extending from the door's edge) revealed in the door's bore hole. There are usually two smaller screws on the faceplate of this mechanism that secure it to the door edge. Unscrew these, and then pull the latch mechanism straight out of the door. Note the orientation of the latch bolt – specifically, which way the beveled edge faces (it should always face the door frame). Your new latch will need to be installed in the same orientation.
- If the latch is stuck: Sometimes paint or debris can make removal difficult. A utility knife can be used to score around the faceplate to break any paint seals, then carefully pry it out with a flathead screwdriver.
-
Check Backset and Adjust New Latch — Take your new deadbolt's latch mechanism and compare it to the old one. Most deadbolts are designed to fit either a 2-3/8 inch or 2-3/4 inch backset. Many new latches are adjustable. If yours is, you'll see a small pin or lever on the side that allows you to extend or retract the bolt housing to the correct backset length. Consult your new deadbolt's instructions for specific adjustment methods. Ensure the latch bolt's beveled edge faces the door frame, just like the old one.
- Crucial Check: If your new latch isn't adjustable or doesn't match the backset, stop. You need a deadbolt with the correct backset for your door; otherwise, it won't fit properly.
-
Install the New Latch Mechanism — Slide the new latch mechanism into the hole in the edge of the door. Ensure the curved or beveled side of the deadbolt faces the door frame, allowing it to slide smoothly when the door closes. Secure it with the two small screws provided with the new deadbolt kit, making sure they are snug but not overtightened. The faceplate should sit flush with the door's edge.
-
Insert Exterior Cylinder — From the outside of the door, slide the new exterior keyed cylinder into the larger bore hole. Make sure the 'tailpiece' (the thin metal piece that extends from the cylinder into the door) is correctly oriented to pass through the slot in the latch mechanism. It might need to be rotated slightly to fit.
- Important Alignment: The tailpiece must engage with the slot in the latch. Gently wiggle and turn the key (if applicable) to ensure it slides through properly.
-
Install Interior Thumb Turn — Align the interior thumb-turn assembly with the two screw holes in the door and the tailpiece from the exterior cylinder. The tailpiece should seat into the corresponding slot on the interior mechanism. This often requires some careful alignment and light maneuvering. Make sure the parts fit together without forcing them.
-
Secure the Deadbolt — Insert the new long mounting screws (usually two) through the interior thumb-turn assembly and thread them into the exterior keyed cylinder. Hand-tighten them evenly at first. Then, use your Phillips head screwdriver to fully tighten them. Avoid overtightening, which can bind the mechanism and make the lock stiff. Tighten until snug, then test the lock.
- Test Periodically: As you tighten, periodically check the deadbolt's operation with the door open. If it starts to bind, loosen the screws slightly and realign the components.
-
Test Operation — With the door open, test the deadbolt several times using both the key from the outside and the thumb turn from the inside. The bolt should extend and retract smoothly without catching. Next, close the door and test it again. Ensure the deadbolt extends fully into the strike plate on the door frame without resistance. If it binds, the strike plate might need adjustment.
-
Adjust Strike Plate (If Needed) — If the deadbolt encounters resistance when closing or doesn't extend fully into the strike plate, mark where it's hitting. You may need to slightly enlarge the hole in the strike plate using a chisel or file, or even reposition the strike plate itself. Be careful not to create too large an opening, which can compromise security. Secure the strike plate with longer wood screws (at least 2.5 inches) for added security, if not already installed.
Common Causes
- Wear and Tear: Over years of use, the internal springs, pins, and cam mechanisms within a deadbolt can wear out, leading to stiffness, sticking, or complete failure to lock/unlock. Exposure to elements like humidity can accelerate corrosion.
- Misalignment: The door or frame may shift over time due to house settling, humidity changes, or heavy use. This can cause the deadbolt to no longer align perfectly with the strike plate, leading to binding or incomplete locking.
- Incorrect Installation: A deadbolt installed improperly from the start can lead to premature failure. Common errors include overtightening screws, misaligning internal components, or using the wrong backset.
- Damaged Components: Physical damage, such as attempted forced entry, or even dropping the lock body during installation, can bend or break internal parts.
- Security Upgrade: Many homeowners replace older deadbolts even if they function, simply to upgrade to more secure models with anti-picking or anti-drilling features, or to match new door hardware.
Common Mistakes
- Ignoring Backset Measurement: A common error is buying a new deadbolt without checking the existing backset (distance from door edge to the center of the large hole). Most doors are 2-3/8" or 2-3/4". An incompatible backset means the lock won't fit without drilling new holes, which is a much bigger job.
- Overtightening Screws: While you want the deadbolt to be secure, overtightening the two long mounting screws can compress the internal mechanism, causing the key or thumb turn to bind and making the lock difficult to operate.
- Incorrect Latch Orientation: Installing the latch mechanism with the deadbolt's beveled edge facing away from the door frame will cause it to catch and not extend smoothly when the door is closed.
- Not Testing with Door Open THEN Closed: Homeowners often only test the lock with the door open. It's crucial to test it closed as well, as alignment issues with the strike plate become apparent then.
- Discarding Old Parts Too Soon: Keep the old deadbolt components until the new one is fully installed and working perfectly. They can serve as a reference in case of questions, or if you need to return the new lock.
- Using Existing Screws for New Hardware: Always use the screws provided with your new deadbolt. They are specifically designed for that lock and may have different lengths or thread patterns than your old ones.
Cost & Time Breakdown
| Task | DIY cost | Pro cost | Time |
|---|---|---|---|
| New Deadbolt (parts only) | $25–$150 | $25–$150 (parts) | — |
| DIY Installation | $0 | $75–$150 (labor) | 15–30 minutes |
| Door Frame/Strike Plate Adjust | $0–$5 (files/chisel) | $25–$50 (minor) | 5–15 minutes |
| Total | $25–$155 | $125–$350 | 20–45 minutes |
Tips & Prevention
- Regular Lubrication: Apply a graphite-based lubricant (never oil-based) into the keyway and around the thumb turn mechanism once or twice a year. This helps keep internal components smooth and prevents sticking.
- Check Screws Periodically: Over time, the mounting screws can loosen. A quick check and tightening every few months can prevent wobble and improve security.
- Upgrade for Security: Consider upgrading to a deadbolt with American National Standards Institute (ANSI) Grade 1 rating for maximum residential security. Look for features like anti-bump, anti-pick, and drill resistance.
- Inspect Door and Frame: Regularly check the door itself and the door frame for signs of warping, rot, or damage that could affect the deadbolt's alignment. Address any issues promptly.
- Proper Key Use: Avoid jiggling or forcing the key if it's sticky. If the key is worn, get a new one cut from the original master key, not a copy of a copy, which can damage the lock overtime.
- Consider Smart Locks: If you're looking for an upgrade, explore smart deadbolts that offer keyless entry, remote access, and integration with home security systems, adding convenience and advanced features.
When to Call a Professional
While deadbolt replacement is often a manageable DIY task, there are specific situations where calling a licensed locksmith or handyman is the wisest course of action. If your door lacks existing boreholes and you need new holes drilled for the deadbolt, or if the existing holes are severely damaged or misaligned beyond simple adjustment, professional assistance is essential. Anytime you encounter structural damage to the door or frame that impacts the lock's integrity, such as rot, splits, or significant splintering around the boreholes, a pro can ensure proper repair before installing the new lock. Furthermore, if you're dealing with a complex multi-point locking system or want to integrate the deadbolt with a master key system across multiple locks, a professional locksmith has the expertise and specialized tools to handle these intricate tasks safely and effectively. Don't hesitate to call if you feel uncomfortable at any point or if the installation becomes more complex than expected.
Related Articles
Keep troubleshooting with these hand-picked guides from FixlyGuide:
- The 15-Minute Deadbolt Swap: Why Your Old Lock Is a Security Risk (And the Easy Fix) — Upgrade your home security in just 15 minutes by replacing an old or faulty deadbolt lock with a new, more secure model.
- The 15-Minute Deadbolt Swap: Why Your Old Lock Is a Security Risk — Boost your home's security and refresh your door's look by replacing an old deadbolt lock with a new one in just minutes.
- The 15-Minute Deadbolt Swap: Why Your Old Lock Is a Security Risk (And the Cheap Fix) — Upgrade your home security in minutes by learning how to replace a deadbolt lock yourself with this easy-to-follow guide.
- The 5-Minute Trick to Fix a Door That Won't Latch (No New Hardware Needed) — Discover the simple, often-overlooked reason your door won't latch and how to fix it in minutes without replacing any parts.
- The 3 Hidden Reasons Your Interior Door Sticks (and The 15-Minute Fix) — Discover the surprisingly common reasons your interior door sticks and learn how to fix it in under 15 minutes with simple tools.
- The #1 Mistake Homeowners Make When a Gas Burner Won't Light (And the Easy Fix) — Before you call a technician, discover the most common, overlooked reason your gas stove burner isn't lighting and how to fix it yourself i…
Get the print-ready PDF of this guide
A clean, ad-free, printable version you can keep on your phone or pin to the workshop wall. Free with a FixlyGuide account.
- Print-optimized layout
- Tools, materials & every step included
- Saved to your account
Recommended for DIYers & woodworkers
Sponsored
The Top 20 Tools for Workshops of Any Budget
No stationary machines or power tools required — plus 3 fundamental tools that can't be bought at any price.
Get the free guide
Ted's Woodworking — The #1 Woodworking Resource
Detailed instructions, dimensioned drawings, materials & cutting lists, and 3D schematics for every skill level.
See the plansSponsored: links above are affiliate links. FixlyGuide may earn a commission on qualifying purchases — at no extra cost to you.
Frequently asked questions
How long does it take to replace a deadbolt?+
Most deadbolt replacements can be completed in 15 to 30 minutes by a homeowner with basic tools, assuming the new deadbolt matches the existing door's backset and boreholes.
Do all deadbolts fit all doors?+
No, deadbolts are designed to fit specific door preparations, primarily determined by the 'backset' (the distance from the door edge to the center of the lock hole). Most residential doors have a backset of 2-3/8 inches or 2-3/4 inches, and many new deadbolts are adjustable to fit both. Always check your existing backset before purchasing.
What's the difference between a single-cylinder and double-cylinder deadbolt?+
A single-cylinder deadbolt has a keyhole on the exterior and a thumb turn on the interior. A double-cylinder deadbolt requires a key for both the exterior and interior operation. While double-cylinder locks can offer increased security against intruders smashing a nearby window and reaching in, they can also pose a fire safety risk, as a key is required for emergency exit.
Can I replace a deadbolt without replacing the doorknob?+
Yes, deadbolts and doorknobs (or lever handles) are typically separate locking mechanisms and can be replaced independently. You can upgrade just your deadbolt for enhanced security while keeping your existing doorknob, provided that the new deadbolt fits the existing door preparation.
When should I call a professional locksmith for a deadbolt replacement?+
You should call a professional if your door requires new holes to be drilled, if the existing boreholes are severely damaged, if you're installing a complex multi-point lock, or if you're uncomfortable with any part of the process. Professionals ensure proper installation and can handle unforeseen challenges.


Discussion
Loading comments…