
Tools & materials you'll need
Affiliate linksAs an Amazon Associate FixlyGuide earns from qualifying purchases — at no extra cost to you. Prices and availability are accurate as of publication and subject to change.
Quick Answer
If your dryer is tumbling but not heating, the most common culprits are a tripped thermal fuse, a failed heating element, a malfunctioning thermistor, or an insufficient power supply. Begin by verifying your home's circuit breakers. If that's not the issue, you'll likely need to access your dryer's internal components for testing and possible replacement of a faulty part, which can often be done with basic tools in under an hour for many models.
The Problem
There's nothing more frustrating than pulling ostensibly dry clothes from a dryer, only to find them damp and cold. Your dryer motor whirs, the drum spins reliably, and clothes are tossed about as usual, but the crucial element – heat – is completely absent. This isn't just an inconvenience; it can lead to longer drying times, mildewed laundry, and wasted electricity. The problem typically stems from a failure within the heating system or its protective mechanisms, preventing the heating element from receiving power or generating warmth.
How It Works
To understand why your dryer isn't heating, it's helpful to grasp the basic principles of how it does heat. When you select a heat cycle, electricity flows to a resistance-style heating element (for electric dryers) or a gas burner assembly (for gas dryers – this article focuses on electric dryers).
For an electric dryer, the heating element is a coiled wire that generates heat as electricity passes through it. Air is drawn into the dryer through an intake, heated by this element, and then circulated through the tumbling drum to collect moisture from your clothes. This hot, moist air is then expelled through the dryer vent and out of your home.
Several safety devices are integrated into this circuit. A thermal fuse is a one-time safety component designed to blow and cut power to the heating element if the dryer overheats, often due to a clogged vent. A thermostat (or multiple thermostats) regulates the internal temperature by cycling the heating element on and off. A thermistor is another temperature sensor that provides more precise resistance-based feedback to the control board to fine-tune temperature. If any of these components fail, or if the main heating element itself burns out, the dryer will stop producing heat, even if the motor continues to run. All these parts are interconnected, forming an electrical pathway that must be intact for heat generation.
Step-by-Step Fix
1. Check Your Dryer's Power Supply — The simplest fix first
Your dryer uses a significant amount of electricity, often on a dedicated 240V circuit. If only one leg of this 240V supply is interrupted, the motor might still run (using 120V) while the heating element (requiring 240V) receives no power. This is a common and often overlooked cause.
- Action: Locate your home's main electrical panel. Inside, find the circuit breaker(s) labeled for your dryer. A 240V dryer typically uses a double-pole breaker (two linked switches). If one or both are tripped (usually midway between ON and OFF), firmly push the breaker(s) completely to the OFF position, then back to the ON position. Wait 5 minutes, then test the dryer.
- If this doesn't work: If the breaker immediately trips again, do not reset it repeatedly. This indicates a short circuit, and you should call a licensed electrician.
2. Inspect and Clean the Lint Trap and Vent — Overheating protection is often the culprit
A clogged lint screen or blocked exhaust vent can cause the dryer to overheat, tripping the thermal fuse as a safety measure. Even a partially blocked vent significantly reduces airflow, leading to longer drying cycles and potential fuse trips.
- Action: First, remove and thoroughly clean your lint screen. Next, disconnect the vent hose from the back of the dryer and inspect inside the dryer's exhaust port and the hose itself for lint buildup. Use a vacuum cleaner with a hose attachment to remove any obstructions. If the vent goes through a wall, consider using a long vent cleaning brush from a hardware store to clear the entire run.
- Safety: Always unplug the dryer before moving or working behind it.
- If this doesn't work: If the vent was heavily clogged, the thermal fuse is likely blown. Proceed to the next step.
3. Test the Thermal Fuse — A common, inexpensive fix
The thermal fuse is a small, inexpensive, non-resettable safety device located on the exhaust duct near the blower housing, typically identifiable as a small white plastic component with two wires attached. When it blows, it interrupts the power supply to the heating element.
- Action:
- Tools: Phillips head screwdriver, nut driver (commonly 1/4-inch or 5/16-inch), multimeter.
- Safety: UNPLUG THE DRYER COMPLETELY from the wall outlet.
- Access: Depending on your dryer model, you'll need to remove the back panel or potentially the top and front panels to gain access to the heating element and exhaust duct. Consult your owner's manual or an online service manual for your specific model.
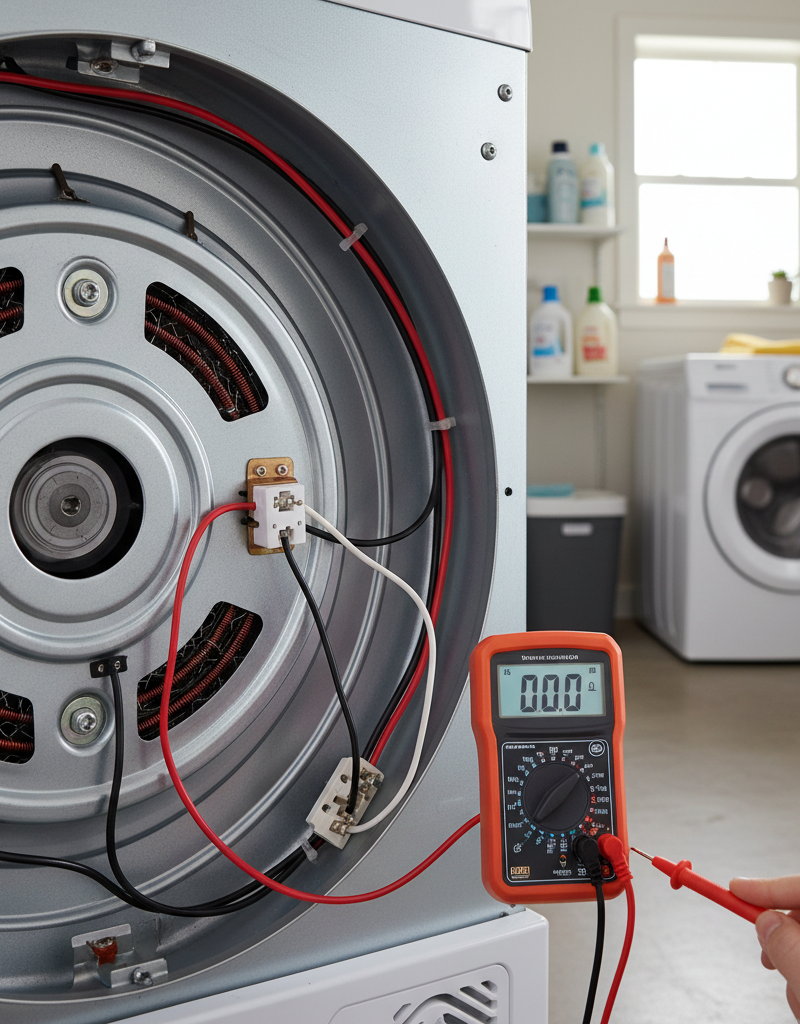
- Testing: Disconnect the two wires from the thermal fuse. Set your multimeter to the ohms (Ω) setting. Touch one probe to each terminal of the fuse. A good thermal fuse will show continuity (a reading close to 0 ohms or a beep, depending on your meter). If you get no reading (open circuit or OL), the fuse is blown and needs to be replaced.
- Replacement: If blown, obtain an exact replacement thermal fuse for your dryer model. Install it, reattach the wires, and reassemble the dryer.
- If this doesn't work: If the thermal fuse tests good, move on to the next component.
4. Test the Heating Element — The core heat generator
The heating element is typically a coiled wire or ribbon inside a metal housing. Over time, these can break or burn out, preventing heat generation.
- Action:
- Tools: Phillips head screwdriver, nut driver, multimeter.
- Safety: Ensure the dryer is UNPLUGGED.
- Access: The heating element is usually found in a housing at the back or bottom of the dryer, behind the drum. You may need to remove additional panels.
- Testing: Disconnect the power wires leading to the heating element. Set your multimeter to the ohms (Ω) setting. Touch one probe to each terminal of the heating element. A good heating element will typically show a resistance reading between 8 and 12 ohms. If you get an open circuit (OL) or a reading significantly outside this range, the element is faulty and needs to be replaced.
- Visual Inspection: Sometimes, a broken heating element coil will be visibly singed or broken.
- Replacement: If the element is bad, replace it with an exact part for your dryer model. Reconnect wires securely.
- If this doesn't work: If the heating element tests good, the issue might be subtler.
5. Examine the Thermistor (or Thermostats) — The temperature sensor
The thermistor or cycling thermostat senses the air temperature within the dryer and communicates with the control board or cycles the heating element on and off. A faulty thermistor can send incorrect temperature readings, preventing the dryer from heating or causing it to overheat.
- Action:
- Tools: Phillips head screwdriver, nut driver, multimeter.
- Safety: Ensure the dryer is UNPLUGGED.
- Access: The thermistor is often located on the blower housing or exhaust duct. Cycling thermostats are usually mounted on the heating element housing or air duct.
- Testing (Thermistor): A thermistor's resistance changes with temperature. At room temperature (around 70°F or 20°C), it might read around 10k-50k ohms, but this varies significantly by model. The best way to test is to compare its reading to the specifications in your dryer's service manual. An open circuit (OL) or short circuit (0 ohms) definitely indicates a bad thermistor.
- Testing (Thermostats): Cycling thermostats are typically simple continuity switches. With the dryer cool, they should show continuity (near 0 ohms). If one shows an open circuit (OL), it's faulty.
- Replacement: Replace any faulty thermistor or thermostat with an exact OEM part.
Common Causes
- Tripped Circuit Breaker: The most straightforward cause, where the 240V circuit feeding the dryer has lost one or both legs of power.
- Clogged Vent or Lint Trap: Restricts airflow, leading to overheating, which in turn trips the thermal fuse as a safety measure.
- Blown Thermal Fuse: A single-use safety device designed to break the circuit to the heating element if the dryer overheats. Often a symptom of a clogged vent.
- Failed Heating Element: Over time, the coiled wire inside the heating element can burn out or break, preventing heat generation.
- Faulty Thermistor or Thermostat: These temperature-sensing devices can fail, causing incorrect temperature readings or an inability to cycle the heating element on.
- Broken Belt Switch (less common for no heat but possible): Some dryers have a switch that detects belt tension; if it fails, it might prevent the heating element from engaging.
Common Mistakes
- Ignoring the Breaker: Assuming the dryer has a deeper problem without first checking the electrical panel is a common oversight. Always start here.
- Replacing Parts Blindly: Guessing which part is faulty without testing wastes money and time. A multimeter is essential for accurate diagnosis.
- Not Cleaning the Vent Thoroughly: Replacing a thermal fuse without addressing the underlying clogged vent will likely result in the new fuse blowing again quickly.
- Using Non-OEM Parts: While cheaper, generic parts may not fit correctly or function optimally, leading to further issues or reduced dryer performance.
- Forgetting to Unplug the Dryer: Working on an appliance with a 240V power supply is extremely dangerous. Always, always unplug the dryer completely before starting any work.
- Ignoring the Underlying Cause: A blown thermal fuse is often a symptom, not the root problem. Always investigate why the fuse blew (e.g., restricted airflow) to prevent recurrence.
Cost & Time Breakdown
| Task | DIY Cost | Pro Cost | Time |
|---|---|---|---|
| Check Breaker & Clean Vent | $0 | N/A | 10-20 min |
| Replace Thermal Fuse | $10–$30 | $100–$250 | 30-60 min |
| Replace Heating Element | $30–$100 | $150–$350 | 45-90 min |
| Replace Thermistor/Thermostat | $15–$50 | $120–$300 | 30-75 min |
| Full Dryer Diagnostic | $0 (DIY) | $75–$150 (Pro) | 1-2 hours (DIY) |
Tips & Prevention
- Regular Vent Cleaning: Clean your lint trap before every load. Annually, disconnect the dryer vent hose and clean it thoroughly, along with the dryer's exhaust port and the exterior vent cap. This is the single most important preventive measure.
- Proper Loading: Avoid overloading the dryer. Overloading restricts airflow and puts strain on components, potentially leading to overheating.
- Check for Kinks: Ensure the dryer vent hose at the back of the machine isn't kinked or crushed, which can impede airflow.
- Warning Signs: Pay attention to drying times getting progressively longer, clothes feeling excessively hot, or a burning smell – these are often precursors to a heating failure.
- Professional Vent Cleaning: If your vent run is particularly long or complex, or you notice persistent issues, consider hiring a professional vent cleaning service every few years.
When to Call a Professional
While many dryer heating issues can be resolved by a savvy homeowner, there are clear instances when professional help is warranted. If, after systematically troubleshooting, you're unable to identify the faulty component, or if you're uncomfortable working with electrical components, it's time to call a licensed appliance repair technician. Specifically, if your circuit breaker continues to trip after being reset, or if you suspect an issue with your home's electrical wiring rather than the appliance itself, immediately contact a licensed electrician. Never attempt to bypass safety components or force a breaker back on, as this could lead to fire or serious electrical shock. A professional possesses the specialized tools and expertise to diagnose complex electrical issues safely and efficiently, ensuring your dryer operates correctly and your home remains safe. While the initial service call has a cost, it's a worthwhile investment in safety and peace of mind.
Related Articles
Keep troubleshooting with these hand-picked guides from FixlyGuide:
- The #1 Mistake Homeowners Make When Heat Pumps Stop Heating in Winter — Discover the crucial mistake most homeowners make when their heat pump struggles in cold weather and how to fix it, potentially saving hund…
- The #1 Mistake Homeowners Make When Their AC Won't Turn On (And the Easy Fix) — Learn the most common oversight homeowners make when their AC won't turn on and how to troubleshoot basic issues to restore cooling.
- The Dryer Vent Fire Trap: 3 Hidden Signs Your Home Is at Risk — Learn the critical signs your dryer vent is clogged and how to safely clean it to prevent a dangerous house fire.
- The #1 Mistake Homeowners Make Installing a Smart Thermostat (and How to Fix It) — Avoid the most common pitfall when installing a smart thermostat yourself and ensure a smooth, energy-efficient setup.
- The $5 Part That Stops Your Dryer From Heating (And How to Replace It in 30 Minutes) — A dryer that tumbles but doesn't heat often points to a blown thermal fuse, a simple and inexpensive fix most homeowners can do themselves.
- The 3 Hidden Reasons Your Refrigerator Leaks Water (And How to Fix Them in 30 Minutes) — Discover the most common culprits behind a leaking refrigerator and learn how to diagnose and fix them quickly with this comprehensive guid…
Frequently asked questions
Why would my electric dryer spin but not heat?+
If your electric dryer spins but doesn't heat, the most common reasons include a tripped circuit breaker, a blown thermal fuse (often due to a clogged vent), a faulty heating element, or a malfunctioning thermistor/thermostat. Always start by checking your home's electrical panel.
How do I test a dryer heating element?+
To test a dryer heating element, first unplug the dryer. Access the heating element (usually at the back or bottom). Disconnect its wires and use a multimeter set to ohms (Ω) to test for continuity across its terminals. A good element will show a resistance reading, typically 8-12 ohms. An 'OL' (open loop) reading indicates a broken element.
Can a clogged dryer vent cause the dryer to not heat?+
Yes, absolutely. A clogged dryer vent restricts airflow, causing the dryer to overheat. This overheating triggers the thermal fuse, a safety device designed to blow and cut power to the heating element, preventing a fire hazard. Even a partially clogged vent can lead to longer drying times and eventually trigger similar issues.
Where is the thermal fuse located on a dryer?+
The thermal fuse on most electric dryers is located on the exhaust duct near the blower housing. It's typically a small, white plastic component with two wires attached. You usually need to remove the back panel of the dryer to access it, but specific locations can vary by model.


Discussion
Loading comments…