
Tools & materials you'll need
Affiliate links- AmazonNew HVAC air filter1
As an Amazon Associate FixlyGuide earns from qualifying purchases — at no extra cost to you. Prices and availability are accurate as of publication and subject to change.
How it works
A heat pump operates on the principle of heat transfer, not heat creation. Unlike a furnace that burns fuel to generate heat, a heat pump moves existing heat from one place to another. Its primary components are an indoor air handler unit, an outdoor condenser/compressor unit, and a closed loop of refrigerant that flows between them. A key component, the reversing valve, dictates whether the system is in heating or cooling mode.
In the heating cycle, the refrigerant, in a low-pressure liquid state, flows to the outdoor coil. Here, it absorbs thermal energy from the ambient air—even when that air is cold. As the refrigerant absorbs heat, it evaporates into a low-pressure gas. This gas then travels to the compressor, which pressurizes it, dramatically increasing its temperature. The resulting high-pressure, superheated gas flows to the indoor coil inside the air handler. The system's blower motor pushes indoor air across this hot coil, transferring the heat into your home's ductwork. As the refrigerant loses its heat, it condenses back into a high-pressure liquid and continues the cycle.
The system’s efficiency is directly tied to the outdoor temperature. As the air gets colder, there is less ambient heat to absorb, and the heat pump must work harder to extract it. Most heat pumps reach a "balance point," typically between 30°F and 45°F, where their heat output can no longer keep up with the home's heat loss. At this point, supplementary heating—known as auxiliary heat or "aux heat," usually comprising electric resistance coils—activates to assist.
Step-by-Step Fix
Follow these steps in order, from simplest to most involved, to diagnose why your heat pump is struggling in cold weather. Safety is paramount; turn off power at the thermostat and circuit breaker before inspecting internal components.
-
Verify Thermostat Settings — Ensure the thermostat is set to "Heat," not "Cool" or "Off." Set the fan to "Auto," which allows the blower to run only when heating. Running the fan on "On" will circulate air continuously, making it feel cool between heating cycles. To force a heating cycle for testing, raise the set temperature at least 5°F above the current room temperature.
- Safety: No electrical safety risk at this step.
- Note: If you have a smart thermostat, check for any "eco" modes, schedules, or auxiliary heat lockout settings that may be preventing the system from running as expected.
-
Inspect and Replace the Air Filter — A clogged filter is the most common cause of reduced heating performance. It restricts airflow over the indoor coil, preventing proper heat exchange and potentially causing the system to overheat and shut down.
- Tools: A new, correct-size air filter.
- Instructions: Turn the system off at the thermostat. Locate the filter slot, typically in the return air duct near the indoor air handler or behind a large grille on a wall or ceiling. Slide the old filter out and note the size printed on its frame. Insert the new filter, ensuring the arrow printed on the frame points in the direction of airflow (toward the air handler).
-
Check Both HVAC Circuit Breakers — Heat pumps have two dedicated circuits: one for the indoor air handler and a separate, higher-amperage circuit for the outdoor unit. A tripped breaker will cut power and disable that part of the system.
- Tools: None.
- Instructions: Locate your home's main electrical panel. Look for two breakers labeled "Air Handler," "Furnace," "Air Cond," or "Heat Pump." A tripped breaker will be in the center position, between "On" and "Off." To reset it, push the switch firmly to the "Off" position, then back to "On."
- If this doesn't work: If a breaker trips again immediately or soon after, it indicates a serious electrical fault. Do not reset it again. Proceed to the "When to call a pro" section.
-
Clear Obstructions Around the Outdoor Unit — The outdoor unit requires unimpeded airflow to absorb heat from the ambient air. Obstructions act like a clogged filter, starving the system.
- Tools: Work gloves.
- Instructions: Visually inspect the unit. Remove any leaves, grass clippings, tarps, or debris piled against the sides. Trim back bushes, shrubs, or weeds to ensure at least 24 inches of clear space on all sides and above the unit. In winter, clear away any snow drifts that may have accumulated against it.
-
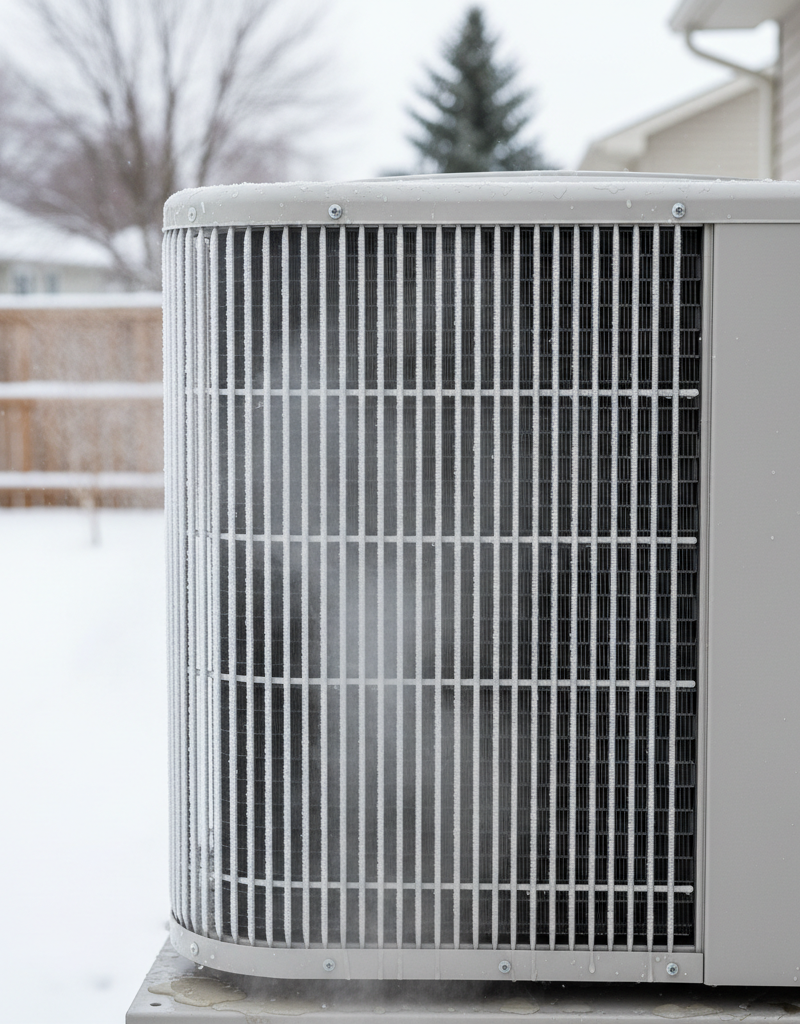
Assess Ice or Frost on the Outdoor Unit — A thin layer of white frost on the coils is normal during cold, damp weather and should be cleared by the system's automatic defrost cycle. A thick, solid block of ice is not.
- Tools: Garden hose.
- Instructions: If you see heavy ice, turn the system off at the thermostat, then locate the outdoor electrical disconnect box (a small metal box mounted to the house near the unit) and turn it off. Gently pour cool or lukewarm water from a garden hose over the top of the unit, letting it melt the ice from top to bottom.
- Safety: Never use hot or boiling water, as the thermal shock can crack the coils. Never use a sharp object, shovel, or ice pick, as you can easily puncture a refrigerant line, leading to a very expensive repair.
-
Observe for a Proper Defrost Cycle — The defrost cycle is designed to prevent ice buildup. If it's not working, the unit will quickly turn into a block of ice and stop heating effectively.
- Tools: None.
- Instructions: After manually thawing the unit (if necessary), turn all power back on and let the heat pump run. Within an hour, especially in temperatures below 40°F, you should see it enter a defrost cycle. The outdoor fan will stop, the reversing valve will make a "whooshing" sound, and steam may rise from the unit as the coils heat up to melt frost. The cycle typically lasts 5-15 minutes. If this never happens and the unit ices over again, the defrost system is faulty.
-
Ensure All Vents and Registers Are Open — Closed vents disrupt the system’s airflow balance, reducing efficiency and putting strain on the blower motor.
- Tools: None.
- Instructions: Walk through your home and confirm that all supply registers (where warm air blows out) and return grilles (where air is pulled in) are open and not blocked by furniture, rugs, curtains, or other items. A common mistake is closing vents in unused rooms; this is counterproductive and should be avoided.
-
Manually Test the Auxiliary Heat — Testing the backup heat can help isolate the problem to either the heat pump itself or the entire system.
- Tools: None.
- Instructions: Go to your thermostat and change the system mode to "Emergency Heat" or "Aux Heat." This bypasses the outdoor unit and activates only the indoor electric heat strips. Wait 5-10 minutes. If you feel warm air coming from the vents, your auxiliary heat is working, which confirms the problem lies with the outdoor heat pump unit (e.g., low refrigerant, bad compressor). If the air is still cool, the issue is with the auxiliary heat strips or their controls.
-
Listen for Atypical Operating Sounds — Mechanical failures are often preceded by distinct noises.
- Tools: Your ears.
- Instructions: Stand near the outdoor unit while it is running. A normal unit produces a steady hum from the compressor and the whirring of the fan. Listen for loud, rhythmic clanking, high-pitched squealing, or a grinding noise. These sounds often indicate failing bearings in the fan motor or a distressed compressor, both of which require professional service.
-
Inspect Outdoor Unit Condensate Drainage — During the defrost cycle, a significant amount of water is produced. If this water cannot drain away, it will refreeze at the base of the unit and work its way up the coil.
- Tools: Work gloves.
- Instructions: Examine the base of the outdoor unit. It should be slightly elevated on a pad or "feet" to allow water to drain out. Ensure the drain holes in the unit's base pan are not clogged with leaves or debris. If the unit sits in a low spot, ice can form a dam, preventing drainage.
Common mistakes
- Leaving the Thermostat on "Emergency Heat." This setting is for temporary use only. It deactivates the efficient heat pump and relies solely on the electric resistance strips, which consume 3-5 times more electricity. Using it as a long-term solution will cause a massive spike in your utility bill.
- Using Aggressive Methods to De-Ice the Unit. Pouring boiling water on a frozen coil can cause metal fatigue and cracks from rapid expansion. Using sharp tools like screwdrivers or hammers to chip away ice is a sure way to puncture a coil and cause a refrigerant leak, turning a potential service call into a multi-thousand-dollar repair.
- Ignoring a Repeatedly Tripping Breaker. A breaker is a safety device. If it trips more than once, it's signaling an underlying electrical hazard, such as a short circuit in a motor winding or a failing capacitor. Simply flipping it back on repeatedly risks a fire or catastrophic equipment failure.
- Installing a High-MERV Air Filter Without Professional Advice. While it seems logical that more filtration is better, filters with a MERV rating of 13 or higher can severely restrict airflow. This "chokes" the system, reducing performance and putting immense strain on the blower motor, similar to a clogged filter. Stick to the MERV 8-11 range unless your system was specifically designed for higher filtration.
- Making Large Temperature Adjustments. Setting the thermostat back significantly at night and then raising it by 10°F in the morning will often cause the thermostat's logic to bypass the heat pump and immediately engage the expensive auxiliary heat to satisfy the large demand quickly. Small, gradual adjustments are more efficient.
- Closing Vents in Unused Rooms. This does not save significant energy. Instead, it increases static pressure within the ductwork, forcing the blower motor to work harder and reducing airflow to other rooms. It can also cause the indoor coil to overheat or freeze, depending on the season.
Cost & time breakdown
Costs are estimates and can vary by location, system age, and accessibility. "Pro cost" typically includes a diagnostic service fee of $100-$200, which is often applied to the final repair bill.
| Task | DIY cost | Pro cost | Time |
|---|---|---|---|
| Replacing Air Filter | $5 - $30 | N/A | 5 minutes |
| Thawing Frozen Outdoor Unit | $0 (water cost) | $100 - $250 (as part of a diagnostic call) | 30 - 60 minutes |
| Replacing a Faulty Thermostat | $50 - $350 | $200 - $600 | 1 - 2 hours |
| Replacing a Bad Capacitor | $15 - $50 (part only) | $175 - $450 | 1 hour |
| Repairing Defrost System (Board/Sensor) | N/A | $300 - $800 | 1 - 3 hours |
| Fixing Refrigerant Leak & Recharging | N/A | $500 - $1,500+ | 2 - 5 hours |
When to call a pro
While many issues are simple fixes, several symptoms warrant an immediate call to a qualified HVAC technician. Continuing to run the system with these signs can lead to more extensive and costly damage.
Call a professional if:
- The outdoor unit ices up again quickly after you have manually thawed it. This confirms a failure in the defrost control board, defrost sensor, or reversing valve.
- A circuit breaker for the indoor or outdoor unit trips repeatedly. This signifies a dangerous electrical problem, such as a shorted compressor or fan motor, that requires expert diagnosis.
- The system produces no heat when set to "Emergency Heat." This indicates the backup electric heat strips, sequencers, or fuses have failed, leaving you with no heat source.
- You hear loud, persistent mechanical noises like grinding, squealing, or metallic banging from either unit. These are hallmarks of failing motor bearings or an internally failing compressor.
- The system runs constantly but blows cool or lukewarm air, and you have already confirmed the filter is clean and airflow is unobstructed. This is a classic sign of a significant refrigerant leak or a weak, failing compressor.
Prevention & maintenance
Proactive maintenance is the best way to ensure your heat pump operates reliably and efficiently through the winter.
- Change Air Filters Diligently. This is the single most important maintenance task. Check your filter monthly during peak heating and cooling seasons. Replace it at least every 90 days, or more frequently if you have pets or live in a dusty area.
- Schedule Annual Professional Servicing. Have an HVAC technician perform a tune-up every fall. They will clean indoor and outdoor coils, check refrigerant pressure, test capacitors and contactors, inspect electrical connections, and verify the defrost cycle is functioning correctly before you need it most.
- Keep the Outdoor Unit Clean and Clear. Throughout the year, maintain a minimum of 24 inches of clearance around the condenser. In the fall, clear away fallen leaves and debris. In the spring, after pollen has subsided, power off the unit at the disconnect and gently rinse the fins with a garden hose (from the inside out, if possible) to remove buildup.
- Ensure Proper Drainage. Regularly check that the drain holes in the base of the outdoor unit are free of debris. If your indoor unit is in an attic or closet, pour a cup of distilled vinegar down the condensate drain line every few months to prevent algae and sludge buildup that can cause clogs.
- Level the Outdoor Unit. Periodically check that the concrete pad supporting your outdoor unit is level. A unit that has tilted can impair compressor lubrication and block proper defrost drainage, leading to ice buildup.
- Listen to Your System. Pay attention to the normal sounds of your heat pump. If you notice a change in the sound—a new buzz, rattle, or hum—it can be an early warning sign of a developing problem.
Related Articles
Keep troubleshooting with these hand-picked guides from FixlyGuide:
- Oven Not Heating to Correct Temperature? How to Diagnose and Fix — An oven that doesn't heat to the correct temperature can ruin meals. This guide helps you diagnose common issues like a faulty igniter or h…
- Dryer Not Heating: Fix a Tripped Thermal Fuse Fast — Is your electric dryer running but not heating? This guide walks you through safely diagnosing and replacing a tripped thermal fuse, a comm…
- Why Your House is Humid Despite AC & How to Fix It — Even with your AC running, high indoor humidity can make your home uncomfortable. Often, common issues like oversized units or clogged filt…
- Your Thermostat Isn't Broken — It's These 3 Culprits — If your thermostat isn't hitting the mark, it could be a simple fix. Learn how to troubleshoot common issues and get your home comfortable…
- Why Your AC is Blowing Warm Air: Troubleshooting and Fixes — If your AC is blowing warm air, it's often due to a clogged air filter, dirty condenser coils, or a tripped circuit breaker, all of which y…
- Washing Machine Won't Spin or Drain? Easy Fixes for Common Problems — If your washing machine isn’t spinning or draining, it’s usually due to a clogged pump filter, a kinked drain hose, or an overloaded machin…
Get the print-ready PDF of this guide
A clean, ad-free, printable version you can keep on your phone or pin to the workshop wall. Free with a FixlyGuide account.
- Print-optimized layout
- Tools, materials & every step included
- Saved to your account
Frequently asked questions
Why does my heat pump blow cold air when it's very cold outside?+
When outdoor temperatures are extremely low, a heat pump's efficiency decreases, and it might struggle to extract enough heat from the air, causing it to blow cooler air than usual. It may also be in a defrost cycle or need auxiliary heat to kick in.
How do I know if my heat pump is in defrost mode?+
During defrost mode, the outdoor fan typically stops, and you might see steam rising from the outdoor unit. The indoor unit might blow cooler air, and auxiliary heat should engage to counteract this, preventing a drop in indoor temperature. A defrost cycle usually lasts 5 to 15 minutes.
Should auxiliary heat come on automatically?+
Yes, auxiliary or emergency heat should typically come on automatically when the heat pump struggles to meet the thermostat's set temperature, especially in very cold weather. If it's not engaging, check your thermostat settings or for a tripped breaker.


Discussion
Loading comments…