Tools & materials you'll need
Affiliate linksAs an Amazon Associate FixlyGuide earns from qualifying purchases — at no extra cost to you. Prices and availability are accurate as of publication and subject to change.
Quick Answer
When your heat pump isn't heating in cold weather, the most frequent culprits are a dirty outdoor coil, a malfunctioning defrost cycle leading to excessive ice buildup, or an incorrect thermostat setting. Often, a simple cleaning of the outdoor unit or checking for blockages around it can restore its proper function. If the unit is heavily iced, ensure the defrost cycle is initiating correctly. Always check your thermostat first to confirm it's set to 'Heat' and the emergency heat isn't accidentally on.
The Problem
Few things are more unsettling than a heat pump that decides to stop providing warmth precisely when you need it most – during a cold snap. Homeowners often report their heat pump blowing cool air, running constantly without reaching the set temperature, or even having the outdoor unit completely covered in ice. This isn't just an inconvenience; it can lead to uncomfortable indoor temperatures, higher electricity bills as supplementary heat kicks in, and even frozen pipes if temperatures drop severely enough. While heat pumps are marvels of energy efficiency, their performance can indeed be compromised by plummeting mercury, especially if underlying issues aren't addressed. Understanding why your system struggles when the temperature outside dips is the first step to a cozier home.
How It Works
A heat pump, unlike a furnace which generates heat, works by moving heat. In heating mode, it extracts heat energy from the frigid outdoor air – yes, even air below freezing contains heat – and transfers it indoors. This process relies on a refrigerant circulating through indoor and outdoor coils. The refrigerant absorbs heat from the outdoor air as it passes through the outdoor coil, then travels to the indoor coil where it releases that heat into your home. A compressor is central to this, raising the temperature and pressure of the refrigerant. An expansion valve then drops the pressure, allowing the refrigerant to cool and be ready to absorb more heat. During cold weather, the outdoor coil naturally gets very cold, often below freezing, which can cause moisture in the air to condense and freeze onto its surface. To combat this, heat pumps are equipped with a 'defrost cycle.' This cycle temporarily reverses the flow of refrigerant, essentially turning the outdoor coil into an indoor coil (briefly warming it up) to melt off any ice buildup. This typically occurs for 5-15 minutes every 30-90 minutes, depending on conditions. During defrost, the system will often engage auxiliary electric strip heaters (emergency heat) to prevent sending cold air into your home. If this defrost cycle fails, or if the outdoor unit is under unusual stress (like being severely restricted by snow or debris), the unit can become overwhelmed with ice, severely reducing its ability to absorb heat from the outside air and thus diminishing its heating capacity.
Step-by-Step Fix
Here’s how to diagnose and often fix a heat pump that’s struggling in the cold:
-
Check Your Thermostat Settings – The simplest solution first
- Ensure your thermostat is set to 'Heat' and not 'Cool' or 'Fan Only.'
- Verify the desired temperature is set at least 5 degrees Fahrenheit above the current room temperature to call for heat.
- Look for an 'Emergency Heat' or 'Auxiliary Heat' indicator. If it's on accidentally, your heat pump might not engage, or it might be running less efficiently purely on expensive electric resistance heat. Switch it to 'Heat' or 'Auto' if applicable.
- If this doesn't work: Calibrate or replace an old, inaccurate thermostat.
-
Inspect the Outdoor Unit for Obstructions – Clear for airflow
- Safety Note: Always turn off power to the outdoor unit at the service disconnect switch (usually on the wall near the unit) or at your main electrical panel before working on it.
- Examine the outdoor unit for anything blocking airflow around or through it. This includes snow drifts, leaves, dirt, or yard debris. A minimum of two feet of clear space around all sides and above the unit is ideal.
- Use a broom or shovel to gently clear away snow and ice. Never chip at ice directly on the coils with anything sharp, as you could damage the delicate fins.
- If this doesn't work: Check for internal blockages within the coil fins (step 3).
-
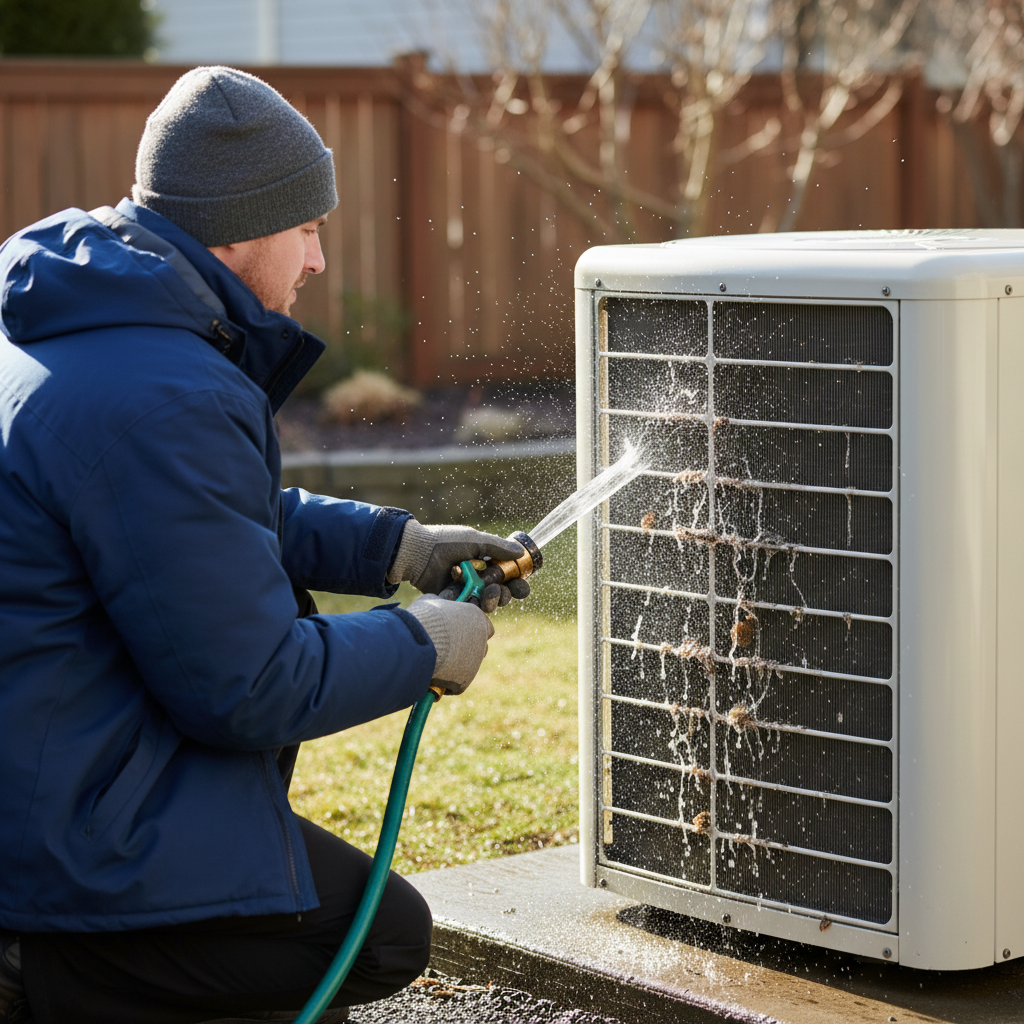
Clean the Outdoor Coil (If Dirty) – Restore heat absorption
- Safety Note: Power off the unit first.
- Visually inspect the fins of the outdoor coil. If they are covered in a layer of grime, dirt, or matted leaves, this severely restricts airflow and heat transfer efficiency. Dirt acts as an insulator.
- Using a garden hose with moderate pressure (not a pressure washer, which can bend fins), rinse the coil from the inside out if possible. This pushes dirt outwards. If you can't get inside, rinse from the outside, top-down.
- For stubborn dirt, you can use a diluted coil cleaner (available at HVAC supply stores) and follow the product instructions, ensuring thorough rinsing.
- If this doesn't work: Consider evaporator coil cleaning (indoor) for a more thorough system cleaning, though less likely to be the primary cold-weather issue.
-
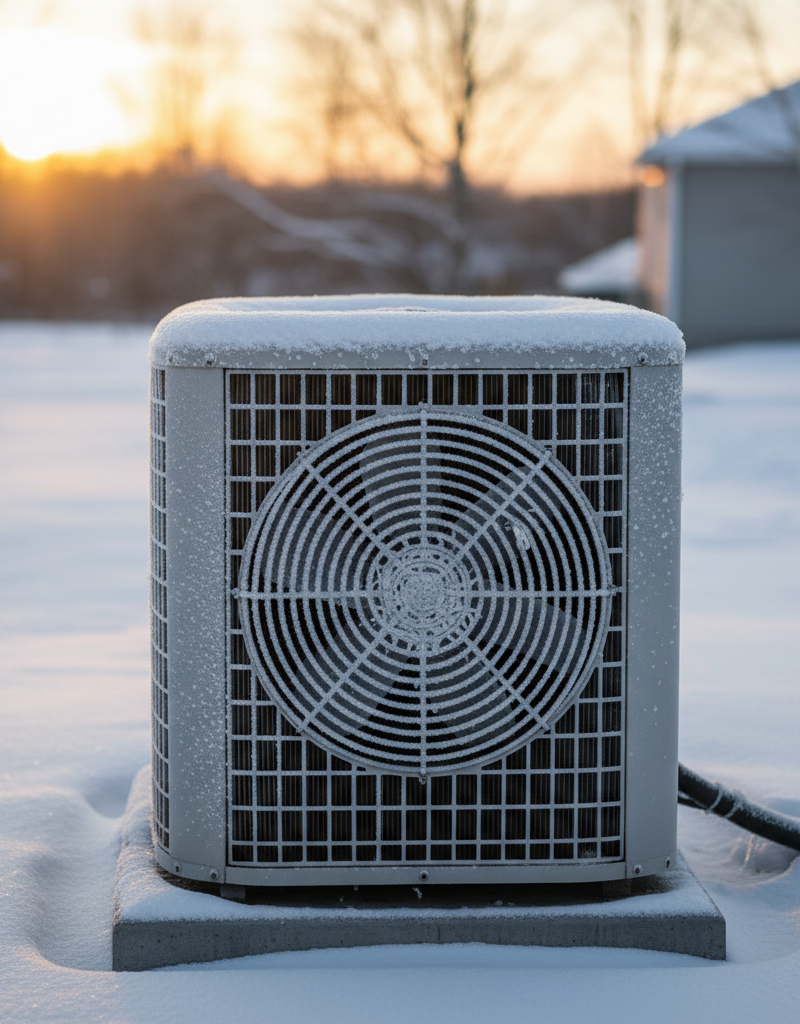
Observe the Defrost Cycle – Is it kicking in?
- If your outdoor unit is heavily iced over, especially on the coil fins, the defrost cycle might not be working. The unit should periodically cycle into defrost mode, which sounds like an outdoor fan momentarily stopping, and sometimes you'll see steam rising from the unit or water draining from the base.
- Let the unit run for an hour or so in very cold conditions and watch for it to initiate defrost. If it never defrosts and builds up significant ice, there's a problem.
- Temporary fix: You can help melt ice by carefully pouring lukewarm (not hot!) water over the coils and allowing it to drain. Never use anything to chip ice.
- If this doesn't work: A faulty defrost board, defrost sensor, or reversing valve might be the issue, requiring professional diagnosis.
-
Check the Indoor Air Filter – Don't starve the system
- A clogged air filter in your indoor air handler restricts airflow, making your entire system work harder and less efficiently. This directly impacts how well your heat pump can distribute heat.
- Locate your air filter (usually in the return air duct or the air handler itself) and inspect it. Hold it up to a light; if you can't see light through it, it's time for a replacement.
- Replace disposable filters every 1-3 months. Reusable filters should be washed monthly.
- If this doesn't work: Inspect return air vents for obstructions (furniture, rugs) and ensure they are open.
-
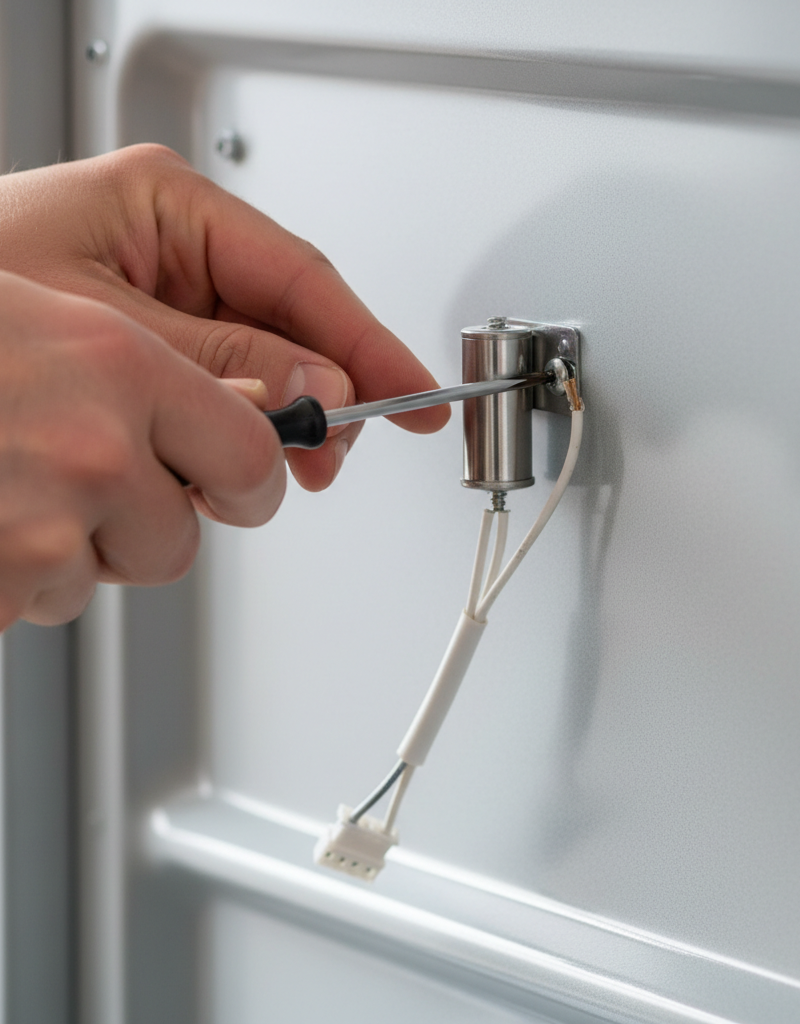
Listen and Look for Fan Issues – Movement is key
- Safety Note: Power off the unit before inspecting.
- Listen to your outdoor unit. Is the fan running when it should be (outside of a defrost cycle)? If the fan isn't spinning, or is making grinding noises, the motor or capacitor might be failing.
- Visually inspect the fan blades for physical damage or obstructions if powered off.
- If this doesn't work: A seized fan motor or bad capacitor requires replacement, often a professional job.
-
Check Refrigerant Lines for Damage – Insulation is crucial
- Visually inspect the insulated copper lines running between your outdoor unit and your home. The larger line should be insulated. If the insulation is torn, cracked, or missing, heat can be lost or gained unnecessarily.
- Repair damaged insulation with self-adhesive foam pipe insulation tape or new insulation sleeves.
- If this doesn't work: If you see frost on the larger refrigerant line in heating mode (when it should be warm), this could indicate a low refrigerant charge or other severe issues, requiring professional help.
Common Causes
- Dirty Outdoor Coil: The most common culprit. A layer of dirt, leaves, or even just dust on the outdoor coil severely impedes its ability to absorb heat from the ambient air, making the unit struggle to provide warmth. Think of it like trying to breathe through a thick, dirty blanket.
- Malfunctioning Defrost Cycle: If the defrost sensor, defrost board, or reversing valve fails, the outdoor coil won't clear itself of ice. Excessive ice acts as an insulator, blocking airflow and preventing heat transfer.
- Low Refrigerant Charge: A leak in the system can lead to insufficient refrigerant. Without the correct amount, the heat transfer process becomes inefficient, causing the unit to struggle to extract heat, particularly in colder temperatures.
- Thermostat Issues: Incorrect settings (e.g., set to 'Emergency Heat' accidentally) or a faulty thermostat can prevent the heat pump from calling for heat or engaging properly.
- Clogged Air Filter: While an indoor issue, a dirty air filter restricts airflow across the indoor coil, making the entire system less efficient at distributing warm air throughout the home.
- Outdoor Unit Obstructions: Snow drifts, overgrown bushes, or yard debris too close to the unit can block airflow, starving the coil of the air it needs to exchange heat with.
- Fan Motor Problems: If the outdoor fan motor isn't running or is running slowly, the unit cannot effectively draw air over the coils, dramatically reducing its heating capacity.
Common Mistakes
- Ignoring a Dirty Outdoor Unit: Many homeowners forget to clean the outdoor unit, allowing leaves, dirt, and debris to build up over time. This is a critical mistake that significantly impacts efficiency.
- Using a Pressure Washer on Coils: While tempting for a quick clean, a high-pressure washer can easily bend the delicate aluminum fins, further restricting airflow and potentially damaging the coil.
- Breaking Off Ice with Tools: Attempting to chip or pry ice off the outdoor coil with hammers, screwdrivers, or other sharp objects often results in punctured refrigerant lines or bent fins, leading to expensive repairs.
- Setting the Thermostat to 'Emergency Heat' for Prolonged Periods: Emergency heat uses electric resistance strips, which are far less efficient and much more expensive to run than the heat pump itself. Only use it when the heat pump is truly broken or in extreme cold as a temporary measure.
- Neglecting Air Filter Changes: A dirty indoor air filter is a major cause of reduced airflow and efficiency, forcing your heat pump to work harder than necessary and diminishing its heating output.
- Overlooking Refrigerant Line Insulation: Damaged or missing insulation on the larger refrigerant line can lead to significant heat loss before the refrigerant even reaches your indoor coil, reducing overall heating performance.
Cost & Time Breakdown
| Task | DIY Cost | Pro Cost | Time |
|---|---|---|---|
| Thermostat Check/Adjustment | $0 | $50–$100 (service call) | 5 minutes |
| Outdoor Unit Clearing/Rinsing | $0–$10 (cleaner) | $100–$200 (basic cleaning) | 15–30 minutes |
| Air Filter Replacement | $10–$40 | Included in tune-up ($150–$300) | 5 minutes |
| Defrost Cycle Observation | $0 | $150–$500 (component diag.) | 30–60 minutes |
| Refrigerant Line Insulation | $15–$30 | Approx. $100+ (materials & labor) | 10–20 minutes |
| Fan Motor Replacement | $150–$400 | $400–$800 | 2–4 hours (pro) |
Tips & Prevention
- Regular Coil Cleaning: Annually clean your outdoor coil, ideally in late spring or early fall, to remove accumulated debris before significant heating or cooling demands. This simple act prevents much heartache.
- Maintain Clearances: Ensure at least 2 feet of clear space around your outdoor unit at all times. Trim back bushes and clear away snow and leaves regularly, especially before and during winter.
- Change Air Filters Routinely: Set a reminder to check and replace your indoor air filter every 1-3 months, or more frequently if you have pets or allergies.
- Monitor Defrost Cycles: During cold weather, occasionally observe your outdoor unit to ensure it's defrosting properly. Ice buildup on the coil fins that doesn't clear in 30-90 minutes is a red flag.
- Annual Professional Tune-up: Schedule a yearly professional HVAC tune-up. A technician can identify potential issues like low refrigerant, failing components, or electrical problems before they become major breakdowns.
- Insulate Refrigerant Lines: Regularly inspect the insulation on your refrigerant lines. Repair any damage promptly to ensure maximum efficiency.
When to Call a Professional
While many heat pump issues in cold weather can be addressed by a diligent homeowner, certain problems absolutely warrant calling a licensed HVAC professional. If your heat pump is still not heating effectively after you've performed the basic troubleshooting steps, or if you observe widespread ice buildup that doesn't clear, it's time to call a pro. Additionally, if you notice strange noises coming from the unit, a burning smell, or if the outdoor fan isn't running at all, these are signs of a more serious mechanical or electrical fault. Dealing with refrigerant leaks, compressor issues, or electrical control board failures requires specialized tools, training, and certifications and should never be attempted by an untrained individual, as these can lead to further damage, safety hazards, or inefficiencies. A professional can accurately diagnose complex issues, perform safe refrigerant handling, and ensure your system is operating at peak performance and safety.
Related Articles
Keep troubleshooting with these hand-picked guides from FixlyGuide:
- The #1 Mistake Homeowners Make When Their Heat Pump Stops Heating in Winter — Discover the most common reason your heat pump struggles in cold weather and how a simple homeowner fix can restore warmth to your home.
- The #1 Mistake Homeowners Make When Heat Pumps Stop Heating in Winter — Discover the crucial mistake most homeowners make when their heat pump struggles in cold weather and how to fix it, potentially saving hund…
- Why Your Heat Pump Auxiliary Heat Won't Turn Off — Discover why your heat pump's auxiliary heat keeps running, driving up your energy bills. Learn to troubleshoot common issues and know when…
- The Secret Reason Your Thermostat Lies (And How to Fix It in Minutes) — Discover why your thermostat isn't hitting its set temperature and learn simple, actionable steps to diagnose and fix the most common culpr…
- The Secret Reason Your Oven Fails to Heat (It's NOT Always the Element) — Discover why your oven isn't reaching its set temperature, from common part failures to overlooked calibration issues, and how to fix it.
- The Secret Culprit Behind Your Leaking Washing Machine (and the $15 Fix) — Discover the often-overlooked cause of washing machine leaks from the bottom and how a simple, affordable fix can save you from costly repa…
Get the print-ready PDF of this guide
A clean, ad-free, printable version you can keep on your phone or pin to the workshop wall. We'll also send occasional weekly tips matched to your home situation.
- Print-optimized layout
- Tools, materials & every step included
- Unsubscribe anytime
Frequently asked questions
Why does my heat pump blow cool air in winter?+
Your heat pump might blow cool air in winter if it's in a defrost cycle (which is normal and temporary), if the outdoor unit's coils are frozen solid, or if there's a problem with refrigerant levels or the compressor. Also, check if your thermostat is accidentally set to 'Emergency Heat,' which uses less efficient electric strips.
How often should my heat pump defrost in cold weather?+
A heat pump typically enters a defrost cycle every 30 to 90 minutes when outdoor temperatures are cold enough to cause ice buildup. The duration of each defrost cycle usually lasts between 5 to 15 minutes, during which time the outdoor fan may shut off and you might see steam rising from the unit.
Can a dirty heat pump coil cause it to stop heating?+
Yes, absolutely. A dirty outdoor coil is one of the most common reasons a heat pump struggles to heat effectively in cold weather. Dirt, leaves, and debris act as an insulating layer, severely reducing the coil's ability to absorb heat from the outside air, making the unit work harder and deliver less warmth.
What’s the difference between 'Heat' and 'Emergency Heat'?+
'Heat' uses your heat pump, which is highly energy-efficient, to extract heat from outside air and deliver it indoors. 'Emergency Heat' bypasses the heat pump entirely and uses electric resistance heating elements (like a large toaster oven) to generate heat. Emergency heat is much more expensive to run and should only be used as a backup when the heat pump is not functioning.

Discussion
Loading comments…