
Tools & materials you'll need
Affiliate linksAs an Amazon Associate FixlyGuide earns from qualifying purchases — at no extra cost to you. Prices and availability are accurate as of publication and subject to change.
Quick Answer
A dryer that tumbles but doesn't heat up is a frustrating, yet often simple, problem to solve. Before you panic or call a technician, check your home's circuit breakers. Many electric dryers operate on two separate breakers – one for the motor and one for the heating element. If only the heating element's breaker has tripped, the dryer will spin but won't generate warmth. A quick flip of the breaker can resolve this. If that's not it, a faulty thermal fuse is another very common culprit, and can be diagnosed and replaced with basic tools.
The Problem
Imagine loading a fresh batch of wet laundry into your dryer, selecting your preferred cycle, and returning later only to find your clothes are still damp, or worse, completely soaked. The drum is spinning, the lights are on, and everything seems normal – except for the crucial absence of heat. This frustrating scenario points directly to a failure in the heating system, leaving your clothes to tumble in cold air indefinitely. While it might feel like a major appliance breakdown, the underlying cause is frequently one of several common, and often DIY-friendly, components.
How It Works
Understanding how your dryer generates heat is key to troubleshooting. Electric dryers draw a significant amount of power, typically using a 240-volt circuit, unlike most other household appliances that run on 120 volts. This 240-volt power is split: one leg powers the motor (which spins the drum) and the control board, while the other leg is dedicated to the heating element.
When you start a cycle, the control board sends power to the heating element, a long coil of resistance wire, often encased in a metal housing, located in the dryer's air duct. As electricity flows through this coil, it heats up, much like a toaster element. A blower motor simultaneously draws outside air into the dryer, forces it over the hot heating element, and then pushes this heated air through the tumbling clothes and out through the dryer vent system.
Crucially, several safety components monitor this process. A thermostat regulates the temperature, preventing the dryer from overheating and scorching your clothes or, worse, starting a fire. If the temperature exceeds a safe limit, a thermal fuse, a one-time safety device, will blow, cutting power to the heating element specifically. Some dryers also have a hi-limit thermostat that acts similarly. If any of these safety devices activate, or if the heating element itself fails, the dryer will continue to tumble (because the motor is on a separate circuit), but it will produce no heat.
Step-by-Step Fix
1. Power Check – The Simplest Fix
— Start with the basics; sometimes the simplest solution is the right one. Many electric dryers require two separate 120V circuits (totaling 240V) to run. One circuit powers the motor and controls, while the other powers the heating element. If the breaker for the heating element trips, the dryer will spin but won't heat. * Safety First: Always unplug the dryer before performing any internal checks or repairs. * Locate your breaker panel: Find the circuit breaker labeled for your dryer. It's usually a double-pole breaker (two linked switches). * Reset the breaker: If it's tripped (often midway between ON and OFF), firmly push the switch all the way to OFF, then back to ON. Even if it looks on, a quick reset can sometimes solve the issue. Test the dryer. * Check the outlet: If you have a multimeter, carefully test the outlet for 240V. Only do this if you are comfortable and experienced working with electricity. Insert the probes into the two vertical slots. If you get a reading of 240V (or close to it, like 230V), your outlet is supplying proper power. If you read 120V or 0V, you have a problem with your home's wiring or breaker panel, and you should call an electrician.
2. Lint Trap & Vent – The Overlooked Culprit
— A clogged vent system is a leading cause of overheating and can trip safety fuses. Reduced airflow prevents heat from properly dissipating, causing the thermal fuse to blow as a protective measure. * Clean the lint trap: Pull out the lint screen and remove all accumulated lint. Do this after every load, but if you haven't recently, give it a thorough cleaning. * Inspect the vent hose: Disconnect the flexible vent hose from the back of the dryer and the wall. Use a vacuum cleaner with a long attachment to remove any lint buildup. Shine a flashlight into the vent pipe and look for obstructions. * Check the exterior vent cap: Go outside and inspect the dryer vent cap. Ensure the flapper opens freely and isn't blocked by lint, debris, or even a bird's nest. Clean it thoroughly. * Test again: Reconnect everything securely and run the dryer. If a blockage caused the problem, it should now heat.
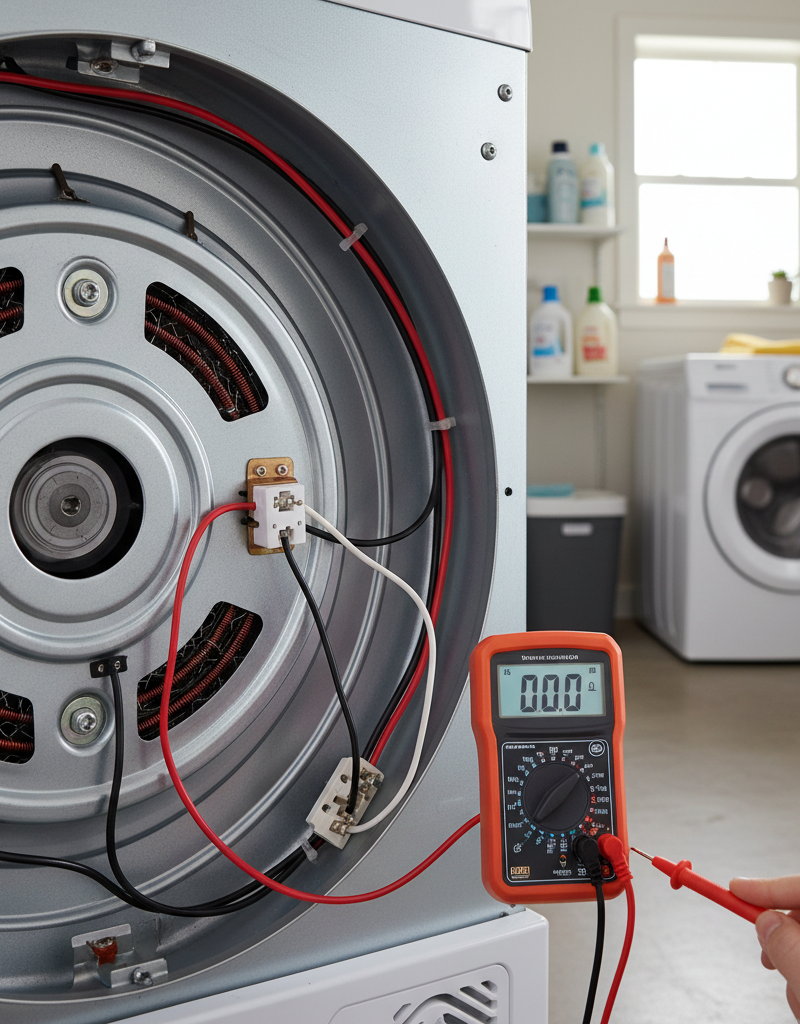
3. Thermal Fuse – The Common Casualty
— The thermal fuse is a one-time safety device designed to blow if the dryer overheats. It's the most common cause of a no-heat situation where the dryer still spins. * Locate the fuse: Unplug the dryer. Gain access to the heating element housing, usually by removing the rear access panel or the lower front panel. The thermal fuse is typically a small, cylindrical component with two wires attached, mounted on the blower housing or heating element assembly. It often looks like a ceramic or plastic cylinder, about 1-2 inches long. * Test with a multimeter: Set your multimeter to the continuity setting (often indicated by a speaker icon). Place one probe on each terminal of the fuse. If the fuse is good, the multimeter will beep or show a reading close to zero ohms (continuity). If it shows no reading, an open circuit, or infinite resistance, the fuse is blown and needs replacement. * Replacement: Thermal fuses are specific to dryer models. Take a picture or note the part number. Disconnect the wires and remove the old fuse. Install the new fuse, ensuring connections are secure. They typically cost $10-$20. * Important: If the thermal fuse blew, it's crucial to address why it blew. Most often, it's due to restricted airflow (lint!), so ensure your vent system is spotless.
4. Heating Element – The Core Issue
— If the thermal fuse is good, the heating element itself might be broken, especially if the dryer is older. The element is a coiled wire that can break over time. * Locate the element: With the dryer unplugged and the access panel removed, locate the heating element housing. It's usually a metal box with a coiled wire inside. (Some elements are not serviceable and require replacing the entire housing). * Visual inspection: Look for visible breaks, signs of scorching, or a warped coil in the element. A healthy element will consist of an intact, evenly spaced coil. * Test with a multimeter: Disconnect at least one wire from the heating element to isolate it from the circuit. Set your multimeter to the ohms (resistance) setting. Place probes on the element's terminals. A good heating element will typically show a resistance reading between 8 and 12 ohms (check your dryer's service manual for the exact specification). A reading of infinite resistance or 'OL' (open loop) indicates a broken element that needs replacement. * Replacement: Heating elements are specific. Note the part number. Disconnect all wires, unmount the old element from its housing, and install the new one. Reconnect wires securely. Heating elements generally cost $50-$100.
5. Thermostats or Thermal Cut-Off – Secondary Safety Devices
— Like the thermal fuse, these also cut power to prevent overheating, but they are often resettable. Dryers typically have several thermostats (operating thermostat, hi-limit thermostat) and sometimes an additional thermal cut-off fuse. * Locate and test: These are usually small, coin-shaped components with two wires, often mounted near the heating element or on the blower housing. Disconnect wires and test for continuity with a multimeter. A good thermostat will show continuity at room temperature. A bad one will show an open circuit. * Reset: Some hi-limit thermostats have a small, red reset button in the center. If present, push it firmly. If it clicks, it was tripped. * Replacement: If a thermostat fails the continuity test and isn't resettable, it needs replacement. They are usually less expensive than heating elements, around $15-$30.
Common Causes
- Tripped Circuit Breaker: The most overlooked cause. Electric dryers use a 240V circuit, often split across two breakers. If one trips, the motor runs but the heating element receives no power.
- Clogged Vent System: Excessive lint buildup in the vent hose or exterior cap restricts airflow, causing the dryer to overheat. This leads to the thermal fuse blowing as a safety measure.
- Blown Thermal Fuse: A single-use safety device designed to protect the dryer from overheating. Once it blows, it must be replaced.
- Faulty Heating Element: Over time, the coiled wire inside the heating element can break or degrade, preventing it from generating heat.
- Defective Thermostat(s): Dryers have multiple thermostats (operating and hi-limit) that regulate temperature. If one fails, it can prevent the heating element from turning on or cause it to overheat.
- Broken Belt Sensor (rare, but possible): Some advanced dryers have sensors that prevent the heating element from turning on if they detect the drum isn't spinning, even if it appears to be moving slowly.
Common Mistakes
- Forgetting the Circuit Breaker: Many homeowners jump straight to internal components without checking the simplest, most common issue first. Always start at the source of power.
- Ignoring the Vent System: Replacing a thermal fuse without addressing a clogged vent system is a temporary fix. The fuse will likely blow again quickly.
- Not Unplugging the Dryer: Working on an appliance connected to a 240V circuit is extremely dangerous. Always unplug it from the wall, not just turn it off, before opening it up.
- Buying the Wrong Part: Dryer parts, especially fuses and elements, are model-specific. Always verify the exact part number for your dryer's make and model to ensure compatibility.
- Assuming a Major Repair: A no-heat issue often signals a minor component failure that's relatively inexpensive and easy to replace, not an entire dryer replacement.
- Skipping Multimeter Testing: Guessing which component is faulty wastes money and time. A multimeter provides a clear diagnosis of continuity for fuses and resistance for heating elements.
Cost & Time Breakdown
| Task | DIY cost | Pro cost | Time |
|---|---|---|---|
| Circuit breaker reset | $0 | $0–$100 | 5 minutes |
| Vent cleaning | $0–$10 | $50–$150 | 15–30 minutes |
| Thermal fuse replacement | $10–$25 | $100–$200 | 30–60 minutes |
| Heating element replacement | $50–$100 | $150–$250 | 1–2 hours |
| Thermostat replacement | $15–$30 | $100–$200 | 45–90 minutes |
Tips & Prevention
- Clean the Lint Trap Regularly: Make it a habit to clean the lint screen after every single load. This is the single most effective way to prevent vent clogs and improve dryer efficiency.
- Inspect and Clean Vent Annually: At least once a year (more often if you use your dryer heavily or have pets), thoroughly clean the entire dryer vent system from the back of the dryer to the exterior vent cap. Dryer vent cleaning kits are available at hardware stores.
- Avoid Overloading: Overloading your dryer restricts airflow and makes the heating element work harder, increasing the risk of overheating and component failure.
- Check for Kinks in Vent Hose: Periodically pull your dryer out and ensure the flexible vent hose isn't kinked or crushed, which can severely impede airflow.
- Listen for Unusual Noises: Rattling, squealing, or grinding noises can indicate other problems developing within the dryer, which might indirectly affect heating or overall operation.
- Perform Continuity Checks: If you have a multimeter, knowing how to perform basic continuity checks on components like thermal fuses and thermostats can save you diagnostic time and money.
When to Call a Professional
While many no-heat dryer issues are DIY-friendly, there are specific situations where calling an appliance repair professional is the safest and most efficient choice. If, after checking the circuit breaker and cleaning your vent system, the dryer still isn't heating, and you're uncomfortable working with electrical components or disassembling your appliance, it's time to call a pro. Additionally, if your multimeter readings are inconclusive, or if you suspect a problem with the main circuit board or the household electrical wiring (e.g., if your outlet isn't providing 240V), a licensed electrician or appliance technician has the specialized tools and expertise to diagnose and safely repair these more complex issues. Attempting to fix complex electrical problems without proper training can be dangerous and cause further damage to your appliance or home's electrical system.
Related Articles
Keep troubleshooting with these hand-picked guides from FixlyGuide:
- The 4 Hidden Reasons Your Dryer Tumbles Cold (And How to Fix Them in 30 Minutes) — Your dryer tumbles, but clothes stay cold. Discover the four most common culprits behind a dryer that won't heat, and how to troubleshoot t…
- The #1 Reason Your AC Blows Warm Air (And It's Not What You Think) — A dirty air filter is often the overlooked culprit behind an air conditioner blowing warm air, hindering its ability to cool your home effi…
- The Dryer Vent Fire Trap: 3 Hidden Signs Your Home Is at Risk — Learn the critical signs your dryer vent is clogged and how to safely clean it to prevent a dangerous house fire.
- The $5 Part That Stops Your Dryer From Heating (And How to Replace It in 30 Minutes) — A dryer that tumbles but doesn't heat often points to a blown thermal fuse, a simple and inexpensive fix most homeowners can do themselves.
- The $5 Part That Stops Your Dryer From Heating (And How to Replace It) — A dryer that tumbles but doesn't heat often points to a blown thermal fuse, a cheap and simple fix any homeowner can do.
- The 5-Minute Fix for a Dead Range Hood Fan (and When to Call a Pro) — Don't panic if your range hood fan suddenly stops working. Often, a simple circuit breaker reset or a quick filter check can restore airflo…
Frequently asked questions
Why would my dryer spin but not heat up?+
The most common reasons a dryer spins but doesn't heat up include a tripped circuit breaker for the heating element, a blown thermal fuse due to overheating, a clogged dryer vent, or a faulty heating element or thermostat.
How do I test a dryer thermal fuse?+
To test a thermal fuse, unplug the dryer, locate the fuse (often near the heating element or blower housing), disconnect one wire, and use a multimeter set to continuity mode. If the multimeter beeps or shows a reading near zero, the fuse is good. If it shows no continuity (open circuit), the fuse is blown and needs replacement.
Can a clogged dryer vent cause the dryer to not heat?+
Yes, absolutely. A clogged dryer vent restricts airflow, causing the dryer to overheat. This consistently high temperature can cause the thermal fuse, a safety device, to blow, which then cuts power to the heating element, resulting in no heat.
How much does it cost to replace a dryer heating element?+
A DIY replacement of a dryer heating element typically costs $50-$100 for the part itself. If you hire a professional, the cost can range from $150-$250, including parts and labor.
Where is the reset button on a dryer?+
Some dryers have a small, red reset button on the hi-limit thermostat, usually located near the heating element housing or on the blower housing. You might need to remove an access panel to find it. Not all dryers have a manually resettable thermostat.


Discussion
Loading comments…