
Tools & materials you'll need
Affiliate links- AmazonNew thermal fuseSpecific to your dryer make/model
As an Amazon Associate FixlyGuide earns from qualifying purchases — at no extra cost to you. Prices and availability are accurate as of publication and subject to change.
Quick Answer
Most often, a dryer that runs but produces no heat has a blown thermal fuse. This small, inexpensive safety device is designed to fail and cut power to the heating element if the dryer overheats, typically due to restricted airflow. Replacing it is a straightforward DIY task that takes about 30-60 minutes.
The Problem
There’s nothing more frustrating than pulling clothes out of the dryer only to find them still damp and cold. While a complete lack of power signals an electrical issue, a dryer that hums, spins, and lights up – but just won’t get hot – usually points to a specific set of culprits. Forget complex diagnostics for a moment; the vast majority of these cases boil down to a simple, inexpensive part designed to fail: the thermal fuse. This tiny component, often costing less than a specialty coffee, acts as a safety valve, protecting your dryer from overheating by cutting power to the heating element. It's a good thing, preventing fires, but a bad thing for your laundry day. If your dryer is tumbling, and you can hear the motor working, but there's no warmth whatsoever, you're likely dealing with a blown thermal fuse or, less commonly, a faulty heating element, thermostat, or heating coil.
How It Works
Understanding how your dryer produces heat can demystify the troubleshooting process. Electric dryers operate on a relatively simple principle. When you select a heated cycle, electricity flows from your home's circuit breaker, through the dryer's controls, and then to the heating element. This element is essentially a large, coiled resistor that glows red-hot when current passes through it, generating intense heat. A powerful blower fan simultaneously pulls room air into the dryer, over the glowing heating element, and then circulates this superheated air through the tumbling drum, drying your clothes. Finally, the moist air is expelled out through the exhaust vent.
Several safety devices are in this pathway to prevent overheating and potential fires. The most critical for our discussion are the thermal fuse and the thermostats. The thermal fuse is a one-time-use safety device, typically mounted on the blower housing or heating element assembly. If the temperature inside the dryer (often near the exhaust vent or heating element) exceeds a predetermined, unsafe limit – usually due to restricted airflow from a clogged lint trap or vent duct – the fuse "blows," creating an open circuit and permanently cutting power to the heating element. It's a non-resettable component, meaning once it blows, it needs replacement. Thermostats, on the other hand, are cycling devices. They monitor the temperature and cycle the heating element on and off to maintain the desired temperature you select on the control panel. If a thermostat fails, it can either continuously keep the heat off or, more dangerously, allow the dryer to overheat. A blown thermal fuse is often a symptom of an underlying issue like poor ventilation, which is why simply replacing the fuse without checking for clogs is a temporary fix.
Step-by-Step Fix
Safety First! Always unplug the dryer from the wall outlet before performing any inspections or repairs to prevent electrical shock.
- Disconnect Power – Unplug the dryer completely. This is non-negotiable for your safety. Do not rely on simply turning off the circuit breaker, as some dryers may still have residual current.
- Clear the Lint Trap and Exhaust Vent – Start with the basics. A clogged lint trap or exhaust vent is the #1 cause of overheating and blown thermal fuses. Thoroughly clean the lint screen. Then, disconnect the flexible exhaust duct from the back of the dryer and vacuum out any lint buildup from both the dryer's exhaust port and the duct itself. Use a vent brush to reach deep into the ducting. Also, check the exterior vent hood for blockages (bird nests, lint accumulation).
- Pro Tip: If your vent runs through a wall or ceiling, consider hiring a professional to clean the entire duct run, especially if it's long or has several bends.
- Access the Dryer's Back Panel – Prepare for entry. Depending on your dryer model, you might need a nut driver or screwdriver to remove the screws securing the metal back panel. Lay a towel or blanket on the floor to avoid scratching the dryer or your flooring when you lay it down.
- Tools: Nut driver set, Phillips head screwdriver
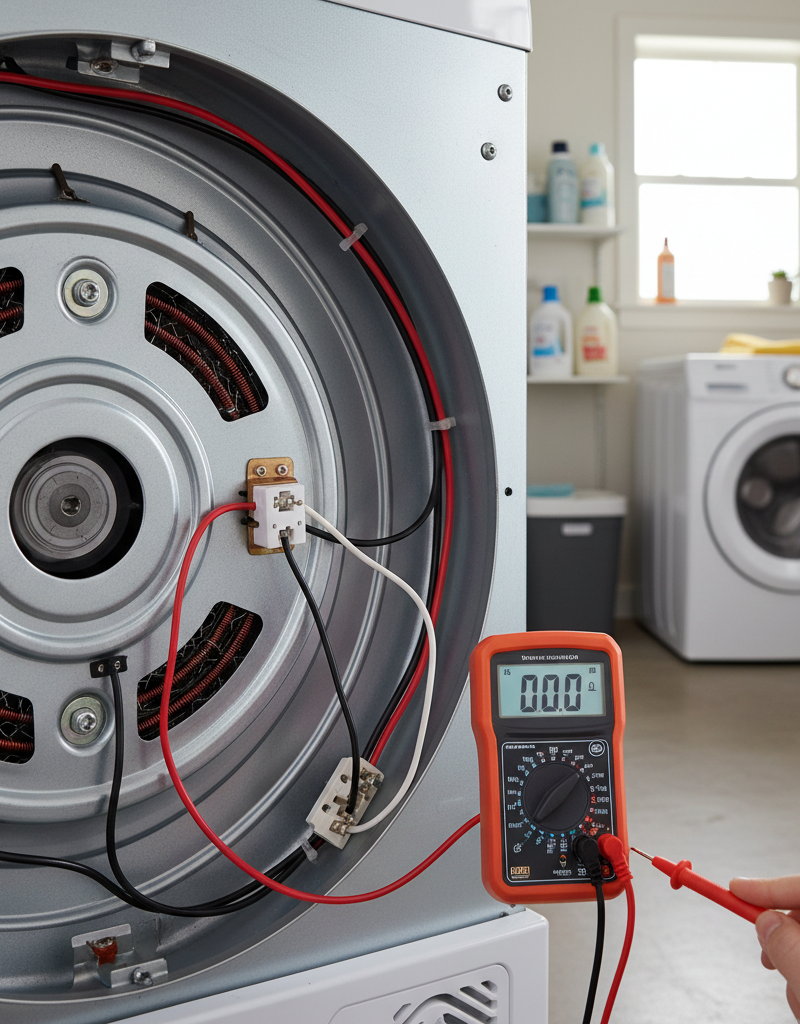
- Locate the Thermal Fuse – Follow the air path. The thermal fuse is typically a small, white plastic component, often rectangular or cylindrical, with two wires connected to it. It's usually located on the blower housing or near the heating element housing. On most models, it will be found on the exhaust ducting, near where the flexible vent attaches at the rear of the machine.
- If you struggle to find it: Consult your dryer's owner's manual or search online for a parts diagram specific to your dryer make and model.
- Test the Thermal Fuse (Continuity Check) – Confirm the diagnosis. Disconnect the two wires attached to the thermal fuse (they usually pull off or require a small tab to be pressed). Set your multimeter to the continuity or lowest resistance (Ohms) setting. Touch one probe to each terminal of the thermal fuse. If the multimeter beeps or shows a reading close to 0 ohms, the fuse is good. If it shows "OL" (overload), "1," or no continuity, the thermal fuse is blown and needs replacement.
- Important: A blown fuse looks perfectly normal; you can't tell it's blown just by looking at it.
- Safety: Ensure the dryer is unplugged before using a multimeter on any internal components.
- Replace the Thermal Fuse – Install the new part. If the thermal fuse tested bad, remove the mounting screw(s) holding it in place. Install the new thermal fuse in the same orientation, tightening the screws gently but firmly. Reconnect the two wires, ensuring they are secure. They should snap firmly onto the terminals.
- Part Sourcing: Purchase an exact OEM replacement part for your specific dryer make and model. Universal parts may not have the correct temperature rating.
- If this doesn't fix it: If testing confirms the fuse is good, your issue lies elsewhere, possibly with a thermostat, heating element, or even the control board. Proceed cautiously if replacing these, or consider calling a pro.
- Inspect Other Heating System Components (Optional but Recommended) – Dig a little deeper. While you have the dryer open, it's a good idea to quickly check the other components often associated with heating issues:
- High-Limit Thermostat(s): These are usually circular, metal discs with two terminals, located near the heating element. Test them for continuity just like the thermal fuse. A good thermostat will show continuity at room temperature. If it's open, it's faulty.
- Operating Thermostat: Similar in appearance to the high-limit, but it cycles the heat. Test for continuity. If it's open at room temperature, it's likely bad.
- Heating Element: This is a large, coiled wire assembly. Visually inspect it for breaks or hot spots. To test, disconnect its power wires and check for continuity across the element's terminals. It should show a resistance reading (e.g., 10-50 ohms, consult your manual). No continuity means a broken element. Caution: Exposed heating elements can be fragile.
- Reassemble and Test – Button it up. Carefully reattach the back panel, ensuring all screws are tightened. Reconnect the exhaust duct to the dryer. Plug the dryer back into the wall outlet. Run a short, heated cycle with a damp towel inside. After a few minutes, open the door and feel for heat. If warm, congratulations! If not, recheck your connections or consider other causes.
Common Causes
- Clogged Lint Trap or Exhaust Vent: This is by far the most common culprit. Restricted airflow causes heat to build up inside the dryer, triggering the thermal fuse to blow as a safety measure. Ensure your lint trap is cleaned after every load and your exhaust vent is cleaned at least once a year.
- Faulty Thermal Fuse: The fuse simply does its job and blows due to overheating. While it's the direct cause of no heat, the reason it blew is usually an underlying airflow issue or occasionally a faulty cycling thermostat.
- Malfunctioning Cycling Thermostat: This thermostat regulates the temperature inside the dryer. If it fails in the "open" position, it won't allow the heating element to turn on. If it fails to open, it can cause the dryer to overheat and blow the thermal fuse.
- Broken Heating Element: Over time, the coiled wire in the heating element can break, creating an open circuit and preventing it from generating heat. This usually happens from repeated heating and cooling cycles or mechanical stress.
- Motor or Blower Wheel Issues: While less common for no heat (they usually cause no tumbling at all), if the blower wheel is seized or the motor is weak, it can reduce airflow sufficiently to cause overheating and a blown thermal fuse.
- Faulty Door Switch: A less obvious cause, but if the door switch is faulty and not registering as closed, some dryers are designed to prevent the heating element from engaging, even if the drum spins.
Common Mistakes
- Ignoring the Underlying Cause: The biggest mistake is simply replacing a blown thermal fuse without investigating why it blew. If you don't clear the clogged vent that caused the fuse to blow, the new fuse will likely blow again almost immediately.
- Failing to Disconnect Power: Working on any appliance without unplugging it is extremely dangerous and can lead to severe electrical shock or death. Always unplug the dryer.
- Improper Venting Material: Using flexible plastic or foil ducting (often thin and prone to kinking and lint buildup) instead of rigid metal ductwork for the main exhaust run. Metal ducts are smoother, more durable, and less likely to sag and trap lint. Replace old, flimsy ducts with rigid or semi-rigid aluminum.
- Not Using OEM Parts: Using generic, off-brand thermal fuses or thermostats that aren't specifically rated for your dryer model. These might fail prematurely or, worse, not trip correctly, posing a fire risk.
- Overlooking the External Vent Cap: Forgetting to check the vent hood on the outside of your house. These can become completely clogged with lint, bird nests, or even painted shut, severely restricting airflow.
- Assuming it's just the fuse: While the thermal fuse is often the culprit, a quick continuity check with a multimeter is critical. Don't just buy a new fuse if yours is actually good; you'll waste time and money, and still have a cold dryer.
Cost & Time Breakdown
| Task | DIY Cost | Pro Cost | Time |
|---|---|---|---|
| Lint Trap & Vent Cleaning | $0–$10 | $100–$250 | 15–30 minutes |
| Thermal Fuse Replacement | $5–$20 | (Included in repair) | 30–60 minutes |
| Thermostat Replacement | $15–$40 | (Included in repair) | 45–90 minutes |
| Heating Element Replacement | $40–$150 | $200–$400+ | 1–2 hours |
| Professional Dryer Diagnosis | N/A | $80–$150 | 30–60 minutes |
Tips & Prevention
- Clean the Lint Screen Every Load: This is the easiest and most effective way to prevent lint buildup and maintain proper airflow.
- Inspect Your Dryer Vent Annually: Disconnect the flexible duct from the dryer and clean as much as you can reach. Consider professional vent cleaning every 1-2 years, especially if your vent run is long or has multiple turns.
- Use Rigid or Semi-Rigid Metal Ducting: Replace flimsy plastic or foil hoses with sturdier metal options for better airflow and fire safety.
- Avoid Overloading Your Dryer: Overloading restricts airflow within the drum, making the dryer work harder and increasing the risk of overheating.
- Check for Kinks or Crushes: Periodically pull your dryer out and ensure the flexible exhaust duct isn't kinked, crushed against the wall, or otherwise obstructing airflow.
- Listen for Changes: Pay attention to how your dryer sounds. Unusual noises or longer-than-usual drying times can be early warning signs of problems.
When to Call a Professional
While replacing a thermal fuse is a straightforward DIY task, there are clear instances where professional help is warranted. If you've thoroughly cleaned your venting system, carefully replaced the thermal fuse (and perhaps even secondary thermostats) with OEM parts, and your dryer still isn't heating, the problem is likely more complex. Issues such as a faulty main control board, a severely damaged or hard-to-access heating element, or intermittent electrical problems require specialized diagnostic tools and expertise. Furthermore, if you're uncomfortable working with electrical components, even with the power off, or you lack the proper multimeter to safely test components, it's always best to call a licensed appliance repair technician. Attempting repairs beyond your skill level can lead to further damage, safety hazards, or void your appliance warranty. A professional can quickly and accurately diagnose the root cause, ensuring a safe and lasting repair.
Related Articles
Keep troubleshooting with these hand-picked guides from FixlyGuide:
- The $5 Part That Stops Your Dryer From Heating (And How to Replace It in 30 Minutes) — A dryer that tumbles but doesn't heat often points to a blown thermal fuse, a simple and inexpensive fix most homeowners can do themselves.
- The $5 Part That Stops Your Dryer From Heating (And How to Replace It in 30 Min) — Discover the most common, inexpensive culprit behind a dryer not heating up and learn how to quickly diagnose and replace it yourself.
- The #1 Reason Your AC Freezes Solid (It's Not What You Think) — A frozen AC unit often points to poor airflow, which can be a simple fix if you know where to look.
- The 4 Hidden Reasons Your Dryer Tumbles Cold (And How to Fix Them in 30 Minutes) — Your dryer tumbles, but clothes stay cold. Discover the four most common culprits behind a dryer that won't heat, and how to troubleshoot t…
- The Secret Reason Your Oven Fails to Heat (It's NOT Always the Element) — Discover why your oven isn't reaching its set temperature, from common part failures to overlooked calibration issues, and how to fix it.
- The #1 Mistake Homeowners Make When Their Dryer Stops Drying (And How to Fix It Free) — If your dryer is taking too long to dry clothes, the most common culprit is a clogged vent, which can be easily fixed with simple tools.
Get the print-ready PDF of this guide
A clean, ad-free, printable version you can keep on your phone or pin to the workshop wall. Free with a FixlyGuide account.
- Print-optimized layout
- Tools, materials & every step included
- Saved to your account
Frequently asked questions
How do I know if my dryer's thermal fuse is blown?+
The most common symptom of a blown thermal fuse is that your dryer will tumble and run normally, but it won't produce any heat. You'll need to use a multimeter to test for continuity across the fuse's terminals after disconnecting power to confirm it's blown.
Can a clogged vent cause a thermal fuse to blow?+
Yes, absolutely. A clogged lint trap or exhaust vent severely restricts airflow, causing heat to build up inside the dryer. This excessive heat triggers the thermal fuse to blow as a safety mechanism to prevent fires. Always clear your vents before replacing the fuse.
Where is the thermal fuse located on a dryer?+
The thermal fuse is typically a small, white plastic component with two wires connected to it. It's usually located on the blower housing or near the heating element assembly, often on the exhaust ducting at the rear of the dryer. You'll usually need to remove the back panel to access it.
Can I bypass a thermal fuse on a dryer?+
No, never bypass a thermal fuse. It is a critical safety device designed to prevent your dryer from overheating and potentially catching fire. Bypassing it creates a serious fire hazard and should never be attempted. Always replace a blown thermal fuse with an exact OEM equivalent.
How much does it cost to replace a dryer thermal fuse?+
A new thermal fuse typically costs between $5 and $20 for the part itself. If you perform the repair yourself, this is often your only cost. A professional appliance repair technician will charge for parts, labor, and a service call, which can range from $150 to $300 or more depending on your location and the specific repair.


Discussion
Loading comments…