
Tools & materials you'll need
Affiliate linksAs an Amazon Associate FixlyGuide earns from qualifying purchases — at no extra cost to you. Prices and availability are accurate as of publication and subject to change.
Quick Answer
If your electric dryer tumbles but doesn't produce heat, the problem is most commonly a tripped circuit breaker, a blown thermal fuse, or a failed heating element. For gas dryers, a faulty igniter or gas valve could be to blame. Always start by checking your home's electrical panel for tripped breakers, as this is the easiest and most frequent fix. If that doesn't resolve it, you'll need to check internal components.
The Problem
There's nothing more frustrating than pulling damp clothes out of a dryer that's supposed to be drying them. When your clothes dryer spins but fails to generate heat, it's not just an inconvenience; it can lead to mildewed laundry and extended drying times, costing you extra in electricity or gas. This issue points to a failure in the heating system itself, whether electrical or gas-fired, or a disruption in its power supply. While some causes are simple DIY fixes, others may require internal component replacement or even professional attention, especially for gas appliances.
How It Works
Understanding how your dryer heats can demystify the troubleshooting process.
Electric Dryers: These dryers generate heat through a heating element, essentially a large resistor coil. When electricity flows through this coil, it heats up, and a fan then draws ambient air over the hot coil and into the drum. A thermostat regulates the temperature, cycling the heating element on and off to maintain the selected heat level. A thermal fuse acts as a safety device, blowing (tripping) if the dryer overheats, often due to restricted airflow caused by lint buildup. High-limit thermostats provide an additional layer of safety, preventing the element from getting too hot.
Gas Dryers: Gas dryers use a gas burner assembly. When you start the dryer, an igniter (a small glow bar) heats up to a very high temperature. Sensors detect this heat, triggering the gas valve to open and release natural gas or propane. As the gas flows, it's ignited by the hot glow bar, creating a flame that heats the air. This hot air is then circulated into the drum by a blower fan. A flame sensor monitors the presence of the flame, ensuring gas flow only when ignition occurs. Gas dryers also have thermal fuses and thermostats, similar to electric models, for safety and temperature regulation.
In both types, the blower motor is crucial, not just for tumbling clothes but also for drawing air through the heating system and exhausting moist air. If any part of this intricate system fails – be it the power supply, a safety device like a thermal fuse, the heating element/igniter, or a control board – the dryer will tumble but won't heat.
Step-by-Step Fix
1. Check Your Circuit Breaker or Gas Supply — The simplest fix first.
Before diving into internal components, ensure your dryer is receiving power. For electric dryers, check your home's electrical panel. Electric dryers typically use two circuit breakers (a double-pole breaker) or two fuses, because they require 240 volts. If one-half of the breaker is tripped, the dryer motor may still run (providing 120 volts to the motor) but the heating element won't get power. Look for a breaker that's flipped to the 'OFF' position or midway between 'ON' and 'OFF'. Firmly push the tripped breaker completely to 'OFF' and then back to 'ON'.
- Safety Note: Always use caution when working near electrical panels. If you're unsure, or if breakers trip repeatedly, call a licensed electrician.
- For Gas Dryers: Verify your gas supply valve is fully open. It's usually a yellow handle behind the dryer, parallel to the gas line. If your dryer shares a gas line with another appliance (like a stove) and that appliance is working, your gas supply is likely fine. If not, check your home's main gas shut-off valve.
- If this doesn't work: Proceed to checking the dryer's components.
2. Inspect the Lint Screen and Vent Hose — A common cause of overheating.
Restricted airflow is the most common reason for a thermal fuse to blow. A clogged lint screen or vent hose causes heat to build up inside the dryer, triggering safety mechanisms.
- Remove and clean your lint screen thoroughly every load.
- Disconnect the vent hose from the back of the dryer and inspect it for lint clogs, kinks, or crushing. Use a vacuum cleaner with a long attachment to clear any blockages.
- Check the exterior vent hood to ensure the flap opens and closes freely and isn't blocked by lint or debris.
- If this doesn't work: Your thermal fuse may have already blown.
3. Test the Thermal Fuse (Electric and Gas Dryers) — The most likely internal culprit.
The thermal fuse is a small, inexpensive, non-resettable safety device designed to blow and cut power to the heating circuit if the dryer overheats. If it's blown, your dryer will tumble but not heat. It's usually a small, white plastic cylinder with two wires, located on the blower housing or exhaust duct.
- Unplug the dryer from the wall outlet or shut off power at the breaker panel.
- Access the thermal fuse. This typically involves removing the rear panel or occasionally the top panel and front bulkheads of your dryer. Consult your dryer's service manual for its exact location.
- Disconnect the wires from the fuse.
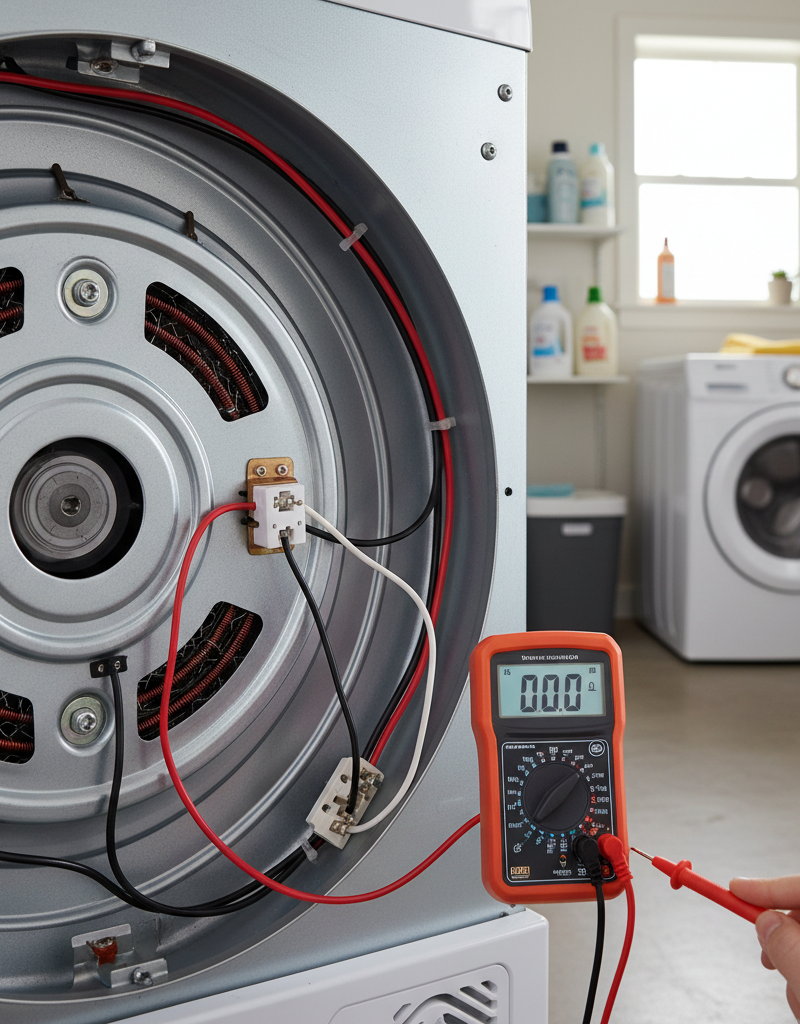
- Use a multimeter set to continuity mode (Ω). Place one probe on each terminal of the fuse.
- If it reads continuity (a beep or a low resistance reading close to 0 Ω): The fuse is good.
- If it reads open circuit (O.L. or infinite resistance): The fuse is blown and needs to be replaced.
- Replace a blown fuse with an exact OEM replacement part. Do not bypass the fuse, as it's a critical safety component.
- Safety Note: Always address the cause of the thermal fuse blowing (usually restricted airflow) before replacing it, or the new fuse will blow again.
4. Examine the Heating Element (Electric Dryers Only) — No heat in electric models.
If the thermal fuse is good, the heating element is the next suspect for electric dryers. It's a coil of wire that glows red hot. Over time, these coils can break.
- Unplug the dryer and remove the back panel to access the heating element housing.
- Visually inspect the element for any visible breaks, scorch marks, or sagging coils. A broken coil will prevent heat.
- Test for continuity with a multimeter. Disconnect one or both wires leading to the element. Place your multimeter probes on the element's terminals.
- Continuity (low resistance): The element is likely good.
- Open circuit (O.L.): The element is bad and needs replacement.
- Replace the element if it's faulty. Be careful not to touch the new element directly with bare hands, as oils from your skin can create hot spots.
5. Check the Igniter and Flame Sensor (Gas Dryers Only) — No warmth in gas models.
For gas dryers that aren't heating, the igniter or flame sensor are common culprits. The igniter should glow brightly before the gas valve opens.
- Unplug the dryer and turn off the gas supply. Remove the dryer's lower front panel or access panel to view the burner assembly.
- Start a cycle and observe. You should see the igniter glow orange-hot within 15-30 seconds. If it doesn't glow or only glows dimly, it might be faulty.
- Test the igniter for continuity using a multimeter (after unplugging and fully cooling). Disconnect the igniter wires and place probes on terminals.
- Continuity: Good.
- Open circuit (O.L.): Replace the igniter.
- If the igniter glows but no flame appears: The flame sensor or gas valve coils might be faulty. The flame sensor should close a circuit when hot, signaling the gas valve to open. Test the flame sensor for continuity (should show continuity when cold, open when very hot, or as specified by your dryer's tech sheet).
- Pro Tip: Gas valves are complex. If the igniter and flame sensor test good, but there's still no flame, it's often best to call a professional for gas valve diagnostics and replacement.
6. Inspect Cycling and High-Limit Thermostats — Less common, but possible.
Dryers have multiple thermostats. The cycling thermostat regulates operating temperature, while the high-limit thermostat is another safety device that trips if the temperature gets too high. Both can fail and prevent heating.
- Unplug the dryer.
- Locate the thermostats. They are typically disk-shaped components with two wires, often mounted on the blower housing or heating element housing. Your dryer's service manual will show their exact locations.
- Test each thermostat for continuity. Disconnect the wires and place multimeter probes on the terminals.
- Continuity: Good.
- Open circuit (O.L.): Replace the faulty thermostat. Most household thermostats should show continuity at room temperature.
7. Examine the Drive Belt and Motor (Less Common) — Indirect causes.
While less directly related to heating, a broken drive belt (which prevents tumbling) or a failing motor can sometimes keep the heating element from engaging as a safety precaution, or simply prevent airflow.
- Visually inspect the drive belt. If it's broken, the drum won't turn. Replace it if broken.
- Listen to the motor. If it sounds strained or doesn't move air, it could be failing.
- Note: A motor problem is often beyond a typical DIY fix and may warrant professional service or dryer replacement due to cost.
Common Causes
- Blown Thermal Fuse: The most frequent cause, often due to restricted airflow from lint buildup.
- Failed Heating Element (Electric Dryers): The resistive coil breaks, preventing heat generation.
- Faulty Igniter (Gas Dryers): The igniter fails to get hot enough to ignite the gas.
- Tripped Circuit Breaker: One leg of the 240V supply (for electric dryers) trips, leaving only 120V for the motor.
- Clogged Venting System: Lint buildup restricts airflow, causing the dryer to overheat and trip safety devices.
- Defective Cycling or High-Limit Thermostat: Fails to regulate temperature or trips prematurely, cutting off heat.
Common Mistakes
- Replacing the thermal fuse without clearing the vent: The new fuse will blow again almost immediately if the underlying airflow issue isn't resolved. Always clean your dryer ducts thoroughly!
- Ignoring a tripped breaker: Many homeowners forget to check their electrical panel first, wasting time on more complex diagnostics. Always start with the simplest solution.
- Not unplugging the dryer before working on it: This is a serious safety hazard and can lead to electric shock. Always disconnect power.
- Using generic parts: Always use OEM-compatible parts where possible, especially for safety components like thermal fuses and thermostats, to ensure proper function and safety.
- Assuming a DIY fix for gas issues: While igniters can be DIYed, complex gas valve issues or any persistent gas smell should immediately trigger a call to a licensed professional. Gas leaks are extremely dangerous.
- Not testing components with a multimeter: Guessing which part is broken leads to unnecessary part purchases and frustration. A multimeter provides definitive answers.
Cost & Time Breakdown
| Task | DIY cost | Pro cost | Time |
|---|---|---|---|
| Check Breaker/Gas Valve | $0 | N/A | 5 min |
| Clean Lint Screen/Vent | $0 | $100-$200 (duct cleaning) | 15-30 min |
| Replace Thermal Fuse | $10–$30 | $150–$300 | 30-60 min |
| Replace Heating Element | $50–$100 | $200–$400 | 45-90 min |
| Replace Igniter (Gas) | $30–$80 | $250–$450 | 45-90 min |
| Replace Thermostat(s) | $20–$50 | $180–$350 | 30-60 min |
Tips & Prevention
- Clean the Lint Filter Every Load: This is the easiest and most effective way to prevent lint buildup and maintain proper airflow, extending the life of your dryer and preventing fires.
- Inspect and Clean Dryer Vent Annually: Disconnect the vent hose and clear any accumulated lint from the hose and the dryer's exhaust port. Consider professional duct cleaning every 2-3 years, especially for longer vents.
- Avoid Overloading: Overloading the dryer restricts airflow, makes the motor work harder, and can cause components to overheat.
- Check for Kinks in the Vent Hose: Periodically pull the dryer out and ensure the exhaust hose isn't crushed or kinked against the wall.
- Verify Electrical Connection: Ensure the dryer cord is fully seated in the outlet and the outlet itself isn't loose.
- Regularly Inspect for Warning Signs: Pay attention to unusually long drying times, a burning smell, or rumbling noises, which can indicate developing problems.
When to Call a Professional
While many dryer heating issues can be resolved with DIY troubleshooting, there are specific situations where a licensed professional is essential for safety and effective repair. Always call a qualified HVAC technician or appliance repair specialist if you smell gas at any point, as this indicates a potentially dangerous leak—do not attempt to troubleshoot gas dryer components if you suspect a leak. You should also contact a professional if electrical issues persist after checking your circuit breaker, such as frequent breaker trips, which could indicate a wiring problem in your home's electrical system. If you've replaced the common culprits like the thermal fuse, heating element, or igniter, and your dryer still isn't heating, a professional can diagnose more complex issues like a faulty control board, motor problems, or internal wiring shorts, preventing further damage and ensuring a safe repair. Complex diagnostic tools and experience are often required for these less common failures.
Related Articles
Keep troubleshooting with these hand-picked guides from FixlyGuide:
- The 4 Hidden Reasons Your Dryer Tumbles Cold (And How to Fix Them in 30 Minutes) — Your dryer tumbles, but clothes stay cold. Discover the four most common culprits behind a dryer that won't heat, and how to troubleshoot t…
- The 5-Minute Trick Everyone Forgets When Their Dryer Stops Heating — Discover the often-overlooked first step that can fix a dryer that isn't heating in just five minutes, potentially saving you a costly repa…
- The One Part That Fails When Your Freezer Works But Fridge Doesn’t ($30 Fix) — If your freezer works but the refrigerator isn't cooling, the most common culprit is a faulty evaporator fan motor or a a clogged defrost d…
- The #1 Mistake Homeowners Make When Their AC Won't Turn On (And the Easy Fix) — Learn the most common oversight homeowners make when their AC won't turn on and how to troubleshoot basic issues to restore cooling.
- The #1 Reason Your AC Blows Warm Air (And It's Not What You Think) — A dirty air filter is often the overlooked culprit behind an air conditioner blowing warm air, hindering its ability to cool your home effi…
- The 5-Minute Fix for a Dead Range Hood Fan (and When to Call a Pro) — Don't panic if your range hood fan suddenly stops working. Often, a simple circuit breaker reset or a quick filter check can restore airflo…
Frequently asked questions
Why would my dryer spin but not heat?+
If your dryer spins but doesn't heat, the most common reasons are a tripped circuit breaker, a blown thermal fuse due to lint buildup, or a faulty heating element (electric dryer) or igniter (gas dryer). Start by checking your electrical panel or gas supply.
How do I reset my dryer's heating element?+
Heating elements generally don't have a reset button. If an electric heating element isn't working, it's typically because the element itself has broken and needs replacement, or a safety device like a thermal fuse or high-limit thermostat has tripped and needs to be replaced. Always diagnose the specific faulty component with a multimeter.
Can a clogged vent stop a dryer from heating?+
Yes, absolutely. A clogged dryer vent restricts airflow, causing heat to build up inside the dryer. This often triggers safety devices like the thermal fuse or high-limit thermostat to blow, cutting power to the heating element to prevent overheating and potential fires. Clearing your vent is a crucial first step.


Discussion
Loading comments…