
Tools & materials you'll need
Affiliate linksAs an Amazon Associate FixlyGuide earns from qualifying purchases — at no extra cost to you. Prices and availability are accurate as of publication and subject to change.
How it works
A residential floor is a layered system designed for structural support and a finished surface. Understanding this structure is key to silencing squeaks. At the bottom are the joists, typically 2x8 or larger lumber spaced 16 or 24 inches apart, which form the primary frame. Attached to the top of the joists is the subfloor, a layer of plywood or oriented strand board (OSB) that creates a solid, flat deck. The final layer is the finished flooring you see and walk on, such as hardwood, laminate, or carpet with padding.
Squeaks are the audible result of unwanted movement and friction. The primary cause is a gap that has formed between these components. As a house settles and wood ages, it dries and shrinks. Nails or screws holding the subfloor to the joists can loosen their grip, creating a micro-gap. When you step on that spot, the subfloor deflects, rubs against the fastener's shank, and then pops back up, creating a creak or pop. A higher-pitched squeak often comes from the finished flooring itself, where individual hardwood planks rub against each other or against the subfloor below. Humidity fluctuations are a major accelerator; wood swells in high humidity and shrinks in low humidity, constantly working fasteners loose and changing the size of gaps between boards. The fix always involves one of two principles: either eliminating the friction with a lubricant or eliminating the movement by fastening the components securely together.
Step-by-Step Fix
Follow these sequential methods, starting with the least invasive. The right approach depends on your floor type and whether you can access the floor from below.
1. Locate the Precise Squeak — Isolate the source of the noise.
Have a helper walk slowly and deliberately back and forth over the general area while you listen from a low angle. Use your own weight to press on individual boards to pinpoint the exact spot. A high-pitched squeak often points to friction between finish floorboards, while a lower-pitched creak or thud suggests a subfloor-to-joist issue. Mark the offending board or area with a small piece of painter's tape.
- Tool: Painter's tape.
- If this doesn't work: If the squeak covers a large area, the problem is likely systemic (e.g., related to joists) and will require an inspection from below.
2. Determine Your Access and Joist Direction — Plan your attack from above or below.
Check if the squeaky floor is above an unfinished basement or accessible crawl space. If so, a fix from below is often more effective and leaves no marks on the finished floor. If not, you must work from above. Next, find the direction of the floor joists, as this is critical for any method involving fasteners. Use a stud finder, or look for rows of nails in the subfloor from below. Joists typically run perpendicular to the longest walls of the room.
- Tool: Stud finder.
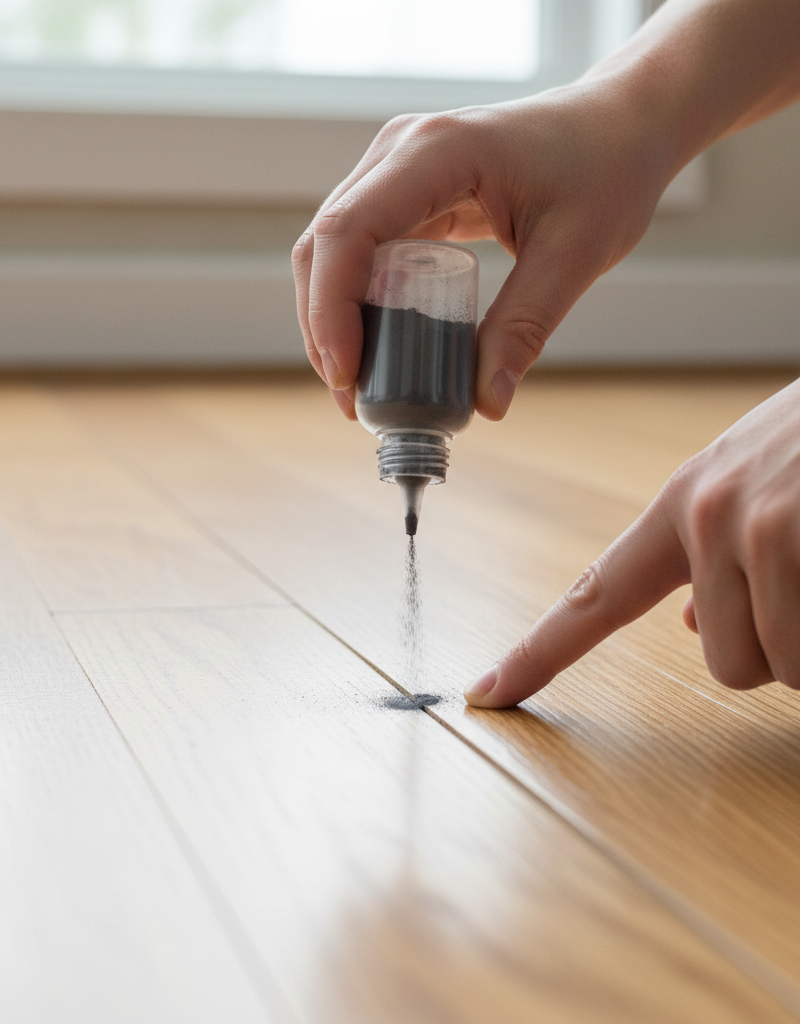
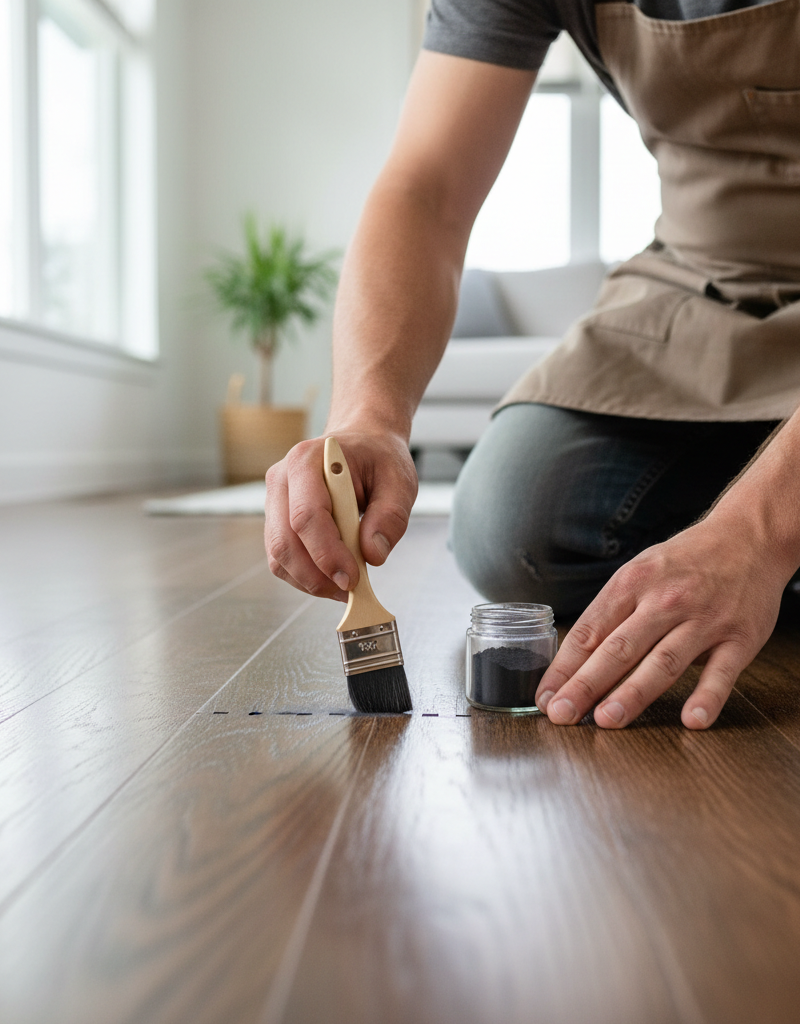
3. Apply Dry Lubricant (Topside Fix) — Address friction between hardwood planks.
For squeaks originating between finished hardwood boards, a dry lubricant can silence the noise instantly. Sprinkle a generous amount of powdered graphite or talcum powder directly over the seam of the squeaky boards. Use a flexible putty knife, an old credit card, or even just your finger to work the powder deep into the gap. Walk on the board to help distribute the powder. This method is ineffective for subfloor issues.
- Tools: Powdered graphite, talcum powder, putty knife, soft cloth for cleanup.
- Safety Note: Do not use oil-based lubricants, as they can permanently stain wood and attract dirt.
4. Use a Snap-Off Screw System (Topside Fix) — Firmly re-attach flooring to the subfloor.
Specialized kits like Counter-Snap or Squeeeeek No More are highly effective. These kits contain long screws designed to snap off below the wood surface. First, locate the nearest joist to the squeak. Place the kit's tripod-like depth-control fixture over the squeaky board, directly above the joist. Drive one of the specialized screws through the fixture's guide hole until the fixture stops the screw at the correct depth. The screw pulls the flooring tight to the subfloor. Finally, rock the screw head back and forth until it snaps off, leaving only a tiny, easily concealable hole.
- Tools: Snap-off screw kit (includes screws, driver bit, and depth fixture), drill/driver, stud finder.
- If this doesn't work: The squeak might not be a floorboard-to-subfloor problem but a subfloor-to-joist problem. A single screw may not be sufficient to close a larger subfloor gap.
5. Secure Boards with Finish Nails (Topside Fix for Hardwood) — Use angled nails for a strong hold.
As an alternative to screw kits, you can use finish nails. Locate the joist under the squeaky board. Drill two small pilot holes (slightly smaller than the nail diameter) at opposing 45° angles through the hardwood board and into the subfloor and joist. Drive two 8d finish nails into the pilot holes. Use a nail set to sink the heads about 1/8 inch below the surface. The opposing angles create a clamp-like effect, holding the board securely.
- Tools: Drill, small drill bit, 8d finish nails, hammer, nail set, wood putty.
6. Address Squeaks Under Carpet — Work through the carpet without removing it.
For carpeted floors, use a joist-finding stud finder to locate the joist nearest the squeak. Then, use a carpet-specific screw kit (such as Squeeeeek No More's carpet version). This works identically to the hardwood version but uses a longer alignment and depth control fixture designed to work through the carpet pile and pad without twisting or catching fibers, allowing you to anchor the subfloor to the joist from above.
- Tools: Carpet-specific snap-off screw kit, stud finder, drill/driver.
7. Insert Shims from Below (Underside Fix) — Fill the gap between a joist and the subfloor.
From your basement or crawlspace, have a helper walk on the floor above to identify the gap. You will see slight movement between the top of a joist and the bottom of the subfloor. Apply a bead of construction adhesive to the top of a thin, tapered wood shim. Gently tap the shim into the gap until it is snug. Do not force it, as this can create a hump in the floor above. The goal is to fill the void, not lift the floor.
- Tools: Wood shims (cedar shingles work well), construction adhesive, hammer.
8. Run a Bead of Construction Adhesive (Underside Fix) — Glue the subfloor and joist together.
For long, narrow gaps or general looseness along a joist, applying adhesive is a simple and effective fix. Using a caulk gun, apply a continuous bead of subfloor-specific construction adhesive along both sides of the joint where the subfloor meets the joist. This fills the void and bonds the two components together, preventing movement and friction once cured.
- Tools: Subfloor construction adhesive, caulk gun.
9. Install a Squeak-Eliminating Bracket (Underside Fix) — Mechanically pull the subfloor down.
Products like the Squeak-Ender or similar hardware brackets provide a powerful mechanical solution. The bracket mounts to the side of the joist, and a threaded rod with a flat plate on top is tightened against the underside of the subfloor. As you tighten the nut, it pulls the subfloor down firmly against the joist, completely eliminating any gap or movement. This is excellent for stubborn, isolated squeaks.
- Tools: Squeak-eliminating bracket kit, drill/driver, wrench.
10. Add Blocking or a "Scab" Board (Underside Fix) — Stiffen the floor structure.
If the subfloor itself feels bouncy or flexible between joists, you can add support. "Blocking" involves cutting pieces of 2x8 lumber to fit snugly between the joists and nailing them in place perpendicular to the joists. A simpler method is to screw a "scab"—a length of 2x4 or 2x6 lumber—flat against the side of the joist, ensuring the top edge is flush against the underside of the subfloor. Driving screws through the scab and into the subfloor provides excellent reinforcement.
- Tools: 2x4 or 2x8 lumber, circular saw, tape measure, construction screws, drill/driver.
11. Fill and Conceal the Repair — Hide the evidence of your topside work.
For any repairs made from above with screws or nails, the final step is concealment. Choose a wood putty that closely matches the color of your hardwood floor. Use a putty knife to press a small amount into the nail or screw hole, then wipe the excess away with a clean cloth. The repair will be nearly invisible.
- Tools: Color-matched wood putty, putty knife, clean cloth.
Common mistakes
- Forcing shims too tightly. Jamming a shim into a gap with excessive force will lift the subfloor and finish floor, creating a noticeable hump. Instead, apply adhesive to the shim and tap it in only until you feel firm resistance, letting the adhesive do the work of bonding it in place.
- Using the wrong lubricant. Applying WD-40 or other wet, oil-based lubricants to hardwood floor gaps is a critical error. They do not dry, will attract dust and grime, and can permanently discolor the wood. Always use a dry powder like graphite dust or talcum.
- Missing the joist when fastening from above. Driving a screw or finish nail into the empty bay between joists provides no structural support and will not stop a squeak. Always use a stud finder or measure from a known joist location to ensure you are anchoring into solid wood.
- Using screws that are too long. When fastening from above, a screw that is too long can penetrate the joist and damage hidden plumbing or electrical wiring. Measure your flooring and subfloor thickness (~1.5 inches total is common) and choose a screw that will anchor firmly in the joist without passing through it (a 2.5-inch screw is often sufficient).
- Gluing finish floorboards together. Squirting wood glue into the gaps between hardwood planks is counterproductive. It prevents the boards from expanding and contracting naturally with humidity changes, which can lead to buckling or cracking. Use lubricant for friction, not adhesive.
Cost & time breakdown
Costs are approximate and can vary by location and material choice. Pro costs typically reflect a minimum service charge for a small job.
| Task | DIY Cost | Pro Cost | Time |
|---|---|---|---|
| Pinpoint Squeak & Apply Lubricant | $5 - $15 | $100 - $150 | 20-40 minutes |
| Fix From Above with Snap-Off Screws | $25 - $45 | $150 - $250 | 1 hour per area |
| Fix From Below with Shims & Adhesive | $15 - $30 | $175 - $300 | 1-2 hours |
| Install Underside Reinforcing Bracket | $15 - $25 per bracket | $200 - $350 | 1 hour per bracket |
| Install Blocking or a "Scab" Board | $30 - $60 | $250 - $450 | 2-4 hours |
When to call a pro
While most floor squeaks are minor annoyances, some signal deeper structural problems that are beyond a simple DIY fix. It's time to call a flooring contractor or structural engineer if you observe any of the following:
- Widespread and Severe Squeaking: If the entire floor, or a very large section of it, creaks and groans with every step, it may indicate a systemic failure of the subfloor fastening or joist system.
- Noticeable Sagging or Bounciness: A floor that visibly dips in the center or feels unusually spongy and bouncy underfoot could have undersized, over-spanned, or damaged joists.
- Visible Damage to Joists: During an underside inspection, if you see joists with large cracks, evidence of rot (dark, soft, or crumbling wood), or significant termite damage, the structural integrity is compromised and requires professional assessment.
- Associated Wall or Ceiling Cracks: Floor movement severe enough to cause cracks in the drywall on the ceiling below or on adjacent walls is a red flag for a significant framing or foundation issue.
Attempting to fix these issues without professional expertise can be ineffective and potentially dangerous.
Prevention & maintenance
- Control indoor humidity. Wood expands and contracts with humidity, which loosens fasteners. Use a dehumidifier in the summer and a humidifier in the winter to keep relative humidity stable, ideally between 35% and 55%.
- Inspect crawl spaces and basements. Annually check the area below your floors for any signs of moisture intrusion, leaks, or pest activity. A dry, healthy substructure is critical for a quiet floor.
- Use proper construction methods. If building or remodeling, ensure the new subfloor is both glued with subfloor adhesive and screwed (not just nailed) to the joists. This glue-and-screw method is the gold standard for preventing future squeaks.
- Acclimate new flooring. Before installing new hardwood, let the planks sit in the room where they will be installed for several days. This allows the wood to acclimate to the home's temperature and humidity, preventing excessive shrinking or swelling after installation.
- Add supportive furniture pads. Place felt or rubber pads under the legs of all heavy furniture. This distributes the weight more evenly and prevents constant, focused pressure from loosening floorboards over time.
Related Articles
Keep troubleshooting with these hand-picked guides from FixlyGuide:
- Your Squeaky Floor's Secret: It's Not the Wood, It's the Gap — Tired of that persistent floor squeak? Discover the hidden causes of noisy floorboards and learn several easy, DIY methods to silence them…
- The Weird Trick to Silence a Squeaky Floor (Without Tearing Anything Up) — Learn how to effectively silence a squeaky floor without the invasive and costly process of removing floorboards, often using simple tools…
- The Hidden Cause of Squeaky Hardwood Floors & The Real Fix — That persistent squeak from your hardwood floors isn't just an annoyance; it's a sign of movement. We'll uncover the hidden causes, from hu…
- The 5-Minute Trick to Fix a Sagging Window (No New Parts Needed) — Discover the simple, often overlooked cause of a window that won't stay open and how to fix it in minutes using common household items.
- Why Your Hardwood Floors Have Gaps in Winter (And When to Worry) — Seeing gaps in your hardwood floors this winter? It's likely caused by low indoor humidity making the wood shrink. Learn what's normal, how…
- Skip the Demo: The Secret to Tiling Over Existing Floors — Discover the professional method for tiling directly over your existing bathroom floor, saving you thousands on messy, expensive demolition…
Recommended for DIYers & woodworkers
Sponsored
The Top 20 Tools for Workshops of Any Budget
No stationary machines or power tools required — plus 3 fundamental tools that can't be bought at any price.
Get the free guide
Ted's Woodworking — The #1 Woodworking Resource
Detailed instructions, dimensioned drawings, materials & cutting lists, and 3D schematics for every skill level.
See the plansSponsored: links above are affiliate links. FixlyGuide may earn a commission on qualifying purchases — at no extra cost to you.
Frequently asked questions
Can floor squeaks be fixed permanently?+
Yes, many floor squeaks can be permanently fixed by addressing the underlying cause, whether it's lubricating friction points, securing loose boards with screws, or reinforcing the subfloor from below. However, given wood's natural expansion and contraction, minor squeaks can occasionally re-emerge over time, requiring touch-ups.
Is a squeaky floor a structural problem?+
Most squeaky floors are not a structural safety problem, but rather an indication of loose components or friction due to wood shrinkage and movement. However, if squeaks are accompanied by noticeable sagging, severe bouncy areas, or cracks in the ceiling below, it could indicate a more serious structural issue requiring professional assessment.
How do I find the joists under my floor?+
You can find joists using a stud finder, which will locate the dense wood beneath the floor. Alternatively, joists are typically spaced 16 or 24 inches on center. If you can access the basement or crawl space below, you can directly see and mark the joist locations on the floor above by tapping a nail up through the subfloor next to the joist.

Discussion
Loading comments…