Tools & materials you'll need
Affiliate linksAs an Amazon Associate FixlyGuide earns from qualifying purchases — at no extra cost to you. Prices and availability are accurate as of publication and subject to change.
Quick Answer
Ice dams are destructive winter phenomena that form when heat escaping from your home melts snow on the upper roof, which then flows down and refreezes at the colder eaves. This creates a barrier that prevents further meltwater from draining, leading to water backing up under your shingles and potentially into your home. Safely removing an ice dam involves using methods like calcium chloride ice melt socks or a roof rake to create drainage channels, followed by addressing the underlying issues of poor attic insulation and ventilation to prevent future formation.
The Problem
That beautiful blanket of snow on your roof might be hiding a destructive secret: an ice dam. These thick ridges of ice at the edge of your roofline aren't just an unsightly winter nuisance; they're a direct threat to your home's structural integrity, interior finishes, and energy efficiency. Homeowners often underestimate the damage ice dams can inflict, leading to costly repairs and ongoing frustration. The core problem is unregulated heat loss from your living space into your attic, which warms the roof deck, melting the snow above. This meltwater then trickles down to the colder, unheated eaves, where it refreezes, building up layer by layer into a formidable dam. Once an ice dam forms, it acts like a dam on a river, blocking the natural path of any subsequent meltwater. This trapped water pools behind the ice, creating hydrostatic pressure that forces it up and under your roof shingles. From there, it can seep into your attic, through ceilings, down walls, and even into your insulation, leading to rot, mold, ruined drywall, and compromised electrical systems. Beyond the immediate water damage, ice dams can also tear off gutters, loosen shingles, and damage fascia boards due to their immense weight. Addressing ice dams is not just about removing the visible ice; it's about understanding and mitigating the conditions that cause them to form in the first place.
How It Works
To effectively combat ice dams, it's crucial to understand the subtle interplay of heat, cold, and physics that creates them. Your home's attic, ideally, should be almost as cold as the outside air during winter. This is achieved through a combination of robust insulation on the attic floor and adequate ventilation. Insulation acts as a thermal barrier, preventing heat from your living spaces below from rising into the attic. Ventilation, typically through soffit (intake) and ridge (exhaust) vents, allows cool outside air to enter, circulate, and then exit, carrying away any stray heat and moisture that might accumulate. \n\nThe formation of an ice dam begins when this system fails. If insulation is insufficient or improperly installed, or if there are unsealed air leaks (from recessed lights, attic hatches, or plumbing stacks), warm air from your home leaks into the attic. This warm air heats the underside of your roof deck. When snow falls and accumulates on your roof, this heated section of the roof deck melts the snow directly above it. This meltwater then flows down the roof slope, beneath the snowpack, until it reaches the colder eaves, which extend beyond the heated portion of the house and are thus at or below freezing temperatures. \n\nUpon reaching these colder eaves, the meltwater refreezes, forming a small ridge of ice. As more snow melts and more water flows down, this ridge grows larger and larger, creating the 'dam.' This dam then traps subsequent meltwater behind it. With nowhere to go, this pooled water begins to back up, pushing under the shingles via capillary action and gravity. Standard asphalt shingles, designed to shed water downwards, are not waterproof when water flows sideways or upwards. Once under the shingles, the water can penetrate the roof decking, insulation, and eventually interior ceilings and walls, causing significant and often hidden damage. The cycle continues as long as there's snow on the roof, escaping heat, and freezing temperatures at the eaves.
Step-by-Step Fix
Safety First—Never attempt to chip away at ice dams with a chisel, axe, or shovel directly on your roof, especially if a ladder is involved. This is extremely dangerous and can damage your roof. Avoid climbing onto a snow-covered or icy roof yourself. If the ice dam is extensive or hard to reach, call a professional.
-
Assess the Situation—Before you start, evaluate the size and location of the ice dam. Small, easily reachable dams on a single-story home might be suitable for DIY. Complex, multi-story, or massive dams are best left to professionals. Look for signs of water intrusion inside your home, such as new water stains on ceilings or walls, which indicate active leakage.
- Tools: Binoculars, flashlight (for attic inspection).
- Safety: Do not attempt direct roof access if you are unsure or uncomfortable.
-
Gather Your Materials—Ensure you have all necessary items before starting. This prevents multiple trips in cold weather.
- Materials: Calcium chloride ice melt (NOT rock salt, which can damage roofing and plants), old nylon pantyhose or knee-highs, roof rake with extension poles, sturdy ladder (if using a roof rake from the ground).
- Safety: Read all labels on ice melt products. Calcium chloride is generally safer for roofs than rock salt but can still be corrosive to some metals and irritating to skin.
-
Create Drainage Channels with Calcium Chloride Socks—This is the safest method for actively melting through an ice dam without damaging your roof or risking a fall. Fill the legs of old pantyhose with calcium chloride ice melt.
- Tie off the ends to create long, sausage-like tubes.
- Carefully place these socks perpendicular to the ice dam, spanning across its width and extending slightly onto the shingled area behind it. The calcium chloride will slowly melt channels through the ice, allowing trapped water to drain off the roof.
- If this doesn't work: If the ice dam is extremely thick, you may need multiple applications or thicker socks.
- Safety: Wear gloves. Avoid dropping the socks from a great height to prevent them from bursting.
-
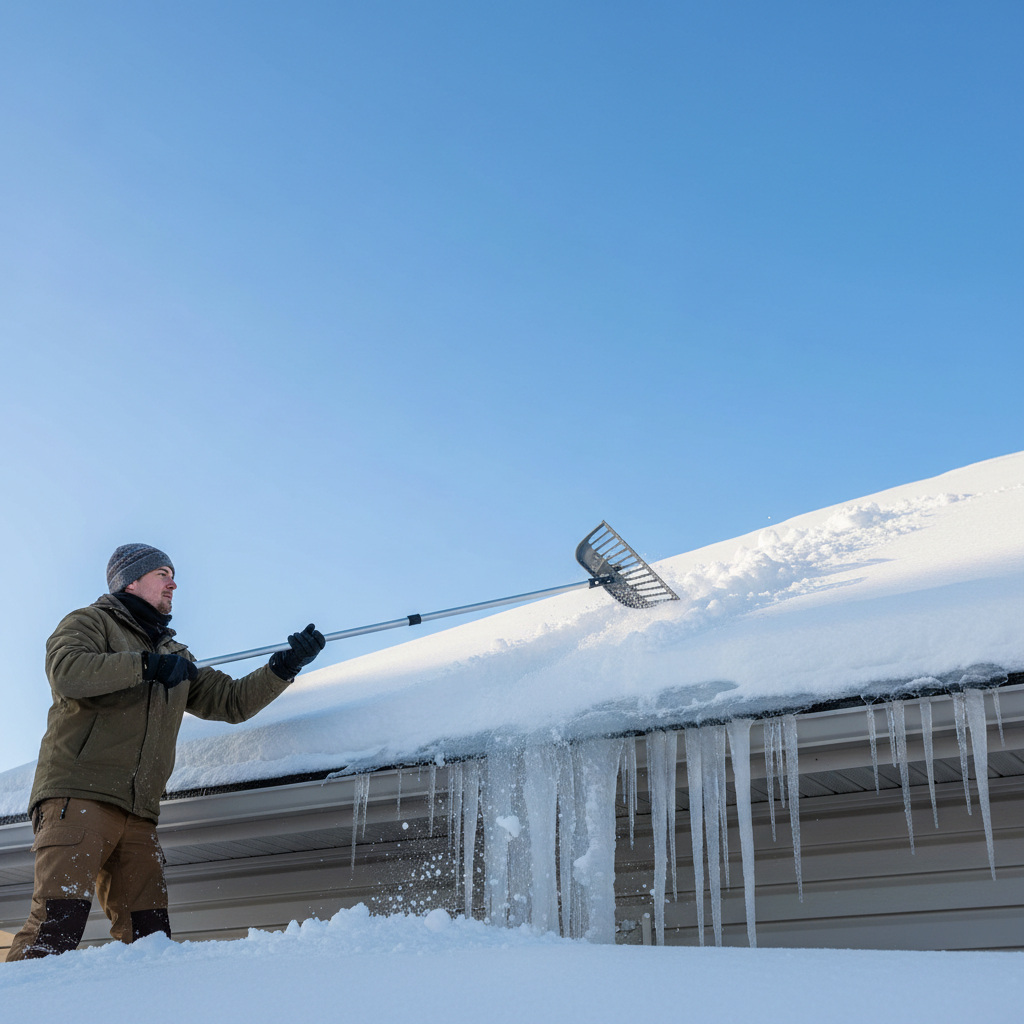
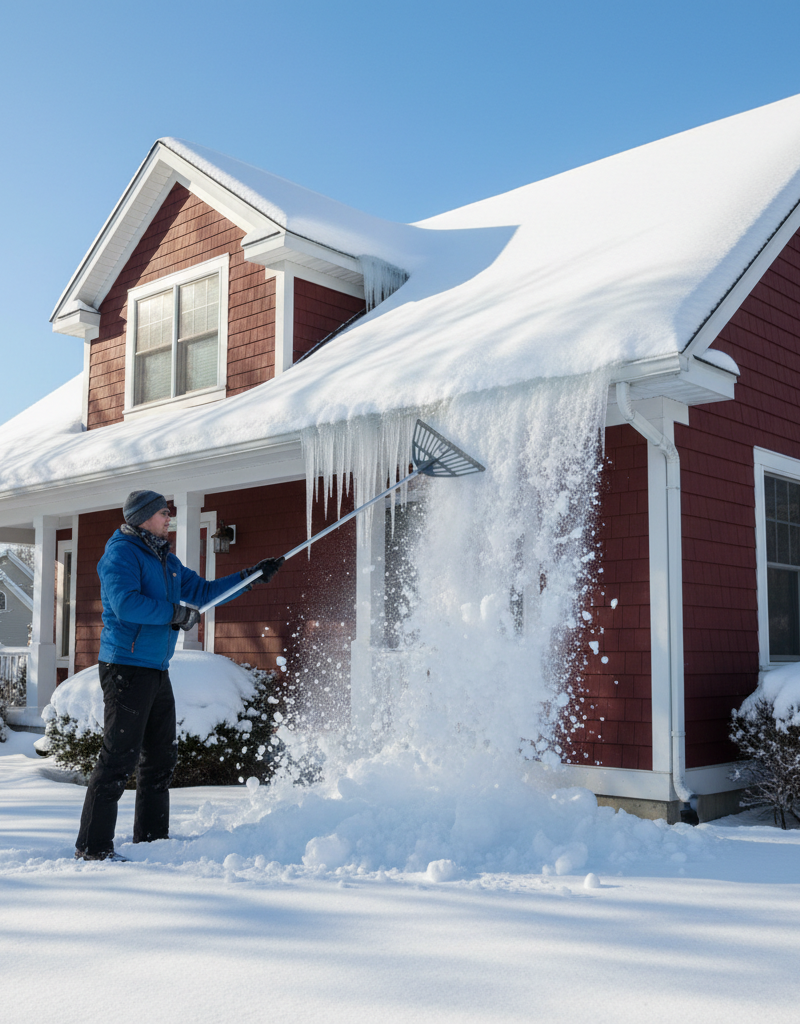
Use a Roof Rake to Remove Snow—Once drainage channels are established or if the ice dam is minimal, use a roof rake from the ground to pull snow off the lower 3-5 feet of your roof. This removes the fuel for the ice dam—the snow that melts to form it.
- Work slowly and carefully, pulling snow towards you in small sections.
- Avoid digging the rake blade into the shingles.
- Tools: Roof rake with telescoping handle.
- Safety: Be aware of falling snow and ice. Stand well back from the drip line. Do not use a metal rake head on a wet roof or near electrical wires.
-
Address Gutter Clogs—Often, ice dams are exacerbated by frozen gutters. If safe to do so from a ladder, gently clear any ice or debris from your gutters, especially the downspouts. This ensures that once the ice dam melts, water can flow freely away.
- Tools: Small trowel or gutter scoop.
- Safety: Use a spotting partner if on a ladder. Ensure the ladder is stable on firm, level ground. Wear safety glasses.
-
Locate and Seal Attic Air Leaks—Once the immediate threat is mitigated, turn your attention to the root cause. In the attic, use a flashlight to identify areas where warm interior air might be escaping. Common culprits include:
- Recessed light fixtures, attic hatches, plumbing and electrical penetrations, chimney chases, and unsealed top plates of interior walls.
- Seal these gaps with expanding foam sealant, caulk, or batt insulation. Ensure insulation doesn't block soffit vents.
- Materials: Expanding foam sealant, caulk, caulk gun, utility knife.
- Safety: Wear a respirator or dust mask, gloves, and eye protection in the attic. Watch your footing on joists.
-
Improve Attic Insulation—If your attic insulation is sparse, compressed, or uneven, add more. The recommended R-value for most attics in cold climates is R-49 to R-60..
- Ensure the insulation covers all areas evenly and doesn't block soffit vents (use baffles if necessary).
- Materials: Blown-in cellulose or fiberglass insulation, insulation baffles.
- Safety: Wear a respirator, gloves, long sleeves, and eye protection when working with insulation. Ensure attic is well-ventilated during work.
-
Enhance Attic Ventilation—Ensure your attic has a balanced system of intake (soffit) and exhaust (ridge or gable) vents. A general rule is 1 square foot of net free vent area for every 300 square feet of attic floor space, with a 50/50 split between intake and exhaust.
- Clear any obstructions from existing vents.
- Consider adding more or upgrading existing vents if your current system is inadequate.
- Tools: Utility knife, staple gun (for baffles).
- Safety: Working on roofs for vent installation is for professionals. Ensure attic work is done with adequate lighting and clear pathways.
Common Causes
- Poor Attic Insulation: The most frequent culprit. Insufficient insulation on the attic floor allows heat from the living space to easily transfer into the attic and warm the roof deck. This creates the temperature differential necessary for snow to melt and refreeze.
- Inadequate Attic Ventilation: A lack of proper airflow through the attic (soffit and ridge vents) prevents any stray heat and moisture from escaping. This essentially traps warm air, keeping the roof deck warmer than the eaves.
- Unsealed Air Leaks: Gaps and cracks around recessed light fixtures, plumbing stacks, electrical conduits, chimneys, and attic hatches act like small chimneys, funneling warm, moist air directly from your conditioned living space into the cold attic. This bypassing of insulation is very efficient at heating the roof deck.
- Blocked Soffit Vents: If insulation is pushed against the underside of the roof deck at the eaves, it can block the soffit vents, preventing cold outdoor air from entering the attic and flushing out warm air. This disrupts the intended airflow and temperature balance.
- Excessive Snow Accumulation: While not a direct 'cause' of an ice dam's formation mechanism, a very heavy snowfall provides ample material for melting and refreezing, exacerbating the problem when other conditions are met.
- Warm Wall Top Plates: In some older homes, the top plates of exterior walls and interior partition walls are not adequately sealed or insulated where they meet the attic floor, creating thermal bridges for heat loss.
Common Mistakes
- Chipping Away with Mallets or Axes: This is incredibly dangerous and almost guaranteed to damage your roof, shingles, gutters, and potentially even your underlying roof deck. The force can crack or dislodge shingles, creating new points for water intrusion. Instead: Use calcium chloride ice melt in pantyhose or a roof rake from the ground.
- Using Rock Salt (Sodium Chloride): While effective at melting ice, rock salt can corrode roofing materials, damage gutters and downspouts, harm plants and landscaping below, and leave behind white residue. Instead: Opt for calcium chloride, which is generally safer for structures and landscaping in moderation.
- Using Hot Water or Pressure Washers: Pouring hot water on an ice dam provides only a temporary solution and can create even larger, more dangerous sheets of ice when it refreezes. Pressure washing can strip granules from shingles and force water under them. Instead: Focus on gradual melting with ice melt or mechanical removal of snow.
- Ignoring the Root Cause: Simply removing the visible ice dam without addressing the underlying issues of heat loss and poor attic ventilation is like putting a band-aid on a broken leg. The ice dam will simply return with the next snowfall. Instead: Follow up removal with attic inspection, air sealing, insulation upgrades, and ventilation improvements.
- Not Using Fall Protection or Proper Ladder Safety: Attempting to work on an icy roof or using a ladder improperly can lead to severe injury, even death. Icy surfaces are extremely treacherous. Instead: Work from the ground with a roof rake or a properly secured ladder for placing ice melt socks, with a spotter. If roof access is required, hire a professional with appropriate safety gear.
- Blocking Attic Vents with Insulation: When adding insulation, some DIYers inadvertently push insulation right into the soffit vents, blocking the crucial airflow. This makes the ventilation problem worse, not better. Instead: Use insulation baffles (ventilation chutes) to ensure a clear pathway for air from soffit vents into the attic space.
Cost & Time Breakdown
| Task | DIY Cost | Pro Cost | Time |
|---|---|---|---|
| Emergency Ice Dam Removal | $20–$50 | $300–$1,000+ | 1–3 hours |
| Attic Air Sealing | $50–$200 | $200–$600 | 2–6 hours |
| Add Attic Insulation | $300–$1,000+ | $800–$2,500+ | 4–8 hours |
| Improve Attic Ventilation | $100–$500 | $500–$2,000+ | 4–12 hours |
| Water Damage Repair | Varies - $0+ | Varies - $500+ | Varies |
Tips & Prevention
- Regular Attic Inspection: Annually inspect your attic for signs of moisture, compressed insulation, and blocked vents. Do this before winter sets in.
- Check Insulation R-Value: Ensure your attic has adequate insulation for your climate zone, typically R-49 to R-60 in colder regions.
- Seal Air Leaks Diligently: Use caulk and expanding foam to seal every crack and penetration leading from your conditioned space into the attic. Focus on penetrations for pipes, wires, and light fixtures, as well as the junction where interior walls meet the attic floor.
- Maintain Clear Vents: Ensure that soffit vents are not blocked by insulation. Install insulation baffles (ventilation chutes) to maintain a clear path for airflow from the soffits. Similarly, ensure ridge or gable vents are clear of debris or snow.
- Consider Smart Thermostats: While not directly preventing ice dams, optimizing heating schedules and zoning can help reduce overall heat loss into the attic.
- Regular Gutter Cleaning: Keep gutters and downspouts clear of leaves and debris year-round to ensure proper drainage when snow melts. Clogged gutters can contribute to ice dam formation.
- Evaluate Roof Color: A lighter-colored roof can reflect more sunlight, keeping the roof surface cooler, while a dark roof absorbs more solar radiation. This is a longer-term consideration during roof replacement.
When to Call a Professional
While some ice dam issues can be tackled by a proactive homeowner, there are definitive signs that it's time to call a licensed professional. If the ice dam is extensive, spans multiple stories, or is beyond your comfortable reach from the ground with a roof rake, professional removers have specialized steam equipment or safe ice-melting techniques that won't damage your roof. If you notice active water leaks inside your home (stains on ceilings, walls, or drips), this indicates that water has already compromised your roof and attic, necessitating immediate professional assessment. Furthermore, if you suspect significant structural damage, widespread mold growth, or electrical issues due to water intrusion, a professional general contractor or a specialized restoration company is essential. For addressing the root causes – significant insulation upgrades, complex attic ventilation improvements, or roof repairs – licensed contractors specializing in roofing, insulation, and HVAC are best equipped to correctly diagnose and implement long-term solutions, ensuring your home is protected and energy-efficient for years to come. Do not attempt extensive work on a slippery roof or with specialized tools without proper training and safety equipment.
Related Articles
Keep troubleshooting with these hand-picked guides from FixlyGuide:
- The #1 Mistake Homeowners Make Removing Ice Dams (And 3 Safer Fixes) — Discover the safest and most effective ways to remove ice dams from your roof, avoiding common mistakes that can cause severe damage to you…
- The #1 Mistake Homeowners Make with Ice Dams (and How to Fix It SAFELY) — Most homeowners approach ice dam removal incorrectly, creating more damage or safety risks. Learn the right, safe methods to protect your r…
- The 3 Hidden Reasons Your Roof Gets Ice Dams (and the Easy Fixes) — Ice dams are a common winter problem that can cause significant damage to your roof and home if not addressed safely and effectively.
- The #1 Mistake Homeowners Make When Diagnosing Low Water Pressure (It's Not Your City's Fault) — Before you blame your municipal water supply for low water pressure, learn the most common overlooked culprit inside your home.
- The $30 Trick to Melting Ice Dams (Before They Destroy Your Roof) — Discover how to safely remove ice dams from your roof instantly with common household items, preventing costly damage. Stay safe while tack…
- The Secret Reason Your Furnace Turns On and Off So Much (It's Not What You Think) — Short cycling strains your furnace and wastes energy. Learn the most common surprising causes and how to fix them to restore efficient heat…
Get the print-ready PDF of this guide
A clean, ad-free, printable version you can keep on your phone or pin to the workshop wall. Free with a FixlyGuide account.
- Print-optimized layout
- Tools, materials & every step included
- Saved to your account
Recommended for DIYers & woodworkers
Sponsored
The Top 20 Tools for Workshops of Any Budget
No stationary machines or power tools required — plus 3 fundamental tools that can't be bought at any price.
Get the free guide
Ted's Woodworking — The #1 Woodworking Resource
Detailed instructions, dimensioned drawings, materials & cutting lists, and 3D schematics for every skill level.
See the plansSponsored: links above are affiliate links. FixlyGuide may earn a commission on qualifying purchases — at no extra cost to you.
Frequently asked questions
What causes ice dams to form on a roof?+
Ice dams form when heat from your home's interior escapes into the attic, warming the roof deck and melting snow. This meltwater then flows down to the colder eaves, where it refreezes and builds up, creating a barrier that traps more water.
Is it safe to chip away an ice dam with a shovel or axe?+
No, it is extremely dangerous and can severely damage your roof, shingles, and gutters. You risk personal injury from falling ice or slipping on the roof. Use gentler methods like calcium chloride ice melt or a roof rake from the ground.
What is the best way to melt an ice dam safely?+
The safest DIY method is to fill old pantyhose with calcium chloride ice melt (not rock salt) and place them across the ice dam. The calcium chloride will slowly melt channels through the ice, allowing trapped water to drain.
How can I prevent ice dams from forming in the future?+
Preventing ice dams involves addressing the root causes: improve attic insulation to prevent heat loss, seal all air leaks between your living space and attic, and ensure adequate and balanced attic ventilation.
When should I call a professional for ice dam removal?+
Call a professional if the ice dam is large, difficult to reach, you see active water leaks inside your home, or you are uncomfortable working on a ladder or the roof. Professionals have specialized tools and safety equipment for extensive ice dams.


Discussion
Loading comments…