
Tools & materials you'll need
Affiliate linksAs an Amazon Associate FixlyGuide earns from qualifying purchases — at no extra cost to you. Prices and availability are accurate as of publication and subject to change.
Quick Answer
Landscape edging frequently disappoints homeowners by shifting, buckling, or failing to contain mulch and soil. This often stems from three key installation mistakes: an uneven or shallow trench, insufficient anchoring, and selecting an edging material unsuitable for the local soil conditions or intended purpose. Correcting these involves careful preparation, using the right tools and techniques for a stable base, and securing the edging properly with robust stakes and connectors to ensure it lasts for years.
The Problem
You've spent hours meticulously planting your flower beds, selecting the perfect mulch, and now you're ready to define the space with crisp landscape edging. You install it, admire your handiwork, and for a short while, it looks perfect. But then, as seasons change and weather takes its toll, you notice it: the edging is heaving out of the ground, bowing in the middle, or gaps are appearing where weeds can sneak through. Mulch starts migrating into your lawn, and your once-pristine border looks messy and unprofessional. This isn't just an aesthetic issue; failed edging means more time spent on maintenance, less effective weed control, and a constant battle against escaping bed materials. The frustration is real, and it often leads homeowners to believe landscape edging is more trouble than it's worth. However, the root of the problem usually lies not with the edging itself, but with preventable installation errors.
How It Works
Landscape edging, at its core, works by creating a physical barrier between two distinct landscaping elements, most commonly a flower bed and a lawn or path. To function effectively, this barrier needs to be stable, level, and offer sufficient resistance against natural forces. Most edging materials, whether plastic, metal, or stone, rely on being partially or fully buried in the soil to achieve stability. The trench provides the initial hold, and then stakes or anchors further secure the material against movement.
Soil dynamics play a significant role. Over time, soil expands and contracts with moisture changes (wet clay soils heave more than sandy soils). Freezing and thawing cycles can lift improperly installed edging out of the ground, a phenomenon known as 'frost heave'. Tree roots, as they grow, can also exert pressure. The top edge of the border, typically rising an inch or two above the finished grade, serves to contain mulch and soil, preventing it from washing away or spreading into adjacent areas. The buried portion resists lateral pressure from soil and turf. For a successful installation, the edging needs to interact harmoniously with these forces, remaining rigid and in place despite environmental challenges and the pressure from contained materials.
Step-by-Step Fix
Safety Note: Always wear appropriate gloves and eye protection when working with tools and materials. Be mindful of utility lines when digging; call 811 before you dig if trenching deeply.
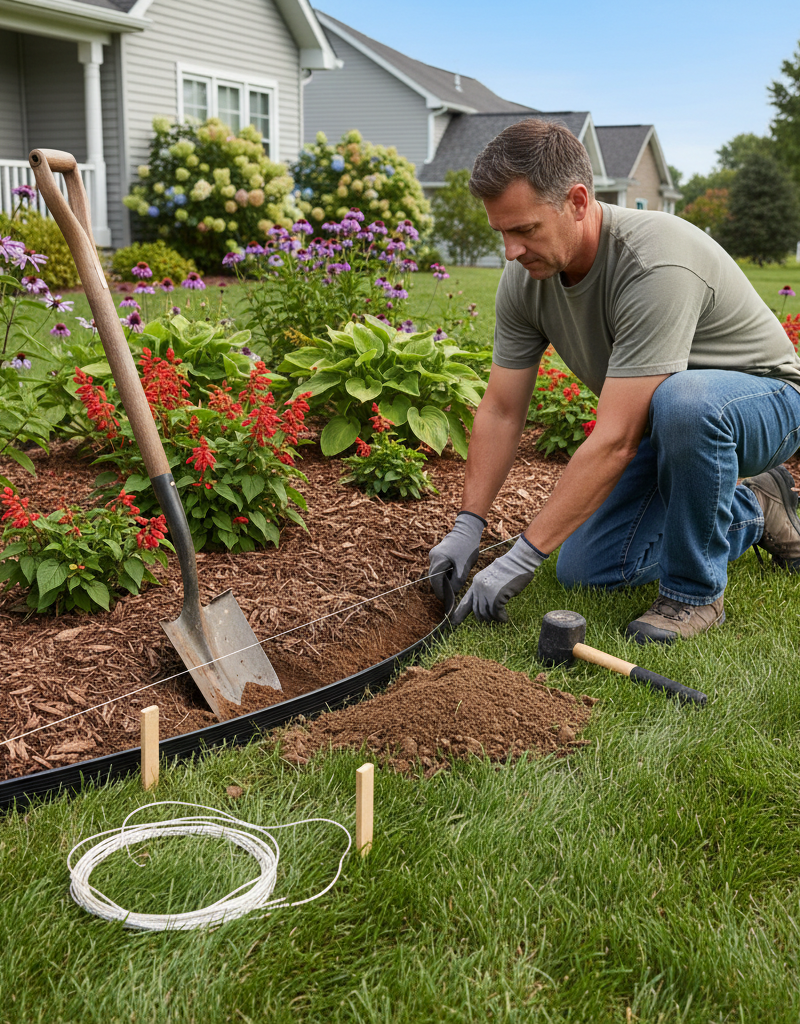
1. Plan Your Layout – Map out your design with precision.
Mark the exact path of your edging using spray paint or a garden hose. This allows you to visualize the curve or straight line and make any necessary adjustments before you start digging. Consider the surrounding elements – sprinklers, buried lines, or future plantings – to avoid conflicts.
- Pro Tip: For curves, use a garden hose; it naturally forms smooth, pleasing arcs more easily than a string line. For straight lines, a taut string line between two stakes is essential for accuracy.
2. Dig a Proper Trench – Create a stable foundation, not just a shallow groove.
This is where many DIY projects fail. The trench needs to be consistently deep and wide enough to accommodate at least two-thirds of the edging's height, ensuring stability. For most plastic or metal edging, this means a trench approximately 4-6 inches deep and 2-3 inches wide. Use a sharp spade or a trenching tool to create a clean, V-shaped or U-shaped channel.
- If the trench is uneven: Your edging will look wavy, making it prone to shifting. Use a hand trowel or mini-spade to level the bottom of the trench, removing any rocks or roots that might interfere.
- If the trench is too shallow: The edging won't have enough buried material to resist frost heave or soil pressure, leading to it popping out of the ground. Dig deeper until the recommended depth is achieved.
3. Install the Edging Material – Work in manageable sections for best results.
Start at one end of your planned design, inserting the edging into the trench. For flexible plastic or rubber edging, unroll it and slowly guide it into the trench, following your marked line. For rigid materials like metal or paver edging, ensure each piece is butted tightly against the previous one. Aim for the top edge of the material to be about 0.5 to 1 inch above the finished grade.
- Use connectors: Many plastic and metal edging products come with specialized connectors to join sections. Never attempt to simply overlap them as this creates weak points and an unprofessional finish. Securely snap or bolt these connectors in place.
- Maintain consistent height: Use a level or a small scrap of wood laid across the trench to periodically check that the top edge of the edging is at a consistent height along its entire length. This is crucial for a professional look.
4. Drive Anchoring Stakes – Secure your edging against movement.
This is the second critical area for failure. Even if your trench is perfect, insufficient anchoring will allow the edging to shift over time. For flexible plastic or rubber edging, use heavy-duty plastic or metal stakes every 2-3 feet along straight sections and every 1-1.5 feet along curves. Drive the stakes flush with the top of the edging, ensuring they don't protrude above the material.
- For metal edging: Most metal edging has built-in stake pockets or requires specific metal stakes that slide down behind the flange. Drive these stakes at similar intervals, making sure they penetrate deep into the subsoil for maximum hold.
- If your soil is very loose or sandy: Consider using longer stakes (10-12 inches instead of 8 inches) or closer spacing to provide extra stability.
5. Backfill and Compact – Lock the edging firmly in place.
Once the edging is installed and anchored, backfill the trench with the soil you removed. Push the soil firmly against both sides of the edging. Use your foot or a tamper to compact the soil, removing air pockets and creating solid support. Water the newly backfilled soil thoroughly; this helps settle the dirt around the edging more effectively.
- If you skip compacting: Loose soil will allow the edging to wiggle and shift as it settles naturally, undoing all your hard work. Always compact the soil after backfilling.
- Consider a gravel base: For very wet areas or if you have heavy clay soil, a 1-inch layer of compacted gravel or sand at the bottom of the trench before installing the edging can improve drainage and reduce frost heave.
6. Check for Level and Flushness – Perform a final quality control inspection.
After backfilling and compacting, step back and examine your work. Is the edging still level? Is the top edge consistent? Are there any sections that have popped up or shifted during backfilling? Make any minor adjustments now, before you add mulch or other bed materials. A perfectly level and flush installation not only looks better but also functions more effectively.
Common Causes
- Insufficient Trench Depth: The most common culprit. If less than two-thirds of the edging is buried, it doesn't have enough resistance against soil movement, frost heave, or impacts. It will inevitably pop out of the ground or buckle.
- Uneven Trench Bottom: A trench with high spots and low spots means the edging will have weak points where it isn't fully supported, leading to wavy lines and instability. It also makes achieving a consistent top height impossible.
- Lack of Anchoring/Improper Spacing: Relying solely on the trench to hold flexible edging is a mistake. Stakes are crucial for preventing lateral movement and popping. Too few stakes, or stakes that aren't driven deep enough, render them ineffective.
- Incorrect Material Choice: Soft, flimsy plastic edging might be cheap, but it's often not rigid enough to withstand soil pressure or lawnmower bumps, especially in curved designs. Heavier gauge materials are necessary for durability.
- No Expansion/Contraction Allowance: Some materials, particularly plastic, expand in heat and contract in cold. If installed too tightly with no room for movement, they can buckle dramatically in summer and pull apart in winter.
- Soil and Climate Conditions Ignored: Heavy clay soils prone to frost heave require deeper, more stable trenches and robust anchoring. Wet climates or areas with significant root growth demand more durable solutions than dry, sandy regions.
Common Mistakes
- Eyeballing the Line: Trying to install edging without a clearly marked line (spray paint, garden hose, string) almost always results in wobbly, unprofessional lines that detract from your landscape. Always use a guide.
- Not Removing Obstacles: Leaving small rocks, roots, or clumps of dirt in the trench bottom creates uneven pressure points on the edging, leading to stresses and eventual buckling or cracking. Clear the trench thoroughly.
- Using Flimsy Edging for Curves: Very thin, flexible plastic edging often struggles to hold tight curves without kinking or stressing. For sharp curves, consider edging specifically designed for flexibility or choose segmented materials like pavers.
- Backfilling Casually: Simply pushing dirt back into the trench without compacting it is a recipe for disaster. The loose soil will settle unevenly over time, leaving gaps and allowing the edging to shift.
- Ignoring Connections: Neglecting to use the appropriate connectors for multi-section edging, or using weak alternatives, creates the weakest points in your entire border. These will be the first to separate.
- Installing Too Deep or Too Shallow: Edging installed too deep disappears into the mulch and loses its containment ability. Too shallow, and it pops out. The goal is 0.5 to 1 inch above finished grade.
Cost & Time Breakdown
| Task | DIY Cost | Pro Cost | Time |
|---|---|---|---|
| Planning & Layout | $0 | N/A | 15-30 min |
| Trenching (per 100 ft) | $0 (if own tools) | $100–$250 | 1–2 hours |
| Edging Material (per 100 ft) | $50–$200 | $50–$200 + markup | N/A |
| Installation (per 100 ft) | $0 | $150–$400 | 2–4 hours |
| Backfilling & Compacting | $0 | Included | 30 min – 1 hour |
| Total (per 100 ft) | $50–$200 | $300–$850 | 3.5–7.5 hours |
Tips & Prevention
- Choose the Right Material: For long-lasting results, invest in thicker, more rigid plastic or metal edging. Avoid the cheapest, flimsiest options for anything more than temporary borders. Consider stone or brick for permanent, no-maintenance solutions.
- Consider Permeable Edging: If drainage is an issue, select edging that allows for water flow, or install a small french drain behind the edging if you're dealing with significant runoff.
- Regular Inspections: Periodically walk around your landscape beds and check for sections of edging that are heaving, bowing, or separating. Addressing these issues early can prevent larger failures.
- Edge Your Lawn Regularly: Use a string trimmer or edger along the lawn side of your landscape edging to keep turf from growing over and obscuring the border. This also helps maintain a clean line.
- Proper Backfill Material: For areas with heavy clay or poor drainage, consider using a sand or fine gravel mix for backfill rather than just plain soil. This can improve stability and reduce frost heave.
- Don't Overfill Beds: Keep mulch and soil levels slightly below the top of the edging (about 0.5 inch). Overfilling beds means the edging loses its ability to contain the material effectively.
When to Call a Professional
While installing landscape edging is a common DIY task, certain situations warrant calling a professional landscaper. If your project involves extensive grading, complex multi-tier designs, or tying into existing hardscaping like patios or walkways, a professional can ensure proper drainage and structural integrity. Professionals also have access to heavy-duty equipment for trenching long distances or through very rocky soil, which can be incredibly labor-intensive and challenging for a DIYer. Moreover, if your property has significant slopes or unique soil conditions, a landscaper can recommend and install specialized erosion control solutions that integrate with your edging. When in doubt about achieving a truly durable and aesthetically pleasing result for a large or intricate project, investing in professional expertise can save you time, frustration, and money in the long run by avoiding costly re-dos.
Related Articles
Keep troubleshooting with these hand-picked guides from FixlyGuide:
- The #1 Mistake Killing Your Lawn's Clover—and the Easy fix That Spares Your Grass — Discover the most common mistake homeowners make when trying to eliminate clover, and learn how to remove it effectively without harming yo…
- The 3 Hidden Reasons Your Sprinkler Head Won't Pop Up (And How to Fix Them) — Frustrated by a sprinkler head that won't rise? Discover the top three culprits behind this common irrigation issue and how to resolve them…
- The #1 Mistake Homeowners Make Pruning Trees (And How to Fix It) — Pruning trees at the wrong time can severely damage them, stunting growth and inviting pests. Learn the critical mistake to avoid.
- The #1 Mowing Mistake That Invites Weeds (And How to Fix It in 15 Minutes) — Discover the secret to a thriving lawn and banish weeds by avoiding the most common mowing error homeowners make, improving grass health dr…
- The #1 Mistake Killing Your Lawn's Clover—And 3 Secrets to Get Rid of It for Good — Discover the common mistake homeowners make when trying to eliminate clover and learn three effective, grass-safe strategies to remove it p…
- The 7 Critical Wall Prep Mistakes That Ruin Your Paint Job (And How to Fix Them) — Discover the crucial wall preparation steps often overlooked by DIYers that lead to peeling, cracking, and uneven paint finishes, and learn…
Frequently asked questions
Why does my landscape edging keep popping out of the ground?+
Landscape edging often pops out due to insufficient trench depth, meaning it's not buried deep enough to resist soil movement and frost heave. It can also be caused by loose backfill, inadequate anchoring stakes, or heavy clay soil that expands and contracts significantly with moisture.
How deep should I bury landscape edging?+
You should bury landscape edging to a depth where at least two-thirds of its height is below ground, with the top 0.5 to 1 inch visible above the finished grade. For most standard edgings, this means a trench approximately 4-6 inches deep.
What's the best type of landscape edging to prevent it from moving?+
Rigid PVC or heavy-gauge metal edging (steel or aluminum) are generally excellent choices for stability. These materials, when properly trenched and anchored with robust stakes, offer superior resistance to shifting, buckling, and frost heave compared to thinner, more flexible plastic options.
Can I install landscape edging without digging a trench?+
While some shallow, decorative edgings can be surface-installed with stakes, for true stability and effectiveness in containing soil and resisting movement, digging a proper trench is almost always necessary. Edging without a trench is prone to quickly shifting, popping up, or failing to contain bed materials.
How far apart should landscape edging stakes be?+
For flexible landscape edging, stakes should typically be placed every 2-3 feet on straight sections and every 1-1.5 feet on curves to provide adequate anchoring. For more rigid materials like metal, follow the manufacturer's recommendations, usually aligning with pre-drilled holes or stake pockets.


Discussion
Loading comments…