
Tools & materials you'll need
Affiliate linksAs an Amazon Associate FixlyGuide earns from qualifying purchases — at no extra cost to you. Prices and availability are accurate as of publication and subject to change.
Quick Answer
Many homeowners struggle with landscape edging that quickly becomes messy, allowing grass and weeds to invade flower beds, or that shifts and buckles over time. The primary culprit is often improper trenching and incorrect depth during installation. A level, adequately deep trench, combined with correctly secured edging, is crucial for creating a lasting barrier that keeps your beds tidy and defined.
The Problem
Picture this: you've spent hours carefully planting your flower beds, envisioning a pristine, weed-free border. You install landscape edging, confident it will keep things neat. But within weeks or months, grass from the lawn starts creeping over or under the edging, weeds sprout right next to it, and the edging itself begins to heave, tilt, or gaps appear. This isn't just an aesthetic issue; it means your hard work isn't protected, and you're constantly re-weeding and adjusting. The problem isn't usually the edging material itself, but how it was put in. An unstable, ineffective border costs you more time and effort in the long run.
How It Works
Landscape edging functions as a physical barrier, separating different landscape elements, most commonly a lawn from a garden bed. To be effective, this barrier must extend deep enough into the soil to block horizontal root growth (like creeping fescue or Bermuda grass runners) and stand tall enough above the soil to prevent above-ground runners and mulch migration. Most flexible landscape edgings (plastic, rubber, or even some metal types) rely on a combination of a buried base flange and securing stakes to hold them in place. The base flange, often an L-shape or T-shape at the bottom of the edging, needs to be fully buried and compacted to prevent grass roots from growing underneath. The visible top edge needs to be just above the soil line, typically 0.5 to 1 inch, to create a crisp division and contain mulch, without becoming a tripping hazard or impeding lawnmowers. If the trench isn't level, the edging won't be level. If it's not deep enough, roots go under. If it's not secured properly with stakes, it buckles and shifts. The goal is to create a seamless, impenetrable wall that clearly defines your landscape zones and holds its position against soil movement, water runoff, and routine yard maintenance.
Step-by-Step Fix
Ready to get that landscape edging looking sharp and staying put? This process assumes you're either re-installing failed edging or installing new edging with proper technique from the start.
1. Clear the Path Thoroughly — Remove old edging, debris, and existing weeds.
- Use a spade or shovel to dig out any old edging.
- Pull out all weeds, paying special attention to roots of creeping grasses that may still be in the soil where the new trench will go. A weeding fork can be helpful here.
- If this doesn't work: If you have particularly aggressive weeds like Bermuda grass, consider laying down a temporary weed barrier fabric for a few weeks before continuing, or carefully applying a targeted non-residual herbicide (follow all label directions carefully and avoid overspray).
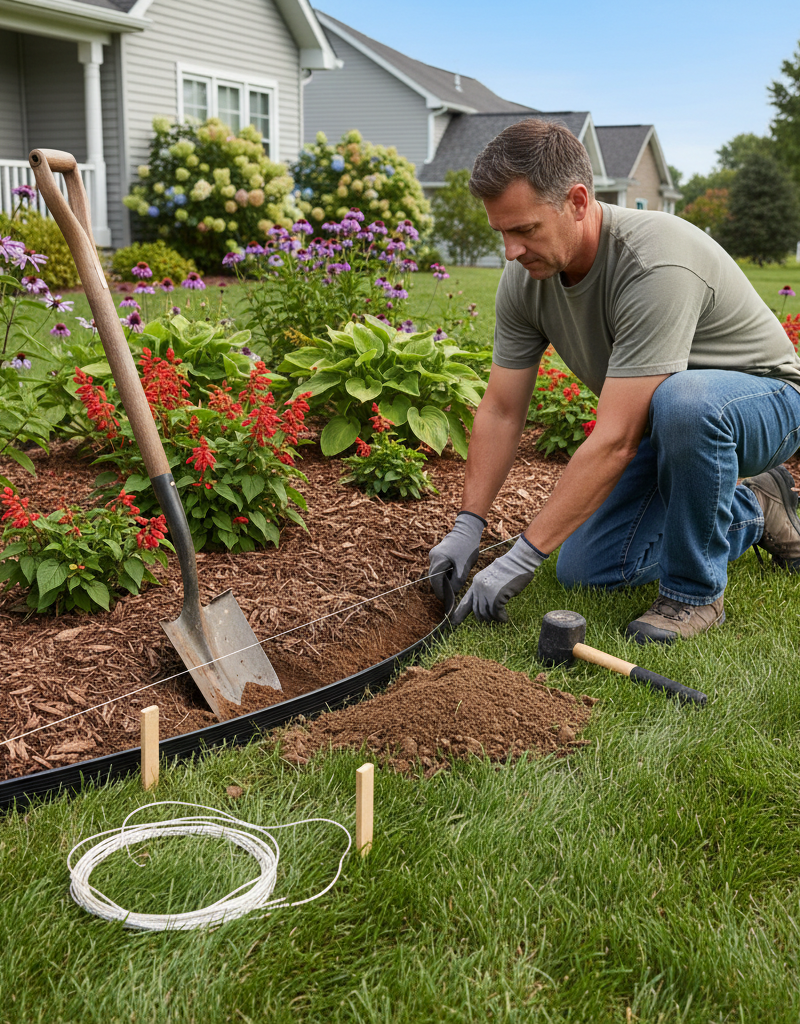
2. Mark Your Line Precisely — Use a string line or garden hose to define your edge.
- For straight lines, set up stakes and run a taut string between them.
- For curves, lay out a garden hose or spray paint a clean line on the ground. A good trick for smooth curves is to gently lay the hose on its side and adjust until the curve is perfect.
- This line will be your guide for digging, ensuring a consistent, aesthetically pleasing border.
3. Dig a Level Trench — Create a V-shaped or U-shaped trench of uniform depth.
- Safety Note: Always wear sturdy gloves and eye protection when digging to prevent injury from rocks or soil debris.
- Using a spade or trenching shovel, dig a trench along your marked line. For most flexible plastic or metal edging, a 4-6 inch deep, 3-4 inch wide trench is ideal. The key is consistency.
- The bottom of your trench should be as level as possible. Use a small hand level for critical areas, especially for more rigid edging or pavers.
- If this doesn't work: If your soil is very rocky, you may need a pickaxe to break up the soil or consider renting a motorized trenching tool for long runs. Alternatively, for less aggressive weeds, a shallower trench might suffice, but expect to do more manual weeding.
4. Compact the Trench Bottom — Ensure a stable base for your edging.
- Once the trench is dug, use the end of a 2x4, a hand tamper, or even your foot to firmly compact the soil at the bottom of the trench.
- This prevents the edging from settling unevenly over time, especially after rain or irrigation.
5. Install Edging at the Correct Depth — Bury the base, expose the top.
- Place the edging material into the trench. For most flexible plastic edging, the L-shaped base flange should be facing the garden bed, fully buried for stability and weed prevention.
- The top edge of the edging should sit approximately 0.5 to 1 inch above the finished grade of your lawn. This allows for easy mowing without hitting the edging while still containing mulch effectively.
- Use a rubber mallet to gently tap the edging into place, ensuring it's snug against the compacted trench bottom and level.
- If this doesn't work: If the edging is too high, it will be a tripping hazard and difficult to mow around. If it's too low, grass will grow right over it. Adjust immediately before backfilling.
6. Secure with Stakes (If Applicable) — Prevent shifting and buckling.
- For flexible plastic or metal edging, drive securing stakes through the designated holes (or over the top flange for some designs) every 3-5 feet.
- Use a rubber mallet to drive the stakes flush with the top of the edging or slightly below the soil surface, depending on the stake design.
- Ensure stakes are driven vertically, not at an angle, for maximum holding power.
7. Backfill and Compact Both Sides — Lock the edging in place.
- Carefully push soil back into the trench on both sides of the installed edging.
- Use your hands or a small hand tool to ensure the soil is packed firmly against the edging.
- Lightly compact the soil on both the lawn side and the bed side. You can gently tap the soil with the back of a shovel or use your foot.
- If this doesn't work: Insufficient backfilling and compaction is a major cause of future edging instability. Don't skip this step. Add water to help settle the soil, then add more soil if needed.
8. Final Grade and Mulch — Complete the look and enhance weed suppression.
- Ensure the soil on the garden bed side is graded appropriately, perhaps sloping slightly away from the edging to allow for water drainage.
- Add your preferred mulch (wood chips, decorative stone, etc.) to the garden bed. The edging will now effectively contain it.
Common Causes
- Insufficient Trench Depth: If the trench isn't deep enough, grass roots or runners can easily grow underneath the edging, negating its purpose.
- Uneven Trenching: A wobbly or inconsistent trench leads to an uneven, unprofessional-looking edge that can also create weak points.
- Lack of Compaction: Without compacting the trench bottom and the backfill, the soil will settle unevenly, causing the edging to buckle, heave, or sink.
- Improper Edging Depth Above Ground: Edging installed too high is a tripping hazard and difficult to mow around; too low, and it fails to contain mulch or block creeping weeds effectively.
- Not Using Stakes (or Not Enough Stakes): Flexible edging needs to be secured with stakes at regular intervals to prevent it from shifting, expanding, or contracting with temperature changes.
- Ignoring Existing Weeds/Roots: Failing to clear the area thoroughly before installation means you're building a barrier on top of existing problems that will quickly resurface.
Common Mistakes
- Rushing the Trench: Homeowners often try to just push edging into the ground with their foot or a hammer, creating a shallow, uneven "trench" that offers no stability or weed barrier. Always dig a proper trench.
- Eyeballing the Line: Guessing the curve or straightness of your edge leads to wobbly lines that stand out. Take the extra time to use a string line or garden hose for a professional look.
- Leaving Gaps at Connections: When joining sections of edging, ensure there are no gaps where grass and weeds can exploit. Use connectors if provided, or overlap slightly if the material allows.
- Burying Edging Too Deep or Leaving Too Much Exposed: The "sweet spot" is usually 0.5 to 1 inch above the finished grade. Too deep, and it disappears; too high, and it looks like a barrier wall. Measure and adjust.
- Not Considering Drainage: If your trench or backfill creates a dam, water can pool against the edging, potentially leading to issues with the nearby plants or even eroding the soil around the edging. Ensure proper grading.
- Ignoring Soil Type: Very sandy soil may require more frequent staking and deeper burial for stability, while rocky soil will make trenching challenging and might require different tools or strategies.
Cost & Time Breakdown
| Task | DIY Cost | Pro Cost | Time |
|---|---|---|---|
| Entry-level flexible edging | $0.50–$2 per foot | N/A | 30-60 min/50 ft |
| Higher-end rigid/metal edging | $2–$10 per foot | N/A | 1-2 hours/50 ft |
| Tools & materials | $20–$50 (one-time) | N/A | N/A |
| Professional installation | N/A | $3–$15 per linear foot | 4–8 hours/100 ft |
| Backfill soil/mulch | $10–$50 per bed | Included in labor | 15–30 min |
Tips & Prevention
- Regular Inspection: Periodically walk along your landscape edging, especially after heavy rains or freeze-thaw cycles, to check for any heaving, gaps, or areas where grass is starting to creep. Address issues early.
- Edge Maintenance: Use a string trimmer safely along the lawn side to keep grass from growing over the top. Avoid hitting the edging directly, as this can damage it over time.
- Pre-Emergent Herbicide: For persistent weed issues, consider applying a pre-emergent herbicide product in your flower beds in early spring and fall. This will help prevent weed seeds from germinating and reduce pressure on your edging.
- Proper Mulch Depth: Maintain 2-4 inches of mulch in your flower beds. This works in conjunction with your edging to suppress weeds and retain soil moisture. Keep mulch a few inches away from plant stems.
- Consider Material Choice: For high-traffic areas or very aggressive grass types, consider more rigid materials like paver edging or metal edging, which offer superior durability and root barrier capabilities compared to flexible plastic.
- Check for Buried Obstructions: Before digging, especially deep trenches, use a utility marker or call 811 to check for buried utility lines (gas, water, electric, cable). Striking one can be dangerous and costly.
When to Call a Professional
If you're dealing with extremely rocky soil that makes trenching impossible with hand tools, if you have very complex or extensive landscape designs with intricate curves, or if you prefer a highly durable and aesthetically specific solution like concrete curbing or stone paver edging, it might be time to call a professional landscaper. They have specialized equipment for digging trenches quickly and precisely, and the expertise to install complex edging systems that require heavy lifting, mortar, or specific setting beds. For issues involving property lines, significant grade changes, or large-scale projects, a professional can also ensure proper drainage and compliance with local regulations, saving you headaches and potential costs down the line. For small to medium-sized flexible edging jobs, most homeowners can achieve excellent results with the right technique and patience.
Related Articles
Keep troubleshooting with these hand-picked guides from FixlyGuide:
- The 3 Hidden Mistakes That Make Landscape Edging Fail (And How to Fix Them) — Discover common mistakes homeowners make when installing landscape edging and learn the correct methods to achieve a durable, professional-…
- The #1 Mistake Homeowners Make When Testing Soil pH (And How to Get It Right Every Time) — Learn the critical mistake most homeowners make when testing lawn soil pH and how to perform accurate tests at home for a healthier, greene…
- The #1 Mistake Killing Your Lawn's Clover—and the Easy fix That Spares Your Grass — Discover the most common mistake homeowners make when trying to eliminate clover, and learn how to remove it effectively without harming yo…
- The 3 Hidden Water Sources Breeding Mosquitoes in Your Yard (And How to Eliminate Them) — Naturally control mosquitoes in your backyard by targeting and eliminating hidden standing water sources where they breed, using simple, ec…
- The #1 Mistake Homeowners Make When Fighting Dandelions (And The Weeds Still Win) — Learn the surprising reason dandelions continue to plague your lawn and the effective, long-term strategies to reclaim your turf without en…
- The #1 Mistake Homeowners Make After Finding Missing Shingles (And How to Fix It Right) — Discover the crucial steps to take after a storm rips shingles from your roof, ensuring a proper, lasting repair and preventing costly futu…
Frequently asked questions
Why does my landscape edging keep coming up?+
Landscape edging often comes up due to improper trenching and insufficient securement. If the trench isn't deep enough, or if stakes aren't used (or aren't enough), the edging can shift, heave, or buckle due to soil movement, temperature changes, or aggressive grass roots.
How deep should I bury landscape edging?+
For most flexible landscape edging, the base should be buried 4-6 inches deep to effectively block grass roots. The top edge should sit about 0.5 to 1 inch above the finished grade of your lawn to contain mulch and create a clean visual separation without interfering with mowing.
What is the best way to keep grass from growing over landscape edging?+
To prevent grass from growing over, ensure your edging is installed at the correct height (0.5-1 inch above grade) and that its base is fully buried. Regularly trim the grass right along the edge with a string trimmer, and consider applying a pre-emergent herbicide in the adjacent lawn area to deter new growth.


Discussion
Loading comments…