
Tools & materials you'll need
Affiliate linksAs an Amazon Associate FixlyGuide earns from qualifying purchases — at no extra cost to you. Prices and availability are accurate as of publication and subject to change.
Quick Answer
For homes built before 1978, any DIY project that disturbs painted surfaces – such as sanding, scraping, drilling, or demolition – carries a significant risk of releasing harmful lead-based paint dust. This dust, often invisible to the naked eye, can be inhaled or ingested and poses severe health threats, particularly to children and pregnant women. Understanding proper containment, cleaning protocols, and when to test for lead is crucial for safely performing repairs in older homes.
The Problem
You're eager to tackle that bathroom remodel, repaint the nursery, or finally fix those chipping window sills. But if your home predates 1978, there's a silent, invisible threat lurking beneath those layers of paint: lead. While lead paint, when undisturbed and in good condition, generally doesn't pose an immediate risk, the moment you start a DIY project that scrapes, sands, drills, or even vigorously cleans these surfaces, you release microscopic lead particles into the air and onto every surface. This isn't just "dust" – it's a toxic hazard that can accumulate in the body over time, leading to a range of severe health problems. Children are especially vulnerable, as their developing bodies absorb lead more readily, and they often put their hands and contaminated objects into their mouths. Even a small amount of lead dust can have lasting neurological and developmental consequences, impacting learning, behavior, and overall health. The problem isn't just during the project either; improper cleanup can leave lead contamination behind, posing a continuous threat long after the work is done.
How It Works
Lead-based paint was widely used in homes until it was banned in 1978 due to its recognized toxicity. The lead compounds were added to paint for various reasons: to make it more durable, to help it dry faster, and to give it vibrant colors. When this paint ages, it can chip, peel, or chalk, but the real danger emerges when it's mechanically disturbed. Imagine paint as a matrix where lead particles are embedded. Actions like sanding create fine dust, scraping releases flakes, and drilling generates tiny lead-filled particles. These particles are incredibly small – often invisible – and can remain suspended in the air for hours before settling on floors, furniture, toys, and even in ventilation systems. Once settled, they can be easily re-aerosolized by walking or air currents.
Lead is persistent and doesn't break down in the environment. When inhaled, these minuscule particles bypass the body's natural defenses and enter the bloodstream. If ingested, they are absorbed through the digestive system. Once in the body, lead mimics calcium and can be deposited in bones, teeth, and soft tissues. It interferes with numerous bodily functions, particularly affecting the nervous system, kidneys, and blood-forming processes. Even low levels of lead exposure can have detrimental effects on children's developing brains, leading to reduced IQ, behavioral problems, and learning disabilities. For adults, lead exposure can cause hypertension, kidney damage, reproductive issues, and neurological problems. Understanding this mechanism of exposure and accumulation is key to appreciating why stringent safety measures are non-negotiable when dealing with older paint.
Step-by-Step Fix
Dealing with lead-based paint isn't a "fix" in the traditional sense, but rather a set of critical safety protocols to manage and contain the hazard during any home repair project. These steps are designed to minimize exposure and prevent contamination.
1. Test Before You Touch – Before planning any work on painted surfaces, obtain a lead test kit.
- Purchase a reliable EPA-recognized lead test kit from a hardware store. These typically involve swabbing the paint and observing a color change. Perform tests on all painted surfaces you intend to disturb.
- If the test is positive, or if you're unsure, assume lead is present. Consider professional testing for a definitive answer and detailed risk assessment.
2. Plan for Containment – Isolate the work area completely before starting any activity.
- Clear the room of all furniture, rugs, and personal items. If items cannot be removed, cover them completely with two layers of 6-mil plastic sheeting, sealed with duct tape.
- Seal all doorways with two sheets of 6-mil plastic sheeting, creating an airlock. Cover air vents and returns with plastic and tape to prevent dust from circulating throughout your HVAC system.
- Lay down two layers of 6-mil plastic sheeting on the floor, extending at least 6 feet beyond the work area.
- Safety Note: Never eat, drink, or smoke in the work area. Keep children and pets completely out of the contained space until cleanup is complete.
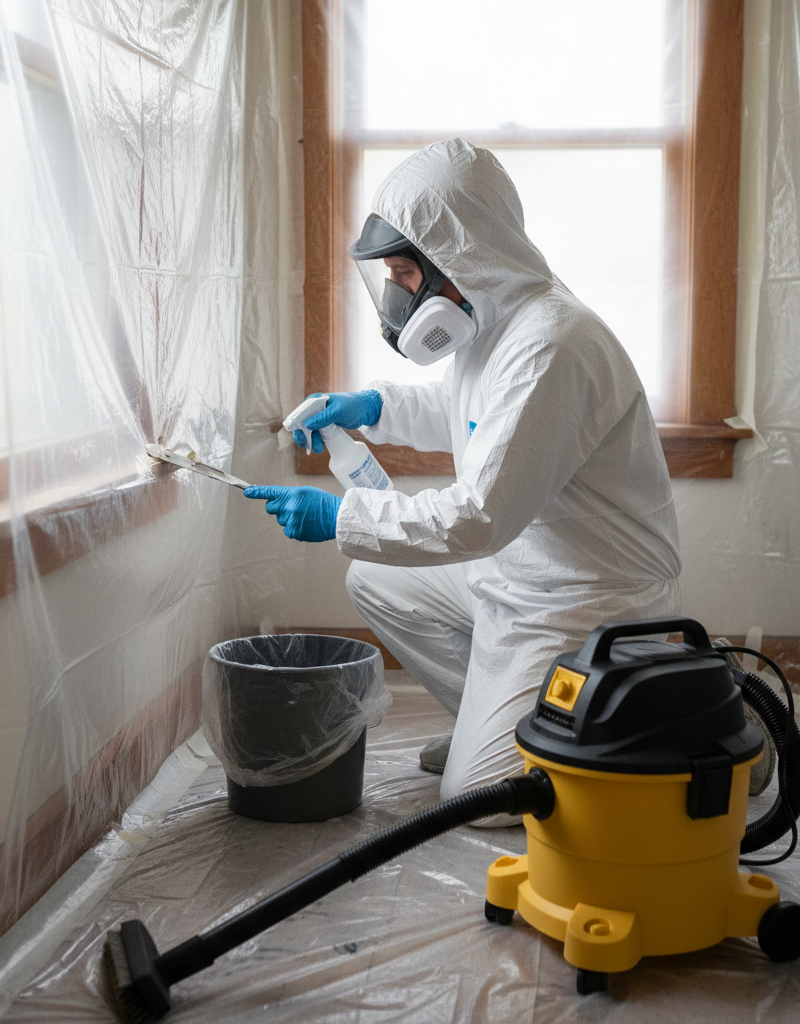
3. Dress for Protection – Wear appropriate personal protective equipment (PPE) before entering the work area.
- Don a disposable respirator rated N100 or P100. N95 masks are not sufficient for lead dust.
- Wear a disposable full-body suit (Tyvek suit) with a hood.
- Use disposable gloves and shoe covers.
- If this doesn't work: If you feel uncomfortable or cannot maintain a tight seal with your respirator, contact a professional. Your safety is paramount.
4. Minimize Dust Generation – Choose disturbance methods that create the least amount of dust.
- Scraping: Use wet scraping techniques with a HEPA-filtered vacuum nearby to capture loosened paint immediately. Keep a spray bottle with water handy to dampen surfaces.
- Sanding: Avoid dry sanding entirely. If sanding is absolutely necessary, use wet sanding methods or power tools equipped with a HEPA filter attachment.
- Drilling: Use a shroud with a HEPA vacuum attachment to capture dust at the source.
- Demolition: Score and remove painted components in large sections where possible, rather than pulverizing them. Mist surfaces with water to suppress dust.
5. Wet Clean As You Go – Regularly clean up dust and debris throughout the project.
- Never use a standard household vacuum cleaner; it will only spread lead dust. Use a HEPA-filtered vacuum only.
- After minimal work, dampen a heavy-duty wipe (specifically designed for lead cleanup) or a disposable rag with a lead-specific cleaning solution or a general all-purpose cleaner.
- Wipe down all surfaces, starting from the top and working your way down. Collect debris and dispose of it in heavy-duty plastic bags.
6. Double Clean and Dispose – Perform thorough cleaning after the work is complete.
- Once the project is finished, wet-wipe all surfaces within the containment area multiple times using new rags and clean water or lead-specific cleaning solution each time.
- Vacuum thoroughly with a HEPA vacuum.
- Carefully fold the top layer of plastic sheeting inward to contain any settled dust, then roll it up. Mist with water if needed to prevent dust from becoming airborne.
- Place all contaminated materials – plastic sheeting, rags, PPE, paint chips, and dust – into heavy-duty plastic bags. Seal the bags and label them "Hazardous Waste – Lead Contaminated." Contact your local waste management facility for proper disposal instructions for lead waste.
7. Decontaminate Yourself – Properly remove your PPE before leaving the work area.
- While still in the containment area, remove your disposable full-body suit, turning it inside out as you peel it off.
- Remove shoe covers and gloves. Place all disposable PPE directly into a hazardous waste bag.
- Exit the work area and immediately shower and wash your hair with soap and water to remove any lingering dust. Leave your work shoes outside the clean living space.
Common Causes
The primary "cause" of lead paint hazard is simply the age of the home mixed with the homeowner's understandable desire to maintain or upgrade it. Here are the specific scenarios that most frequently activate this risk:
- Homes Built Before 1978: This is the overarching factor. Any painted surface in such a home is a potential lead paint source.
- Deteriorating Paint: Chipping, peeling, flaking, or chalking paint on walls, windows, doors, and trim naturally releases lead dust and chips, even without active disturbance.
- Friction and Impact Surfaces: Windows that slide, doors that open and close, and stair treads are high-wear areas where friction can abrade lead paint, creating dust. Impact areas (like door frames repeatedly hit by doors) also create lead dust.
- DIY Renovation and Repairs: Any project involving sanding, scraping, drilling, cutting, or demolishing painted surfaces in an older home directly generates lead-contaminated dust and debris.
- Improper Cleaning Methods: Using a dry cloth, a broom, or a standard vacuum cleaner on lead dust will aerosolize it and spread it, rather than removing it.
Common Mistakes
Dealing with lead paint requires vigilance and precision. Here are common mistakes homeowners make that increase their risk of exposure:
- Skipping the Lead Test: Assuming your home is too "new" or that only certain rooms have lead paint. Always test if your home was built before 1978.
- Assuming "Intact" Means "Safe": While intact paint is less risky, any planned disturbance, no matter how minor, can release dangerous dust. Don't rely on visual inspection alone.
- Using Standard respirators: An N95 dust mask is insufficient. Lead particles are too small; you need an N100 or P100 respirator to filter them effectively.
- Dry Sanding or Scraping: These methods create significant amounts of fine, airborne lead dust, maximizing exposure risk. Always use wet methods or HEPA-equipped tools.
- Using a Regular Vacuum Cleaner: Household vacuums lack the proper filtration (HEPA) and will blow microscopic lead particles into the air, contaminating your entire house.
- Ignoring Proper Containment: Not sealing off the work area properly allows lead dust to escape and spread to other rooms, furniture, and HVAC systems.
- Improper Disposal: Throwing lead-contaminated debris into regular household trash. This is illegal and dangerous, contributing to environmental contamination.
Cost & Time Breakdown
| Task | DIY Cost | Pro Cost | Time |
|---|---|---|---|
| Lead Test Kits | $25–$50 | $200–$600 (full inspection) | 5–10 minutes per test |
| PPE (respirator, suit, gloves) | $40–$75 | Included | 5 minutes to don |
| Containment Supplies | $50–$100 | Included | 30–60 minutes per room |
| HEPA Vacuum Rental | $30–$50 per day | Included | N/A |
| Lead-Specific Cleaning Suplies | $20–$40 | Included | N/A |
| Hazardous Waste Disposal | Varies by locality (often free for small amounts) | Included | N/A |
Tips & Prevention
- Regular Visual Inspections: Periodically check painted surfaces, especially around windows, doors, and areas with friction or impact, for signs of chipping, peeling, or chalking paint. Address deterioration promptly and safely.
- Wet-Wipe Regularly: For homes built before 1978, regularly wet-wipe floors, window sills, and other surfaces with an all-purpose cleaner to remove any settled dust before it can be disturbed.
- Wash Hands Frequently: Encourage frequent handwashing, especially for children, to minimize the ingestion of any lead dust that might have settled.
- Keep Children Away: Always keep children and pregnant women out of areas where lead-based paint is being disturbed, even if containment measures are in place.
- Professional Abatement for Large Projects: For extensive renovations or if significant lead paint is widespread, seriously consider professional lead abatement services. This is a specialized field that ensures complete removal and safety.
- Maintain Exterior Paint: Keep exterior lead paint well-maintained to prevent it from chalking and contaminating soil around your home. Plant shrubs or ground cover near the house foundation to minimize direct access to soil.
When to Call a Professional
While vigilant DIY safety can manage small-scale lead paint disturbances, there are clear instances where professional intervention is not just recommended, but critical. If your lead test results show widespread lead paint or highly positive readings, especially in high-traffic or child-occupied areas, a licensed lead abatement contractor should be your first call. Similarly, if your project involves large-scale demolition, removal of extensive painted components, or work on exterior lead paint, a professional will have the specialized equipment, training, and certifications to safely encapsulate, remove, and dispose of the hazardous materials. Do not attempt to tackle major lead paint remediation yourself; the risks of improper containment and disposal are simply too high for both your health and the environment.
Related Articles
Keep troubleshooting with these hand-picked guides from FixlyGuide:
- The Hidden Reason Your GFCI Trips (It's Not Always a Faulty Outlet) — A continuously tripping GFCI outlet is a critical safety warning, often indicating moisture, a faulty appliance, or a wiring problem that r…
- The Secret to Lush Raised Beds? It's Not Just About How You Water — Smart irrigation for raised garden beds isn't just about automation; it's about delivering the right amount of water precisely when your pl…
- The Hidden Reason Your GFCI Trips (It’s Not Always a Bad Outlet) — A tripping GFCI outlet is a safety mechanism doing its job, often indicating a problem like moisture, a faulty appliance, or a wiring issue…
- The 6 Cleaning Secrets Hiding in Your Power Drill (Plus Attachments to Master) — Your power drill isn't just for DIY projects; with the right attachments, it's a powerful and efficient cleaning tool for tackling tough gr…
- The Secret to Scoring Deep Grill Discounts (Before Everyone Else Does) — Unlock massive savings on top-brand grills and outdoor cooking essentials by understanding the overlooked retail inventory cycles before Me…
- The #1 Mistake Killing Your Lawn? It's Hiding in Your Soil pH — Discover how to quickly and accurately test your lawn's soil pH at home, identify nutrient absorption issues, and unlock a healthier, green…
This article was independently written by FixlyGuide based on the source topic.
Frequently asked questions
How do I know if my house has lead paint?+
The easiest way is to use an EPA-recognized lead test kit, available at hardware stores, on painted surfaces. For a comprehensive and precise assessment, especially before a major renovation, you can hire a certified lead inspector.
Is it safe to paint over lead paint?+
Yes, encapsulation (painting over) is a common and often safe strategy for intact lead paint that is not deteriorating. However, it's crucial to ensure the underlying lead paint is stable and not chipping or peeling. If it's in poor condition, encapsulation won't be a long-term solution, and the paint should be safely removed or abated by a professional.
What is the most dangerous way to disturb lead paint?+
Dry sanding and scraping are by far the most dangerous methods as they create large quantities of fine, breathable lead dust that can easily spread throughout your home and linger in the air for hours. Power tools without HEPA attachments also pose a significant risk.


Discussion
Loading comments…