
Tools & materials you'll need
Affiliate linksAs an Amazon Associate FixlyGuide earns from qualifying purchases — at no extra cost to you. Prices and availability are accurate as of publication and subject to change.
Quick Answer
If your home dates back to before 1978, assume that some of its painted surfaces contain lead-based paint. While intact lead paint generally poses a low risk, any activity that disturbs it—like sanding, scraping, drilling, or demolition—can release microscopic lead dust and chips into the air, creating a severe health hazard. Before embarking on any renovation project, always test painted surfaces, especially in high-friction areas like windows and doors. If lead is confirmed, meticulously follow containment and cleanup procedures, or consider hiring a certified lead-safe professional to ensure your household's safety.
The Problem
Imagine taking on a seemingly innocent DIY project, like stripping an old door or sanding down a chipped window sill, only to unknowingly release a silent, invisible toxin into your home. This is the insidious danger of lead-based paint. While it was widely used for its durability and vibrant colors for decades, its perilous health effects, particularly on children and pregnant women, led to its ban in residential paint in 1978. For millions of homeowners living in older houses, this means a hidden threat lurking beneath layers of newer paint.
The real problem isn't necessarily the paint itself when it's stable and undisturbed. The danger escalates dramatically when activities like scraping, sanding, or even drilling through lead paint generate ultrafine dust particles and tiny paint chips. These particles, too small to see with the naked eye, can be inhaled, ingested, or tracked throughout your home, contaminating surfaces for years. Once inside the body, lead can cause severe and irreversible damage to the nervous system, kidneys, and blood, leading to developmental delays in children, learning difficulties, behavioral problems, and high blood pressure and reproductive issues in adults. This isn't just about a dusty mess; it's about protecting the long-term health of everyone in your home, which is why understanding and addressing lead paint is paramount for any homeowner tackling projects in older properties.
How It Works
Lead, a heavy metal, was a prized additive in paints for its ability to increase durability, speed up drying, and create richer pigments. Its crystalline structure provided a tough, long-lasting finish that held up exceptionally well to wear and tear, making it a popular choice for both interior and exterior applications. However, this very durability also means that lead paint doesn't simply degrade safely over time. Its particles remain hazardous for decades, even centuries.
When lead paint is disturbed, the mechanical action (scraping, grinding, impacting) breaks the paint film into microscopic dust and larger chips. This dust is exceedingly fine, often less than 5 microns in diameter, making it easily airborne and light enough to travel far from the work area. Once airborne, it can settle on floors, furniture, toys, and even in ventilation systems. Children are particularly vulnerable because they are more likely to put their hands or objects coated with lead dust into their mouths. Their digestive systems also absorb lead more efficiently than adults', and their developing brains and nervous systems are far more sensitive to its toxic effects.
Furthermore, lead dust doesn't just sit there; it can become re-entrained in the air with normal activities like walking, vacuuming, or opening and closing doors and windows. This means that a poorly contained renovation project can lead to ongoing exposure long after the work is completed. The chemical properties of lead allow it to persist in the environment, leaching into soil around exterior painted surfaces and becoming a constant source of potential exposure. Understanding this persistence and the mechanics of dust dispersal is crucial for appreciating why stringent lead-safe practices aren't just recommendations but essential safeguards.
Step-by-Step Fix
Safety Note: Never attempt to remove lead paint in large quantities without proper training, equipment, and containment. For extensive projects, always call a lead-certified professional. This guide focuses on safe practices for IDENTIFYING and dealing with minor, localized disturbances.
-
Test First, Assume Later — Before any renovation work in a pre-1978 home, test painted surfaces. You can purchase EPA-recognized lead test kits from hardware stores, which provide a quick indication by reacting with a color change. For definitive results, especially for larger areas, send paint chip samples to a certified lab.
- Pro Tip: Test multiple layers of paint, as lead paint may be buried under newer, lead-free layers. Focus on high-friction areas like windowsills, door frames, and railings.
-
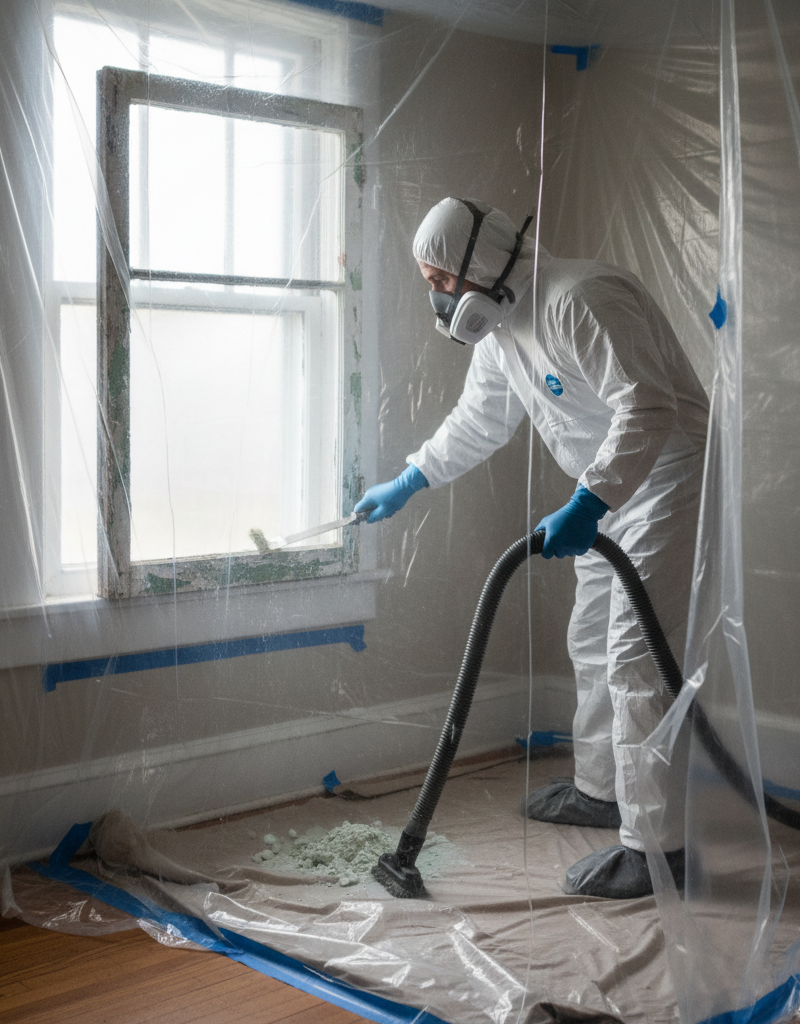
Prepare the Work Area — Even for small repairs, containment is key. Remove all furniture, curtains, rugs, and personal items from the room. Cover fixed elements like carpets and light fixtures with 6-mil plastic sheeting, taped securely to the walls using painter's tape. Turn off forced-air heating and air conditioning systems to prevent dust dispersal.
- Tools: 6-mil plastic sheeting, painter's tape, utility knife, heavy-duty trash bags.
-
Don Your Personal Protective Equipment (PPE) — Essential protection includes a minimum of an N100 or P100 respirator, disposable coveralls, disposable shoe covers, and nitrile gloves. A full-face respirator offers additional eye protection.
- Safety: Ensure your respirator is properly fitted and sealed. Facial hair can compromise the seal.
-
Wet Methods Only — If scraping or minor sanding is unavoidable for a small, localized repair (e.g., smoothing a single chipped area), use "wet methods." Lightly mist the surface with water before scraping or sanding. This significantly reduces airborne dust.
- Why Wet? Water agglomerates lead dust particles, making them heavier and less likely to become airborne.
- Avoid: Dry sanding, power sanding, heat guns over 1,100°F (which can vaporize lead), or open-flame burning. These methods create extremely dangerous lead fumes and dust clouds.
-
Contain Debris Immediately — As you work, collect paint chips and dust on the plastic sheeting. Never let debris fall directly onto the floor. If using wet methods, use a wet/dry shop vacuum equipped with a HEPA filter to collect water and paint sludge.
- Tools: HEPA-filtered vacuum, dedicated clean bucket.
-
Dispose of Waste Properly — Carefully fold the plastic sheeting inward to contain all debris. Seal it in durable, heavy-duty plastic bags. Check with your local waste management facility for specific guidelines on disposing of lead-contaminated waste. Do NOT put it in regular household trash unless explicitly permitted.
- Local Regulations: Lead waste disposal rules vary by municipality. Always verify.
-
Multi-Stage Cleanup — After removing all gross debris, perform a thorough cleaning. First, wet-wipe all surfaces repeatedly with a detergent solution, changing cloths frequently. Then, use the HEPA-filtered vacuum to vacuum all surfaces, including walls, ceilings, and floors. Finish with another wet-wiping stage.
- Measurement: A lead-certified dust wipe test can confirm clean surfaces if you're very concerned, but this usually requires a professional.
-
Personal Decontamination — Before leaving the containment area, remove disposable coveralls and shoe covers, placing them in a waste bag. Remove gloves and respirator. Wash your hands and face thoroughly with soap and water, or better yet, take a shower immediately after finishing work.
- Hygiene: Do not track lead dust into clean areas of your home or contaminate your personal clothing.
Common Causes
- Age of Home: The most common cause is simply living in a home built before 1978, the year lead-based paint was banned for residential use in the United States.
- Friction and Impact: Lead paint on surfaces that experience regular friction or impact, such as window sills and sashes, door frames, and banisters, is more prone to chipping, flaking, and generating dust.
- Deterioration: Peeling, chipping, or chalking paint, often due to water damage, poor surface preparation, or age, exposes the underlying lead layers.
- Renovation Activities: Any DIY activity that mechanically disturbs painted surfaces—sanding, scraping, drilling, cutting, demolition—is a primary cause of lead paint becoming a hazard.
- Accessibility to Children: Low-to-the-ground painted surfaces, especially those a child can chew on (e.g., window sills, cribs), present a direct pathway for ingestion of lead paint chips.
Common Mistakes
- Not Testing First: Assuming paint is lead-free because it's covered by newer layers or "looks fine." Always test if your home is pre-1978, especially before disturbing painted surfaces.
- Dry Sanding or Scraping: Using dry methods for paint removal is the quickest way to create a massive lead dust hazard. Always use wet methods or highly specialized tools that capture dust at the source.
- Using a Regular Vacuum Cleaner: Standard household vacuums, even those with "HEPA-style" filters, are ineffective at trapping microscopic lead dust and will actually spread it further into the air and throughout your home.
- Improper Containment: Failing to seal off the work area completely with thick plastic sheeting can allow lead dust to migrate to other parts of the house.
- Neglecting Personal Protective Equipment (PPE): Working without a properly fitted N100/P100 respirator, disposable coveralls, and gloves exposes you directly to lead dust through inhalation and skin contact.
- Poor Cleanup: Rushing the cleanup or using inadequate methods (like sweeping) leaves lead dust behind, creating a long-term contamination risk.
Cost & Time Breakdown
| Task | DIY cost | Pro cost | Time |
|---|---|---|---|
| Lead test kit (homeowner) | $20–$50 | N/A | 5–10 minutes |
| Lab paint sample analysis | $50–$150 per sample | Included in inspection | 3–7 days turnaround |
| Basic PPE (respirator, gloves, coveralls) | $30–$70 | Included | N/A |
| Containment materials (plastic, tape) | $20–$50 | Included | N/A |
| HEPA vacuum rental (day rate) | $40–$70 | Included | N/A |
| Professional lead risk assessment | N/A | $300–$600+ | 1–3 hours |
| Professional lead abatement (per room) | N/A | $1,000–$5,000+ | Days to weeks |
Tips & Prevention
- Regular Inspections: Periodically check all painted surfaces, especially around windows, doors, and other high-contact areas, for signs of chipping, peeling, or chalking paint. Address any deterioration promptly and safely.
- Maintain Intact Paint: The best prevention is to keep lead paint intact. Regularly clean surfaces with lead paint using wet methods. If repainting, ensure proper surface preparation without disturbing existing lead paint if possible.
- Educate Occupants: Inform everyone in the household, especially those involved in DIY projects or childcare, about the risks of lead paint and the importance of lead-safe practices.
- Handwashing: Encourage frequent handwashing for children and adults, especially before eating, to minimize accidental ingestion of lead dust.
- Cover Exposed Soil: If exterior lead paint is present, especially near foundations, consider planting shrubs or laying down mulch/gravel to cover lead-contaminated soil and prevent tracking it indoors.
- Consider Encapsulation: For intact lead paint, encapsulation (covering it with a durable, lead-safe coating, paneling, or drywall) can be a long-term solution, but it doesn't remove the lead.
When to Call a Professional
While this guide outlines precautions for minor, localized lead paint disturbances, there are clear instances when a professional is not just advisable but essential. You must call a lead-certified professional (often called a Lead Abatement Contractor) if you are planning extensive renovations, demolition, or any project that will disturb large areas of suspected lead paint. This includes replacing windows and doors, removing walls, stripping entire rooms, or dealing with heavily deteriorated lead paint. Professionals have specialized training, equipment (like full-face respirators with supplied air, negative air machines), and legal certifications to safely contain, remove, and dispose of lead-based paint and dust without contaminating your home or the surrounding environment. They can also perform lead risk assessments and clearance testing to confirm your home is safe after the work is complete. Attempting large-scale lead paint removal without proper expertise and equipment can result in severe lead contamination and put your family's health, and potentially your neighbors', at grave risk.
Related Articles
Keep troubleshooting with these hand-picked guides from FixlyGuide:
- 7 Inspection Red Flags That Secretly Signal a $20,000 Bill — Don't let your dream home become a money pit. Many buyers and even some inspectors overlook subtle home inspection red flags that lead to f…
- The 12 Checks That Prevent 80% of Costly Home Repairs — Don't wait for a disaster. Our comprehensive monthly home maintenance checklist reveals the surprising, simple tasks that catch small issue…
- The 4 Critical Dimensions of a Bluebird House (Most DIY Plans Miss One) — Discover the precise measurements and often-overlooked design elements essential for building a bluebird house that truly attracts nesting…
- The Single Board Secret to Attracting Bluebirds: A Quick DIY House — Discover how to construct an ideal bluebird house using just one cedar board, providing a safe and inviting home for these cherished backya…
- The #1 Chainsaw Mistake That Wrecks Your Yard (and Your Back) — Avoid common chainsaw errors that lead to frustration, damage, and unnecessary physical strain.
- Your Painted Cabinets Are Peeling? The $50 Primer Is Why. — Discover the #1 reason DIY painted cabinets chip and peel—it's not the paint, but the overlooked, non-negotiable prep step pros use for a r…
Get the print-ready PDF of this guide
A clean, ad-free, printable version you can keep on your phone or pin to the workshop wall. Free with a FixlyGuide account.
- Print-optimized layout
- Tools, materials & every step included
- Saved to your account
This article was independently written by FixlyGuide based on the source topic.
Frequently asked questions
How do I know if my home has lead paint?+
If your home was built before 1978, it's highly likely to contain lead-based paint. The only way to know for sure is to test painted surfaces using a DIY lead test kit or by sending paint chip samples to a certified lab for analysis.
Is intact lead paint dangerous?+
Intact, undamaged lead paint generally poses a low risk. The danger arises when the paint chips, peels, or is disturbed by activities like sanding, scraping, or drilling, which release hazardous lead dust and chips into the environment.
What are the health risks of lead paint exposure?+
Lead exposure can cause severe and irreversible damage to the brain, nervous system, kidneys, and blood. In children, it can lead to developmental delays, learning difficulties, and behavioral problems. In adults, it can cause high blood pressure, reproductive issues, and neurological damage.
Can I remove lead paint myself?+
For very minor, localized repairs, you can follow strict lead-safe practices (wet methods, containment, PPE). However, for extensive renovations, large-scale removal, or heavily deteriorated paint, it's strongly recommended to hire a lead-certified professional to ensure safety and compliance.
What should I do if I find lead paint in my home?+
If you find lead paint, don't panic. The safest approach is to encapsulate it (cover it with new, lead-free materials) or hire a lead abatement professional for removal. If undertaking small DIY tasks, always test first, use wet methods, wear proper PPE, and ensure meticulous cleanup and containment.


Discussion
Loading comments…