
Tools & materials you'll need
Affiliate linksAs an Amazon Associate FixlyGuide earns from qualifying purchases — at no extra cost to you. Prices and availability are accurate as of publication and subject to change.
Quick Answer
If your home was constructed before 1978, there's a significant likelihood of lead-based paint being present. The primary hazard isn't typically solid, undisturbed paint, but rather the microscopic dust and paint chips generated when surfaces are scraped, sanded, drilled, or demolished during home repairs. Homeowners must test for lead before any renovation and implement rigorous safety protocols, including containment, personal protective equipment, and meticulous cleanup, to prevent lead exposure and protect occupants, especially children and pregnant women.
The Problem
Imagine you're tackling a long-awaited renovation project – perhaps scraping old paint from a windowsill or sanding down a doorframe. You're focused on the task, but unknowingly, you could be releasing a silent, invisible toxin into your home: lead dust. Lead-based paint was commonly used in homes until it was banned in 1978 due to its severe health consequences. When this paint deteriorates or is disturbed during repairs, it creates lead dust and chips that can easily be inhaled or ingested. This isn't just a minor irritant; lead poisoning can cause serious developmental problems in children, nervous system damage, kidney issues, and reproductive problems in adults. The problem isn't always obvious; lead dust can settle on floors, toys, and furniture, making every surface a potential exposure risk. Even small amounts over time can accumulate and poison residents. Understanding this hidden danger is the first crucial step to protecting your family during any home repair project.
How It Works
Lead-based paint is essentially conventional house paint with lead compounds added to it. Historically, lead was valued for its durability, quick drying time, and ability to resist moisture, making painted surfaces last longer and look better. It was particularly common on exterior surfaces, doors, windows, and trim due to these properties. When these painted surfaces are in good condition – meaning the paint is not chipping, peeling, or cracking – the lead is encapsulated and poses minimal risk. The danger emerges when the paint film is broken. Any activity that creates friction, dust, or airborne particles, such as sanding, scraping, grinding, drilling, or demolition, releases lead particles into the air. These particles, often too small to see, can travel far from the work area and settle on every surface. Once settled, they can be re-aerosolized by normal activities like walking or vacuuming without a HEPA filter. Children are especially vulnerable because they often play on floors and have hand-to-mouth behaviors, easily ingesting lead dust. The body absorbs lead, which then interferes with various bodily systems, mimicking other conditions, which makes diagnosis difficult. Lead accumulates in bones over time, and even low levels of exposure can have lasting health and developmental impacts.
Step-by-Step Fix
Step 1: Get Your Home Tested — Before starting any project in a pre-1978 home, assume lead is present and test specifically for it.
- Tools/Materials: EPA-recognized lead test kits (available at hardware stores), or contact a certified lead inspector for professional testing. For DIY kits, follow manufacturer instructions rigorously.
- If this doesn't work: If DIY test results are unclear or you want definitive answers and a comprehensive report, always hire a certified lead inspector. Professional testing is recommended for larger renovations or if children or pregnant women are present.
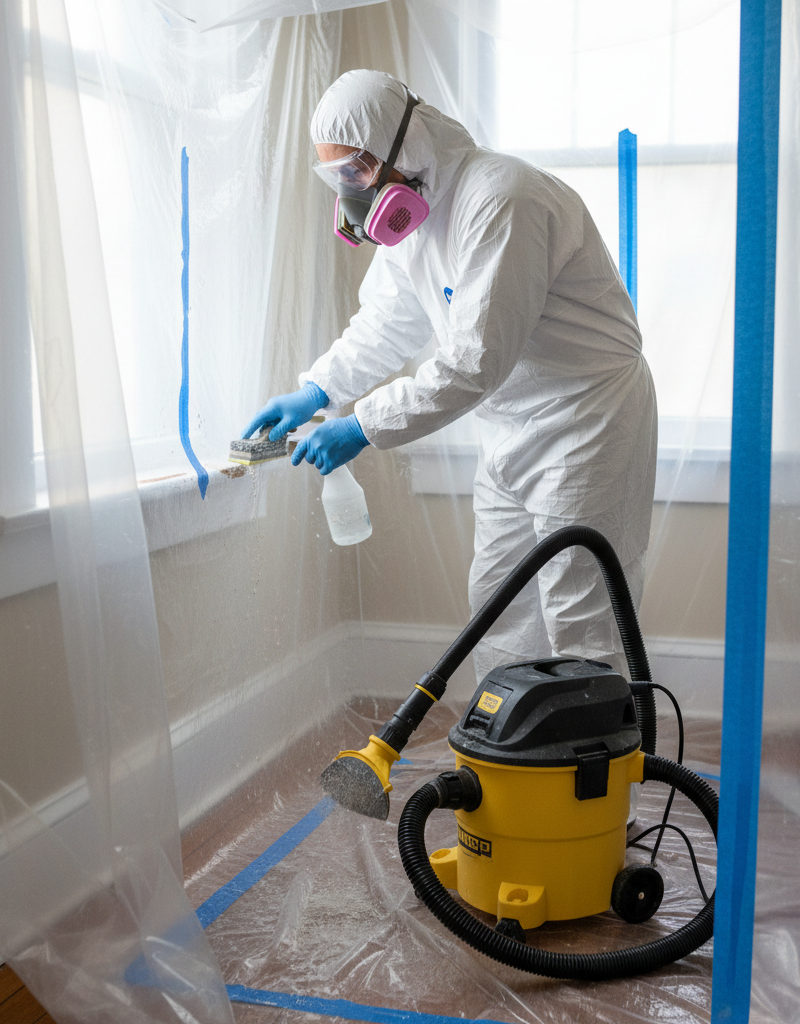
Step 2: Isolate the Work Area — Prevent lead dust from spreading to other parts of your home.
- Clear the room: Remove all furniture, curtains, rugs, and anything else movable from the work area. For items that can't be removed, cover them completely with two layers of 6-mil plastic sheeting and painter's tape.
- Seal it off: Close all windows and doors leading out of the work area. Use 6-mil plastic sheeting and painter's tape to create airtight barriers over doorways, air vents, and any other openings. Extend plastic sheeting at least 6 feet beyond the work surface in all directions.
- Safety Note: Turn off your HVAC system to prevent circulating lead dust throughout the house.
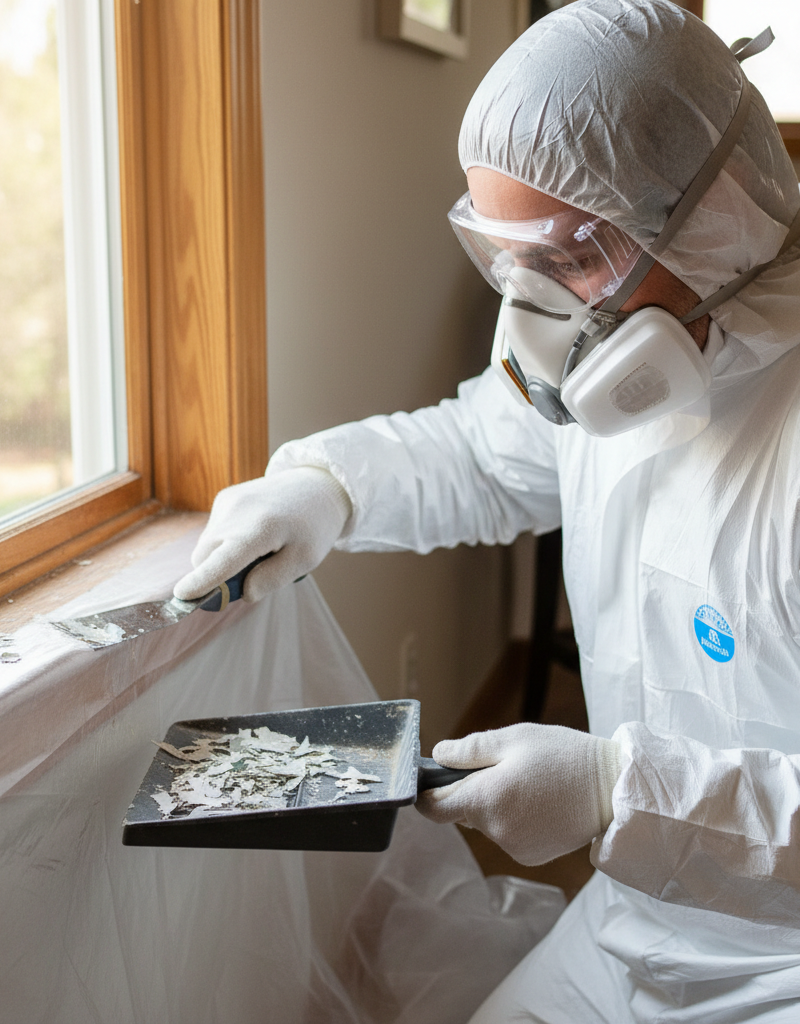
Step 3: Wear Personal Protective Equipment (PPE) — Protect yourself from inhaling or ingesting lead particles.
- Respirator: Use an N100 or P100 NIOSH-approved respirator (not just a dust mask). Ensure it fits properly and creates a good seal.
- Clothing: Wear disposable coveralls or old clothing that can be discarded or carefully washed separately. Ensure long sleeves and pants. Wear disposable shoe covers.
- Gloves: Use heavy-duty work gloves over disposable gloves.
- Eye Protection: Wear safety glasses or goggles.
Step 4: Use Lead-Safe Work Practices — Minimize dust generation during the repair process.
- Wet methods: Whenever possible, use wet scraping or wet sanding techniques. Mist the paint surface with water before disturbing it to keep dust levels down. Do not use heat guns above 1100°F (593°C) as they can vaporize lead.
- Power tools: If you must use power tools, ensure they are equipped with a HEPA-filtered vacuum attachment.
- No open flames: Never use open-flame torch burning to remove paint containing lead.
Step 5: Contain Debris — Collect all lead-contaminated materials immediately.
- Plastic sheeting as ground cover: Lay down additional layers of 6-mil plastic sheeting directly underneath your work area to catch all paint chips and debris.
- Waste disposal: As you generate debris, collect it carefully and place it into heavy-duty, sealable plastic bags. Label these bags "Hazardous Waste – Lead Contaminated."
Step 6: Thorough Cleanup — Remove all traces of lead dust from the work area.
- Initial sweep: Carefully fold up the outer layer of plastic sheeting, containing all debris, and place it in a hazardous waste bag. Then, follow with a thorough HEPA vacuuming.
- HEPA vacuuming: Use a HEPA vacuum (not a regular household vacuum) to thoroughly vacuum all surfaces in the work area, including walls, ceilings, and floors.
- Wet wipe: After vacuuming, wet-wipe all hard surfaces with a solution of household detergent and water. Use disposable cloths and change them frequently. Rinse thoroughly with clean water.
- Dispose of cleaning materials: All wipes, rags, mop heads, and used plastic sheeting must be sealed in heavy-duty plastic bags and disposed of as hazardous waste.
Step 7: Post-Renovation Cleaning — Ensure the area is safe for reoccupation.
- Repeat cleaning: Perform another round of HEPA vacuuming and wet wiping throughout the work area and adjacent spaces.
- Professional Cleaning: For extensive projects, consider hiring a lead-safe certified firm to perform a post-renovation cleaning verification. They have specialized equipment and can test for residual lead dust.
Step 8: Proper Disposal — Adhere to local regulations for hazardous waste.
- Check local laws: Contact your local waste management facility or health department for specific instructions on disposing of lead-contaminated waste. This can vary by municipality and may require special drop-off sites or pickups.
- Never dispose in regular trash: Lead waste should never be placed in household trash or recycling bins.
Common Causes
- Abrasive Renovation Techniques: Sanding, scraping, grinding, drilling, or power washing painted surfaces without proper containment are the most common ways lead dust is generated and released into the air. Anything that creates friction on lead paint is a risk.
- Impact and Friction: Windows and doors that stick, rub, or are frequently opened and closed can create lead dust from painted friction surfaces over time. This includes areas like sash weights, window sills, and door jambs.
- Deteriorating Paint: Peeling, chipping, cracking, or chalking lead-based paint, often found on exterior walls, fences, or older window sills, can naturally release lead dust and chips into the environment, especially exposed to weather.
- Demolition Activities: Breaking apart walls, tearing down painted structures, or removing architectural features in older homes without lead-safe practices disperses large quantities of lead dust and debris.
- DIY Mistakes: Homeowners unaware of lead paint risks or who fail to use specialized equipment like HEPA vacuums and respirators often unknowingly contaminate their homes during renovations.
- Water Damage: Leaks or moisture can accelerate paint deterioration, causing lead paint to peel and chip more rapidly, increasing the risk of exposure.
Common Mistakes
- Not Testing First: Assuming your pre-1978 home is lead-free or skipping testing entirely. Always test to confirm presence and assess risk before starting work.
- Using a Regular Vacuum Cleaner: Standard vacuums (even those with "HEPA-style" filters) are not equipped to capture microscopic lead particles and will simply redistribute the dangerous dust throughout your home.
- Dry Sanding or Scraping: These methods create vast amounts of airborne lead dust, which is the primary exposure pathway. Always use wet methods or tools with HEPA vacuum attachments.
- Inadequate Containment: Failing to properly seal off the work area with plastic sheeting and painter's tape allows lead dust to escape and contaminate other rooms.
- Wearing Flimsy Dust Masks: Common paper dust masks offer almost no protection against lead dust. You need a NIOSH-approved N100 or P100 respirator.
- Improper Disposal: Throwing lead-contaminated debris into regular household trash. This can contaminate landfills and is illegal in many areas. Follow local hazardous waste guidelines.
- Bringing Contaminated Clothes Inside: Wearing work clothes into living areas, or washing them with regular laundry, can spread lead dust throughout the home.
Cost & Time Breakdown
| Task | DIY cost | Pro cost | Time |
|---|---|---|---|
| Lead Test Kit (DIY) | $20–$50 | N/A | 10–15 minutes |
| Professional Lead Inspection | N/A | $300–$600 | 2–4 hours |
| Safety Gear & Containment | $100–$250 | Included in bid | 1–2 hours |
| Lead-Safe Renovation (DIY) | $50–$200 | $1,000+ (per area) | Varies by project |
| HEPA Vacuum Rental | $40–$70/day | Included in bid | 1–2 hours |
| Hazardous Waste Disposal | $0–$50 | Included in bid | Varies by municipality |
Tips & Prevention
- Regular Inspections: Periodically inspect painted surfaces, especially windows, doors, and areas exposed to impact or friction, for signs of chipping, peeling, or chalking paint. Address deteriorating paint promptly using lead-safe methods.
- Maintain Intact Paint: If lead paint is present but in good condition, the best approach is often to leave it undisturbed. You can paint over it with non-lead paint, effectively encapsulating the lead. However, this is not a permanent solution if the surface will be physically disturbed later.
- Educate Occupants: Inform everyone living in your home, especially those participating in repairs, about the risks of lead paint and the importance of lead-safe practices. Emphasize handwashing for children.
- Use Door Mats: Place durable doormats inside and outside entryways to help trap lead dust from shoes, preventing it from tracking into living spaces.
- Keep Children Away: During any renovation involving potential lead paint, ensure children and pregnant women are not in the home. Consider temporary relocation until cleanup is complete and verified.
- Clean Regularly: Wet-mop and wet-wipe floors and surfaces regularly (at least weekly in older homes) to pick up any settled dust before it becomes airborne. Use all-purpose cleaners or detergent. Do not dry sweep or use regular vacuums.
- Professional Cleaning After Work: After lead-safe work is completed, consider hiring an independent, certified lead professional to conduct a final cleaning verification test to ensure all lead dust has been safely removed.
When to Call a Professional
While many lead-safe practices can be adopted by DIY enthusiasts, there are specific scenarios where calling a licensed, EPA-certified lead abatement professional is not just recommended, but essential for safety and compliance. If your project involves extensive removal of lead paint, such as stripping large areas, demolishing lead-painted components, or if you discover lead paint on structural elements, a professional is required. Furthermore, if you are uncomfortable with the rigorous containment and disposal protocols, lack the specialized HEPA equipment, or if children or pregnant women will be present in the home during or immediately after the renovation, a professional is crucial. They have the training, insurance, and specialized gear to safely encapsulate, remove, or abate lead hazards while adhering to all federal, state, and local regulations, ensuring your home is truly safe. Ignoring these signs can lead to significant health risks and potential legal liabilities.
This article was independently written by FixlyGuide based on the source topic.
Frequently asked questions
How do I know if my home has lead paint?+
If your home was built before 1978, assume it has lead paint. The only way to know for sure is to use an EPA-recognized lead test kit or hire a certified lead inspector for professional testing.
Is it safe to paint over lead paint?+
If lead paint is in good condition (not chipping or peeling), painting over it with a new layer of non-lead paint can encapsulate the lead and reduce exposure risks. However, this is a temporary solution and does not remove the lead hazard if the surface is disturbed later.
What kind of mask do I need for lead paint?+
You need a NIOSH-approved N100 or P100 respirator to protect against lead dust, not a simple paper dust mask. Ensure it fits properly and creates a tight seal.
How do I dispose of lead-contaminated waste?+
Lead-contaminated waste is hazardous and must not be disposed of in regular trash. Contact your local waste management facility or health department for specific instructions on disposal, which often involves special drop-off sites or hazardous waste pickups.
Can I renovate a home with lead paint myself?+
You can perform lead-safe renovations yourself if you follow strict EPA guidelines for containment, personal protection, and cleanup. However, for extensive removal or if you're unsure, it's best to hire an EPA-certified lead abatement professional to ensure safety.

Discussion
Loading comments…